background image

28

AUTOMATIC MULTI-SCAN SYSTEM

This projector automatically tunes to most different types of
computers based on VGA, SVGA, XGA or SXGA (refer to
“COMPATIBLE COMPUTER SPECIFICATION” on page 29).
When selecting Computer, this projector automatically tunes to
the incoming signal and projects the proper image without any
special settings.  (Setting of the Computer System may be
required when connecting some computers.)

Note : The projector may display one of the following messages.

The projector cannot discriminate or detect the input
signal from the computer.  Adjust and set the
computer system manually.

There is no signal input from the computer.  Make
sure the connection of the computer and the
projector is set correctly.

Go to PC adj.

No signal

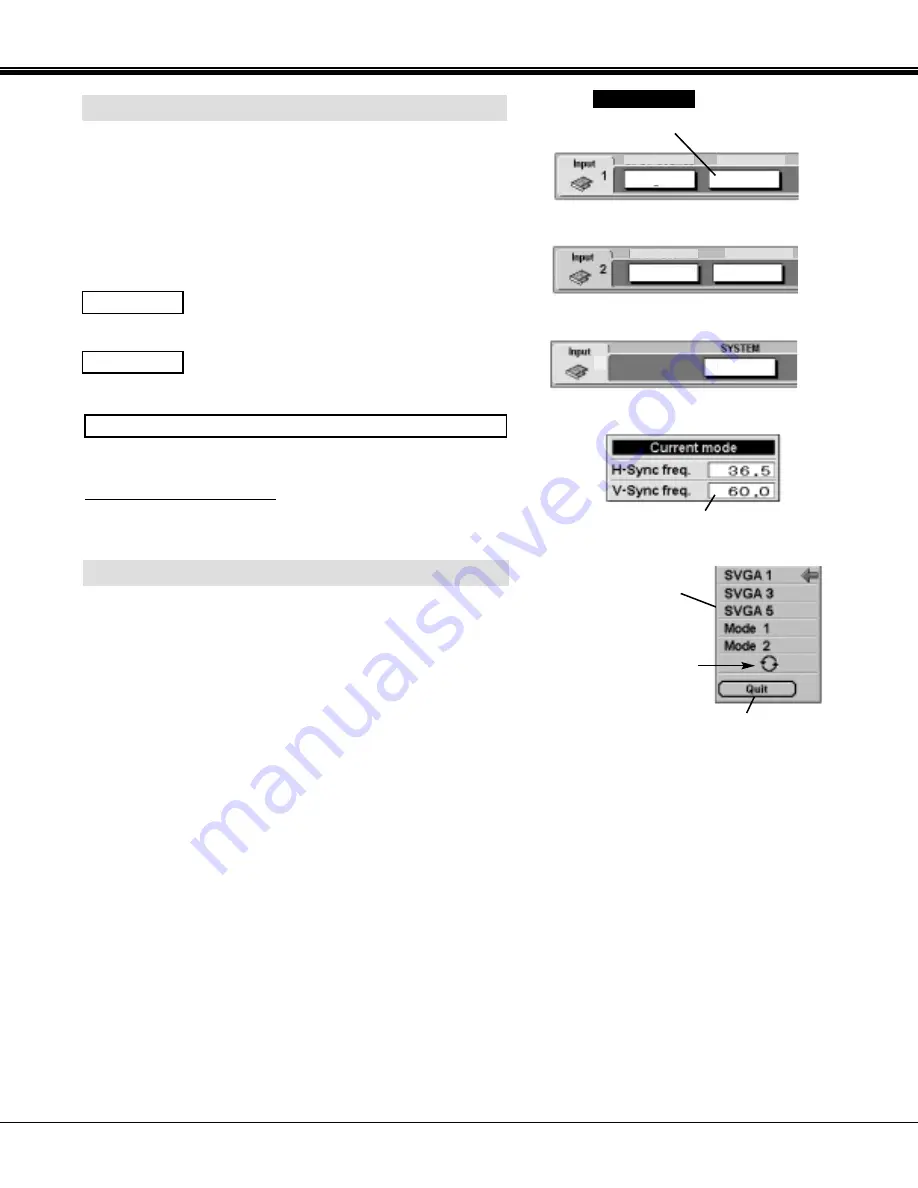
SELECT COMPUTER SYSTEM MANUALLY

To set the Computer system manually, select the mode on the
ON-SCREEN MENU.

Display the SYSTEM being selected.

SYSTEM BOX

The systems on this dialog
box can be selected.

Close the
SYSTEM Menu.

Press the MENU button and the ON-SCREEN MENU will
appear.  Press the POINT LEFT/RIGHT buttons to select
SYSTEM and press the SELECT button.  Another dialog box
COMPUTER SYSTEM Menu will appear. 

Press the POINT DOWN button and a red-arrow icon will
appear.  Move the arrow to the system that you want to set, and
then press SELECT button.  

1

2

When this mark is
displayed as black, more
computer system modes
will be available.  Move
the arrow to this mark and
then press the SELECT
button, and the other
modes will be displayed.

XGA 1

XGA 1

XGA 1

Analog

4

RGB

SYSTEM

SYSTEM

The input signal is digital from the DVI terminal. 

D-VGA, D-SVGA, D-XGA, D-SXGA 1, D-SXGA 2 or D-SXGA 3

The Current Mode display appears to show the information of the
computer being selected.  

CURRENT MODE DISPLAY

Providing the information of the
computer detected by the
projector.

When select the DVI terminal.

When select the 5 BNC terminal.

When select the HDB 15-PIN terminal.

COMPUTER MODE

Summary of Contents for XF20 - PLC XGA LCD Projector

Page 1: ...Owner s Manual PLC XF20 Multimedia Projector MODEL Projection lens is optional ...

Page 2: ...ONS WARNING TO REDUCE THE RISK OF FIRE OR ELECTRIC SHOCK DO NOT EXPOSE THIS APPLIANCE TO RAIN OR MOISTURE This projector produces intense light from the projection lens Do not stare directly into the lens as possible Eye damage could result Be especially careful that children do not stare directly into the beam This projector should be set in the way indicated If not it may result in a fire hazard...

Page 3: ...cabinet slots as they may touch dangerous voltage points or short out parts that could result in a fire or electric shock Never spill liquid of any kind on the projector This projector should be operated only from the type of power source indicated on the marking label If you are not sure of the type of power supplied consult your authorized dealer or local power company Do not overload wall outle...

Page 4: ...e cord should be suitably prepared and the correct plug fitted See Over WARNING A PLUG WITH BARED FLEXIBLE CORD IS HAZARDOUS IF ENGAGED IN A LIVE SOCKET OUTLET The Wires in this mains lead are coloured in accordance with the following code Green and yellow Earth Blue Neutral Brown Live As the colours of the wires in the mains lead of this apparatus may not correspond with the coloured markings ide...

Page 5: ...ING VIDEO SOURCE 35 SELECTING COLOR SYSTEM 36 PICTURE IMAGE ADJUSTMENT 37 NORMAL FUNCTION 38 PICTURE SCREEN ADJUSTMENT 38 SETTING MENU 39 SETTING LANGUAGE 41 OPERATING WIRELESS MOUSE 42 MAINTENANCE 43 TEMPERATURE WARNING INDICATOR 43 AIR FILTER CARE AND CLEANING 43 LAMP MANAGEMENT 44 LAMP REPLACEMENT 45 CLEANING THE PROJECTION LENS 45 TROUBLESHOOTING 46 TECHNICAL SPECIFICATIONS 48 BASIC OPERATION ...

Page 6: ... the Auto Image function No complicated setup is necessary and projection is always precise Digital Zoom Computer Mode only The Digital Zoom magnifies the image up to 49 times allowing you to focus on crucial information at a presentation Power Management Power Management function is provided to reduce power consumption while the projector is not in use This Power Management function operates to t...

Page 7: ...ed This projector detects the internal temperature and automatically controls the operating power of the Cooling Fans FRONT OF THE CABINET LAMP COVER ADJUSTABLE FEET This projector is equipped with cooling fans for protection from overheating Pay attention to the following to ensure proper ventilation and avoid a possible risk of fire and malfunction Do not cover the vent slots Keep bottom clear o...

Page 8: ...rojector on Refer to pages 12 15 for connection CONNECTING THE AC POWER CORD Connect the AC Power Cord supplied to the projector The AC outlet must be near this equipment and must be easily accessible To the POWER CORD CONNECTOR on the projector Projector side AC Outlet side Ground NOTE ON THE POWER CORD The AC Power Cord must meet the requirement of the country where you use the projector Confirm...

Page 9: ...where you want LENS SHIFT ADJUSTMENT MOVED UP OR DOWN MOVED LEFT OR RIGHT Use the LENS SHIFT button and the POINT UP DOWN button to move the image up or down Use the LENS SHIFT button and the POINT LEFT RIGHT button to move the image left or right This projector is designed to project on a flat projection surface ROOM LIGHT The brightness in the room has a great influence on the picture quality It...

Page 10: ...ng it unproperly may result in damage of cabinet or person s injury Replace the lens cover and retract the feet to prevent damage to the lens and cabinet 1 2 3 Pull up the lock buttons on each side of carrying handles and release the locks CARRYING HANDLE LOCK BUTTONS Pull carrying handles out fully until it s locked with a click Move the projector by holding two handles by 2 or more people To ret...

Page 11: ...Screws on the terminal 1 2 REPLACEMENT OF THE TERMINAL Tighten the screws to secure the terminal Replace the terminal Insert the terminal along Guide to fit Plug into Socket 3 4 ANALOG RGB R Pr G Y B Pb H HV V CONTROL PORT DVI INPUT 1 R C JACK USB RESET MONO MONO MONO MONO MONO CONTROL PORT AUDIO CONTROL PORT S VIDEO VIDEO Y C INPUT 2 INPUT 3 INPUT 4 AUDIO AUDIO AUDIO SERIAL PORT IN SERIAL PORT OU...

Page 12: ...S 5 BNC INPUT JACKS S VIDEO INPUT JACK Connect the component video output Cr Y Cb or Pr Y Pb from the video equipment to the R Pr G Y and B Pb jacks or connect the computer output 5 BNC Type Red Green Blue Horiz Sync and Vert Sync from the computer to the R Pr G Y B Pb H HV and V jacks Refer to P14 15 Connect the computer output Digital Analog DVI I type to this terminal Refer to P14 DVI INPUT TER...

Page 13: ...LOG RGB R Pr G Y B Pb H HV V CONTROL PORT DVI INPUT 1 R C JACK USB RESET MONO MONO MONO MONO MONO CONTROL PORT AUDIO CONTROL PORT S VIDEO VIDEO Y C INPUT 2 INPUT 3 INPUT 4 AUDIO AUDIO AUDIO SERIAL PORT IN SERIAL PORT OUT AUDIO OUT R L R L R L R R L L SERIAL PORT OUT TERMINAL SERIAL PORT IN TERMINAL This port is used to control the projector with the computer It is also used to control the computer...

Page 14: ...e for PS 2 port Serial port or ADB port MAC VGA Adapter DVI Cable BNC Cable BNC x 5 Audio Cables RCA x 2 Control Cable for PS 2 Port Control Cable for ADB Port Audio Cable stereo NOTE When connecting the cable the power cords of both the projector and the external equipment should be disconnected from AC outlet Turn the projector and peripheral equipment on before the computer is switched on Termi...

Page 15: ...ideo Cable BNC x 1 BNC x 2 or BNC x 3 S VIDEO Cable Audio Cable RCA x 2 Cables are not supplied with this projector NOTE When connecting the cable the power cords of both the projector and the external equipment should be disconnected from AC outlet Turn the projector and peripheral equipment on before the computer is switched on Audio Output Y Pb Cb Pr Cr R L External Audio Equipment AV AUDIO IN ...

Page 16: ...factory P33 38 Used to select an item or adjust the value in the MENU It is also used to pan the image in DIGITAL ZOOM mode P34 Used to execute the item selected It is also used to expand the image in DIGITAL ZOOM mode P34 Used to turn the projector on or off P23 ZOOM BUTTONS Used to select LENS SHIFT function P24 AUTO IMAGE BUTTON SELECT BUTTON NORMAL BUTTON POINT BUTTONS LENS SHIFT BUTTONS SIDE ...

Page 17: ...is turned on And bright when the projector is in stand by mode INDICATORS BEFORE OPERATION WARNING TEMP INDICATOR This indicator flashes red when internal projector temperature is too high P43 WARNING TEMP READY LAMP REPLACE LAMP FRONT INDICATORS REAR INDICATORS This LAMP REPLACE indicator lights yellow when any of Projection Lamps is nearing its end and flashes when any of them becomes out Check ...

Page 18: ... Laser Light Window These caution labels are put on the remote control LASER POINTER FUNCTION Used to select input source either INPUT 1 or INPUT 2 P26 Used to execute the item selected or to expand the image in DIGITAL ZOOM mode P34 It is also used as a PC mouse in Wireless Mouse Operation P42 POWER ON OFF BUTTON Used to turn the projector on or off P23 MENU BUTTON Used to select MENU operation P...

Page 19: ...nt REMOTE CONTROL BATTERIES INSTALLATION 1 2 3 Operating Range Point the remote control toward the projector Receiver Window whenever pressing the buttons Maximum operating range for the remote control is about 16 4 5m and 60 in front and rear of the projector 16 4 5 m 60 16 4 5 m MUTE BUTTON Used to mute sound P26 ZOOM BUTTON FOCUS BUTTON Used to adjust focus P24 NO SHOW BUTTON Used to turn the p...

Page 20: ...2 3 5 4 You can control and adjust this projector through the ON SCREEN MENU Refer to the following pages to operate each adjustment in the ON SCREEN MENU 1 MOVING THE POINTER 2 SELECT THE ITEM Move the pointer see the NOTE below by pressing POINT button s on the SIDE CONTROL or the REMOTE CONTROL Select the item by pressing SELECT button Used to select the item SELECT BUTTON Used to move the Poin...

Page 21: ...MENU Used to adjust the sound Volume Bass or Treble to select Built in SP On Off and Sound Mute Refer to P26 BEFORE OPERATION POSITION MENU Used to adjust the position of the image Refer to P33 MENU BAR IN COMPUTER MODE WHEN SELECT THE HDB 15 PIN TERMINAL WHEN SELECT THE DVI TERMINAL WHEN SELECT THE 5 BNC TERMINAL AND RGB INPUT SELECT INPUT MENU Used to select the Input source Refer to P26 INPUT S...

Page 22: ... Refer to P36 WHEN SELECT THE 5 BNC TERMINAL AND Y Pb Cb Pr Cr INPUT SELECT SETTING MENU LANGUAGE MENU Used to select the language used in the Menu Refer to P41 SOUND MENU Used to adjust the sound Volume Bass or Treble to select Built in SP On Off and Sound Mute Refer to P26 INPUT MENU Used to select the Input source Refer to P26 Used to set the Display Menu other functions setting and reset Lamp ...

Page 23: ...eck the air filters for dust accumulation 3 Clean the Air Filter See AIR FILTER CARE AND CLEANING section on page 43 4 Turn the Projector on again If the TEMPERATURE WARNING indicator should still continue to flash contact the sales dealer where you purchased this projector or service center 1 Complete the peripheral connections with Computer VCR etc before turning on the projector Refer to CONNEC...

Page 24: ... the POINT UP button to move the image up press the POINT DOWN button to move the image down press the POINT LEFT to move the image left and press the POINT RIGHT to move the image right KEYSTONE ADJUSTMENT 1 Press the KEYSTONE button on the Remote Control Unit or select the Keystone on the SCREEN menu Refer to page 34 38 The message Keystone is displayed 2 Correct the Keystone distortion by press...

Page 25: ...starts to count the time 00 00 59 59 To stop the P TIMER press the P TIMER button And then press the P TIMER button again to cancel the P TIMER function P TIMER FUNCTION BASIC OPERATION Sound Volume Adjustment Press the VOLUME button s on the Side Control or on the Remote Control Unit to adjust the volume The Volume dialog box appears on the screen for a few seconds button to increase the volume a...

Page 26: ...w to the item and then press the SELECT button Close the Sound Menu MENU OPERATION Volume Mute BASIC OPERATION SELECTING INPUT SOURCE MENU OPERATION INPUT 3 INPUT 4 DIRECT OPERATION Select INPUT source by pressing the INPUT 1 2 and INPUT 3 4 button on the side Control or on the Remote Control Unit Press the MENU button and the ON SCREEN MENU will appear Press the POINT LEFT RIGHT buttons to select...

Page 27: ...When connecting to those equipment select the type of Input source in INPUT SOURCE Menu WHEN SELECT THE INPUT 2 5 BNC SLOT SELECTING COMPUTER SYSTEM Press the MENU button and the ON SCREEN MENU will appear Press the POINT LEFT RIGHT buttons to select INPUT SOURCE and press the SELECT button Another dialog box INPUT SOURCE Menu will appear Press the POINT DOWN button and a red arrow icon will appea...

Page 28: ...he SYSTEM being selected SYSTEM BOX The systems on this dialog box can be selected Close the SYSTEM Menu Press the MENU button and the ON SCREEN MENU will appear Press the POINT LEFT RIGHT buttons to select SYSTEM and press the SELECT button Another dialog box COMPUTER SYSTEM Menu will appear Press the POINT DOWN button and a red arrow icon will appear Move the arrow to the system that you want to...

Page 29: ...024 64 20 70 40 SXGA 5 1280 x 1024 62 50 58 60 SXGA 6 1280 x 1024 63 90 60 00 SXGA 7 1280 x 1024 63 34 59 98 SXGA 8 1280 x 1024 63 74 60 01 SXGA 11 1152 x 900 71 69 67 19 SXGA 12 1152 x 900 81 13 76 107 SXGA 13 1280 x 1024 Interlace 63 98 60 02 SXGA 14 1280 x 1024 Interlace 61 20 65 20 71 40 75 60 50 00 43 00 HDTV720p Progressive 50 00 47 00 45 00 60 00 XGA 1 1024 x 768 XGA 2 1024 x 768 XGA 3 1024...

Page 30: ...STEM MENU P28 and 29 Press the MENU button and the ON SCREEN MENU will appear Press the POINT RIGHT LEFT button to select PC ADJUST and press the SELECT button Another dialog box Where to reserve Menu will appear In this dialog box you can store the parameter into the area from Mode 1 to Mode 8 When memorizing the new computer parameter select the Mode with the message Free by pressing the POINT U...

Page 31: ...ge has a dark bar s try this adjustment Clamp Adjustment of the area displayed with this projector Select the resolution at the Display area dialog box or adjust the number at the column of H or V to match the resolution of the image Display area Adjustment of the horizontal height or vertical width of the image Horizontal Scale Vertical Scale Each of the keys operates as follow Press the SELECT b...

Page 32: ...epen the color From 0 to 63 Each of the keys operates as follow Fine sync Total dots White balance Red Green Blue Contrast Brightness Point to to soften the image and select to sharpen the image From 0 to 15 Sharpness PICTURE IMAGE ADJUSTMENTS NOTE The Fine sync and the Total dots cannot be operated when the input signal is digital from DVI terminal or RGB is selected on the SYSTEM MENU P28 and 29...

Page 33: ...T buttons and then press the SELECT button Select the arrow to the direction described as or and then press the SELECT button Each of the keys operates as follow Recalls the setting data previously set Reset Stores the setting data in the memory Stored Closes the PICTURE POSITION Menu Quit COMPUTER MODE AUTO IMAGE FUNCTION The AUTO IMAGE function cannot be operated when the input signal is digital...

Page 34: ...OINT button To adjust the image to 1024 x 768 press NORMAL button To make the image into its original size select True in the dialog box When the original image size is larger than the screen size 1024 x 768 the image can be panned by pressing the POINT UP DOWN LEFT RIGHT buttons Move the arrow to the function and press the SELECT button Press the POINT DOWN button and a red arrow icon will appear...

Page 35: ... When connect the composite video output from the video equipment to the VIDEO Y jack select Video in VIDEO SOURCE Menu S Video When connect the S Video output from the video equipment to the S Video jack select S Video in VIDEO SOURCE Menu WHEN SELECT THE INPUT 3 AV TERMINAL 3 Press the MENU button and the ON SCREEN MENU will appear Press the POINT LEFT RIGHT buttons to select INPUT SOURCE and pr...

Page 36: ...r video image it is necessary to select a specific broadcast signal format among PAL SECAM NTSC NTSC 4 43 PAL M and PAL N Move the arrow to the Mode and press the SELECT button This box indicates the system being selected Move the arrow to the Mode and press the SELECT button This box indicates the system being selected Auto PAL SECAM NTSC NTSC4 43 PAL M PAL N The projector automatically detects t...

Page 37: ...ustom setting dialog box will appear Move the arrow to the item that you want to change by pressing the POINT UP DOWN button and adjust each value or change the setting On or Off by pressing the SELECT button to match with the image 2 Press the POINT DOWN button and a red arrow icon will appear Move the arrow to the function that you want to select and then press SELECT button Normal picture level...

Page 38: ... SELECT button Another dialog box PICTURE SCREEN ADJUSTMENT DISPLAY will appear Press the POINT DOWN button and a red arrow icon will appear Move the arrow to the screen size that you want to set and then press the SELECT button 1 2 Normal Video Image size with 4 x 3 aspect ratio Resizes the image for wide screen size with 16 x 9 aspect ratio Move the pointer to the function and press the SELECT b...

Page 39: ...curtains when the input source is turned into another one This function turns the Projection Lamp off when the projector detects signal interruption and the projector is not used for a certain period in order to reduce power consumption and maintain the Lamp life This projector is shipped with this function ON Power Management function operates to turn the Projection Lamp off when the input signal...

Page 40: ...REEN MENU will appear Press the POINT LEFT RIGHT buttons to select SETTING and press the SELECT button Another dialog box SETTING MENU will appear 2 Press the POINT DOWN button and move a red arrow icon to Lamp Mode Set 4 lamps mode or 2 lamps mode by pressing the SELECT button When Lamp Mode is set from 4 lamps mode to 2 lamps mode the image becomes little darker When Lamp Mode is set from 2 lamp...

Page 41: ...placement Monitor Timer when the Lamp Assembly is replaced When the Lamp Replacement Monitor Timer is reset the LAMP REPLACEMENT indicator stops lighting Turn the projector on and press the MENU button and the ON SCREEN MENU will appear Press the POINT LEFT RIGHT buttons to select SETTING and press the SELECT button Another dialog box SETTING MENU will appear 1 Press the POINT DOWN button and a re...

Page 42: ...uter And make sure that the mouse port of the computer connected to Control Port is activated OPERATING WIRELESS MOUSE When controlling the pointer of the computer operate the Wireless Mouse with POINT button SELECT button and RIGHT CLICK button on the Wireless Remote Control Unit Used to move the pointer The pointer is moved corresponding with the direction you are pressing POINT button This butt...

Page 43: ... Filter become clogged with dust particles it will reduce the Cooling Fans effectiveness and may result in internal heat build up and adversely affect the life of the projector Clean the Air Filter following the steps below 3 4 CAUTION Do not operate the projector with the Air Filter removed Dust may accumulate on the LCD Panel and the Mirror degrading picture quality Do not put small parts into t...

Page 44: ...and flashes when any of them becomes out Check the number of the lamp on Lamp Status Display and replace the lamp Yellow Lamp Dim Lamp X Mark on Lamp Red Lamp LAMP REPLACE INDICATOR The Projection Lamp is turned off The Projection Lamp is nearing its end When the image becomes darker or the color becomes unnatural replace the lamp The LAMP REPLACE indicator lights yellow The Projection Lamp is out...

Page 45: ... the two screws 5 7 8 Connect the AC Power Cord to the projector and turn the projector on Reset the Lamp Replacement Monitor Timer Refer to the section Lamp Replacement Monitor Timer on page 41 NOTE Do not reset the LAMP REPLACEMENT MONITOR TIMER when the lamp is not replaced CAUTION Do not operate the projector while any of lamps is removed It may result in malfunctions fire hazard or other acci...

Page 46: ...ing NOTE Moving the projector from a cool temperature location to a warm temperature location may result in moisture condensation on the lens In such an event leave the projector OFF and wait until condensation disappears Before calling your dealer or service station for assistance check the items below once again 1 Make sure you have connected the projector to your equipment as described in secti...

Page 47: ... the cable connection between the projector and the computer Check the mouse setting on your computer Turn on the projector before you turn on the computer Wireless mouse function does not work Try these Solutions SERVICE WARNING High voltages are used to operate this projector Do not attempt to open the cabinet You can often correct operating problems yourself If the projector fails to work prope...

Page 48: ...ype Audio R and L and DIN 8 pin Control port Serial port in DB 9 Serial port out DB 9 USB port Audio Monitor out RCA Type R and L and Wired Remote Jack INT SP Stereo R and L 3 watt RMS T H D 10 Up to 5 7 AC 100 120 V 10A Max Ampere 50 60 Hz The U S A and Canada AC 200 240 V 5A Max Ampere 50 60 Hz Continental Europe and The U K 41 F 95 F 5 C 35 C 14 F 140 F 10 C 60 C Input 2 Jack Input 3 Jack Input...

Page 49: ...5 8 7 6 Pin Configuration CONTROL PORT CONNECTOR CLK DATA GND GND R X D GND RTS T X D GND GND ADB GND GND PS 2 Serial ADB 1 2 3 4 5 6 7 8 DVI I TERMINAL DIGITAL ANALOG This terminal accepts only Digital TMDS or Analog RGB output signal Connect the display output terminal of the computer to this terminal with the DVI cable supplied 1 9 17 2 10 18 3 11 19 4 12 20 5 13 21 6 14 22 7 15 23 8 16 24 C1 C...

Page 50: ...l port output terminal of the computer to this terminal with the Serial Cable not supplied Pin Configuration SERIAL PORT IN OUT TERMINAL USB PORT TERMINAL Pin Configuration Connect the USB port output terminal of the computer or peripheral equipment to this terminal with the USB port Cable not supplied 2 3 4 1 ...

Page 51: ...51 APPENDIX ...

Page 52: ...SANYO Electric Co Ltd Printed in Japan Part No 610 287 0534 1AA6P1P2359 ML6A ...

Reviews: