


- 3 -
EN
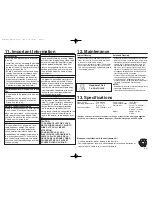
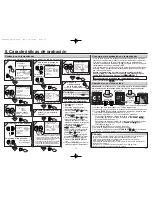
3. Preparation for Use
2
2
LANGUAGE SELECT
B
ENGLISH
[ON]
FRANCAIS
ESPAÑOL
Hint
Hint
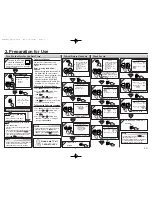
• Repeat these steps only if either there was
a power failure or this unit has been
unplugged for more than 30 seconds.
1
1
Turn on the TV and
set it to channel 3.
• If channel 3 is already occu-
pied for broadcasting, see “RF Output
Channel” section.
POWER
STOP
PLAY
3
3
CH 01
AUTO SET UP
F.FWD
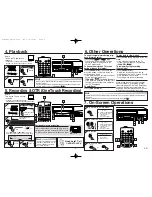
To Select a Channel
You can select a channel by using
the Number buttons
on the remote
control.
Notes for using the Number
buttons:
• When selecting cable channels which
are higher than 99, enter channel
numbers as a three-digit number. (For
example: 117, press
[1]
,
[1]
,
[7]
)
• You must precede single-digit
channel numbers with a zero (For
example: 02, 03, 04 and so on).
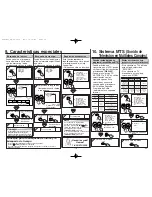
To Preset the Channel Again
1) Press
[MENU]
until the main menu appears.
2) Press
[PLAY
B
B
]
or
[
C
C
STOP]
to select
“CHANNEL SET UP”, then press
[F.FWD
g
g
]
.
3) Press
[PLAY
B
B
]
or
[
C
C
STOP]
to select
“AUTO SET UP”, then press
[F.FWD
g
g
]
. After scanning, the tuner stops
on the lowest memorized channel.
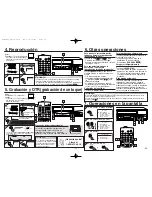
To Change the On-Screen Language
1) Press
[MENU]
until the main menu appears.
2) Press
[PLAY
B
B
]
or
[
C
C
STOP]
to select
“LANGUAGE SELECT”, then press
[F.FWD
g
g
]
.
3) Press
[PLAY
B
B
]
or
[
C
C
STOP]
to select
“ENGLISH” , “FRANCAIS” or “ESPAÑOL”,
then press
[C.RESET/EXIT]
.
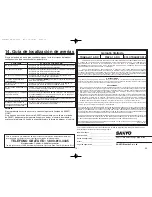
1
1
- M E N U -
TIMER PROGRAMMING
AUTO REPEAT [OFF]
B
CHANNEL SET UP
CLOCK SET
LANGUAGE SELECT
AUDIO OUT
TV STEREO
[ON]
SAP
MENU
2
2
CHANNEL SET UP
AUTO SET UP
B
MANUAL SET UP
STOP
PLAY
3
3
MANUAL SET UP
CHANNEL 30
(CATV)
ADD
4
4
MANUAL SET UP
CHANNEL 30
(CATV)
DELETE
STOP
PLAY
F.FWD
F.FWD
STOP
PLAY
F.FWD
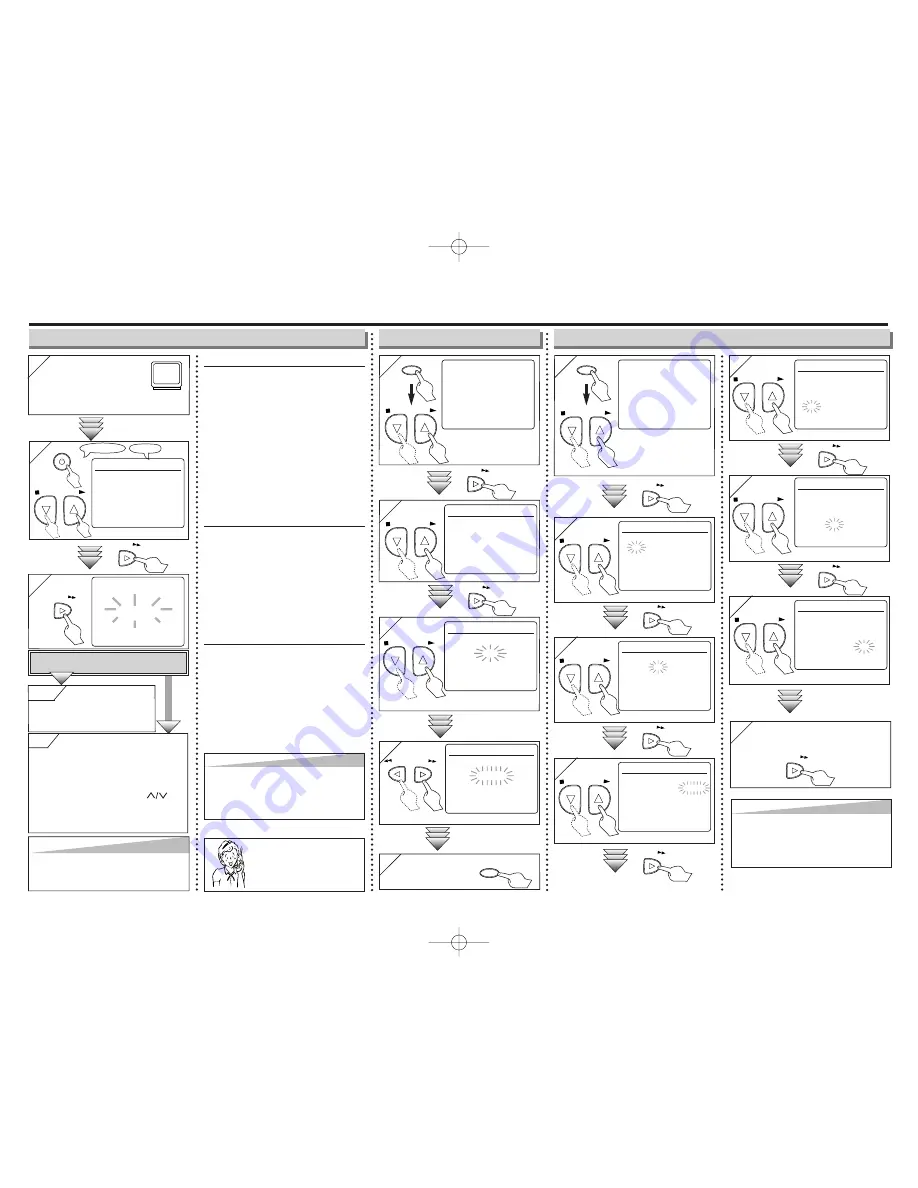
1
1
- M E N U -
TIMER PROGRAMMING
AUTO REPEAT [OFF]
CHANNEL SET UP
B
CLOCK SET
LANGUAGE SELECT
AUDIO OUT
TV STEREO
[ON]
SAP
MENU
2
2
CLOCK SET
MONTH DAY
YEAR
1 0 / – –
– – – –
HOUR MINUTE
AM/PM
– – : – –
– –
STOP
PLAY
STOP
PLAY
F.FWD
F.FWD
3
3
CLOCK SET
MONTH DAY
YEAR
1 0 / 0 3
– – – –
HOUR MINUTE
AM/PM
– – : – –
– –
STOP
PLAY
F.FWD
4
4
CLOCK SET
MONTH DAY
YEAR
1 0 / 0 3 2 0 0 5
HOUR MINUTE
AM/PM
– – : – –
– –
STOP
PLAY
F.FWD
5
5
CLOCK SET
MONTH DAY
YEAR
1 0 / 0 3 MON 2 0 0 5
HOUR MINUTE
AM/PM
0 5 : – –
– –
STOP
PLAY
F.FWD
6
6
CLOCK SET
MONTH DAY
YEAR
1 0 / 0 3 MON 2 0 0 5
HOUR MINUTE
AM/PM
0 5 : 4 0
– –
STOP
PLAY
F.FWD
7
7
CLOCK SET
MONTH DAY
YEAR
1 0 / 0 3 MON 2 0 0 5
HOUR MINUTE
AM/PM
0 5 : 4 0
P M AM
B
PM
STOP
PLAY
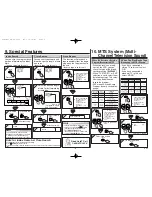
Hint
Hint
• To go back one step, press
[
h
h
REW]
(during the steps 2) to 7)).
• Your clock setting will be lost if either there
is a power failure or this unit has been
unplugged for more than 30 seconds.
REW
F.FWD
No
No
Please wait for a few minutes.
After scanning...
• The tuner stops on the lowest memorized
channel.
• You can select only the channels memorized
in this unit by using
[CHANNEL ]
.
• If “AUTO SET UP” appears on the TV screen
again, check the cable connections. Then,
press
[F.FWD
g
g
]
once again.
Hint
Hint
• If you accidentally select Spanish or French
and need English: Press
[MENU]
and
choose SELEC. IDIOMA, or SELECTION
LANGUE. Press
[F.FWD
g
g
]
and select
ENGLISH. Finally, press
[C.RESET/EXIT]
.
Select “ADD” or “DELETE”.
Select the channel to be
added or deleted.
5
5
To exit the
menu
C.RESET
EXIT
Select the current month.
Select the current day.
Select the current year.
Select “AM” or “PM”.
8
8
To exit the CLOCK SET
screen
Select the current hour.
Select the current minute.
Y
Y
es
es
Press
[MENU]
to
exit.
• Refer to “Hints for Cable Box or
Satellite Box” section on page 1.
Do you connect the cable of the cable box or
the satellite box to the unit’s ANT-IN jack?
Yes
No
Clock Set Up
To Add/Delete Channels
Turn On the Unit for the First Time
TV Screen
Remote Control
F.FWD
• If the clock is not set, the
CLOCK SET screen
appears when you press
[MENU]
. In this case, go
to step 2).
or
or
or
or
or
or
or
or
or
or
or
or
Need help? Call
1-800-813-3435
HJ420UD_EN/SP.QX33 05.1.14 14:06 Page 3


