background image

14

MULTICHANNEL TV SOUND INDICATOR
(MTS) 

Appears on-screen as illustrated below when 

ENTER

is

pressed.

One or both of the indicators will light, depending on the MTS
broadcast.

If only STEREO appears on the TV screen.

The VCR can record in stereo onto the VHS Hi-Fi audio tracks
when BROADCAST TYPE is in the STEREO position. The VCR
will also record mono audio onto the mono audio track.

If only SAP appears on the TV screen.

Set BROADCAST TYPE to SAP.

If both STEREO and SAP appear on the TV screen

Use BROADCAST TYPE to select the desired recording mode
(STEREO or SAP).

SAP (Second Audio Program) RECORDING

Some stations transmit a Second Audio Program, which is
used for a second language or additional information.
When the station broadcasts a Second Audio Program,
follow the procedure below to record the SAP.

1

Insert a video cassette with the safety tab in place.

2

Set BROADCAST TYPE to SAP (SETUP menu). 

Do this if only the SAP appears on the TV screen or you know
the program will use the SAP.

3

Press 

MENU

when finished.

4

Set the desired speed (SP or SLP) by pressing 

SP/SLP

.

5

Select the desired channel. The SAP should appear on
the TV screen.

6

Press 

REC

once

Recording of the program you are viewing on the TV starts.

7

Press 

STOP

to stop recording.

STEREO

Lights up when a stereo broadcast is
being received.

SAP

Lights up when a SAP BILINGUAL
broadcast is being received.

TV screen

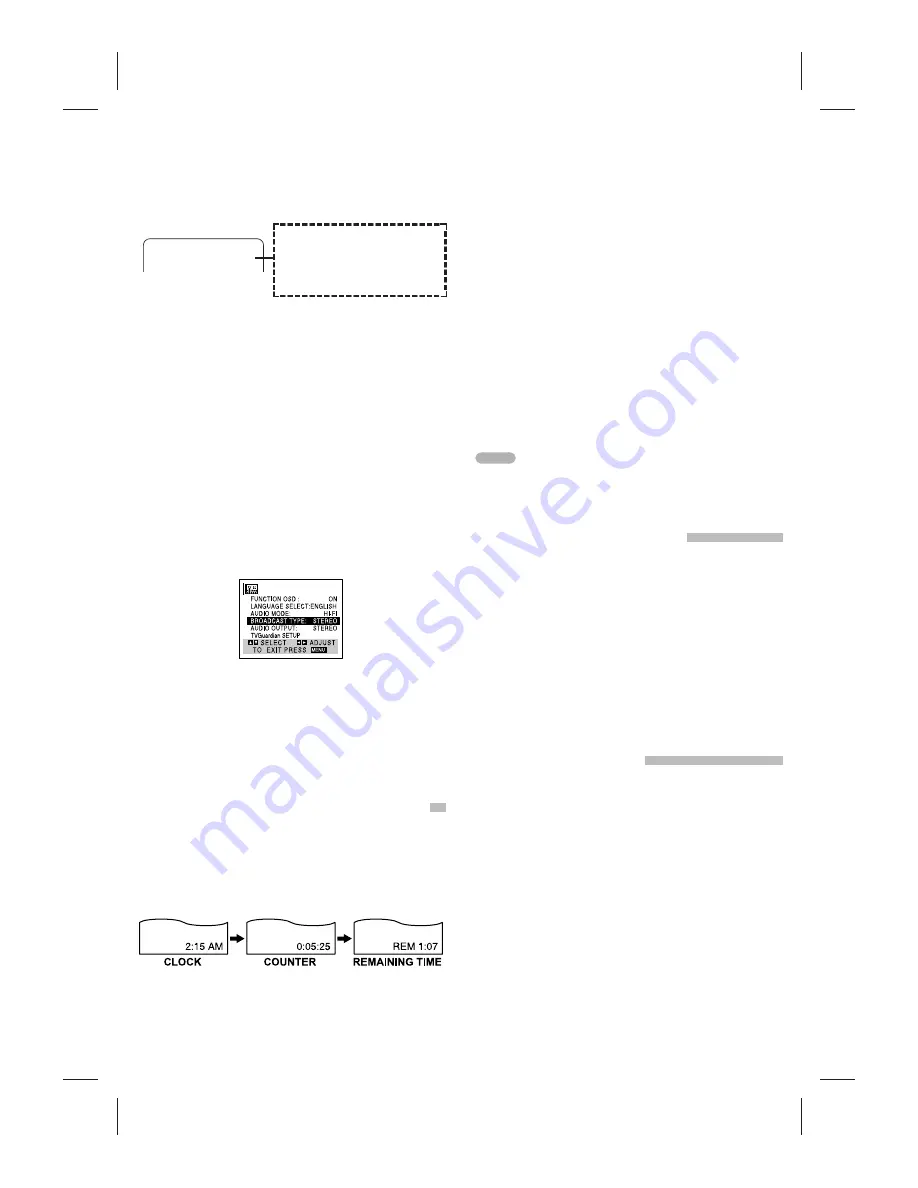
TAPE COUNTER MEMORY FEATURE

COUNTER MEMORY FUNCTION

This is useful if there is a section of tape you want to view
immediately after recording or if you want to return to the
same point several times.

1

Begin recording or playing a tape.

2

Press 

CLK/COUNT

repeatedly to display the real-time

counter on the TV.

3

At the point that you want to locate later, reset the 
real-time counter to

0:00:00

by pressing 

CLEAR

.

4

Continue to play or record.

5

Press 

STOP

when recording or playback finishes.

6

Press 

REW

.

The tape automatically stops when the tape counter returns to
about “0:00:00”.

TAPE REMAINING

This function allows the time of the remaining tape to be
displayed during recording or playback.
Press 

CLK/COUNT

until the REM indicator appears on

the TV screen during recording or playback.

The remaining tape length indicator may not be displayed 
correctly depending on the condition and type of tape and the
kind of the tape (T-140, T-160, or T-210, etc.).

NOTE

CH  4

STEREO/SAP

REAL-TIME COUNTER

Shows tape length in hours, minutes, and seconds as
illustrated below. Press 

CLK/COUNT

to select the real-

time counter display.
Every press of 

CLK/COUNT

changes the item as illus-

trated below.

Counter changes to 

0:00:00

when the cassette is ejected.

The real-time counter does not operate when nothing is
recorded on the tape.

The real-time counter will not work when the tape is not 
inserted.

EDITING A RECORDING

OPERATING HINTS

1

Press 

PLAY

and watch the program until you reach

the exact point where you want the new recording to
start.

2

Press 

PAUSE

.

3

Press 

REC

once.

The program material to be recorded will appear on the tele-
vision.

4

When you wish to start recording, press 

PAUSE

again.

The new program material will directly follow the previously
recorded material. This feature is especially helpful for dub-
bing from the camcorder to the VCR and making various seg-
ments of a recording into a continuous program.

In manual recording, Timer recording, Instant Timer Recording,
playback, or fast forward modes, the VCR automatically starts
rewinding at the end of the tape. The cassette will stop at the
beginning of the tape and be ejected, and the VCR will turn
itself off.

After you have finished using the VCR, rewind, eject, and
remove the cassette. Place the cassette in its protective sleeve
to protect it from dust. It is not necessary to rewind the cassette
before removing it, but if you do, it will be ready to play or
record the next time you use it.

Be sure the VCR Channel Selector is on the correct channel
you wish to record. The channel that is being recorded can
always be checked by setting the television to the VCR chan-
nel (3 or 4) and pressing the 

TV/VCR

selector to turn the VCR

indicator on.

Do not attempt to hook up more than one television set to the
VCR for either recording or playback.

Summary of Contents for VWM-900

Page 1: ... with this video cassette recorder As an ENERGY STAR Partner SANYO has determined that this product or product model meets the ENERGY STAR guidelines for energy efficiency INSTRUCTION MANUAL VWM 900 4 HEAD Hi Fi STEREO VCR English SANYO S HELP LINE Call the toll free number below if you have any difficulties operating this product 1 800 813 3435 Weekdays 7 30 AM 4 00 PM Central Time ...

Page 2: ... the back of this unit This number is unique to this unit and not available to others You should record requested information here and retain this guide as a permanent record of your purchase Model No VWM 900 Serial No This lightning flash with arrowhead symbol within an equilateral triangle is intended to alert the user to the presence of uninsulated dangerous voltage within the product s enclosu...

Page 3: ...rounding type plug has two blades and a third grounding prong The wide blade or the third prong are pro vided for your safety If the provided plug does not fit into your outlet consult an electrician for replace ment of the obsolete outlet 10 Protect the power cord from being walked on or pinched particularly at plugs convenience recep tacles and the point where they exit from the apparatus 11 Onl...

Page 4: ...ms through the TV tuner REC Record indicator INDICATOR PANEL REMOTE CONTROL OPERATIONS Aim the remote control unit at the sensor on the front panel of the VCR For TV operation This remote control will only work with Sanyo TVs HOW TO INSTALL THE BATTERIES 1 Detach the battery compartment cover in the direction of the arrow 2 Insert 2 AA size batteries in cor rect polarity 3 Attach the cover The rem...

Page 5: ...TV IN OUT RF OUT Without Cable Box If your cable wire is connected to your TV without a converter or descrambler box unscrew the wire from your TV and attach it to the ANT IN connector on the VCR Use the supplied round coaxial cable to connect the VCR s RF OUT VHF UHF CATV connector and the 75 ohm antenna input connector on the TV With this connection you can receive all midband super band and hyp...

Page 6: ...ows the current date Month Day Day of the week format CLOCK COUNT REMAIN DISPLAY Shows the current time the tape counter and remaining time of the tape TVG DISPLAY Shows TVG function is active Each press of ENTER changes the TV screen in the fol lowing sequence REM 1 58 0 35 40 2 15 PM STOP CH 4 SP STEREO TVG OCT 8 FRI 2 15 PM MAIN MENU These menus can be displayed for 3 minutes NOTE EASY INFORMAT...

Page 7: ... The FUNCTION OSD is switched between ON and OFF by pressing b or B LANGUAGE SELECT The onscreen programming of this VCR can display in either English Spanish or French The LANGUAGE SELECT is switched among ENGLISH ESPANOL and FRANCAIS by pressing b or B AUDIO MODE DISPLAY The VCR has two separate audio playback systems the high quality VHS Hi Fi system and the standard NORMAL mono sys tem The sam...

Page 8: ... date and time information or sends the wrong information causing the VCR to set the time incorrectly In this case set the clock manually NOTE MANUAL CLOCK SET Example July 5 2004 2 15 AM 1 Press MENU and the MAIN menu will appear 2 Press v or V to choose the CLOCK menu Press ENTER and the CLOCK menu will appear 3 Press b or B to choose the month 4 Press V for DAY Press b or B to choose the day Th...

Page 9: ...to the OFF mode all the word sets are turned OFF Whenever you change from the TVG OFF mode to any TVG ON mode TOLERANT MODERATE or STRICT all three of these word sets are changed to the ON mode DAMN HELL Word Set This set includes variations of Damn and Hell RELIGIOUS Word Set This set includes numerous Religious words such as God and Jesus One might want to turn this Word Set to OFF if watching r...

Page 10: ...t the tape and video heads 2 To continue normal playback press PLAY SPECIAL EFFECTS PLAYBACK TO WATCH A STILL or Frame Advance PICTURE During PLAYBACK mode 1 Press PAUSE or PAUSE STILL on the front panel A still picture will appear on the TV screen If the still picture vibrates vertically stabilize it by pressing CH TRACK v V on the remote control If the VCR is left in STILL mode for more than 5 m...

Page 11: ...ing The VCR indicator disappears 2 Using the TV select the channel to be viewed This VCR can be programmed to record up to 8 programs within a period of 1 year For unattended recording the timer needs to know the channels to be recorded and the starting and ending times PREPARATION Turn on the power of both the VCR and the TV Be sure the TV is set to the VCR Output Channel CH 3 or 4 Make sure the ...

Page 12: ...ED A TAPE INTO THE VCR and B YOU MUST TURN OFF THE VCR BEFORE IT WILL RECORD ANY TIMER PROGRAMS TIMER indicator lights The VCR is then set to record the preset programs 3 Press b or B to select a program you want to check or erase If you want to erase the program press CLEAR 4 Press MENU to return to the TV screen PROGRAM PRIORITY If the recording start and end times of preset programs overlap on ...

Page 13: ...ults than using the RF jack on the rear panel VHS Hi Fi STEREO SYSTEM MTS BROADCAST This VCR is equipped with the VHS Hi Fi audio sound system for recording and playback The information below gives a brief description of Hi Fi audio and how to record and play a tape in the Hi Fi audio mode PLAYBACK WITH Hi Fi STEREO AUDIO SOUND A stereo TV with AUDIO VIDEO input jacks or a stereo audio system is r...

Page 14: ...tion allows the time of the remaining tape to be displayed during recording or playback Press CLK COUNT until the REM indicator appears on the TV screen during recording or playback The remaining tape length indicator may not be displayed correctly depending on the condition and type of tape and the kind of the tape T 140 T 160 or T 210 etc NOTE CH 4 STEREO SAP REAL TIME COUNTER Shows tape length ...

Page 15: ...ting time Setup recording time according to instructions Be sure the AM PM display is correct The tape is ejected in the timer mode The cassette has had the safety tab removed Stick a piece of cellophane tape over the safety tab hole or select a different cassette TAPE IN indicator flashes Insert a cassette The Auto Clock Setup procedure enters the wrong date and or time The TV station sent the wr...

Page 16: ...tered defaced or removed 2 This warranty shall not apply to the cabinet or cosmetic parts broken or damaged video heads batteries or routine maintenance 3 This warranty does not apply to uncrating setup installation removal of the product for repair or reinstallation of the product after repair 4 This warranty does not apply to repairs or replacements necessitated by any cause beyond the control o...

Reviews: