


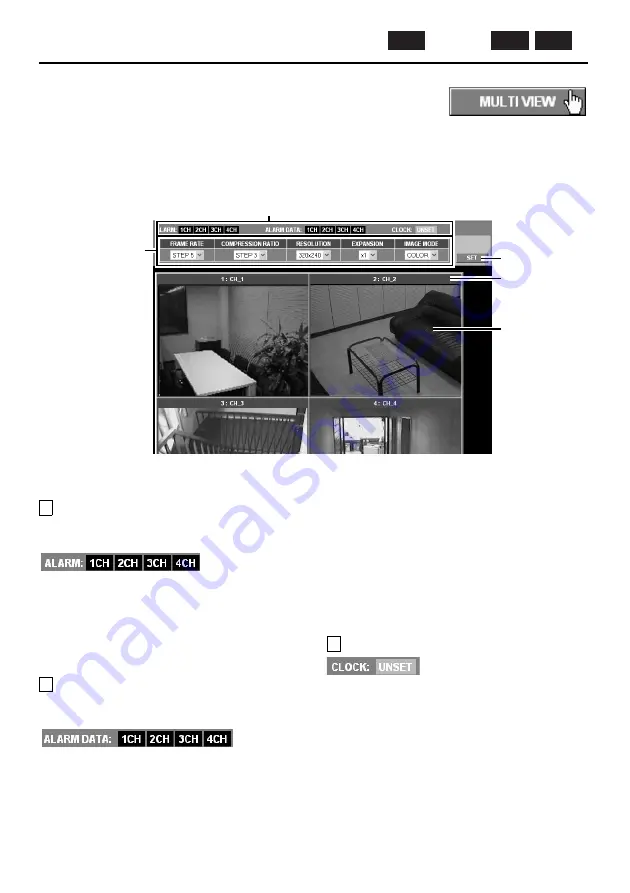
MULTI VIEW Settings
Click the [MULTI VIEW] button in the main menu.
The 4-screen live image screen will be displayed. The live image screen
lets you make settings such as alarm data detection and recording status,
and also for the image quality, compression ratio, image size and
enlargement ratio for the images that are being transmitted.
If selecting setting values for items from the drop-down list boxes, be sure to click the [SET] button
after making a selection.
1
Alarm detection and recording status
A
ALARM indicator
The alarm status of each video server is
indicated by these ALARM indicators.
•
Lit red:
During alarm recording
•
Lit orange:
Illuminates during pre-alarm
recording and while images are being copied to a
memory card
When recording of alarm images is finished, the
indicator switches off.
B
ALARM DATA indicator
The alarm recording status of each video server
is indicated by these ALARM DATA indicators.
•
Lit red:
This indicates that alarm images have
filled the video server’s internal memory (16 MB) or
filled the memory card that has been inserted into
the PC card slot of the video server. Alarm image
playback is possible at this time.
•
Lit orange:
This indicates that alarm images are
being transferred from the video server’s internal
memory to the memory card, that alarm recording is
in progress, or that a memory card error has
occurred.
•
Lit green:
This indicates that there is some free
space available in the alarm recording area when a
memory card is inserted into the video server. Alarm
image playback is possible at this time.
Note:
Refer to “Alarm settings” for details on
checking alarm images and alarms. (p. 33)
C
CLOCK UNSET indicator
This indicates the time has not yet been set.
Accordingly, “UNSET” is displayed only when
the time has not been set, and it disappears
automatically once the time has been set. Click
the [CLOCK] button in the main menu to set the
time. (p. 42)
1
3
4
5
2
ID2
ID3
ID1
(View only)
English
– 27 –