background image

EN-24

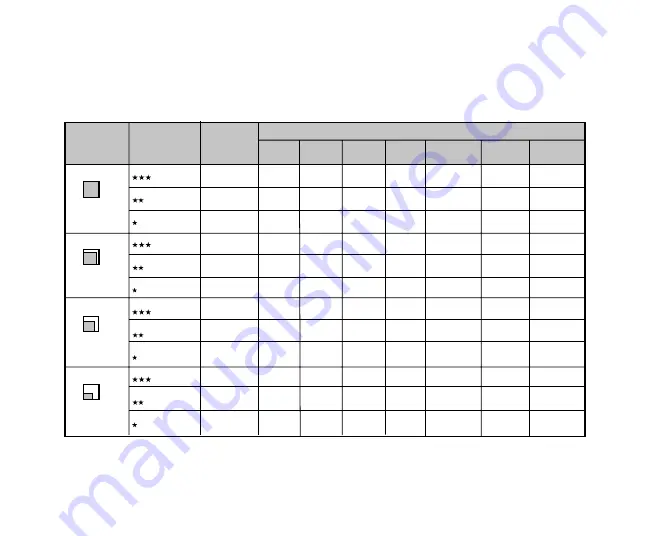
Possible number of shots (still image)

The table shows the approximate shots that you can capture at each setting based on the capacity
of the internal memory and the SD/SDHC memory card.

2560 x 1920

Fine

Standard

Economy

Fine

Standard

Economy

Fine

Standard

Economy

Fine

Standard

Economy

3072 x 2304

1600 x 1200

640 x 480

Size

Quality

2GB

64MB 128MB 256MB 512MB

SD/SDHC memory card capacity

1GB

Internal

Memory

6

10

14

8

13

18

15

24

34

61

86

111

13

22

31

18

29

40

34

54

75

135

188

242

27

45

63

37

59

81

70

110

151

272

381

489

54

90

126

76

119

163

141

221

304

547

766

984

108

181

254

152

239

326

283

443

610

1098

1536

1973

218

363

509

305

480

654

567

887

1222

2199

3067

3951

4GB

SDHC

873

1456

2039

1223

1922

2622

2271

3556

4898

8809

12322

15829

436

727

1019

611

960

1310

1135

1776

2447

4402

6157

7909

Summary of Contents for VPC-T700EX

Page 1: ...L VPC T700EX Digital Camera Important note This manual explains how to safely operate the VPC T700EX Please read these instructions carefully before using the camera Keep this manual in a safe place for later reference ...

Page 2: ...se J The battery may feel warm after long period of continuous use of the camera or the flash This is normal and not a malfunction J The camera may feel warm after long period of continuous use This is normal and not a malfunction J If the battery is not to be used for a long period of time remove it from the camera to prevent leakage or corrosion J If the battery is not to be used for a long peri...

Page 3: ...cording Voice Memos 28 Using the Digital Zoom 29 Setting the Flash 30 Setting the Focus 31 Setting the Self timer 32 Exposure Compensation Backlight Correction 33 Setting the Scene Mode 35 Setting the Panorama Mode 35 Video Mode PLAYBACK MODE 36 Playing Back Still Images 37 Playing Back Video Clips 37 Playing Back Still Images Video Clips on a TV 38 Attaching Voice Memos 38 Slideshow Display 39 Zo...

Page 4: ...ter 58 Downloading Images and Video Files USING THE CAMERA AS A PC CAMERA 59 Install the PC Camera Driver 60 Connect the Camera to Your Computer 60 Run Your Application Software i e Windows NetMeeting EDITING SOFTWARE INSTALLATION 61 Installing Photo Explorer 61 Installing Photo Express 62 Installing Cool 360 CAMERA SPECIFICATIONS TROUBLESHOOTING ...

Page 5: ...approx 27 MB for image storage External memory supports SD SDHC memory card Optical zoom 3x optical lens allows you to capture telephoto and wide angle images Digital zoom 4x digital zoom and 3x optical zoom permit zoom photography of up to 12 times 4x playback captured images to enlarge a selected portion of an image Voice memo A voice memo can be recorded once for 30 seconds at photography mode ...

Page 6: ...g items Common Product Components J Digital camera J User s manual J Software CD ROM J USB cable J AV cable J Camera strap J Camera pouch J AC power adapter J Adapter converter for DC Jack to mini USB cable J Rechargeable lithium ion battery Common Optional Accessories J SD SDHC memory card ...

Page 7: ...EN 13 GETTING TO KNOW THE CAMERA Front View 1 Shutter button 2 ON OFF button 3 Self timer LED 4 Flash 5 Lens 6 Microphone 1 5 3 4 2 6 ...

Page 8: ...o mode Playback mode 3 DISPLAY button 4 Status LED 5 Zoom in button Zoom out button 6 MENU button 1 2 3 4 5 6 11 9 8 7 13 12 10 7 Erase button 8 Speaker 9 SET Direction button 10 PC AV terminal 11 Strap holder 12 Battery SD SDHC memory card cover 13 Tripod socket ...

Page 9: ...EN 15 SET Direction button 1 S button Focus button 2 X button Flash button 3 T button Self timer button 4 W button Exposure Backlight correction button 5 SET button ...

Page 10: ...d Economy P 18 Scene mode P Program AE Panorama Portrait Man Portrait Lady Landscape Sport Night Portrait Night Scene Candlelight Firework TEXT Text Sunset Sunrise Splash Water Flow Water Sepia Monochrome Snow Beach Pets User Setting J Each press of the DISPLAY button switches one step in the sequence of OSD full display OSD full with Histogram OSD display off 11 Date and time 12 Self timer icon 1...

Page 11: ...ill image playback 1 Playback mode 2 File number 3 Folder number 4 Protect icon 5 Voice memo 6 DPOF icon Playback mode Video playback 1 Video status bar 2 Elapsed time 3 File number 4 Folder number 5 Protect icon 6 Video mode 7 Playback mode 8 Sound off icon When the S button is pressed during video playback 9 Total recorded time 00 07 30 10S 6 1 100 0011 3 5 4 6 Total Play 00 00 10 00 00 06 1 2 9...

Page 12: ... inserting or removing the battery Inserting the Battery 1 Open the battery SD SDHC memory card cover 2 Insert the battery in the correct orientation shown Tilt the battery lock lever in the direction of the arrow and orient the battery so that its label is facing to the rear side of the camera and then insert the battery 3 Close the battery SD SDHC memory card cover Removing the Battery Open the ...

Page 13: ...ing J Charging time varies according to the ambient temperature and the status of battery 1 2 3 J This camera must be used with specified AC power adapter Damage caused by the use of an incorrect adapter is not covered under the warranty J Always make sure that the camera is off before removing the battery J The battery may feel warm after it has been charged or immediately after being used This i...

Page 14: ...J Hold the SD SDHC memory card with its front side of the SD SDHC memory card printed arrow facing the rear side of the camera and then insert the card as far as it can go 3 Close the battery SD SDHC memory card cover Removing the SD SDHC memory card Open the battery SD SDHC memory card cover press lightly on the edge of the SD SDHC memory card and it will eject J To prevent valuable data from bei...

Page 15: ...de the mode switch to or 2 Press the MENU button and select Setup menu with the Xbutton 3 Select Date Time with the S T buttons and press the SET button The Date Time setting screen will be displayed 4 Select the item s field with the W X buttons and adjust the value for the date and time with the S T buttons The date and time is set in the order year month day hour minute The time is displayed in...

Page 16: ...ancel formatting select Cancel and press the SET button J To format the internal memory do not insert an SD SDHC memory card into the camera Otherwise you will format the SD SDHC memory card J Formatting the SD SDHC memory card also erases the protected images All data other than images are also erased Before formatting the card make sure that all the images are unnecessary J Formatting is an irre...

Page 17: ...olution and quality settings are recommended for printed output and situations requiring the finest detail Lower resolution quality images take up less memory space and may be quite suitable for sharing images via e mail in a report or on a web page To change image resolution or image quality perform these steps below 1 Slide the mode switch to or 2 Press the MENU button J Capture menu is displaye...

Page 18: ...04 1600 x 1200 640 x 480 Size Quality 2GB 64MB 128MB 256MB 512MB SD SDHC memory card capacity 1GB Internal Memory 6 10 14 8 13 18 15 24 34 61 86 111 13 22 31 18 29 40 34 54 75 135 188 242 27 45 63 37 59 81 70 110 151 272 381 489 54 90 126 76 119 163 141 221 304 547 766 984 108 181 254 152 239 326 283 443 610 1098 1536 1973 218 363 509 305 480 654 567 887 1222 2199 3067 3951 4GB SDHC 873 1456 2039 ...

Page 19: ...le recording time sec video clip Size Quality 2GB 64MB 128MB 256MB 512MB SD SDHC memory card capacity 1GB Internal Memory 4GB SDHC 320 x 240 Fine Standard Fine Standard 640 x 480 00 00 29 00 00 32 00 01 31 00 01 44 00 00 59 00 01 06 00 03 05 00 03 31 00 02 01 00 02 14 00 06 13 00 07 05 00 04 04 00 04 31 00 12 30 00 14 15 00 08 10 00 09 05 00 25 04 00 28 34 00 00 12 00 00 14 00 00 41 00 00 46 00 16...

Page 20: ...s turned on at mode the lens will remain closed 2 Slide the mode switch to 3 Compose your image in the LCD monitor J Pressing the button zooms in on the subject and enlarges the subject on the LCD monitor J Pressing the button provides a wider angle image 4 Press the shutter button J Pressing the shutter button down halfway automatically focuses and adjusts the exposure and pressing the shutter bu...

Page 21: ...ton to exit from the menu J icon is displayed on the screen 6 Compose the image press the shutter button down halfway then press it down fully J VOICE RECORDING is displayed on the screen immediately and the voice memo recording starts 7 Press the shutter button one more time during recording or wait for 30 seconds J VOICE RECORD END will be displayed and the recording will end J An icon is displa...

Page 22: ...ss the MENU button b Select Function with the W X buttons c Select Digital Zoom with the S T buttons and press the SET button d Select On with the S T buttons again and press the SET button e Press the MENU button to exit from the menu screen f To activate the digital zoom press and hold the button completely until the image on the LCD monitor expands 3 Press the shutter button to capture a zoomed...

Page 23: ... want to capture natural looking images of people and animals in low light conditions When capturing images the red eye phenomenon can be reduced by asking the subject person to look at the camera or get as close to the camera as possible Forced Flash In this mode the flash always fires Use this mode for photographing under artificial light such as backlighting Flash Off Use this mode when capturi...

Page 24: ...n Blank Auto Focus Selects this when you want to leave the settings up to the camera so that you can capture images without paying attention to settings Approximately 50cm 19 7inches to infinity both Wide and Tele Macro Selects this when you want to capture a close up image Wide zoom off Approximately 6cm 2 4inches to infinity Tele at optical zoom 3x Approximately 35cm 13 8inches to infinity Infin...

Page 25: ...ime has elapsed The countdown is displayed on the LCD monitor To cancel the self timer during operation press the shutter button halfway The table below will help you choose the appropriate self timer mode Self timer mode Description 10s 10 sec The image is captured about 10 seconds after the shutter button is pressed 2s 2 sec The image is captured about 2 seconds after the shutter button is press...

Page 26: ... button to increase the value Press the button to decrease the value The setting range of the exposure compensation is as follows 2 0 1 7 1 3 1 0 0 7 0 3 0 0 3 0 7 1 0 1 3 1 7 2 0 Press the button to confirm the setting The larger the value the brighter the image The smaller the value the darker the image The set value is displayed on the screen Effective Subjects and Set Values positive compensat...

Page 27: ...a series of shots then stitch them together with software to make a single image Portrait Man Select this mode when you want to capture an image that makes a man stands out against a defocused blurred background Portrait Lady Select this mode when you want to capture an image that makes a lady stands out against a defocused blurred background Landscape Select this mode when you want to capture lan...

Page 28: ...flowing water Shutter speed is automatically slowed down while maintaining proper exposure which producesan image with the water blurred into smooth flowing lines along with a sharply focused background Sepia Select this mode when you want to capture a sepia image Monochrome Select this mode when you want to capture a black white image Snow Select this mode when you want to capture clear snow scen...

Page 29: ...he Panorama Mode This mode is designed to make it easier to take a series of shots then stitch them together with software to make a single image You can capture a photographic subject that won t fit into a single frame such as a landscape and stitch it together later with a program such as Cool 360 or Photoshop application 1 Slide the mode switch to 2 Press the MENU button 3 Select Scene Mode wit...

Page 30: ... to the direction in which the image was rotated will return the image to the normal display J Press the button to view the images in the thumbnail display Images that have been selected with the S T W X buttons will be indicated by a yellow frame Press the SET button to display the selected image is displayed at its regular size 1 100 0001 ISO200 3072 x 2304 Image Display Information You can swit...

Page 31: ... the same as playing back still images and video clips on the camera Playing Back Video Clips You can play back video clips recorded on the LCD monitor You can also play back sound if you recording with the audio 1 Slide the mode switch to J The last image appears on the screen 2 Select the desired video clip with the W X buttons 3 Press the SET button J A press of the X W buttons during playback ...

Page 32: ...memo Playing back voice memo A press of the SET button displays VOICE PLAYBACK and plays back the voice memo J Voice memo is only available for still images Slideshow Display The slideshow function enables you to playback your still images automatically in order one image at a time 1 Slide the mode switch to 2 Press the MENU button J The playback menu is displayed 3 Select Slide Show with the S T ...

Page 33: ...rges the image J To return to normal magnification press the button J The magnification factor is displayed on the LCD monitor J The image is displayed enlarged and a blue frame and yellow frame are displayed on the LCD monitor J The blue frame indicates the entire image while the yellow frame shows the location of the currently enlarged area 4 Press the S T W X buttons to select the area to enlar...

Page 34: ...yed 4 Select Protect with the S T buttons and press the SET button 5 Select Single or All with the S T buttons and press the SET button 6 Select Set with the S T buttons and press the SET button J Protection is applied to the image and the camera returns to the playback mode J The protect icon is displayed with protected images When All has been selected is displayed with all the images Play SET A...

Page 35: ...ith the S T buttons from the playback menu and press the SET button 2 Select Select with the S T buttons and press the SET button J The images are displayed in the thumbnail display 3 Select the image you want to protect with the S T W X buttons and press the DISPLAY button J The protect icon is displayed with protected images Selecting a protected image and pressing the DISPLAY button again will ...

Page 36: ...layed 5 Select Single or All with the S T buttons and press the SET button J Single Sets DPOF for each individual image J All Sets DPOF for all images at once 6 Select Print Num with the S T buttons and press the SET button J This displays the number of prints setting screen 7 Set the number of prints with the S T buttons and press the SET button J You can set up to 9 prints for each image 8 Selec...

Page 37: ...uttons and press the SET button J To quit resizing press the MENU button J When resizing ends the screen returns to playback mode J It is possible to reduce the size of an image It is not possible to increase the size of an image or to restore size after it has been decreased Play SET Adj MENU Exit J This creates a file containing the DPOF information and when the operation is finished the screen ...

Page 38: ...ect Cancel and press theSET button Erasing at Playback Mode Erasing single image Erasing all images 1 Slide the mode switch to J The last image will be displayed on the screen 2 Select the image you want to erase with the W X buttons 3 Press the button J The deletion menu will be displayed 4 Select Single or All with the S T buttons and press the SET button J Single Erases the selected image or th...

Page 39: ...to another subsequently captured image Erasing selected images This erases a number of selected images 1 Slide the mode switch to 2 Press the button J The deletion menu will be displayed 3 Select Select with the S T buttons and press the SET button J The images are displayed in the thumbnail display 4 Select the image you want to erase with the S T W X buttons and press the button J The icon will ...

Page 40: ...pness of the image that will be captured Hard Normal Soft MENU OPTIONS Capture Menu Capture This menu is for the basic settings to be used when capturing still images 1 Slide the mode switch to 2 Press the MENU button J Capture menu is displayed 3 Select the desired Capture option item with the S T buttons and press the SET button to enter its respective menu 4 Select the desired setting with the ...

Page 41: ...t offer a good match Before select Execute determine the subject such as a white paper that will be used to set the white balance Cancel Execute ISO This sets the sensitivity for capturing images When the sensitivity is raised and the ISO figure is increased photography will become possible even in dark locations but the more pixelated grainier the image will appear 50 100 200 400 Auto Metering Th...

Page 42: ...on 5 To exit from the menu press the MENU button Capture Mode This sets the recording method at the time of capturing images Blank Single Captures an image at a time Continuous Permits continuous photography of 3 images max AEB AEB Permits 3 consecutive images in the order of standard exposure underexposure and overexposure compensation J In Continuous and AEB capture mode the voice memo is automa...

Page 43: ...y On Off Preview This sets whether or not to display the captured image on the screen immediately after the image is captured On Off J When Preview is set to Off Voice Memo setting is also fixed at Off Date Print The date of recording can be printed directly on the still images This function must be activated before the image is captured On Off J When Voice Memo is set to On the preview setting is...

Page 44: ...button to enter its respective menu 4 Select the desired setting with the S T buttons and press the SET button 5 To exit from the menu press the MENU button Size This sets the size of the video clip that will be captured 640 x 480 320 x 240 Quality This sets the quality compression rate at which the video clip is captured Fine Standard Color This sets the color of the video clip that will be captu...

Page 45: ...ective menu 4 Select the desired setting with the S T buttons and press the SET button 5 To exit from the menu press the MENU button Audio This sets whether or not to record audio at the time of video recording On Off LCD Bright Refer to section in this manual titled LCD Bright in Capture Menu Function for further details Digital Zoom Refer to section in this manual titled Digital Zoom in Capture ...

Page 46: ...fer to section in this manual titled Protecting Images for further details LCD Bright Refer to section in this manual titled LCD Bright in Capture Menu Function for further details Resize Refer to section in this manual titled Resizing an Image for further details Quality Changes the quality compression rate of a recorded image Compresses images down to half of their size or more overwrites an old...

Page 47: ...time you press the camera button On Off Fr No Reset This creates a new folder The captured images are recorded to the newly created folder from number 0001 Cancel Execute Auto Off If no operation is performed for a specific period of time the power to the camera is automatically turned off This feature is useful to reduce battery wear 1 Min 2 Min 3 Min Off Date Time Refer to section in this manual...

Page 48: ...d Beep in Setup Menu In Photography Mode for further details Format Refer to section in this manual titled Formatting the SD SDHC Memory Card or Internal Memory for further details Fr No Reset Refer to section in this manual titled Fr No Reset in Setup Menu In Photography Mode for further details Card Info This displays the free capacity of the SD SDHC memory card System Info This displays the fir...

Page 49: ...onfigure with the S T buttons and press the SET button J Images Select whether you want to print specific image or all images You may also select printing number for specific image J Date Print According to the printer type select whether you want to print the image with date imprint or not J Paper Size Select the desired paper size according to the printer type J Layout Select the desired printin...

Page 50: ...ss the SET button to confirm 4 Select Exit with the S T buttons and press the SET button 5 Select Print with the S T buttons and press the SET button to start printing 6 The printing starts and the figure shown on the right hand side appears J The COMPLETE will be displayed temporarily reminding you that the printing procedure is finished J If a print error is detected the PRINT ERROR will be disp...

Page 51: ... 3 Turn on your camera J The USB screen appears 4 Select PC with the S T buttons and press the SET button 5 From the Windows desktop double click on My Computer 6 Look for a new Removable disk icon This Removable disk is actually the memory card in your camera Typically the camera will be assigned drive letter e or higher 7 Double click on the removable disk and locate the DCIM folder 8 Double cli...

Page 52: ...re inside these folder s Select the images that you want and then choose Copy from the Edit menu Open the destination location folder and choose Paste from the Edit menu You may also drag and drop image files from the camera to a desired location Macintosh Open the untitled disk icon and the destination location on your hard disk Drag and drop from the camera to the desired destination J Memory ca...

Page 53: ...se the camera for videoconference your computer system must include Microphone Sound card Speakers or headphones Network or Internet connection Install the PC Camera Driver The PC camera driver included on the CD ROM is exclusively for Windows The PC camera function is not supported for Mac platforms 1 Insert the CD ROM that came with the camera into your CD ROM drive The welcome screen appears 2 ...

Page 54: ... be willing to accept your call to start the videoconference The video resolution for videoconferencing applications is generally 320 x 240 For more information about the operation of videoconference application software refer to its respective help documentation Connect the Camera to Your Computer 1 Connect one end of the USB cable to the PC AV terminal on the camera 2 Connect the other end of th...

Page 55: ... on screen instructions to complete the installation Installing Photo Express Ulead Photo Express is complete photo project software for digital images The step by step workflow visual program interface and in program help assist users in creating exciting photo projects Acquire digital photos effortlessly from digital cameras or scanners Organize them conveniently with the Visual Browse mode Use ...

Page 56: ...Web pages or insert them into documents and presentations To install Cool 360 1 Insert the CD ROM that came with the camera into your CD ROM drive The welcome screen appears 2 Click INSTALL Cool 360 SE Follow the on screen instructions to complete the installation J For more information about the operation of the application software refer to its respective help documentation J For Windows 2000 XP...

Page 57: ...m lens Aperture range 2 8 W 4 8 T Focal length 5 8mm 17 4mm equivalent to 35mm 105mm on a 35mm camera Focus range Standard Approx 50cm 19 7inches to infinity Macro Approx 6cm 2 4inches to infinity Wide Approx 35cm 13 8inches to infinity Tele Shutter speed 1 2 1 2000 sec Digital zoom 4x Capture mode 4x Playback mode Flash effective range 0 6m 3 0m Wide 0 6m 2 1m Tele Terminal USB AV DC IN 3 in 1 te...

Page 58: ...is exhausted The camera was left unattended and unused so the auto power off cuts it off It is being used in extreme low temperature Many shots are being captured in dark places inside requiring flash The battery is not fully charged The battery is not used for an extended period of time after charged Long period of continuous use of the camera or the flash Solution Insert the battery correctly Re...

Page 59: ...greater than flash effective range The image is captured in a dark place while set to flash off It is under exposed It is over exposed T h e i m a g e w a s c a p t u r e d i n conditions that are hard for auto white balance to adjust to Solution Recharge the battery Turn the power on Slidethemodeswitchtoshootingmode Press the shutter button all the way down Insert a new memory card or delete unwa...

Page 60: ...e Remove the write protection Remove the write protection Insert a new memory card Adjust the brightness of LCD monitor Playback Symptom Even when the camera s buttons are pressed it does not operate The date and time is wrong T h e d a t e s e t h a s disappeared Cause The battery is running low The correct date and time in not set The battery is removed with the power still on Solution Recharge ...

Reviews: