background image

EN-20

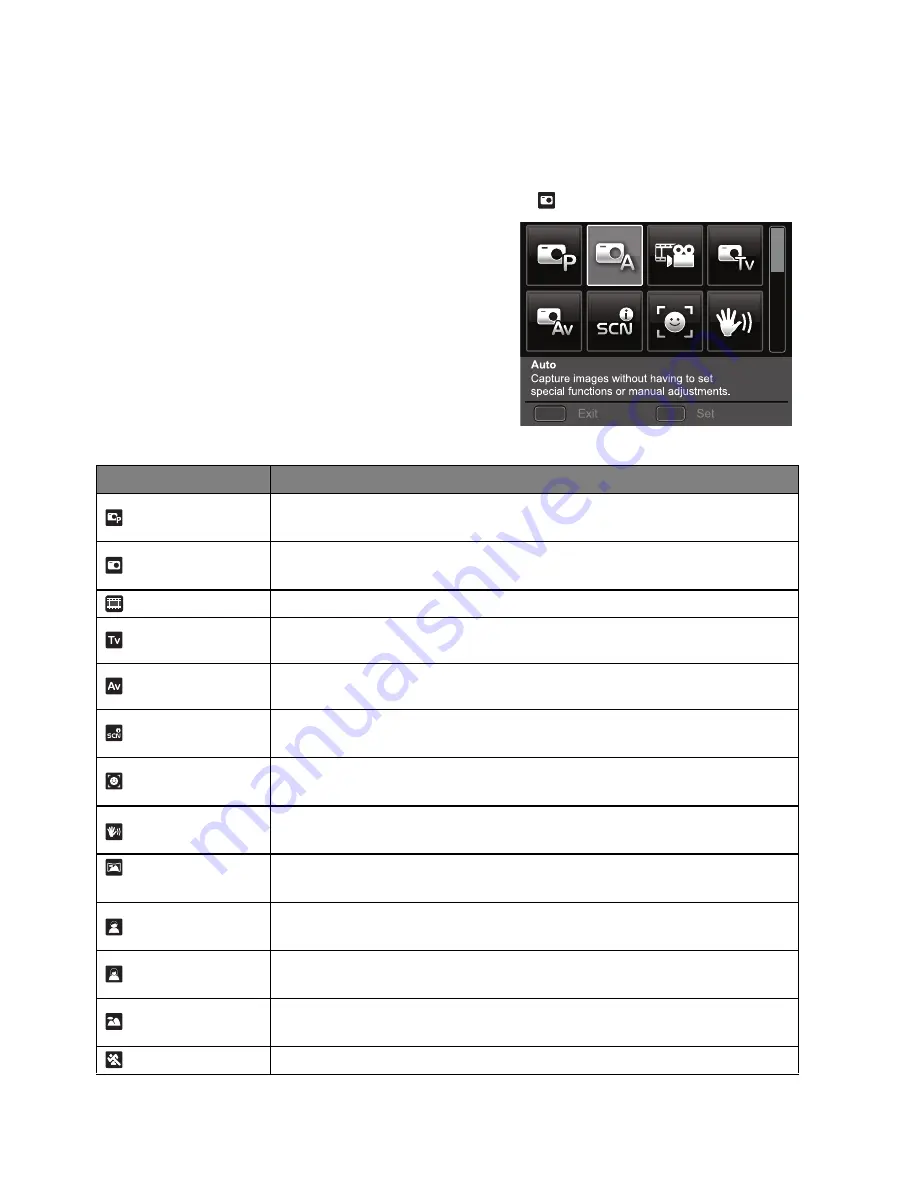
Setting the Scene Mode

By simply selecting one of the available scene modes, you can capture the image with
the most appropriate settings.
1. Press the


SET


button, and set the camera mode to [

], and press the 

SET

 button.

2. Select the desired scene mode with the 

e

 / 

f

c

 / 

d

 buttons, and press the 

SET

 button.

3. Compose the image and press the shutter

button.

The table below will help you choose the appropriate scene mode:

Scene mode

Description

 Program AE

Select this mode when you want to set parameters manually other 
than the shutter speed and the aperture value.

 Auto

Select this mode when you want to capture images without
having to set special functions or manual adjustments

.

 Video

Select this mode when you want to record video clips.


Tv

Select this mode when you want to capture fast moving subjects in 

fast shutter speed, or capture still subjects in slow shutter speed.

 Av

Select this mode when you want to capture images with the 

priority given to aperture. 

 Intelligent Scene

Select this mode when you want the camera to select an ideal 
shooting mode according to environment automatically.

 Smile Detection

Select this mode to automatically capture an image when a smiling 
face is detected.

 Anti-shake

Select this mode when you want to minimize the influences of 
hand shaking when capturing an image.

 Panorama 

PanCapture

Select this mode when you want the camera to combine pictures 
in the camera automatically. 

 Portrait Man

Select this mode when you want to capture an image that makes a 
man stand out against a blurred background.

 Portrait Lady

Select this mode when you want to capture an image that makes a 
lady stand out against a blurred background.

 Landscape

Select this mode when you want to capture an image with infinity 
focus, hard sharpness and high saturation. 

 Sports

Select this mode when you want to capture fast-moving subjects.

MENU

SET

;

;

Summary of Contents for VPC-S1415

Page 1: ...vpc S1415 ...

Page 2: ...llation If this equipment does cause harmful interference to radio or television reception which can be determined by turning the equipment off and on the user is encouraged to try to correct the interference by one or more of the following measures Reorient or relocate the receiving antenna Increase the separation between the equipment and receiver Connect the equipment into an outlet on a circui...

Page 3: ...roduct color appearance and internal memory capacity Contact your dealer for precise product definition and included accessories The illustrations in this manual are for the purpose of explanation and may differ from the actual design of your Camera The manufacturer assumes no liability for any errors or discrepancies in this user manual Sanyo Electric shall not be held responsible for any problem...

Page 4: ...EN 3 ...

Page 5: ...EN 4 ...

Page 6: ...EN 5 ...

Page 7: ...EN 6 ...

Page 8: ...rgy and if not installed and used in accordance with instructions may cause harmful interference to radio communications However there is no guarantee that interference will not occur in a particular installation If this equipment does cause harmful interference to radio or television reception which can be determined by turning the equipment off and on the user is encouraged to try to correct the...

Page 9: ...ol means that the battery or accumulator contains a heavy metal at a certain concentration This will be indicated as follows Hg mercury Cd cadmium Pb lead In the European Union there are separate collection systems for used electrical and electronic equipment batteries and accumulators Please dispose of them correctly at your local community waste collection recycling centre Please help us to cons...

Page 10: ...h FCC Standards FOR HOME OR OFFICE USE Model number VPC S1415 Trade Name SANYO Responsible party SANYO FISHER COMPANY Address 21605 Plummer Street Chatsworth California 91311 Telephone No 818 998 7322 This device complies with Part 15 of the FCC Rules Operation is subject to the following two conditions 1 this device may not cause harmful interference and 2 this device must accept any interference...

Page 11: ...e The batteries may feel warm after a long period of continuous use of the Camera or the flash This is normal and not a malfunction The Camera may feel warm after a long period of continuous use This is normal and not a malfunction If the batteries are not to be used for a long period of time remove them from the Camera to prevent leakage or corrosion and store them after no battery power is left ...

Page 12: ...Function 23 Recording Shots using Face Detection Technology 23 Self portrait Function 24 VIDEO MODE 24 Recording Video Clips 24 Playing Back Video Clips 25 PLAYBACK MODE 25 Playing Back Still Images 25 Thumbnail Display 26 Removing Red eye 26 Dynamic Lighting Feature 27 Attaching Voice Memos 28 Protecting Images 29 Erasing Images 30 MENU OPTIONS 30 Capture Menu 32 Video Menu 33 Playback Menu 35 Se...

Page 13: ...mera is capable of capturing images with a resolution of up to 4288 x 3216 pixels Package Contents Carefully unpack your camera and ensure that you have the following items Common Product Components Digital Camera Quick Guide Bundled CD ROM Application Software and Instruction Manual USB cable Camera strap 2 x AA size batteries Common Optional Accessories SD SDHC memory card Accessories and compon...

Page 14: ...capture mode Video clip to capture mode 5 Focus Focus 6 Compensation s P Previous Image 7 Flash Next Image 8 If any scene mode is set switches to scene mode selection screen Still image to display image Records voice memo if Voice Memo is Record Video clip to play video clip 9 Self timer Self timer G A LCD monitor B Status LED C USB and AV OUT terminal D Strap holder E DC door F Battery Memory car...

Page 15: ...on 4288 x 3216 3264 x 2448 2304 x 1728 1600 x 1200 640 x 480 11 Set key SCN hint icon 12 Main focus area 13 Date and time 14 Quick shot 15 Capture mode icon Single T Continuous U AEB Auto Exposure Bracketing Burst Cont flash Pre shot Coupl shot 16 White balance Auto Incand Fluoresc 1 Fluoresc 2 Daylight Cloudy Manual WB 17 Image quality Fine Standard Economy 18 ISO Auto ISO 100 ISO 200 ISO 400 ISO...

Page 16: ...int icon 8 Date and time 9 Histogram 10 Aperture value Shutter speed 11 Exposure value 12 Image quality 13 ISO 14 Mode icon Playback mode Video playback 1 Protect icon 2 Folder File number 3 Storage media 4 Battery condition 5 Volume mode 6 Total recorded time 7 Video status bar 8 Video condition icon 9 Elapsed time 10 Set key Play Pause hint icon 11 Down key Stop hint icon 12 Mode icon 13 12 9 10...

Page 17: ...h this camera before its initial usage 5 Close the battery memory card cover and make sure it is locked securely To prevent valuable data from being accidentally erased from an SD SDHC memory card you can slide the write protect tab on the side of the SD SDHC memory card to LOCK To save edit or erase data on an SD SDHC memory card you must unlock the card To prevent damaging of an SD SDHC memory c...

Page 18: ... shutter button or press the MENU button will enter capture mode without saving the settings Setting the Date and Time When the date and time information is not displayed on the LCD monitor follow these steps to set the correct date and time 1 Press the SET button and set the camera mode to or or press the 7 button 2 Press the MENU button 3 Select the Setup at the end of the Menu with the c d butt...

Page 19: ... Setup menu press the MENU button Formatting the Memory Card or Internal Memory This utility formats the memory card or internal memory and erases all stored images and data 1 Press the SET button and set the camera mode to or or press the 7 button 2 Press the MENU button 3 Select the Setup at the end of the Menu with the c d buttons and press the SET button 4 Select Format with the c d buttons th...

Page 20: ...ing the shutter button down fully captures the image The focus area frame turns green when the camera is in focus and the exposure is calculated When the focus is not suitable the frame of the focus area turns red AF Tracking Mode Use this option to take pictures of moving subject 1 Press the SET button and set the camera mode to 2 Press the button and select icon with the e f buttons Press the SE...

Page 21: ...or capture still subjects in slow shutter speed Av Select this mode when you want to capture images with the priority given to aperture Intelligent Scene Select this mode when you want the camera to select an ideal shooting mode according to environment automatically Smile Detection Select this mode to automatically capture an image when a smiling face is detected Anti shake Select this mode when ...

Page 22: ...ure The shutter speed becomes slower so using a tripod is recommended Text Select this mode when you want to capture an image that contains black and white subjects like printed documents Sunset Select this mode when you want to capture a sunset This mode helps keep the deep hues in the scene Sunrise Select this mode when you want to capture a sunrise This mode helps keep the deep hues in the scen...

Page 23: ...eview display Press the shutter button once again to reactivate this function Taking and Combining Panoramic Pictures Pictures are manually shot and the camera automatically combines pictures in the camera 1 Press the SET button and set the camera mode to and press the SET button 2 Select Panorama PanCapture with the e f c d buttons and press the SET button 3 Select the photographic direction with...

Page 24: ... will be no frame shown on the screen 3 Press the shutter button halfway down to lock the focus When the main face is in focus the white frame simultaneously turns green Otherwise it turns red 4 Press the shutter button down fully to capture your image Subjects that are not suitable with this function a A person is wearing glasses sunglasses or face is covered with hat or hair b A person turns sid...

Page 25: ...ding will stop automatically when a video clip becomes approx 4GB or 25 minutes Playing Back Video Clips You can play back recorded video clips on the camera You can also play back sound if recorded with the video 1 Press the 7 button The last image appears on the screen 2 Select the desired video clip with the e f buttons 3 Press the SET button A press of the f e buttons during playback allows fa...

Page 26: ...io memo recorded Thumbnail Display This function allows you to view 9 thumbnail images on the LCD monitor at the same time which can let you quickly search for the image that you want 1 Press the 7 button The last image appears on the screen 2 Press the button The images are displayed in the thumbnail display Images that have been selected with the e f c d buttons will be indicated by a yellow fra...

Page 27: ...s replaces the original image with the corrected image Dynamic Lighting Feature This feature compensates for the unfavorable lighting conditions by brightening underexposed areas and balancing overexposed areas 1 Press the 7 button The last image appears on the screen 2 Select the image that you want to edit with the e f buttons 3 Press the MENU button 4 Select Dynam Light with the c d buttons and...

Page 28: ... and press the SET button 5 Press the SET button is displayed on the screen and recording starts 6 To stop recording a voice memo as it is being recorded press the SET button again An icon is displayed with images that have been recorded with a voice memo RE REC mode can only be used for the recorded and selected file and it can record voice memo repeatedly to replace the previous recordings Playi...

Page 29: ... has been selected is displayed with all the images Canceling the Protection To cancel protection for only one image display the image on which you want to remove the image protection 1 Press the 7 button The last image appears on the screen 2 Select the image that you want to cancel protection with the e f buttons 3 Press the MENU button 4 Select Protect with the c d buttons and press the SET but...

Page 30: ...last image All Erases all of the images except for the protected images 6 Select Execute with the e f buttons and press the SET button To not erase select Cancel and press the SET button 7 To exit from the menu press the MENU button Deleting an image will not affect sequential image numbering For example if you delete image number 240 the next captured image will be numbered 241 even though 240 no...

Page 31: ...ity for capturing images When the sensitivity is raised and the ISO figure is increased photography will become possible even in dark locations but the more pixelated grainier the image will appear Set to ISO 3200 6400 image size will be 2M Auto ISO100 ISO 200 ISO 400 ISO 800 ISO 1600 ISO 3200 ISO 6400 Quality This sets the quality compression at which the image is captured Fine Standard Economy W...

Page 32: ... of the screen is measured to calculate the correct exposure Average The exposure is measured all of the image area Single Captures one image at a time Continuous Permits continuous capture of up to 3 images AEB Permits 3 consecutive images in the order of standard exposure underexposure and overexposure compensation Burst Permits continuous photography while pressing and holding the shutter butto...

Page 33: ...nu press the MENU button Size This sets the size of the video clip that will be captured HD VGA QVGA Quality This sets the quality compression at which the video clip is captured Fine Standard Color This sets the color of the video clip that will be captured Standard Vivid Sepia B W Blue Red Green Yellow Purple Audio This sets whether or not to record audio at the time of video recording On Off Di...

Page 34: ...nual titled Dynamic Lighting Feature for further details Slide Show This function enables you to play back your still images automatically in order one image at a time 3 Sec 5 Sec 10 Sec Protect Refer to the section in this manual titled Protecting Images for further details Voice Memo Refer to the section in this manual titled Attaching Voice Memos for further details Resize Resizes a previously ...

Page 35: ...ard Of course you can only do this if you have a memory card installed and some files in internal memory All files remain in the internal memory even after copy to the SD SDHC memory card from the internal memory Execute Cancel Setup Refer to the section in this manual titled Setup Menu for further details ...

Page 36: ...fer to the section in this manual titled Setting the Date and Time for further details Language Refer to the section in this manual titled Choosing the Language for further details Auto Off If no operation is performed for a specific period of time the power to the camera is automatically turned off This feature is useful for reducing battery usage Off 1 Min 2 Min 3 Min Beep This sets whether or n...

Page 37: ...equency setting depending in your local area s voltage 60 Hz 50 Hz LCD Bright Select a brightness level for the LCD monitor Standard Bright Format Refer to section in this manual titled Formatting the Memory Card or Internal Memory for further details Media Info This displays the free capacity of the internal memory or the memory card Sys Info This displays the firmware version of the camera Sys R...

Page 38: ...es and video clips will be inside the folders of DCIM folder Copy Paste or Drag N Drop image and video files to a folder on your computer Mac users Double click the untitled or unlabeled disk drive icon on your desktop iPhoto may automatically launch Black screen appears when camara is conneted with PC without battery inside Windows Macintosh Pentium III 1GHz or equivalent Windows 7 XP Vista 512MB...

Page 39: ...e the designs with your own digital pictures and text based on professionally designed templates and layouts Projects can be printed at home or saved as image files for sharing with family and friends by email or the web To install software 1 Insert the CD ROM that came with the camera into your CD ROM drive The welcome screen appears 2 Click the respective software name Follow the on screen instr...

Page 40: ...EG EXIF 2 2 Motion JPEG AVI HD720p 30fps Lens 5x optical zoom lens Aperture range 3 3 W 5 8 T Focal length 4 5mm 22 5mm equivalent to 25mm 125mm on a 35mm camera Focus Range Normal Wide 0 45m to infinity Tele 0 8m to infinity Macro Wide 0 1m 0 8m Tele 0 6m 1 0m Shutter speed 1 1 2000 Sec Digital zoom 6x Capture mode 4x Playback mode Flash effective range 0 6m 3 0m Wide 0 6m 2 0m Tele Terminals USB...

Page 41: ...2 Standard 274 557 1096 2233 4496 9022 Economy 341 691 1360 2770 5578 11192 3264 x 2448 Fine 258 524 1031 2101 4230 8488 Standard 455 920 1810 3688 7425 14899 Economy 563 1136 2235 4552 9164 18388 2304 x 1728 Fine 631 1135 2232 4547 9154 18367 Standard 948 1900 3313 6749 13586 27259 Economy 1134 2266 4456 9076 18269 36655 1600 x 1200 Fine 1324 2637 5187 10565 21265 42667 Standard 2130 4186 8231 16...

Page 42: ...onitor LCD monitor is dark Adjust the brightness of the LCD monitor in the menu Although it is set to auto focus it does not focus The lens is dirty Wipe clean with a soft dry cloth or lens paper The distance to the subject is smaller than the effective range Get your subject within the effective focus range The contents on the memory card cannot be played back You played back a memory card that w...

Page 43: ...yed on the monitor 1 Select the item you want to configure with the c d buttons and press the SET button Images Select whether you want to print specific image or all images You may also select the printing number for a specific image Date Print According to the printer type select whether you want to print the image with date imprint or not Paper Size Select the desired paper size according to th...

Page 44: ... Print with the c d buttons and press the SET button to start printing 6 The printing starts and the figure shown on the right hand side appears COMPLETE will be displayed temporarily reminding you that the printing procedure is finished If an error is detected during the connection i e a printer hardware problem between camera and printer PRINT ERROR will be displayed If an error is detected duri...

Page 45: ...EN 44 Battery life Design and specifications are subject to change without notice Maximum recording time 150 images CIPA standard when a SanDisk 2 GB SD memory Card is used ...

Page 46: ......

Reviews: