background image

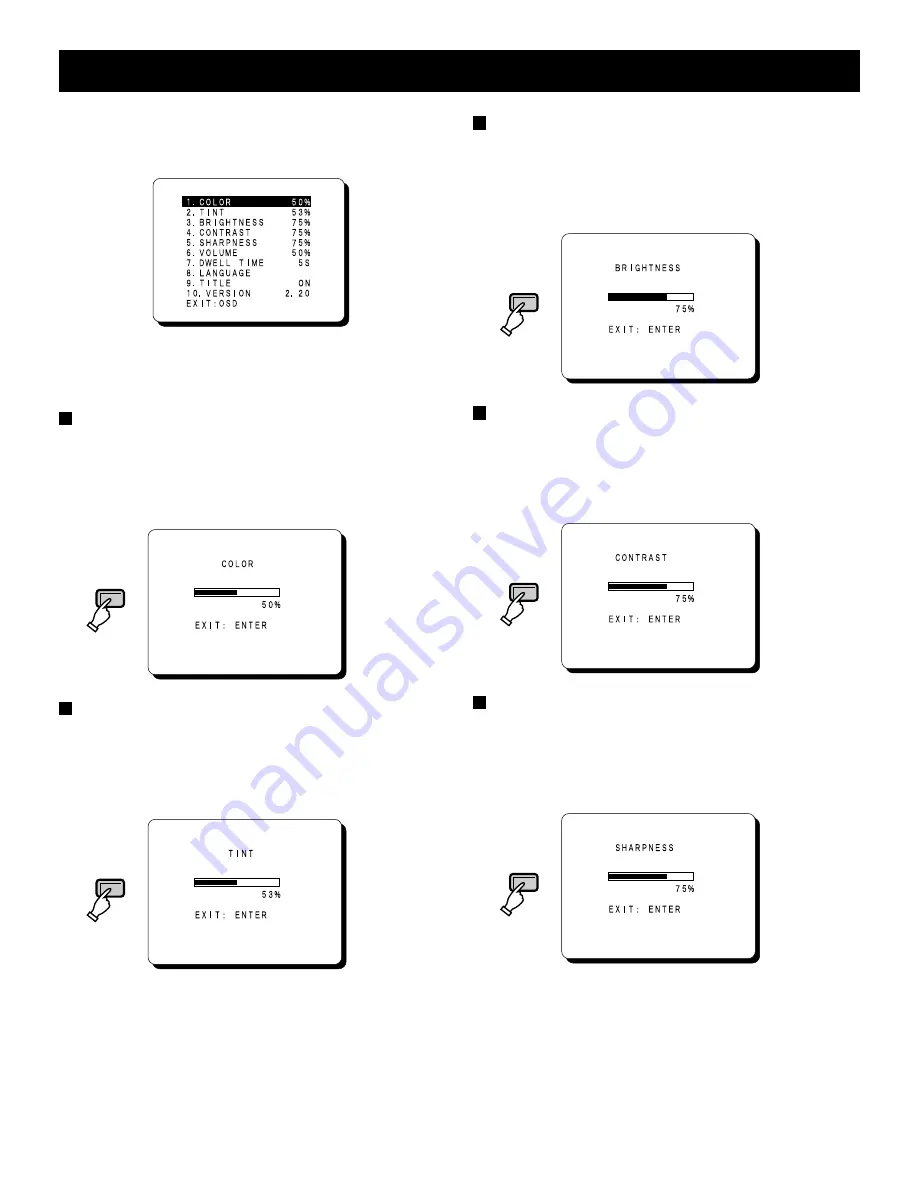
ADJUST THE OSD MENU ITEM

Open the menu screen (press the OSD button), use the
cursor buttons to select the desired menu item, and then
press the ENTER button.

Note: The setting characters which are displayed on

each adjustment screen (such as 50%) may
not display correctly (dropout) in some cases.

COLOR adjustment

1

Select “1. COLOR 50%” and then press the
ENTER button.

2

Use the cursor (

l

) and (

j

) buttons to adjust

the color of the picture.

TINT adjustment

1

Select “2. TINT 53%” and then press the ENTER
button.

2

Use the cursor (

l

) and (

j

) buttons to adjust

the tint of the picture (NTSC only).

BRIGHTNESS adjustment

1

Select “3. BRIGHTNESS 75%” and then press
the ENTER button.

2

Use the cursor (

l

) and (

j

) buttons to adjust

the brightness of the picture.

CONTRAST adjustment

1

Select “4. CONTRAST 75%” and then press the
ENTER button.

2

Use the cursor (

l

) and (

j

) buttons to adjust

the contrast of the picture.

SHARPNESS adjustment

1

Select “5. SHARPNESS 75%” and then press
the ENTER button.

2

Use the cursor (

l

) and (

j

) buttons to adjust

the sharpness of the picture.

OSD

OSD

OSD

OSD

OSD

L8MV5/US, L8MW5/US (VMC-8618, 8613 GB) 2001. 2. 23

8

Summary of Contents for VMC-8613

Page 1: ...nitor VMC 8618 VMC 8613 About this manual Before installing and using this unit please read this manual carefully Be sure to keep it handy for later reference This manual gives basic connections and operating instructions for 2 models ...

Page 2: ... apply to uncrating setup installation removal of the product for repair or reinstallation of the product after repair This warranty does not apply to repairs or replacements necessitated by any cause beyond the control of SFC including but not limited to any malfunction defect or failure caused by or resulting from unauthorized service or parts improper maintenance operation contrary to furnished...

Page 3: ...C COMPLIANCE STATEMENT FCC INFORMATION THIS EQUIPMENT HAS BEEN TESTED AND FOUND TO COMPLY WITH THE LIMITS FOR A CLASS A DIGITAL DEVICE PURSUANT TO PART 15 OF THE FCC RULES THESE LIMITS ARE DESIGNED TO PROVIDE REASONABLE PROTECTION AGAINST HARMFUL INTERFERENCE WHEN THE EQUIPMENT IS OPERATED IN A COMMERCIAL ENVIRONMENT THIS EQUIPMENT GENERATES USES AND CAN RADIATE RADIO FREQUENCY ENERGY AND IF NOT I...

Page 4: ...you are unable to insert the plug into the outlet contact your electrician to replace your obsolete outlet Do not defeat the safety purpose of the grounding type plug 10 POWER CORDS Do not allow anything to rest on the power cord Do not locate video monitor or equipment where the cord will be abused by persons walking on it 11 HEED WARNINGS Follow all instructions marked on the video monitor or eq...

Page 5: ...a fire Do not use the monitor with the power cord wound or tied up Heat may generate and cause a fire When using an extension cord be sure that the total current load of all equipment connected to it dose not exceed the specified ratings of the extension cord If the rating are exceeded heat may generate and cause a fire Make sure to carefully read the specifications accompanying the extension cord...

Page 6: ...n addition this button is used to make adjustment values larger 5 Display selector button ENTER If this button is pressed while a picture is on the monitor screen the screen changes to the adjustment screen If the button is pressed once more the picture returns to the previous screen 6 Automatic screen selector button SEQUENCE For Model 8613 only When this button is pressed the screen changes auto...

Page 7: ... monitor B selector button at the front of the monitor is pressed the audio and video signals from the component which is connected to these terminals can be monitored C AUDIO OUT IN terminals D VIDEO OUT IN terminals 4 Rear Y C terminals AUDIO VIDEO Y C terminals When the monitor Y C selector button at the front of the monitor is pressed the audio and video signals from the component which is con...

Page 8: ...e component it can be connected to either the A or B terminals at the rear of the monitor Monitor Video recorder Video camera Monitor Video recorder Video camera Monitor Video recorder To VIDEO A INPUT terminal Rear panel To Video input terminal To AUDIO A INPUT terminal Basic connections IN signal OUT signal To Audio input terminal To VIDEO B INPUT terminal To AUDIO B INPUT terminal To AUDIO inpu...

Page 9: ...A B or Y C at the rear of the monitor NO SIGNAL will be displayed 3 Menu screen operations 1 Press the OSD button The menu screen will be displayed The menu screen will only be displayed for about 13 seconds 2 Press the cursor l or j button The cursor will move up or down so that you can select the desired menu item To return to the normal monitor screen Press the OSD button once more or Select EX...

Page 10: ...icture TINT adjustment 1 Select 2 TINT 53 and then press the ENTER button 2 Use the cursor l and j buttons to adjust the tint of the picture NTSC only BRIGHTNESS adjustment 1 Select 3 BRIGHTNESS 75 and then press the ENTER button 2 Use the cursor l and j buttons to adjust the brightness of the picture CONTRAST adjustment 1 Select 4 CONTRAST 75 and then press the ENTER button 2 Use the cursor l and...

Page 11: ... and j buttons to adjust the dwell time The time can be set to between 1 second and 31 seconds 3 Return to the menu screen display and then press the SEQUENCE button SEQ will be displayed on the screen Note If SEQ is not displayed no dwell time has been set Menu screen language setting 1 Select 8 LANGUAGE and then press the ENTER button 2 Use the cursor l and j buttons to select the display langua...

Page 12: ... seconds of no activity 1 Use the cursor l button to select CH B 2 Press the ENTER button and then use the cursor l j button to select A 3 Press the ENTER button and then use the cursor l j button to select B 4 Press the ENTER button and then use the cursor l j button to select C 5 Press the ENTER button and then use the cursor l j button to select D 6 Press the OSD button The cursor will move to ...

Page 13: ...glish Français Deutsch Menu Title channel Automatic title channel selection Title settings COLOR adjustment TINT adjustment BRIGHTNESS adjustment CONTRAST adjustment SHARPNESS adjustment VOLUME adjustment DWELL TIME setting 11 ...

Page 14: ...pañol Italiano Russian Menu Title channel Automatic title channel selection Title settings COLOR adjustment TINT adjustment BRIGHTNESS adjustment CONTRAST adjustment SHARPNESS adjustment VOLUME adjustment DWELL TIME setting 12 ...

Page 15: ... Set the connected component correctly 6 Is the volume set to the minimum level Adjust the volume using the VOLUME setting screen 9 Is the audio cable disconnected Securely connect the audio cable 6 Shaking picture Is the monitor close to a device which is generating a strong magnetic field Move the device away from the monitor until the picture stabilizes No color color is incorrect or picture is...

Page 16: ...le Menu screen items Picture adjustment Adjustable COLOR TINT NTSC only BRIGHTNESS CONTRAST SHARPNESS Sound adjustment Adjustable speaker volume Automatic screen switching time 1 second to 31 seconds 1 second units Language setting Six languages English Francais Deutsch Espanol Italiano and Russian Title setting Title entry up to eight alphanumeric characters Overscan or underscan selection YES Sp...

Reviews: