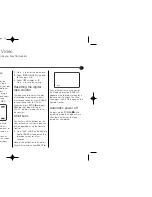
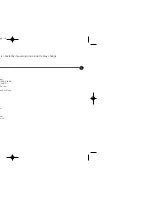
Sanyo VHR-VK310A User Manual Download Page 11

Setting the clock

The Video uses a 24 hour clock, so
that for example 1 pm is represented
as 13:00. Single digit numbers should
be entered with a 0 in front for 
instance, 01.

1

Press 

to enter the main menu.

Use the 

or

buttons to select

TIME DATE

then press 

OK

.

2

Use the numbered buttons or the

or 

on the remote control to

enter the the 

HOURS, MINUTES,

DAY, MONTH 

and 

YEAR

.

The day of the week will appear
automatically once the date has
been entered. If you make a 
mistake use 

or

to select the

item and re-enter the details.

3

Once you are satisfied press 

to

store your settings.
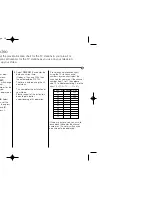
On screen display
(OSD)

This can be used to display the 
current time, tape counter, tape
remaining, day, month and year, day
of week, channel and operational
mode of your Video on your 
television screen. If a recording is 
taking place, the on screen displays 
will not be recorded onto tape.

1

Press 

OK

to show the 

OSD

.

2

Press 

OK

repeatedly to cycle

through the display options. 
The tape counter and amount of
tape left will appear if there is a
tape loaded. 

3

Press 

OK

again to remove all

OSD’s

from the television screen.

To turn off the on screen displays
completely.

1

Press 

to enter the main menu. 

2

Select 

fOSD ON OFF

using 

or

then press 

OK.

3

Select 

OFF

using 

or 

4

.

Press 

to save the setting.

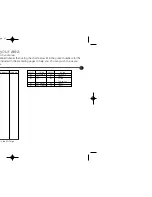
Resetting the digital
tape counter

The tape counter displays the play 
or recording time elapsed in hours 
minutes and seconds. Press 

CLEAR

to reset the counter to 0:00:00.
When you press 

STOP

9

and press

REW

5

, the Video will stop at

0:00:00, the point where you reset
the counter.

Child Lock

You can turn off the buttons on the
Control Panel so that your Video can
only be operated using the Remote
Control.

1

Press the 

C.LOCK

on the Remote

Control. 

SAFE

will appear on the

television screen for a few 
seconds.

None of the buttons on the Control
Panel will work apart from 

EJECT

/

If any other buttons on the front of 
the Video are pressed, 

SAFE

will

appear on the television screen for a
few seconds. To unlock the Child
Lock press the 

C.LOCK

again on the

Remote Control.

Automatic power off

By pressing the 

POWER

while

rewinding a tape the Video will turn
off automatically when the tape
rewind has completed.
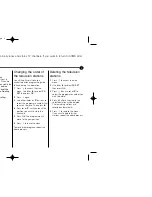
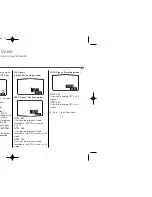
11

HH

MM

DD

MM

YY

:

.

.

-  -

- -

- -

- -

- - - -  - - - 

i

1

2

TIME

DATE

Advanced functions 

on your Video 

Your Video has some advanced operations with features you may find useful.

STOP
SP
AUTO

 PR-01

 1. 1. 2003 WED

12:00

SAFE

FCY970NW/FCY270W NA4NSS-ENG  8/28/03  9:18 AM  Page 11

Summary of Contents for VHR-VK310A

Page 1: ...EC ITR PLAY REW FF EC ITR PLAY REW FF VHR VK910A NZ VHR VK310A NZ w Video PAL Hi Fi MONO ge 1 ...

Page 2: ...g the Video from the mains supply 2 Clean the cabinet with a soft damp cloth do not apply liquid cleaners or aerosol cleaners Never spray cleaning liquids on or near the Video Video head cleaning Whenever a video cassette is insert ed into or ejected from your video the video head is automatically cleaned This should mean that additional head cleaning should not be neces sary However dirt accumula...

Page 3: ... i LP FF PLAY STOP TV VCR TV VCR AV AV CM SKIP CM SKIP ez POWER OFF ez POWER OFF C LOCK C LOCK PROG PROG ez REPEAT ez REPEAT EJECT POWER 1 2 3 4 5 6 0 7 8 9 REC ITR REW To watch one TV channel whilst recording another To display the on screen menu To reset the tape counter to zero To select the recording speed of the tape Use the 3 4 1 2 buttons to move through the menus after accessing them via t...

Page 4: ...e will be shown on the AV channel of your television If you are using a RF cable you need to select a Video channel on your television and tune it to the Video signal a test picture Turn on the Video and TV Select the vacant position 36 on your TV Press POWER on the Remote Control to put the Video on standby then press and hold PROG 3 or 4 on the front of your Video for more than 4 seconds If the ...

Page 5: ...mme number that you wish to move Then press 2 4 Press 3 or 4 until you reach the position you wish to store the channel in 5 Press OK The programme will move to the new position 6 Press to leave the menu To move other programs repeat the above process Deleting the television stations 1 Press to access the main menu 2 Use 1 or 2 to select PR SET then press OK 3 Press then use 3 or 4 to select the p...

Page 6: ... correct position so there is no need to change them later Customising station names If the station name you require isn t listed you can insert one manually instead of using the templates 1 Press to access the main menu Use 1 or 2 to select PR SET then press OK 2 Press again then use 3 or 4 to select the programme number you wish to customise station name 3 Press OK 4 Press 2 to go to STATION and...

Page 7: ...stortions can be seen in the picture reduce them with 3 or 4 Pausing a tape Pressing P STILL will pause play giving you a still picture on the screen This picture may display some interference in the form of black and white horizontal lines This is perfectly normal and does not mean that the video tape or Video are damaged The tape can be paused for up to five minutes The Video will then automatic...

Page 8: ...errupt recording to avoid unwanted scenes If you press P STILL during ITR the Video will enter the record pause mode and the set period of time is cancelled 1 To pause recording press P STILL 2 Press P STILL again to continue recording Tapes can be paused for up to five minutes REC PAUSE will be displayed on the television screen while a tape is paused After five minutes your Video will automatica...

Page 9: ... If you wish at any time to change a recording event press 3 or 4 to select the timer slot that you wish to change Press 1 to delete or OK to edit that entry Use the 1 or 2 buttons to select the section you wish to change and the 3 or 4 buttons to change those sections Protect your recordings To stop a recording you have made being recorded over break off the protection tab on the rear of the vide...

Page 10: ...ack a tape recorded in the NTSC system on PAL TV NTSC 3 58 Use when playing back a tape recorded in the NTSC system in 3 58 mode NTSC 4 43 Use when playing back a tape recorded in the NTSC system in 4 43 mode NTSC Signals Recording mode NTSC 3 58 Use when recording NTSC 3 58 signals NTSC 4 43 Use when recording NTSC 4 43 signals 4 Press to exit the menus i OPR i SYS TEM NTSC 3 58 NTSC 4 43 i NTSC ...

Page 11: ...the point where you reset the counter Child Lock You can turn off the buttons on the Control Panel so that your Video can only be operated using the Remote Control 1 Press the C LOCK on the Remote Control SAFE will appear on the television screen for a few seconds None of the buttons on the Control Panel will work apart from EJECT If any other buttons on the front of the Video are pressed SAFE wil...

Page 12: ... EJECT or REC ITR 0 when the power of your Video is off and a tape is inserted The power turns on automatically and then the appropriate operation will work as below Press Operation PLAY u Power On Play back a tape FF 6 Power On Fast forward a tape REW 5 Power On Rewind a tape EJECT Eject a tape Power Off REC ITR 0 Power On Enter pause record mode If a video tape with no safety tab is loaded the v...

Page 13: ...13 Video ures you may find useful GRAMME timer d RAMME 0 SP atus of timer e menu from ction the language ays are se between ch Français e main menu 1 or 2 e language nguage ons settings ge 13 ...

Page 14: ...ision you should consult your television user guide on how to do this Check the aerial lead is undamaged and securely connected to the correct sockets Ensure that the television has been correctly tuned to your Video NICAM sound is not being recorded VHR VK910A NZ Only Check that AUTO has been selected in the NICAM menu Consult a TV guide to check that the broadcast was in stereo Check your televi...

Page 15: ...15 is constantly innovating and products may change Watts HR VK910A NZ 10A NZ P mode de E 240 Tape nal ed nced ge 15 ...

Page 16: ...ing the 24 hour clock This completes the installation of your Video Please read all of the instruction book to get a better understanding of it s operation Pre set channel allocation chart using the TV station channel numbers by area chart select the channels for your area If the channel number from 1 to 11 then please add 70 to it before entering it into the chart 1 71 2 72 11 81 If there are any...

Page 17: ...reset numbers for the included in the preceding pages to help you You may wish to ask you s 17 PRESET STATION PRESET STATION 01 TELEVISION 06 SKY NEWS 02 TV2 07 LOCAL 03 TV3 08 ACTION TAB LOCAL 04 SKY MOVIES 09 LOCAL 05 SKY SPORTS 10 LOCAL ATION NAME PROG NO in the VHF high ge 17 ...

Page 18: ...el numbers by area TV3 TV4 T SIDE LOCAL1 LOCAL2 LOCAL3 6 7 9 or 1 55 6 11 48 56 10 11 10 8 9 7 56 10 10 7 11 10 10 3 11 9 47 33 7 11 10 11 7 10 50 56 9 9 55 7 10 9 10 7 11 2 46 48 42 40 42 ge 18 ...

Page 19: ...SANYO Electric Co Ltd ge 19 ...

Reviews: