
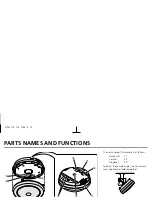


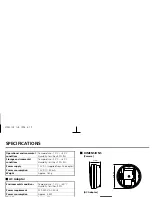

PARTS NAMES AND FUNCTIONS
1
Hood lens
2
Focus ring
The focus does not need adjustment for subjects 1 m and more
from the lens. If the subject is closer than 1 m, turn the focus ring
to adjust the focus as necessary. (See page
8
.)
3
Lens
4
Lens cover
This cover will protect the lens from dust and damage.
5
12 V DC input terminal (12 V DC IN)
Connect DC connecting cord from the AC adaptor to the
12V DC
IN
terminal on the base. Then, plug the AC adaptor into an AC
outlet.
WARNING:
• This AC adaptor is specially conceived for this camera. Never use
another type of AC adaptor with this camera, and do not use this
AC adaptor to power other types of cameras.
• Not for use with toys.
• Never try to disassemble or modify the AC adaptor.
6
Camera mounting screw hole (1/4"–20 UNC)
When mounting the camera to the mounting bracket, use this
installation hole.
7
Lens cover fixing screw
8
GND (ground) terminal screw
Loosen the GND terminal screw, insert the coaxial cable into the
clamp and tighten the GND terminal screw.
9
VIDEO OUT terminal screw
Align the centre wire of the coaxial cable with the VIDEO OUT
terminal, then first tighten the cable clamp and then the VIDEO
OUT terminal screw.
•
Cable type RG-6U (5C-2V)
L73E2/XE GB 1998, 8, 19
4
English