background image

Espa

ñol

15

REPRODUCCIÓN DE IMÁGENES (USANDO EL PROYECTOR)

AJUSTES DE IMAGEN

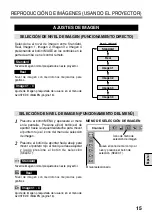
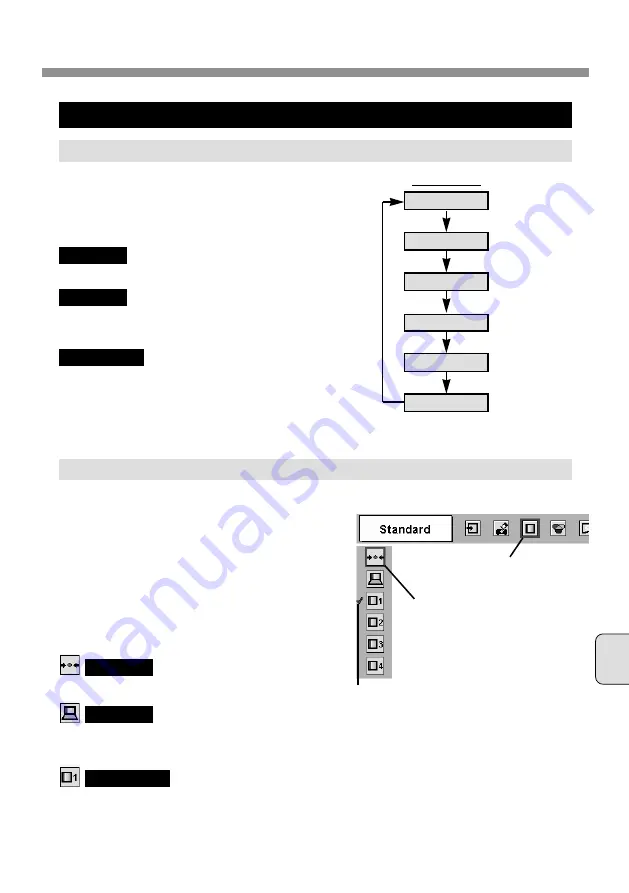
SELECCIÓN DE NIVEL DE IMAGEN (FUNCIONAMIENTO DEL MENÚ)

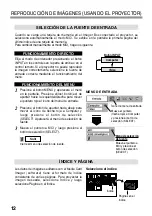
Presione el botón MENU y aparecerá el menú
en la pantalla.  Presione el(los) botón(es) de
apuntar hacia la izquierda/derecha para mover
el puntero rojo al ícono del menú de selección
de imagen.

1

2

Presione el botón de apuntar hacia abajo para
mover el puntero rojo al nivel que desea ajustar
y luego presione el botón de selección
(SELECT).

Mueva el ícono de marco rojo al
nivel y presione el botón de
selección (SELECT).

El nivel seleccionado.

MENÚ DE SELECCIÓN DE IMAGEN

Nivel de imagen normal preajustado en este proyector.

Standard

Nivel de imagen con mediotonos mejorados para
gráficos.

Real

Ajuste de imagen preajustada del usuario en el menú de
AJUSTE DE IMAGEN (página 16).

Imagen 1 - 4

Ícono de menú de
selección de imagen

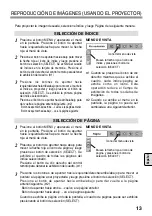
SELECCIÓN DE NIVEL DE IMAGEN (FUNCIONAMIENTO DIRECTO)

Seleccione el nivel de imagen entre Standard,
Real, Imagen 1, Imagen 2, Imagen 3 e Imagen 4
presionando el botón IMAGE en los controles en la
parte de arriba o en el control remoto.

Botón IMAGE

Standard

Real

Imagen 1

Imagen 2

Imagen 3

Imagen 4

Nivel de imagen normal preajustado en este proyector.

Nivel de imagen con mediotonos mejorados para
gráficos.

Ajuste de imagen preajustada del usuario en el menú de
AJUSTE DE IMAGEN (página 16).

Standard

Real

Imagen 1 - 4

Summary of Contents for POAMD07MCI - Digital AV Player

Page 1: ... data can be easi ly projected just by attaching the Imager Box to a projector without any connection with a computer This kit is only used for our projectors that have a terminal for the Imager Box This manual explains the installation of the Imager Box and its operation The data played back through the Imager Box is edited with Media Card Imager soft ware included in the kit For operation of the...

Page 2: ...f and on the user is encouraged to try to correct the interference by one or more of the following measures Reorient or relocate the receiving antenna Increase the separation between the equipment and receiver Connect the equipment into an outlet on a circuit different from that to which the receiver is connected Consult the dealer or an experienced radio TV technician for help Trademark Microsoft...

Page 3: ...r 8 Specifications 9 PLAY BACK IMAGE OPERATING PROJECTOR 11 PLAYING BACK IMAGE IN THE MEMORY CARD 11 PICTURE IMAGE ADJUSTMENT 15 PICTURE SIZE ADJUSTMENT 17 Contents of Media Card Imager Kit The package contains following items Make sure you have all of it Imager Box CompactFlash CF Card CF Card Adapter Media Card Imager Kit Owner s Manual this manual CD ROM MediaCard Imager Owner s Manual Those ar...

Page 4: ...4 Name of Each Part of Imager Box Imager Box LATCH BUTTON CF CARD EJECT BUTTON MOUNTING HOOK SWITCH BUTTON CONNECTOR PLUG CF CARD SLOT INDICATOR lights while accessing ...

Page 5: ...Ks A into the projector to the arrow direction Fig 1 1 2 Plug the CONNECTOR PLUG into the DVI Terminal of the projector while pressing the Imager Box LATCH BUTTON and release it COMPUTER IN DIGITAL MCI S VIDEO R AUDIO IN L VIDEO Y Pb Cb Pr Cr CONTROL PORT USB COMPUTER IN ANALOG AUDIOIN COMPUTER R L AUDIOOUT MONO Fig 1 Fig 2 A LATCH BUTTON The SWITCH BUT TON of the Imager Box is placed on the switc...

Page 6: ...d itself Load and Remove CF Card Load CF Card Fig 4 CF CARD EJECT BUTTON INDICATOR 1 2 Insert the CF Card into the CF Card slot of the Imager Box until the EJECT BUT TON pops out Do not insert it in the wrong way It may damage the equipment Remove CF Card Press the CF CARD EJECT BUT TON The CF Card is released Pull out the CF Card from the Imager Box Do not remove a CF Card while the indicator is ...

Page 7: ...y be damaged or lost due to physical damage to the CF Card or accidental erasure It is recommended that any important data should be copied as a backup onto separate media such as a floppy disk a hard disk or a MO disk etc We shall not be liable for any damage or loss of profits arising from the loss of data caused by the misoperation or the damage to a CF Card or its appliances The following may ...

Page 8: ...on water droplets to form on it leading to malfunctions Avoid this problem by placing the CF Card in a plastic bag and letting it slowly adjust to temperature changes before removing it from the bag If condensation should occur maintain the CF Card at a constant temperature and let the moisture evaporate naturally Store CF Cards Adapters in the protective case Do not use or store CF Cards Adapters...

Page 9: ...a CF card that comes with this kit The following memory cards can also be used Microdrive 1GB or less We do not guarantee use of any memory card except for the above Some memory cards may not operate properly Specifications Imager Box CompactFlash Card Adapter ATA standard Type II NOTE This adapter cannot be used for other memory cards The specifications are subject to change without notice Compac...

Page 10: ...10 ...

Page 11: ... Video Refer to P12 INPUT MENU Used to select image level among Standard Real and Image 1 4 Refer to P15 IMAGE SELECT MENU Used to adjust size of image to Normal or True or expand compress image Digital zoom Refer to P17 SCREEN MENU Used to change settings of projector or reset Lamp Reset Counter Refer to Owner s Manual of your projector SETTING MENU Used to display image data in a memory card Ref...

Page 12: ...t input source through MENU OPERATION INPUT button Computer Video Source Select Menu Move a pointer to MCI and press SELECT button SELECTING INPUT SOURCE DIRECT OPERATION MENU OPERATION INDEX AND PAGE Image data edited with Media Card Imager software is Index format consisting of several Pages To project desirable image select Index and then select Page in the Index When a memory card is loaded in...

Page 13: ... next page 3 SELECTING PAGE Press MENU button and ON SCREEN MENU will appear Press POINT LEFT RIGHT button to move a red frame pointer to VIEW Menu icon 1 2 Press POINT DOWN button to move a red frame pointer to Page icon and then press SELECT button The table of all Pages of selected Index is displayed Press RIGHT CLICK button on Remote Control Unit to stop table display 1 Press POINT LEFT RIGHT ...

Page 14: ... Projected image is turned over to next automatically with interval This Auto play function can be pausing by pressing POINT UP button and restarts with POINT DOWN button When auto play setting is previously set with Media Card Imager software interval set by Media Card Imager has priority over interval with this menu On To cancel Auto play function move a red arrow pointer to Off and then press S...

Page 15: ...lected IMAGE SELECT MENU Normal picture level preset on this projector Standard Picture level with improved halftone for graphics Real User preset picture adjustment in IMAGE ADJUST Menu refer to P16 Image 1 4 IMAGE SELECT Menu icon IMAGE LEVEL SELECT DIRECT OPERATION Select Image Level among Standard Real Image 1 Image 2 Image 3 and Image 4 by pressing IMAGE button on Top Control or on Remote Con...

Page 16: ...and then press SELECT button Store icon Press SELECT button at this icon to store the adjustment Press POINT LEFT button to decrease contrast and POINT RIGHT button to increase contrast From 0 to 63 Contrast Press POINT LEFT button to adjust image darker and POINT RIGHT button to adjust brighter From 0 to 63 Brightness Press POINT LEFT button to lighten tone of each color and POINT RIGHT button to...

Page 17: ...l image is larger than screen size the projector automatically enters Digital zoom mode True When Digital zoom is selected ON SCREEN MENU disappears and the message D Zoom is displayed Press SELECT button to expand image size And press POINT UP DOWN LEFT RIGHT button s to pan the image Panning function can work only when the image is larger than screen size Projected image can be also expanded by ...

Page 18: ...18 ...

Page 19: ...n fixant simplement l Imager Box sur un projecteur sans effectuer aucune connexion à un ordinateur Ce kit est utilisé uniquement sur nos projecteurs équipés d une borne pour l Imager Box Le présent manuel donne les explications relatives à l installation et à l utilisation de l Imager Box Les données lues par l Imager Box sont éditées par le logiciel de Media Card Imager inclus dans le kit Pour l ...

Page 20: ... nous conseillons à l utilisateur d essayer de corriger les interférences en prenant une ou plusieurs des mesures suivantes Modifier l orientation de l antenne de réception ou la placer à un autre endroit Eloigner l équipement du récepteur Brancher l équipement à une prise sur un circuit différent de celui auquel le récepteur est connecté Demander de l aide au revendeur ou à un technicien de radio...

Page 21: ...teur 8 Spécifications 9 LECTURE DE L IMAGE UTILISATION DU PROJECTEUR 11 LECTURE DE L IMAGE DE LA CARTE MEMOIRE 11 REGLAGE D IMAGE 15 REGLAGES DE LA TAILLE D IMAGE 17 Contenu du kit de puce Media Card Imager L emballage contient les articles suivants Vérifiez bien qu ils sont tous inclus Imager Box Carte CompactFlash CF Adaptateur de carte CF Manuel du propriétaire du kit de puce Media Card Imager ...

Page 22: ...HE DU CONNECTEUR 4 Nom des pièces de l Imager Box Imager Box BOUTON DE VERROUILLAGE BOUTON D EJECTION DE CARTE CF CROCHET DE MONTAGE BOUTON DE COMMUTATION FENTE DE CARTE CF TEMOIN s allume lors de l accès ...

Page 23: ...ans le sens indiqué par la flèche Illustration 1 1 2 Branchez la FICHE DU CONNECTEUR dans la borne DVI du projecteur tout en appuyant sur le bouton de VERROUILLAGE de l Imager Box puis relâchez le pour le verrouiller COMPUTER IN DIGITAL MCI S VIDEO R AUDIO IN L VIDEO Y Pb Cb Pr Cr CONTROL PORT USB COMPUTER IN ANALOG AUDIOIN COMPUTER R L AUDIOOUT MONO Illustration 1 Illustration 2 A BOUTON DE VERRO...

Page 24: ...se en place et retrait de la carte CF Mise en place de la carte CF Illustration 4 BOUTON D EJECTION DE CARTE CF TEMOIN 1 2 Mettez la carte CF dans la fente de carte CF de l Imager Box jusqu à ce que le BOUTON D EJECTION sorte N insérez pas la carte dans la mauvaise direction Vous risqueriez d endommager l équipement Retrait de la carte CF Appuyez sur le BOUTON D EJECTION DE CARTE CF La carte CF es...

Page 25: ...isées dans une carte CF risquent d être endommagées ou perdues si la carte CF est abîmée ou effacée par mégarde Il est conseillé de réaliser une copie de secours des données importantes sur un support séparé tel qu une disquette un disque dur ou un disque MO etc Nous dégageons toute responsabilité en cas de dommages ou de perte de profits suite à une perte de données causée par une utilisation inc...

Page 26: ...ondensation gouttelettes d eau pourra s y former et entraîner des anomalies de fonctionnement Evitez ce problème en plaçant la carte CF dans un sac en plastique et en la laisser s adapter lentement aux changements de température avant de la retirer du sac Si de la condensation se forme placer la carte à une température constante et laisser les gouttelettes de condensation s évaporer naturellement ...

Page 27: ...antes peuvent aussi être utilisées Microdrive 1 Go ou moins Nous n offrons aucune garantie pour les cartes mémoires autres que celles mentionnées ci dessus Certaines cartes mémoires rsiquent de ne pas fonctionner correctement Spécifications Imager Box Adaptateur de carte CompactFlash norme ATA type II REMARQUE Cet adaptateur ne peut pas être utilisé avec d autres cartes mémoire Les spécifications ...

Page 28: ...10 ...

Page 29: ...EE Utilisé pour sélectionner le niveau des images entre Standard Naturel ou Image 1 à 4 Reportez vous à la page 15 MENU DE SELECTION D IMAGE Utilisé pour régler la taille de l image à Normal ou Vrai ou pour élargir compresser l image Zoom digital Reportez vous à la page 17 MENU D ECRAN Utilisé pour changer les réglages du projecteur et remettre le Compteur de remplacement de la lampe à zéro Report...

Page 30: ...sélectionnez la source d entrée correcte par OPERATION PAR MENU Touche INPUT Ordinateur Vidéo Menu sélectionner la source Placez un pointeur sur MCI puis appuyez sur le bouton de SELECTION SELECTION DE LA SOURCE D ENTREE OPERATION DIRECTE OPERATION PAR MENU INDEX ET PAGE Les données d images éditées par le Media Card Imager logiciel sont en format Index composé de plusieurs Pages Pour projeter l i...

Page 31: ...TE de la télécommande pour faire disparaître l affichage du tableau 1 Appuyez sur les touches de POINTAGE GAUCHE DROITE HAUT BAS pour placer un pointeur sur la Page à projeter puis appuyez sur le bouton de SELECTION Appuyez sur la touche de POINTAGE HAUT BAS pour passer à la page précédente suivante 2 Touche de POINTAGE HAUT Retourne à la page précédente Touche de POINTAGE BAS Passe à la page suiv...

Page 32: ...ciel est aussi suspendu lorsque le réglage est mis sur Off Off Ne retirez pas la carte mémoire de l Imager Box pendant que la fonction de Fonctionnement Auto est utilisée ou que le témoin de l Imager Box s allume ou clignote Ceci risquerait d endommager la carte mémoire ou les données de la carte mémoire Avant de retirer une carte mémoire de l Imager Box veillez à mettre la fonction de Fonctionnem...

Page 33: ... MENU DE SELECTION D IMAGE Niveau d image normal préréglé sur ce projecteur Standard Niveau d image avec demi teintes améliorées pour les graphiques Naturel Réglage de l image utilisateur préréglée dans le menu REGLAGE D IMAGE page 16 Image 1 4 Icône du menu SELECTION D IMAGE SELECTION DU NIVEAU DE L IMAGE OPERATION DIRECTE Sélectionnez le niveau de l image entre Standard Naturel Image 1 Image 2 I...

Page 34: ...e POINTAGE DROITE pour augmenter le contraste De 0 à 63 Contraste Appuyez sur la touche de POINTAGE GAUCHE pour rendre l image plus sombre et sur la touche de POINTAGE DROITE pour la rendre plus claire De 0 à 63 Luminosité Appuyez sur la touche de POINTAGE GAUCHE pour obtenir un ton plus clair pour chaque couleur et sur la touche de POINTAGE DROITE pour obtenir un ton plus foncé De 0 à 63 Bal Des ...

Page 35: ...t plus grande que la taille de l écran ce projecteur entre automatiquement dans le mode Zoom numérique Vrai Lorsque le zoom digital est sélectionné le MENU A L ECRAN disparaît et le message D Zoom apparaît Appuyez sur le bouton de SELECTION pour agrandir la taille de l image Et appuyez sur la les touche s de POINTAGE HAUT BAS GAUCHE DROITE pour obtenir une image en panning La fonction de panning e...

Page 36: ...18 ...

Page 37: ...fácilmente sólo conectando la Imager Box a un proyector sin ninguna conexión a su computadora Este kit sólo puede ser usado en nuestros proyectores equipados con un terminal para el Imager Box Este manual explica la instalación del Imager Box y su funcionamiento Los datos reproducidos a través del Imager Box son editados con el software Media Card Imager incluido con el kit Para el uso del softwar...

Page 38: ...do y encendiendo el equipo se recomienda al usuario corregir la interferencia mediante una o más de las siguientes medidas Reorientar o reubicar la antena receptora Aumentar la separación entre el equipo y el receptor Conectar el equipo a un tomacorriente en un circuito diferente del que se encuentra conectado el receptor Consultar por ayuda en un lugar de venta o un técnico especializado en radio...

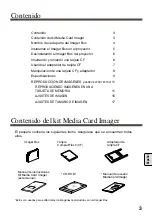
Page 39: ...ficaciones 9 REPRODUCCIÓN DE IMÁGENES USANDO EL PROYECTOR 11 REPRODUCIENDO IMÁGENES EN UNA TARJETA DE MEMORIA 11 AJUSTES DE IMAGEN 15 AJUSTES DE TAMAÑO DE IMAGEN 17 Contenido del kit Media Card Imager El paquete contiene los siguientes items Asegúrese que se encuentran todos ellos Imager Box Tarjeta CompactFlash CF Adaptador de tarjeta CF Manual de instrucciones Kit Media Card Imager este manual C...

Page 40: ...4 Nombre de cada parte del Imager Box Imager Box SEGURO BOTÓN DE EXPULSIÓN DE LA TARJETA CF GANCHO DE MONTAJE INTERRUPTOR CONECTOR RANURA DE TARJETA CF INDICADOR se enciende al acceder a los datos ...

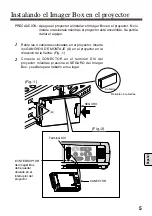
Page 41: ...TAJE A en el proyector en la dirección de la flecha Fig 1 1 2 Conecte el CONECTOR en el terminal DVI del proyector mientras presiona el SEGURO del Imager Box y suéltelo para trabarlo en su lugar COMPUTER IN DIGITAL MCI S VIDEO R AUDIO IN L VIDEO Y Pb Cb Pr Cr CONTROL PORT USB COMPUTER IN ANALOG AUDIOIN COMPUTER R L AUDIOOUT MONO Fig 1 Fig 2 A SEGURO El INTERRUPTOR del Imager Box debe quedar ubicad...

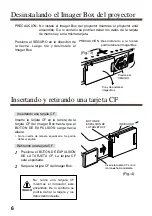
Page 42: ...ta CF Insertando una tarjeta CF Fig 4 BOTÓN DE EXPULSIÓN DE LA TARJETA CF INDICADOR 1 2 Inserte la tarjeta CF en la ranura de la tarjeta CF del Imager Box hasta que el BOTÓN DE EXPULSIÓN salga hacia afuera No la inserte de manera equivocada Se podría dañar el equipo Retirando una tarjeta CF Presione el BOTÓN DE EXPULSIÓN DE LA TARJETA CF La tarjeta CF será expulsada Saque la tarjeta CF del Imager ...

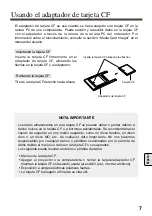
Page 43: ... flechas NOTA IMPORTANTE Los datos almacenados en una tarjeta CF se pueden dañar o perder debido a daños físicos en la tarjeta CF o a borrones accidentales Se recomienda hacer copias de respaldo en otro medio separado como un disco flexible un disco duro o un disco MO etc de cualquier dato importante No nos hacemos responsables por cualquier daños o pérdidas ocasionadas por la pérdida de datos deb...

Page 44: ... cual podría ocasionar malfuncionamientos Evite este problema colocando la tarjeta CF dentro de una bolsa de plástico y dejando que se ajuste lentamente a los cambios de temperatura antes de retirarla de la bolsa Si occuriera condensación mantenga la tarjeta CF a una temperatura constante y deje que la humedad se evapore naturalmente Almacene las tarjetas adaptadores CF en estuches protectores No ...

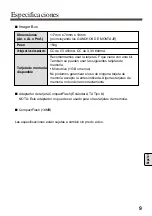
Page 45: ...ones An x Al x Prof Peso Voltaje de funcionamiento Tarjeta de memoria disponible 117mm x 70mm x 19mm no incluyendo los GANCHOS DE MONTAJE 150g CC de 5V 450mA CC de 3 3V 600mA Recomendamos usar la tarjeta CF que viene con este kit También se pueden usar las siguientes tarjetas de memoria Microdrive 1GB o menos No podemos garantizar el uso de ninguna tarjeta de memoria excepto la antes indicada Algu...

Page 46: ...10 ...

Page 47: ...el nivel de la imagen entre Standard Real o Imagen 1 4 Consulte la página 15 MENÚ DE SELECCIÓN DE IMAGEN Se usa para ajustar el tamaño de la imagen a Normal o Real o expandir comprimir la imagen zoom digital Consulte la página 17 MENÚ DE PANTALLA Se usa para cambiar los ajustes del proyector y reponer el contador de cambio de lámpara Consulte el manual del usuario en su proyector MENÚ DE AJUSTE Se...

Page 48: ...ter Video Menú de selección de fuente Mueva el puntero a MCI y presione el botón de selección SELECT SELECCIÓN DE LA FUENTE DE ENTRADA FUNCIONAMIENTO DIRECTO FUNCIONAMIENTO DEL MENÚ ÍNDICE Y PÁGINA Los datos de imágenes editados con el Media Card Imager software tiene el formato de índice consistente de varias páginas Para proyectar la imagen deseada seleccione Índice y luego seleccione Página en ...

Page 49: ... la exhibición del cuadro 1 Presione los botones de apuntar hacia izquierda derecha arriba abajo para mover el puntero a la página a ser proyectada y luego presione el botón de selección SELECT Presione el botón de apuntar hacia arriba abajo para dar vuelta a la página anterior siguiente 2 Botón de apuntar hacia arriba vuelve a la página anterior Botón de apuntar hacia abajo va a la página siguien...

Page 50: ... proyectada cambia automáticamente a la siguiente con el intervalo especificado Esta función de reproducción automática puede ser pausada presionando el botón de apuntar hacia arriba y se puede continuar usando con el botón de apuntar hacia abajo Cuando el ajuste de reproducción automática ha sido ajustado previamente con el Media Card Imager software el intervalo ajustado por el Media Card Imager...

Page 51: ...ECCIÓN DE IMAGEN Nivel de imagen normal preajustado en este proyector Standard Nivel de imagen con mediotonos mejorados para gráficos Real Ajuste de imagen preajustada del usuario en el menú de AJUSTE DE IMAGEN página 16 Imagen 1 4 Ícono de menú de selección de imagen SELECCIÓN DE NIVEL DE IMAGEN FUNCIONAMIENTO DIRECTO Seleccione el nivel de imagen entre Standard Real Imagen 1 Imagen 2 Imagen 3 e ...

Page 52: ...l ícono de registrado Presione el botón de selección SELECT de este ícono para almacenar el ajuste Presione el botón de apuntar hacia izquierda para reducir el contraste y el botón de apuntar hacia derecha para aumentar el contraste De 0 a 63 Contraste Presione el botón de apuntar hacia izquierda para oscurecer la imagen y el botón de apuntar hacia derecha para dar brillo a la imagen De 0 a 63 Bri...

Page 53: ...tamaño de la pantalla este proyector cambia automáticamente al modo de Zoom digital Real Cuando se selecciona el Zoom digital el menú en la pantalla desaparece y se exhibe el mensaje D Zoom Presione el botón de selección SELECT para expandir el tamaño de la imagen Y presione el los botón es de apuntar hacia arriba abajo izquierda derecha para panear la imagen La función de paneo puede funcionar só...

Page 54: ...18 ...

Page 55: ...r angebracht wird Dazu ist ein Anschluss eines Computers nicht notwendig Dieses Kit kann nur für Projektoren verwendet werden die mit einer Buchse für die Imager Box ausgerüstet sind In dieser Bedienungsanleitung wird die Installation und die Bedienung der Imager Box erklärt Die über die Imager Box wiedergegebenen Daten können mit der Software Media Card Imager die mit diesem Kit mitgeliefert wird...

Page 56: ...auf eine der folgenden Arten zu korrigieren Ändern Sie die Ausrichtung oder den Standort der Empfangsantenne Vergrößern Sie den Abstand zwischen dem Gerät und dem Empfänger Schließen Sie das Gerät an einer Steckdose an die sich nicht im gleichen Schaltkreis befindet wie die Steckdose an welcher der Empfänger angeschlossen ist Lassen Sie sich von einem Händler oder einem erfahrenen Radio Fernsehfac...

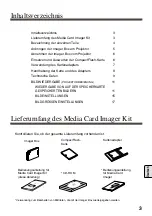
Page 57: ...dapters 8 Technische Daten 9 BILDWIEDERGABE PROJEKTORBEDIENUNG 11 WIEDERGABE VON AUF DER SPEICHERKARTE GESPEICHERTEN BILDERN 11 BILDEINSTELLUNGEN 15 BILDGRÖSSENEINSTELLUNGEN 17 Lieferumfang des Media Card Imager Kit Kontrollieren Sie ob der gesamte Lieferumfang vorhanden ist Imager Box CompactFlash Karte Kartenadapter Bedienungsanleitung für Media Card Imager Kit diese Anleitung CD ROM Bedienungsa...

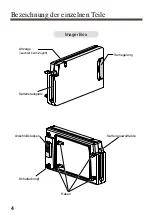
Page 58: ...4 Bezeichnung der einzelnen Teile Imager Box Verriegelung Kartenauswurftaste Haken Schalterknopf Anschlußstecker Kartensteckplatz Anzeige leuchtet beim Zugriff ...

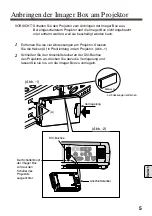
Page 59: ...n Pfeilrichtung in den Projektor Abb 1 1 2 Schließen Sie den Anschlußstecker an der DVI Buchse des Projektors an drücken Sie dazu die Verriegelung und lassen Sie sie los um die Imager Box zu verriegeln COMPUTER IN DIGITAL MCI S VIDEO R AUDIO IN L VIDEO Y Pb Cb Pr Cr CONTROL PORT USB COMPUTER IN ANALOG AUDIOIN COMPUTER R L AUDIOOUT MONO Abb 1 Abb 2 A Verriegelung Der Schalterknopf der Imager Box wi...

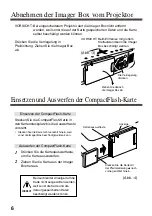
Page 60: ... Einsetzen der CompactFlash Karte Abb 4 Kartenauswurftaste Anzeige 1 2 Stecken Sie die CompactFlash Karte in den Kartensteckplatz bis die Auswurftaste vorsteht Stecken Sie die Karte nicht verkehrt hinein weil sonst die Imager Box beschädigt werden kann Auswerfen der CompactFlash Karte Drücken Sie die Kartenauswurftaste um die Karte auszuwerfen Ziehen Sie die Karte aus der Imager Box heraus Bei leu...

Page 61: ...Daten können durch physikalische Beschädigung oder durch unbeabsichtigtes Löschen der CompactFlash Karte zerstört werden Es wird deshalb empfohlen von allen wichtigen Daten eine Schutzkopie auf einem anderen Datenträger wie einer Floppydiskette einer Festplatte einer MO Diskette usw herzustellen Für irgendwelche Schäden oder Verdienstausfälle die durch eine Zerstörung von Daten wegen Fehlbedienung...

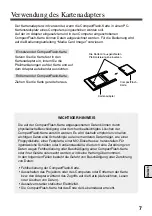
Page 62: ...CompactFlash Karte in einen Plastikbeutel bis sich der Temperaturunterschied ausgeglichen hat Falls sich Kondensat auf der Karte abgeschieden hat bewahren Sie die Karte bei konstanter Temperatur auf bis das abgeschiedene Kondensat auf natürliche Weise verdampft ist Bewahren Sie die CompactFlash Karten bzw den Adapter in der Schutzbox auf CompactFlash Karten und Adapter dürfen nicht unter den folge...

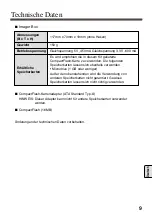
Page 63: ...cht Betriebsspannung Erhältliche Speicherkarten 117mm x 70mm x 19mm ohne Haken 150 g Gleichspannung 5 V 450 mA Gleichspannung 3 3 V 600 mA Es wird empfohlen die in diesem Kit gelieferte CompactFlash Karte zu verwenden Die folgenden Speicherkarten lassen sich ebenfalls verwenden Microdrive 1 GB oder weniger Außer den obenstehenden wird die Verwendung von anderen Speicherkarten nicht garantiert Gewi...

Page 64: ...10 ...

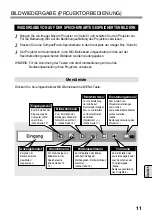
Page 65: ...ter MCI oder Video Siehe Seite 12 Eingangsmenü Zum Einstellen des Bildpegels Standard Natürlich oder Bild 1 4 Siehe Seite 15 Bildwahlmenü Für die Einstellung der Größe auf Normal oder Original bzw zum Erweitern und Komprimieren des Bildes Digitalzoom Siehe Seite 17 Bildschirmmenü Zum Ändern von Projektoreinstellungen und um den Lampenbetriebszeitzähler zurückzustellen Siehe Bedienungsanleitung des...

Page 66: ...ger bearbeiteten Bilddaten sind in Indexe aufgeteilt die wiederum aus mehreren Seiten bestehen können Wählen Sie für die Wiedergabe eines gewünschten Bildes den Index und stellen Sie die betreffende Seite ein Beim Einschieben einer Speicherkarte in die am Projektor angebrachte Imager Box wird automatisch in die MCI Betriebsart umgeschaltet Die erste Seite des letzten Indexes der Speicherkarte wird...

Page 67: ...m die Anzeige der Tabelle zu unterbrechen 1 Drücken Sie die Zeigertaste links rechts auf ab um den Zeiger auf den wiederzugebende Seite zu stellen und drücken Sie die Einstelltaste Durch Drücken der Zeigertaste auf ab können Sie auf die vorhergehende bzw die nächste Seite umblättern 2 Zeigertaste auf Wiedergabe der vorhergehenden Seite Zeigertaste ab Wiedergabe der nächsten Seite Das Seitenverzeic...

Page 68: ...llten Intervalls wiedergegeben Die Auto Wiedergabe kann mit der Zeigertaste auf unterbrochen und mit der Zeigertaste ab wieder fortgesetzt werden Falls die Auto Wiedergabe bereits im Programm Media Card Imager eingestellt wurde so hat das mit Media Card Imager eingestellte Intervall den Vorrang über die Einstellung dieses Menüs Ein Um die Auto Wiedergabefunktion auszuschalten stellen Sie den Zeige...

Page 69: ...ellender Pegel Bildwahlmenü Normale Bildeinstellung Standard Bildeinstellung mit verbesserter Halbtonwiedergabe für Abbildungen Natürlich Anwenderspezifische Bildeinstellung im Bildeinstellmenü Seite 16 Bild 1 4 Bildwahlmenüsymbol Bildpegel Direkte Einstellung Wählen Sie einen Bildpegel Standard Natürlich Bild 1 Bild 2 Bild 3 und Bild 4 durch Drücken der IMAGE Taste auf der Projektoroberseite oder...

Page 70: ...telltaste bei diesem Symbol zum Abspeichern der Einstellungen drücken Drücken Sie die Zeigertaste links zum Vermindern und die Zeigertaste rechts zum Erhöhen des Kontrasts Einstellbereich 0 bis 63 Kontrast Drücken Sie die Zeigertaste links zum Vermindern und die Zeigertaste rechts zum Erhöhen der Helligkeit Einstellbereich 0 bis 63 Helligkeit Mit der Zeigertaste links können Sie den Farbton der ei...

Page 71: ...ie Digitalzoombetriebsart umgeschaltet Original Bei der Einstellung von Digitales Zoom verschwindet das Bildschirmmenü und auf dem Bildschirm wird D Zoom eingeblendet Drücken Sie die Einstelltaste zum Erweitern der Bildgröße Zum Schwenken können Sie die Zeigertaste n auf ab links rechts verwenden Das Schwenken ist nur möglich wenn das Bild größer als der Bildschirm ist Ein projiziertes Bild kann a...

Page 72: ...18 ...

Page 73: ...semplicemente montando Imager Box su un proiettore senza nessun collegamento con un computer Questo kit può essere utilizzato solo con i nostri proiettori dotati di un terminale per Imager Box Questo manuale illustra l installazione di Imager Box e il suo funzionamento I dati riprodotti tramite Imager Box vengono modificati con il software Media Card Imager incluso nel kit Per il funzionamento del...

Page 74: ...nte è incoraggiato a tentare di rimediare al problema delle interferenze con una o più delle contromisure seguenti Riorientare l antenna o installarla in un altro posto Aumentare la distanza tra apparecchio e ricevitore Collegare l apparecchio a una presa della rete elettrica diversa da quella a cui è collegato il ricevitore Rivolgersi al rivenditore o a un tecnico radio TV esperto per i consigli ...

Page 75: ...IONAMENTO DEL PROIETTORE 11 RIPRODUZIONE DELLE IMMAGINI CONTENUTE NELLA SCHEDA DI MEMORIA 11 REGOLAZIONE DELL IMMAGINE 15 REGOLAZIONI DELLA FOTOGRAFIA DELL IMMAGINE 17 Contenuto del kit Media Card Imager La confezione contiene gli elementi seguenti Accertarsi che siano tutti inclusi Imager Box Scheda CompactFlash CF Adattatore per schede CF Manuale del proprietario del kit Media Card Imager questo...

Page 76: ...ONNETTORE 4 Nome delle varie parti di Imager Box Imager Box TASTO DI BLOCCO TASTO DI ESPULSIONE DELLA SCHEDA CF GANCIO DI MONTAGGIO TASTO DEL COMMUTATORE SLOT PER SCHEDE CF INDICATORE si accende durante l accesso ...

Page 77: ... proiettore verso la direzione della freccia Fig 1 1 2 Inserire la spina del connettore nel terminale DVI del proiettore mentre si preme il tasto di blocco di Imager Box e rilasciarlo per bloccarlo COMPUTER IN DIGITAL MCI S VIDEO R AUDIO IN L VIDEO Y Pb Cb Pr Cr CONTROL PORT USB COMPUTER IN ANALOG AUDIOIN COMPUTER R L AUDIOOUT MONO Fig 1 Fig 2 A TASTO DI BLOCCO Il tasto del commutatore di Imager B...

Page 78: ...a CF Caricare la scheda CF Fig 4 TASTO DI ESPULSIONE DELLA SCHEDA CF INDICATORE 1 2 Inserire la scheda CF nello slot per le schede CF di Imager Box fino a quando fuoriesce il tasto di espulsione Non inserirla nel senso sbagliato Altrimenti si potrebbe danneggiare l apparecchio Rimozione della scheda CF Premere il tasto di espulsione della scheda CF La scheda CF viene rilasciata Turare fuori la sch...

Page 79: ...potrebbero alterarsi o perdersi a seguito di danneggiamenti fisici della scheda CF o per cancellazione accidentale Si raccomanda di eseguire una copia di backup di tutti i dati importanti su un supporto separato quale un floppy disk un hard disk o un MO disk ecc Noi non ci riteniamo responsabili per danni o perdite di profitto dovuti alla cancellazione di dati causata da operazioni errate o danneg...

Page 80: ...potrebbe formare della condensa goccioline d acqua su di essa che potrebbe essere causa di malfunzionamenti Ovviare a questo problema inserendo la scheda CF in un sacchetto di plastica e lasciando che si adatti lentamente alla variazione di temperatura prima di rimuoverla dal sacchetto Se si forma la condensa mantenere la scheda CF a una temperatura costante e lasciare che l umidità evapori in mod...

Page 81: ...sioni L x A x P Peso Voltaggio operativo Schede di memoria disponibili 117 mm x 70 mm x 19 mm esclusi i ganci di montaggio 150 g 5 V in c c 450 mA 3 3 V in c c 600 mA Si raccomanda di usare la scheda CF in dotazione con il kit È anche possibile usare le seguenti schede di memoria Microdrive 1 GB o inferiore Non si garantisce l uso di altre schede di memoria tranne quelle citate sopra Alcune schede...

Page 82: ...10 ...

Page 83: ...llo di immagine tra Predefinito Reale o Immagine 1 4 Vedere a pagina 15 MENU SELEZIONE DI IMMAGINE Utilizzato per impostare le dimensioni dell immagine su Normale o Vero o per espandere comprimere l immagine zoom digitale Vedere a pagina 17 MENU SCHERMO Serve per cambiare le regolazioni del proiettore e azzerare il contatore di sostituzione della lampada Consultare il manuale d uso del proiettore ...

Page 84: ...a corretta sorgente di ingresso con USO DEL MENU Tasto INPUT Computer Video Menu selezione sorgente Spostare il puntatore su MCI e poi premere il tasto SELEZIONE SELEZIONE DELLA SORGENTE DI INGRESSO OPERAZIONE DIRETTA USO DEL MENU INDICE E PAGINA I dati delle immagini modificate con Media Card Imager software sono in un formato indice consistente di diverse pagine Per proiettare le immagini deside...

Page 85: ...o il tasto SELEZIONE quando la pagina viene visualizzata tutta sullo schermo 3 Spostare l icona a forma di cornice rossa sull icona della pagina e premere il tasto SELEZIONE MENU VISUALIZZA Icona del menu VISUALIZZA 1 Se si preme il tasto CLICK DESTRO durane la visualizzazione della tabella ogni Indice Pagina viene visualizzato sotto forma di icona Questa operazione riduce il tempo di visualizzazi...

Page 86: ...immagini vengono proiettate in successione automatica con un intervallo fra una e l altra È possibile mettere in pausa la funzione di Riproduzione automatica premendo il tasto PUNTATORE ALTO e premendo poi il tasto PUNTATORE BASSO per riprendere la riproduzione Quando si è impostata la Riproduzione automatica in precedenza con Media Card Imager software l intervallo impostato da Media Card Imager ...

Page 87: ...ne normale preselezionato su questo proiettore Predefinito Livello d immagine con aumento delle tonalità intermedie per i grafici Reale Regolazione dell immagine reimpostata dall utente nel menu REGOLAZIONE DI IMMAGINE pagina 16 Immagine 1 4 Icona del menu SELEZIONE DI IMMAGINE SELEZIONE DEL LIVELLO DELL IMMAGINE OPERAZIONE DIRETTA Selezionare il livello dell immagine tra Predefinito Reale Immagin...

Page 88: ...rasto e il tasto PUNTATORE DESTRA per aumentare il contrasto Da 0 a 63 Contrasto Premere il tasto PUNTATORE SINISTRA per scurire l immagine e il tasto PUNTATORE DESTRA per schiarirla Da 0 a 63 Luminosità Premere il tasto PUNTATORE SINISTRA per alleggerire la tonalità dei colori e il tasto PUNTATORE DESTRA per appesantirla Da 0 a 63 Bilanciamento del bianco Rosso Verde Blu Premere il tasto PUNTATOR...

Page 89: ...e il formato originale dell immagine è maggiore del formato dello schermo il proiettore entra automaticamente in modalità di Zoom digitale Vero Quando si seleziona Zoom digitale menu su schermo scompare e viene visualizzato il messaggio D Zoom Premere il tasto SELEZIONE per ingrandire il formato dell immagine E premere i tasti PUNTATORE ALTO BASSO SINISTRA DESTRA per vedere tutta l immagine La fun...

Page 90: ...18 ...

Page 91: ...キットをプロジ ェクターへ装着することによりこれらの画 像をコンピュータを使わずプロジェクター の操作でスクリーンに映すことができま す このキットはイメージャーボックス接続端 子を持つ当社プロジェクターでのみご使用 になれます 専用の接続端子を持たない指 定外のプロジェクターではご使用になれま せん この取扱説明書はイメージャーボックスの 取り付けかたと操作方法を掲載していま す イメージャーボックスで再生する画像の編 集はキットに付属のCD ROMに収録され ているMedia Card Imagerソフトウェアで 行います 画像編集の詳しくは別冊の Media Card Imager 取扱説明書をご覧 ください イメージャーボックスの取り付けかたと 操作のしかた 日本語 ...

Page 92: ...す Microdrive は 米国IBM 社の商標です CompactFlashおよびCFは 米国SanDisk社の商標または登録商標です 説明書に記載の会社名 および製品名は各社の商標または登録商標です この装置は 情報処理装置等電波障害自主規制協議会 VCCI の基準に基づ くクラスB情報技術装置です この装置は 家庭環境で使用することを目的と していますが この装置がラジオやテレビジョン受信機に近接して使用される と 受信障害を引き起こすことがあります 取扱説明書に従って正しい取り扱いをして下さい ...

Page 93: ...16MB コンパクトフラッシュ カードアダプター メディアカードイメージャー キット取扱説明書 本書 Media Card Imager CD ROM 編集ソフト Media Card Imager 取扱説明書 目次 3 梱包物 3 本体各部のなまえ 4 イメージャーボックスの取り付けかた 5 イメージャーボックスの取り外しかた 6 コンパクトフラッシュカードの取り付け 取り外しかた 6 コンパクトフラッシュカードアダプタの使いかた 7 コンパクトフラッシュカード使用上のご注意 8 仕様 9 画像の再生のしかた プロジェクターの操作 11 メモリカードの画像を投映する 11 イメージの調整 15 適切な画像サイズに調整する 17 ...

Page 94: ...4 本体各部のなまえ インジケーター コネクタープラグ ラッチボタン コンパクトフラッシュ カードイジェクトボタン コンパクトフラッシュ カードスロット イメージャーボックス 取り付け留め具 取り付け検出 ボタン データ読み出し中 ランプが点灯します イメージャーボックス ...

Page 95: ...ロジェクター にひっかけるようにはめこみます 図1 図2 図1 1 2 ラッチボタンを矢印の方向へ押しながら イメージャーボ ックスのコネクタープラグをプロジェクターのDVI端子へ差 し込みます イメージャーボックスをプロジェクターへ押 しつけ プロジェクターへラッチがはまったところで手を 離します COMPUTER IN DIGITAL MCI S VIDEO R AUDIO IN L VIDEO Y Pb Cb Pr Cr CONTROL PORT USB COMPUTER IN ANALOG AUDIOIN COMPUTER R L AUDIOOUT MONO 取り付け検出ボタ ンをこの位置に合 わせます DVI端子 コネクタープラグ A ラッチボタン 4個の穴カバーを取 り外してください 穴カバー ...

Page 96: ...するとイジェ クトボタンが飛び出ます イジェクトボタンを押すと コンパ クトフラッシュカードが少し飛び出 します コンパクトフラッシュカードを引き 出します 1 2 インジケータ インジケータ点灯中は絶対にコンパ クトフラッシュカードを取り出さな いでください データやカードの損 傷の原因となります 注意 イメージャーボックスの取り外しかた イメージャーボックスラッチボタンを 矢印の方向にゆっくりと押し イメー ジャーボックスをプロジェクターから 取り外します 注意 取り外しは必ずプロジェクターの電源を切って行ってください 電源を入れ たままでの取り付け 取り外しは行わないでください データやカードの損 傷の原因となります 注意 無理に取り外すと破損するおそ れがあります 図3 ラッチボタンを左へ 押す ...

Page 97: ...ダプタにしっかりと差し込みます 取り外しかた 外すときは コンパクトフラッシュカー ドを持って まっすぐ引き抜きます 印の向きを合わせます ご注意 コンパクトフラッシュカードに保存されたデータは メモリカードの損傷や誤消去で破壊されたり消 去されることがあります 大切なデータは フロッピーディスク ハードディスク MOディスクなど の別のメディアにバックアップすることをおすすめします 誤った操作 コンパクトフラッシュカー ドや機器の損傷によるデータの消失によって生じる損害 逸失利益などに関し 当社では一切その責 任を負いかねますので ご了承ください 以下の場合にデータが破壊されたり消去されたりすることがあります コンパクトフラッシュカードの操作を誤って行った コンパクトフラッシュカードのアクセス中 記録中 読み出し中 消去中 にプロジェクターやコ ンピュータの電源を切ったり コンパクトフラ...

Page 98: ...にしてください 故障 の原因となることがあります コンパクトフラッシュカード コンパクトフラッシュカードアダプタを分解した り 改造したりしないでください 温度差の大きな場所へ急に移動するとコンパクトフラッシュカードに水滴が付き 結露現象 故障の原因となることがあります 結露を防ぐには 移動の前にビ ニール袋に入れて密封しておき 周囲の温度に充分ならしてから 出してお使い ください コンパクトフラッシュカード コンパクトフラッシュカードアダプタを保管する ときは 専用ケースに入れてください コンパクトフラッシュカード コンパクトフラッシュカードアダプタは 下記の 場所で使用したり 保管しないでください 強い磁気が発生する場所 ほこりや砂ぼこりのたつところ 高温多湿の場所 コンパクトフラッシュカードおよびコンパクトフラッシュカードアダプタは 以下 の環境でご使用ください 使用温度範囲 5 C...

Page 99: ...B 質量 動作電圧 幅117mm x 高さ70mm x 奥行き19mm 突起物含まず 150g DC 5V 450mA DC 3 3V 600mA 付属のコンパクトフラッシュカード 16MB のご使用をおすす めします また下記のメモリーカードについても使用可能となっ ています マイクロドライブ 1GB以下 なお 上記以外のコンパクトフラッシュでの動作は保証いたしま せん また メモリカードによって正常に動作しないものもあり ます 対応メモリカード 寸法 本書に記載されている仕様は 予告なく変更する場合があります あらかじめご了承ください ...

Page 100: ...10 ...

Page 101: ...投映します メニューバー 入力モードを選択し ます コンピュー タ ビデオ 12ページ参照 インプットメニュー 投映した画像のイメー ジモードを選択しま す 標準 リアル イメージ1 4 15ページ参照 イメージ選択メニュー 画面の大きさモードを設 定します ノーマル リアル デジタルズーム 17ページ参照 スクリーンメニュー プロジェクターの設定お よび光源ランプのカウン タをリセットします プロジェクターの使用 説明書参照 セッティングメニュー オンスクリーンメニ ューの選択中の項目 を表示します ガイドボックス MCI入力で投映する画 像データの選択 およ び自動再生の設定をし ます 13 14ページ参照 ビューメニュー 投映した画像をマニュアルで 調整します コントラスト 明るさ ホワイトバランス 赤 緑 青 ガンマ 16ページ参照 イメージ調整メニュー 音量の調節や消音の 切り換...

Page 102: ...ときは インプットメニューで切り換えます 下記参照 INPUTボタン コンピュータ ビデオ 信号形式選択メニュー ポインタを MCI に移 動し SELECTボタンを 押します MCI入力に切り換える INPUTボタンで入力を切り換える 入力切り換えメニューで入力を切り換える インデックスとページ Media Card Imager ソフトウェア で編集 作成され たデータは インデックス 画像データのフォルダとな るもの と このインデックスの中の複数ページ 画像 データ で構成されています 各インデックス内のページを投映するには まずインデ ックスを選択し その後選択したインデックス内のペー ジを選択します コンパクトフラッシュカードをプロジェクターに取り付けたイメージャーボックスに差し込むと プロジ ェクターの入力モードはMCI入力に自動的に切り換わり 最後にコンパクトフラッシュカー...

Page 103: ...イントボタン 上方向 前ページへ戻る ポイントボタン 下方向 次ページへ送る 3 ページを選択する MENUボタンを押してメニューバーを出し ポイン トボタンの左右方向でポインタを ビュー アイコ ンに合わせます 1 2 ポイントボタンの下方向でポインタをメニュー内に 下ろして ページ にポインタを合わせ SELECT ボタンで選択します 現在選択しているインデック ス中のページが一覧表示されます 一覧表示展開中にリモコンの右クリックボタンを押 すと 簡易表示 注1に切り替わります ポイントボタンで投映するページにポインタを合わ せ SELECTボタンで選択します 選択したページ が全体表示されます ポイントボタンの上下方向で 表示中のページの前 次ページへ移動します 注2 ポイントボタン 上方向 前ページへ戻る ポイントボタン 下方向 次ページへ送る ページが全体表示されている状態でSE...

Page 104: ...戻る 自動再生設定メニューを終了します 自動再生を設定します ポイントボタ ンの左右方向で自動再生の展開時間 秒 を調整し SELECTボタンで決 定します 自動再生中はポイントボタンの上方向 で一時停止 ポイントボタンの下方向 で自動再生の再開ができます Media Card Imager ソフトウェア でインデックス中の自動再生を設 定しているときは Media Card Imagerで設定した展開時間が優先 となります オン 自動再生を解除します また Media Card Imager ソフトウ ェア で設定した自動再生も停止しま す オフ 自動再生中 およびイメージャーボックスのインジケーターが点灯 点滅していると きには イメージャーボックスからメモリカードを取り出さないでください カード やデータの破損の原因となります メモリカードを取り出すときは 自動再生を オフ に設定す...

Page 105: ... 明るさ ホワイトバランス 赤 緑 青 ガンマ補正 が 工場出荷時設定の標準値になり ます 標 準 中階調の再現性が高くなります 写真等のグラフィック スを自然な階調で再現できるように設定します リアル イメージ調整メニューでマニュアル調整した画質を呼び 出します 16ページ参照 イメージ1 4 イ メ ー ジ 選 択 アイコン IMAGEボタンでイメージモードを選択する リモコンまたは操作パネルのIMAGEボタンを押すごと に イメージモードが 標準 リアル イメージ1 イメージ2 イメージ3 イメージ4 と切り換わり ます IMAGEボタン 標 準 リアル イメージ1 イメージ2 イメージ3 イメージ4 コントラスト 明るさ ホワイトバランス 赤 緑 青 ガンマ補正 が 工場出荷時設定の標準値になり ます 中階調の再現性が高くなります 写真等のグラフィック スを自然な階調で再現できるよ...

Page 106: ...0から63まで コントラスト イ メ ー ジ 調 整 アイコン ポイントボタンの左方向で画像が暗くなり ポイントボ タンの右方向で画像が明るくなります 0から63まで 明るさ ポイントボタンの左方向で色調が薄くなり ポイントボ タンの右方向で色調が濃くなります 0から63まで ホワイトバランス 赤 緑 青 ポイントボタンの左右方向で画像の白レベルから黒レベ ルまでのコントラストバランスを調整します 0から15 まで ガンマ補正 メモリー ポインタをメモリーアイコンに合わせ SELECTボ タンを押すと イメージ調整データ登録メニューが 現われます 登録するイメージモード イメージ1か ら4までのいずれか にポインタを合わせ SELECT ボタンを押して登録します 3 リセット 調整した内容を取り消し 調整前の値を表示します 戻る メニューを終了します 選択中のイメージモード ポイントボタン...

Page 107: ...効投映画面に合わせて投映します ノーマル 画像をオリジナルサイズで投映します 画像サイズがプ ロジェクターの有効投映画面よりも大きいときは 自動 的に デジタルズーム モードに入ります リアル 画像データを段階的に拡大して投映します デジタルズーム モードに入ると 画面のメニュー バーが消え 左上に 表示が現われます SELECTボタン またはD ZOOM ボタンを押すと画像 が段階的に大きくなります 画像サイズが有効投映画面よりも大きいときは ポイン トボタンの上下左右方向で画像を移動させることができ ます D Zoom デジタルズーム ス ク リ ー ン アイコン 画像データを段階的に縮小して投映します デジタルズーム ー モードに入ると 画面のメニュー バーが消え 左上に 表示が現われます SELECTボタン またはD ZOOM ボタンを押すと画像 が段階的に小さくなります D Zo...

Page 108: ...SANYO Electric Co Ltd Part No 610 294 9902 1AA6P1P2957 ICWZ printed in Japan ...

Reviews: