92
Chapter 8 Network capture functions
PC4
PC3
PC6
Capture
PC5
PC2
PC1
PJ2
PJ1
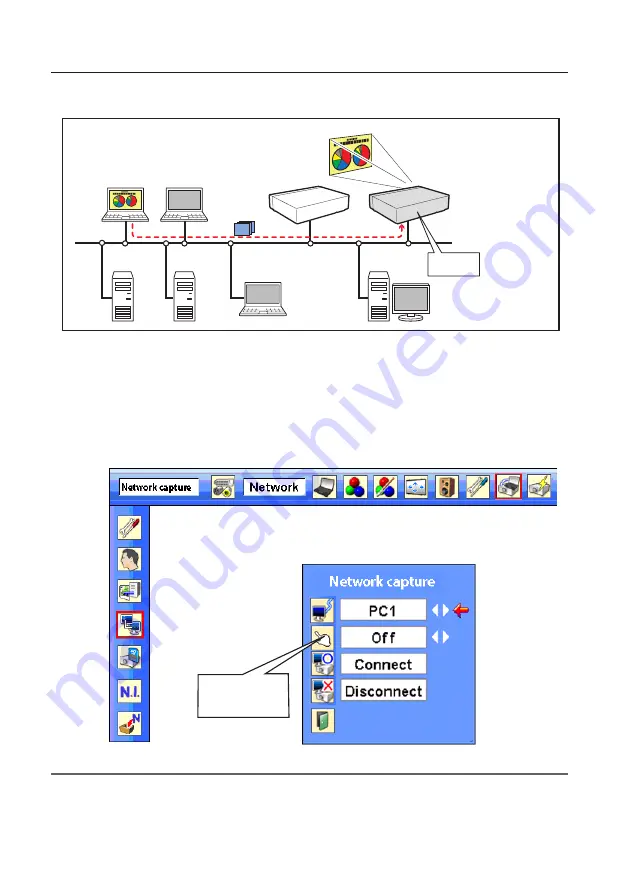
* PC provides the Network Capture.
Project a screen
image of PC1 with
PJ2.
* Star t capturing of
t h e P C 1 f ro m t h e
projector PJ2.
[3] Control by the projector
Select "Network" as input mode previously.
1
Select "Network Capture" icon from "Network" menu. Press
SELECT
button on the projector twice to
display the network capture setting pallet.
2
Select PC number to connect .
3
Select "Connect" and then press
SELECT
button to start capturing. The screen image of the selected
computer will appear on the projected screen in real time.
4
To end capturing, select "Disconnect" and then press
SELECT
button.
✐
The IP address of the connecting PC should be registered previously (
+
p.89).
✐
If the error message appears, check item "Parameter set up" (
+
p.88).
✐
The projector does not provide the function to register the IP address of the computer and to set the parameter of
the capturing. They should be registered by using the web browser previously (
+
p.89-90).
✐
The remote control which is provided with the projector does not have the mouse operating function.
Set "On" when
using the wireless
mouse function
Summary of Contents for PLC-XL51 - 2700 Lumens
Page 14: ...14 Chapter 1 About LAN functions ...
Page 32: ...32 Chapter 4 Wired LAN configurations ...
Page 62: ...62 Chapter 6 Basic setting and operation ...
Page 108: ...108 Chapter 8 Network capture functions ...
Page 126: ...126 Chapter 9 Network Viewer functions ...
Page 143: ...143 Terminology ...
Page 144: ...SO WIN KV7A NETWORK OWNER S MANUAL FOR WINDOWS SANYO Electric Co Ltd ...


