background image

45

APPENDIX

WARNING :
High voltages are used to operate this projector.  Do not attempt to open the cabinet.

Sanyo Service is easily obtained.  If after following all operating instructions, you find that service is
necessary, contact the SFS Corporation in Los Angeles, or the store where you purchased the unit.  Give the
model number and explain the difficulty.  We will advise you how to obtain service.
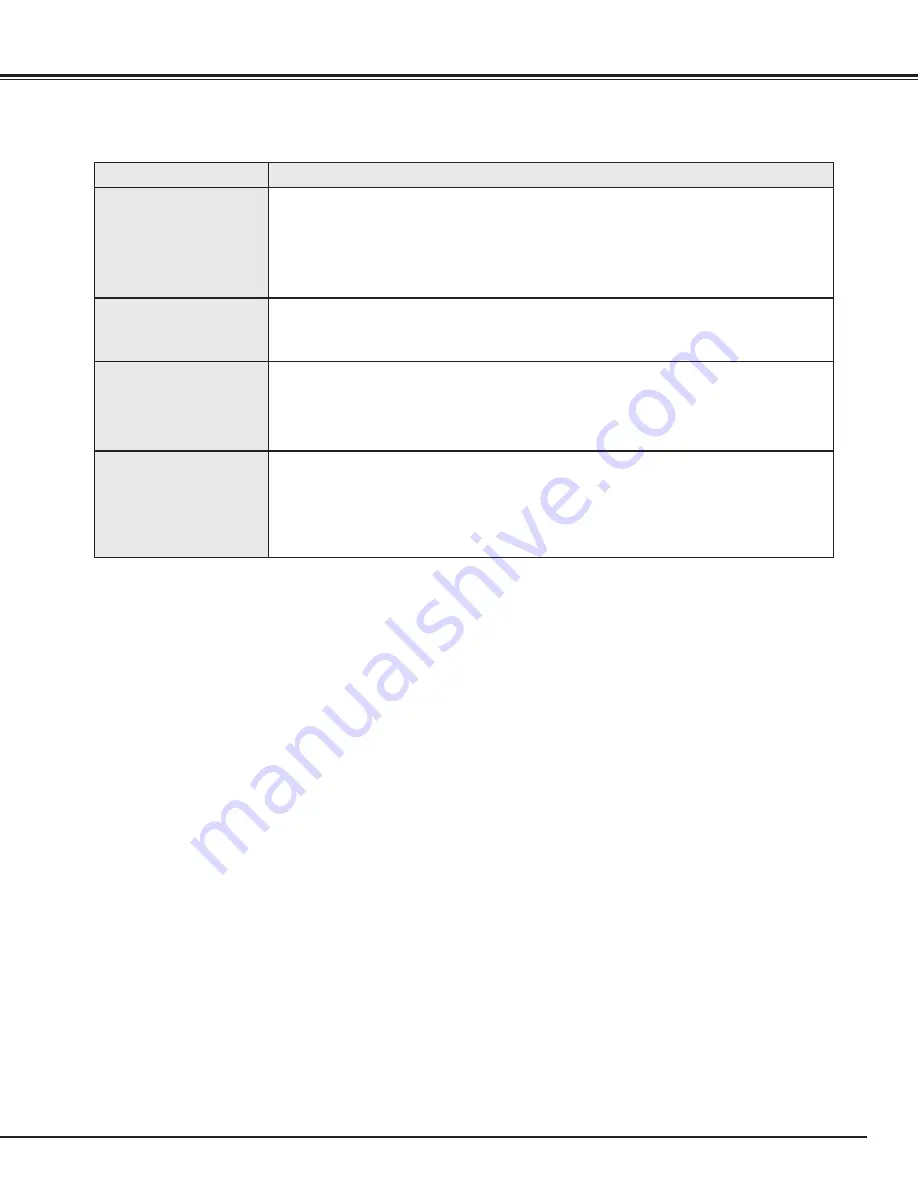
Remote Control Unit
does not work.

Check the batteries.

Check the ALL-OFF switch on the Remote Control Unit is set to “ON.”.

Make sure anything is blocking between the Remote Receiver and the Remote Control

Unit.

Make sure you are not too far from the projector when using the Remote Control Unit.

Maximum operating range is 16.4’ (5m).

Problem:

Try these Solution

Wireless Mouse
function does not
work.

Check the cable connection between the projector and the computer.

Check the mouse setting on your computer.

Turn the projector before your turn on the computer.

The image data in
memory card isn’t
displayed.

Check the memory card is inserted properly into PC CARD SLOT.

Check SmartMedia or PC Card Adapter is set properly.

Check MCI mode is selected.

Check the image data is recorded in the memory card properly.

Start the projector again.

The image data can’t
be written in, read
from the memory
card.

Check the projector is turned on.

Check “Card access” in VIEW menu is selected.

Check Control Cable for Serial Port (optional) is connected properly.

Check the memory card is inserted properly into PC CARD SLOT.

Check Media Card Imager (supplied) is installed in your computer properly.

Check the setting in Media Card Imager (like Serial Port Setting) is set properly.

Summary of Contents for PLC-SU22

Page 1: ...Owner s Manual PLC SU22N Multimedia Projector MODEL ...

Page 2: ...ails to work properly see TROUBLESHOOTING section on pages 44 45 and try the solution marked for each problem WARNING TO REDUCE THE RISK OF FIRE OR ELECTRIC SHOCK DO NOT EXPOSE THIS APPLIANCE TO RAIN OR MOISTURE This Projector has a grounding type AC line plug This is a safety feature to be sure that the plug will fit into the power outlet Do not try to defeat this safety feature This projector pr...

Page 3: ...jector yourself as opening or removing covers may expose you to dangerous voltage or other hazards Refer all servicing to qualified service personnel Unplug this projector from wall outlet and refer servicing to qualified service personnel under the following conditions a When the power cord or plug is damaged or frayed b If liquid has been spilled into the projector c If the projector has been ex...

Page 4: ...TO THE VIDEO EQUIPMENT 11 CONNECTING TO THE COMPUTER 12 OPERATION OF THE REMOTE CONTROL 14 LASER POINTER FUNCTION 14 REMOTE CONTROL BATTERIES INSTALLATION 15 TOP CONTROLS AND INDICATORS 16 OPERATING ON SCREEN MENU 17 HOW TO OPERATE THE ON SCREEN MENU 17 FLOW OF ON SCREEN MENU 17 MENU BAR 18 BASIC OPERATION 20 TURNING ON OFF THE PROJECTOR 20 ADJUSTING THE IMAGE 21 ZOOM ADJUSTMENT 21 FOCUS ADJUSTMEN...

Page 5: ...rom complicated adjustments to project picture images from Computer Accessories This projector comes with the parts listed below Check to make sure all are included If any parts are missing contact to a sales dealer Owner s Manual AC Power Cord Wireless Remote Control Unit Batteries for Remote Control Unit VGA Cable Control Cable for PS 2 Port Media Card Imager for Windows 95 CD ROM and Owner s Ma...

Page 6: ...tion should be taken Do not put a flammable object near this part Keep heat sensitive objects away from the exhaust vent Do not touch this part especially screws and metallic parts This part will become hot while the projector is used INFRARED REMOTE RECEIVER POWER CORD CONNECTOR EXHAUST VENT FRONT OF THE CABINET LAMP COVER ADJUSTABLE FEET AND FEET LOCK LATHCES PROJECTION LENS SPEAKER Monaural INF...

Page 7: ...n the room has a great influence on the picture quality It is recommended to limit ambient lighting in order to provide the best image 30 ADJUSTABLE FEET Picture tilt and projection angle can be adjusted by rotating the ADJUSTABLE FEET Projection angle can be adjusted to 10 degrees Lift the front of the projector and pull the FEET LOCK LATCHES on both sides of the projector 1 ADJUSTABLE FEET SETTI...

Page 8: ...oltage It is designed to work with single phase power systems having a grounded neutral conductor To reduce the risk of electrical shock do not plug into any other type of power system Consult your authorized dealer or service station if your are not sure of the type of power supply in use Connect the projector with the peripheral equipment before turning the projector on Refer to pages 10 13 for ...

Page 9: ...dust cover supplied to this projector CAUTION IN CARRYING OR TRANSPORTING THE PROJECTOR Do not drop or give a shock to the projector otherwise damages or malfunctions may result When carrying the projector use a carrying case recommended by Sanyo Do not transport the projector by using a courier or transport service in an unsuitable transport case This may cause damage to the projector To transpor...

Page 10: ...TERMINAL MONITOR OUTPUT TERMINAL CONTROL PORT CONNECTOR COMPUTER AUDIO INPUT JACK AUDIO INPUT JACKS VIDEO INPUT JACK S VIDEO INPUT JACK AUDIO OUTPUT JACK STEREO Connect the video output from the video equipment to this terminal Refer to P11 COMPUTER INPUT MONITOR OUTPUT TERMINAL Terminal HDB15 PIN Connect the display output terminal of the computer to COMPUTER INPUT with the VGA Cable supplied And...

Page 11: ...of the Projector Use the either of VIDEO jack or S VIDEO jack When the both jacks are connected the S VIDEO jack has priority over the VIDEO jack Video Audio Output S VIDEO Output Audio Input VIDEO CABLE S VIDEO CABLE AUDIO CABLE stereo These cables are not supplied with this projector Used cables for connection NOTE When connecting the cable the power cords of both the projector and the external ...

Page 12: ...rt Audio Output Audio Input To each terminal of your computer To the Monitor NOTE When connecting the cable the power cords of both the projector and the external equipment should be disconnected from AC outlet Turn the projector and peripheral equipment on before the computer is switched on MAC Adapter Set the slide switches following the chart on the next page Terminal ADB port Control Cable for...

Page 13: ...F OFF OFF OFF OFF OFF OFF OFF OFF OFF OFF 1 2 3 4 5 6 ON 1 DIP ON OFF 2 3 4 5 6 CONTROL PORT AUDIO OUT AUDIO IN MONITOR OUT COMPUTER IN Use one of these Control Cables corresponding with the terminal of your computer Set the switches as shown in the table below depend ing on the RESOLUTION MODE that you want to use before your turn on the projector and computer MAC ADAPTER Not supplied ...

Page 14: ...UTTON LASER BUTTON Used to operate laser pointer function The laser beam is emitted while pressing this button within 1 minute When using the laser pointer for more than 1 minute release the button and press it again This remote control emits a laser beam as the Laser Pointer from the Laser Light Window When the LASER button is pressed the laser light goes on And when the button is pressed more th...

Page 15: ...tact with the pins in the compartment REMOTE CONTROL BATTERIES INSTALLATION 1 2 3 MUTE BUTTON Used to mute sound P22 ZOOM BUTTON Used to adjust zoom P21 FOCUS BUTTON Used to adjust focus P21 NO SHOW BUTTON Used to turn the picture into black image P22 AUTO IMAGE BUTTON Use to operate AUTO IMAGE function P28 VOLUME BUTTON Used to adjust volume P22 D ZOOM BUTTON Used to turn the projector into DIGIT...

Page 16: ... indicator flashes red when internal projector temperature is too high P42 Used to turn the projector on or off P20 Used to select zoom adjust P21 MODE BUTTON SELECT BUTTON FOCUS BUTTONS NORMAL BUTTON VOLUME BUTTONS POINT BUTTONS Used to select input source among Computer Video or MCI P23 30 Used to select focus adjust P21 Used to adjust volume P22 Used to reset to normal picture adjustment preset...

Page 17: ...and adjust through ON SCREEN MENU 1 2 3 5 4 You can control and adjust this projector through ON SCREEN MENU Refer to the following pages to operate each adjustment on the ON SCREEN MENU 1 MOVING THE POINTER 2 SELECT THE ITEM Move the pointer see the NOTE below by pressing POINT button s on the TOP CONTROL or the REMOTE CONTROL Select the item by pressing SELECT button SELECT BUTTON POINT DOWN BUT...

Page 18: ...system among PAL SECAM NTSC NTSC 4 43 PAL M and PAL N Refer to P30 IMAGE MENU Used to adjust the picture image Color Tint White Balance Contrast Brightness Sharpness Refer to P31 SCREEN MENU Used to set the size of the image either Regular or Wide or to correct the Keystone distortion Refer to P30 MENU BAR IN VIDEO MODE Press MENU BUTTON while being in Video mode These icons have the same function...

Page 19: ...to P33 MENU BAR IN MCI MODE Press MENU BUTTON while being in MCI mode These icons have the same function as the Computer Mode POSITION MENU Used to adjust the position of the image Refer to P36 SCREEN MENU Used to adjust the size of the image Refer to P37 IMAGE MENU Used to adjust the computer image Fine sync Total dots White Balance Contrast Brightness Refer to P36 ...

Page 20: ... off The message disappears after 4 seconds TURNING ON OFF THE PROJECTOR When the TEMPERATURE WARNING indicator flashes red the projector is automatically turned off Wait at least 5 minutes before turning the projector on again If the TEMPERATURE WARNING indicator continues to flash follow procedures below 1 Disconnect the AC power cord from the AC outlet 2 Check the air filters for dust accumulat...

Page 21: ...e KEYSTONE button on the Remote Control Unit or select the Keystone on the SCREEN menu Refer to page 29 30 37 The message Keystone is displayed 2 Correct the Keystone distortion by pressing the KEYSTONE button or the POINT UP DOWN button s Press the KEYSTONE button or the POINT UP button to reduce the upper part or the image and press the KEYSTONE button or the POINT DOWN button to reduce the lowe...

Page 22: ...e Press the MUTE button to set the Mute function On or Off The display disappears after 4 seconds SOUND ADJUSTMENT Press the FREEZE button on the Remote Control Unit to turn the picture remained on screen This function is cancelled when the FREEZE button is pressed again or any other function button is pressed Press the NO SHOW button on the Remote Control Unit to turn the picture into black image...

Page 23: ...out any special setting Setting of the Computer System may be required when connecting some computers Note The projector may provides the messages below The projector cannot discriminate or detect the input signal from the computer Adjust and set the computer system manually Refer to page 24 There is no signal input from the computer Make sure the connection of the computer and the projector is se...

Page 24: ...her dialog box Where to reserve Menu will appear In this dialog box you can store the parameter into the area from Mode 1 to Mode 5 When memorizing the new computer parameter select the Mode with the message of Free by pressing the POINT UP DOWN buttons and the SELECT button To change the parameters of the Mode previously set select the Mode with Stored 1 2 When the Mode is selected Parameter adju...

Page 25: ...r Total dots Adjustment of the horizontal or vertical picture position When the image is not centered on the screen adjust each of those items Horizontal Vertical Adjustment of the clamp level When the image has a dark bar s try this adjustment Clamp Adjustment of the area displayed with this projector Select the resolution at the Display area dialog box or adjust the number at the column of H or ...

Page 26: ... 800 x 600 53 674 85 06 SVGA 5 800 x 600 48 08 72 19 SVGA 6 800 x 600 37 90 61 03 SVGA 7 800 x 600 34 50 55 38 SVGA 8 800 x 600 38 00 60 51 SVGA 9 800 x 600 38 60 60 31 SVGA 10 800 x 600 47 90 71 92 SVGA 11 800 x 600 32 70 51 09 ON SCREEN DISPLAY RESOLUTION H Freq kHz V Freq Hz XGA 10 1024 x 768 XGA 11 1024 x 768 XGA 12 1024 x 768 Interlace XGA 13 1024 x 768 62 04 77 07 XGA 14 1024 x 768 61 00 75 ...

Page 27: ...adjust deeper From 0 to 63 Press POINT LEFT button to adjust the image darker and press POINT RIGHT button to adjust brighter From 0 to 63 Close the PICTURE IMAGE ADJUSTMENT Menu Move the arrow to the item and press POINT RIGHT LEFT button It indicates the level of the item Recalls the data previously adjusted Reset Stores the adjusted data in the memory Stored Closes the PICTURE IMAGE ADJUSTMENT ...

Page 28: ...d page 28 to adjust Picture Position Close the PICTURE IMAGE ADJUSTMENT Menu Move the arrow to the item and then press the SELECT button Starts the adjustment on the item set to On Adjust the picture as necessary to eliminate flicker from the display This item can be adjusted manually Refer to page 27 The number of the total dots in one horizontal period This item can be adjusted manually Refer to...

Page 29: ...maximum size of the projected image in expand mode is 4 times as large as the screen size 800 x 600 Compress function To compress the image size press the D ZOOM button or the RIGHT CLICK button The size of image is reduced by degrees The minimum size of the projected image in compress mode is 640 x 480 in VGA or 800 x 600 in SVGA XGA Panning function To pan the image press the POINT UP DOWN LEFT ...

Page 30: ...adcast signal format among PAL SECAM NTSC NTSC 4 43 PAL M or PAL N PAL SECAM NTSC NTSC4 43 PAL M PAL N Move the arrow to the Mode and press the SELECT button PICTURE SCREEN ADJUSTMENT This projector has a picture screen resize function which enables you to display the image in desirable size Press the MENU button and the ON SCREEN MENU will appear Press the POINT LEFT RIGHT buttons to select SCREE...

Page 31: ...Move the arrow to the item and press POINT RIGHT LEFT button It indicates the level of the item Press POINT LEFT button to adjust the image lighter and press POINT RIGHT button to adjust deeper From 0 to 63 Press POINT LEFT button to adjust the color more purple and press POINT RIGHT button to adjust more green From 0 to 63 Press POINT LEFT button to adjust the image lighter and press POINT RIGHT ...

Page 32: ...ut NOTE Be sure to insert the memory card with the front side to the left side of the projector Do not insert the card in the reverse The card may be damaged PC CARD SLOT PC CARD SLOT Front PC with Windows 95 Media Card Imager CD ROM Digital Camera SmartMedia with PC Card Adapter supplied PC Card not supplied UNLOAD Press EJECT button and the memory card pops out NOTE Do not take the card out whil...

Page 33: ...ied with this projector Refer to SMARTMEDIA AND PC CARD ADAPTER on pages 38 and 39 for operation NOTE Some PCMCIA Adapter or PC Card is not available for this projector and cannot provide the image data In that case use our SmartMedia and PC Card Adapter Media Card Imager Media Card Imager CD ROM is attached to this projector to edit the image data for projecting Installation of Media Card Imager ...

Page 34: ... page is displayed on full screen SHOW THE DATA IN THE MEMORY CARD BASIC OPERATION This projector can project only the image data in Bit Map type or in JPEG type or the data edited by Media Card Imager supplied through the PC CARD SLOT Other data is not available and should be edited and written in a memory card with Media Card Imager before loading PC CARD SLOT The data in Bit Map type or in JPEG...

Page 35: ...ed and the data in the memory card may be damaged Connect the projector to the Personal Computer with the Control Cable for Serial Port optionally supplied refer to page 12 13 Connect the projector to your computer with the Control Cable for Serial Port optionally supplied Refer to CONNECTING COMPUTER on Page 12 13 Insert the memory card into PC CARD SLOT of the projector And then turn on the proj...

Page 36: ...ess Press the MENU button and the ON SCREEN MENU will appear Press the POINT LEFT RIGHT buttons to select IMAGE and press the SELECT button Another dialog box PICTURE IMAGE ADJUSTMENT Menu will appear Press the POINT DOWN button and a red arrow icon will appear Move the arrow to the item by pressing the POINT UP DOWN buttons To change the value press either the POINT RIGHT button or the POINT LEFT...

Page 37: ... as large as the screen size 800 x 600 Compress function To compress the image size press D ZOOM button or RIGHT CLICK button The size of image is reduced by degrees The minimum size of the projected image in compress mode is 640 x 480 in VGA or 800 x 600 in SVGA XGA Panning function To pan the image press POINT UP DOWN LEFT RIGHT buttons Panning function can work only when the image is larger tha...

Page 38: ...E To remove SmartMedia fully press in the EJECT button The card pops out then take out the card NOTE Do not pull SmartMedia by force It may damage SmartMedia or PC Card Adapter PC Card Adapter supplied SmartMedia supplied EJECT button IMPORTANT NOTE THE DATA STORED ON THE MEMORY CARD SMARTMEDIA OR PC CARD MAY BE DAMAGED OR LOST BECAUSE OF THE DAMAGE OF THE MEMORY CARD OR THE ACCIDENTAL ERASURE IT ...

Page 39: ...adapter turn off the appliances or remove SmartMedia from the PC Card Adapter during writing or reading data It may damage the data in SmartMedia Operating voltage 5 V DC Usage environment Temperature 0 55 C during use 20 65 C during storage Humidity less than 95 during use during storage This adapter can be adapted to only our SmartMedia indicated below Available SmartMedia 3 3V 5V 2MB 4MB 8MB 16...

Page 40: ...acement monitor timer by using this function Refer to page 43 Lamp age SELECTING LANGUAGE Press the MENU button and the ON SCREEN MENU will appear Press POINT LEFT RIGHT buttons to select LANGUAGE and press the SELECT button Another dialog box LANGUAGE Menu will appear Press the POINT DOWN button and a red arrow icon will appear Move the arrow to the language that you want to set and then press th...

Page 41: ...ersonal Computer installation of the mouse driver not supplied is required Make sure that the mouse driver is properly installed in your computer And make sure that the mouse port of the computer connected to Control Port is activated OPERATING WIRELESS MOUSE When controlling the pointer of the computer operate the Wireless Mouse with POINT button SELECT button and RIGHT CLICK button on the Wirele...

Page 42: ...ng Fans effectiveness and may result in internal heat build up and adversely affect on the life of the projector Clean the Air Filters following the steps below AIR FILTER CARE AND CLEANING Clean the Air Filters with brush or wash out the dust and particles 3 Air filters are clogged with dust particles Clean the air filters by following AIR FILTER CARE AND CLEANING below 1 2 If the TEMPERATURE WAR...

Page 43: ...ement Monitor Timer when the Lamp Assembly is replaced When the Lamp Replacement Monitor Timer is reset the LAMP REPLACEMENT indicator stops lighting Turn the projector on and press the MENU button and the ON SCREEN MENU will appear Press the POINT LEFT RIGHT buttons to select SETTING and press the SELECT button refer to the page 40 Another dialog box SETTING MENU will appear 1 Press the POINT DOW...

Page 44: ...EADY indicator will light green again and the projector may be turned on by pressing the power ON OFF button Check the TEMPERATURE WARNING indicator If the indicator flashes red the projector cannot be turned on See TURNING ON OFF THE PROJECTOR section on page 20 Check the Projection Lamp Refer to the page 43 Image is out of focus Adjust the focus Make sure the projection screen is at least 4 6 1 ...

Page 45: ...5m Problem Try these Solution Wireless Mouse function does not work Check the cable connection between the projector and the computer Check the mouse setting on your computer Turn the projector before your turn on the computer The image data in memory card isn t displayed Check the memory card is inserted properly into PC CARD SLOT Check SmartMedia or PC Card Adapter is set properly Check MCI mode...

Page 46: ...r Voltage Power Consumption Operating Temperature Storage Temperature Accessories LCD Panel System The specifications are subject to change without notice F 1 7 2 0 lens with f 33 2mm 43 1mm Motor zoom and focus 4 6 35 4 1 4 m 10 8 m 150 W RCA Type x 1 Video Audio R and L and DIN 4 pin S Video x 1 Projection Lens Throw Distance Projection Lamp AV Input Jacks VGA HDB 15 Terminal x 1 Computer Input ...

Page 47: ... below are optionally supplied When ordering those parts give the name and the Type No of it to the sales dealer Control Cable for Serial Port Type No POA MCSRL Control Cable for ADB Port Type No POA MCMAC MAC Adapter Type No POA MACAP ...

Page 48: ...ent of customer operated controls as explained in the appropriate model s instruction manual or B the repair of any product whose serial number has been altered defaced or removed This warranty shall not apply to the cabinet or cosmetic parts knobs or batteries or routine maintenance This warranty does not apply to uncrating setup installation removal of the product for repair or reinstallation of...

Reviews: