background image

22

Need help? 

www.sanyoctv.com              

1-877-864-9604

This product incorporates the following software:

1. the software developed independently by or for

Sanyo Electric Co.,Ltd.,

2. the software owned by third party and licensed to

Sanyo Electric Co.,Ltd.,

3. the software licensed under the GNU General Public

License, Version 2 (GPL v2),

4. the software licensed under the GNU LESSER General

Public License (LGPL) and/or,

5. sourced software other than the software licensed

under the GPL and/or LGPL

For the software categorized as (3) and (4), please refer
to the terms and conditions of GPL v2 and LGPL, as the
case may be at:
http://www.gnu.org/licenses/old-licenses/gpl-2.0.html
http://www.gnu.org/licenses/old-licenses/lgpl-2.1.html

In addition, the software categorized as (3) and (4) are
copyrighted by several individuals. The copyright notice
of those individuals is written in the media to be provid-
ed upon request.

The GPL/LGPL software is distributed in the hope that it
will be useful, but WITHOUT ANY WARRANTY, without
even the implied warranty of MERCHANTABILITY or
FITNESS FOR A PARTICULAR PURPOSE.

At least three (3) years from delivery of products, Sanyo
Electric Co.,Ltd. will give to any third party who contact
us at the contact information provided below, for a
charge no more than our cost of physically performing
source code distribution, a complete machine-readable
copy of the corresponding source code covered under
GPL v2/LGPL.

Contact Information: [email protected]

GNU GENERAL PUBLIC LICENSE

Version 2, June 1991

Copyright (C) 1989, 1991 Free Software Foundation, Inc., 51
Franklin Street, Fifth Floor, Boston, MA 02110-1301 USA

Everyone is permitted to copy and distribute verbatim
copies of this license document, but changing it is not
allowed.

Preamble

The licenses for most software are designed to takaway
your freedom to share and change it.  By contrast, the
GNU General Public License is intended to guarantee
your freedom to share and change free software--to
make sure the software is free for all its users. This
General Public License applies to most of the Free 

Software

Foundation's software and to any other program whose
authors commit to using it.  (Some other Free Software
Foundation software is covered by the GNU Lesser
General Public License instead.)  You can apply it to your
programs, too.

When we speak of free software, we are referring to

freedom, not price. Our General Public Licenses are
designed to make sure that you have the freedom to dis-
tribute copies of free software (and charge for this ser-
vice if you wish), that you receive source code or can get
it if you want it, that you can change the software or use
pieces of it in new free programs; and that you know you
can do these things.

To protect your rights, we need to make restrictions

that forbid anyone to deny you these rights or to ask you
to surrender the rights. These restrictions translate to
certain responsibilities for you if you distribute copies of
the software, or if you modify it.

For example, if you distribute copies of such a program,

whether free or for a fee, you must give the recipients all
the rights that you have.  You must make sure that they,
too, receive or can get the source code.  And you must
show them these terms so they know their rights.

We protect your rights with two steps: (1) copyright the

software, and (2) offer you this license which gives you
legal permission to copy, distribute and/or modify the
software.

Also, for each author's protection and ours, we want to

make certain that everyone understands that there is no
warranty for this free software.  If the software is modi-
fied by someone else and passed on, we want its recipi-
ents to know that what they have is not the original, so
that any problems introduced by others will not reflect
on the original authors' reputations.

Finally, any free program is threatened constantly by

software patents. We wish to avoid the danger that
redistributors of a free program will individually obtain
patent licenses, in effect making the program propri-
etary. To prevent this, we have made it clear that any
patent must be licensed for everyone's free use or not
licensed at all.

The precise terms and conditions for copying, distribu-

tion and modification follow.

Summary of Contents for NET@ DP47460

Page 1: ......

Page 2: ...tic charges In the U S Selection 810 21 of the National Electrical Code provides information with respect to proper grounding of the mast and supporting structure grounding of the lead in wire to an antenna discharge unit size of grounding conductors location of antenna discharge unit connection to grounding elec trodes and requirements for the grounding electrodes 16 An outside antenna system sho...

Page 3: ...es Reorient or relocate the receiving antenna Increase the separation between the equipment and receiver Connect the equipment into an outlet on a circuit different from that to which the receiver is connected Consult the dealer or an experienced radio TV technician for help CAUTION FCC Regulations state that improper modifications or unauthorized changes to this unit may void the user s authority...

Page 4: ...Settings 17 Sound 18 PC CONNECTIONS MENU OPERATION 19 PHOTO VIEWER 20 WARRANTY 21 GNU GENERAL PUBLIC LICENSE 22 PROTECTING THE SCREEN CAUTION The screen can be damaged if it is not maintained properly Do not use hard objects such as hard cloth or paper to clean the screen Do not use excessive pressure when cleaning the screen excessive pressure can cause permanent discoloration or dark spots NEVER...

Page 5: ... Place HDTV face down on a padded or cushioned flat surface to protect the screen and finish 2 Remove the four 4 screws securing the foot stand CAUTION Hold the stand firmly as you remove the last screw STAND REMOVAL ____________ POSITIONING THE HDTV Always use a firm and flat surface when positioning your HDTV Do not position the unit in a confined area Allow adequate space for proper ventilation...

Page 6: ...on is possible via VIDEO INPUT3 using the Y VIDEO jack and the L R audio jacks See Video 3 Setting on page 12 PC Input and Stereo Audio Mini MONITOR RGB D SUB AUDIO R L Stereo Mini Jack NOTE See page 19 for proper PC hookup and setup 1 2 3 4 5 6 7 8 GETTING STARTED HDTV INPUT OUTPUT REFERENCE 1 4 2 6 USB Input View pictures stored in a USB flash drive or connect to the internet with the WiFi dongl...

Page 7: ...SH DRIVE USB input jack is used to connect a USB mass storage device not included to display digital images on your HDTV or hookup a WiFi USB dongle included to connect your HDTV to the internet through your wireless network DVI HDMI DVI INPUT1 can be used to hookup a DVI device with the use of an appropriate DVI to HDMI cable or adapter VIDEO3 Audio in L R jacks need to be hooked up to the DVI de...

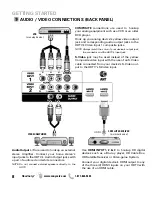
Page 8: ...sed instead of the yellow Composite video input with the use of an S Video cable connected from your device s S Video out put to the HDTV s S Video input SATELLITE RECEIVER or similar device Audio Output L R are used to hookup an external stereo Amplifier Connect your home stereo s input jacks to the HDTV s Audio Output jacks with a pair of audio red and white connectors NOTE Do not connect extern...

Page 9: ...correct AV input for the video source you wish to watch TV SET LOCATION SELECTION Select Home Mode by pressing the CH key to set the HDTV s backlight to an Energy Star qualified level or select Store Mode by pressing CH to set the backlight to a retail display level CHANNEL AND AV SIGNAL SEARCH CHANNEL AND SIGNAL SETUP SCREEN The final setup screen displays analog and digital channels found as wel...

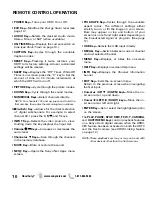
Page 10: ...NOTE These playback keys may or may not react with other devices other than the Xacti camera POWER Key Turns your HDTV On or Off ECO Key Modifies the Energy Saver level see page 13 AUDIO Key Selects the desired Audio mode Stereo Mono or SAP when available ON TIMER Key Displays the current switch on time see Clock Timer on page 14 CAPTION Key Cycles through the available Caption modes RESET Key Pre...

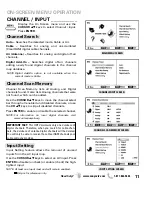
Page 11: ...RSOR keys to move the channel select bar through all enabled and disabled channels or use the CH keys to skip all disabled channels Press ENTER to enable or disable the selected channel Channel Scan Memory NOTE For information on local digital channels visit www antennaweb org IMPORTANT FACT This HDTV maintains only one database of digital channels Therefore when you search for cable chan nels the...

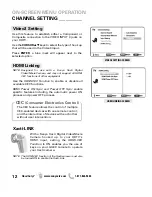
Page 12: ...r Xacti camera Xacti LINK NOTE The HDMI CEC function of the Xacti camera must also be turned ON to enable the Xacti Link NOTE Designed for use with a Sanyo Xacti Digital VIdeo Movie Camera and may not support all HDMI CEC functions of other equipment Use the HDMI CEC Function to enable or disable all available CEC functions HDMI Power ON Sync and Power OFF Sync enable specific features including t...

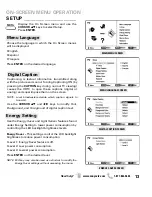
Page 13: ...Foreground of digital caption text Choose the language in which the On Screen menus will be displayed English Español Français Press ENTER on the desired language ON SCREEN MENU OPERATION Energy Setting Menu Language Use the Energy Saver and Light Sensor features found under Energy Setting to lower power comsumption by controlling the LED backlight brightness levels Energy Saver This settings cont...

Page 14: ... Converter fea ture that helps eliminate motion blur and film judder in scenes with fast action On Takes full advantage of your TV s refresh rate capabilities for the best picture quality Off Disables the Motion Sync feature Motion Sync MOTION SYNC SCREEN LIGHT SENSOR SCREEN Light Sensor Detects ambient room light brightness and uses that reading to control the panel brightness level and picture p...

Page 15: ...ng and press ENTER Use the CURSOR keys to set the rating s status as Blocked or Viewable Once ratings are set press the EXIT key to close the V Chip menu NOTE Some TV ratings offer more detailed settings such as Dialogue Language Sexual and Violence V Chip Parental Control ADVANCED V CHIP SYSTEM RRT5 RRT5 V Chip Regional Ratings 5 is an advanced V Chip ratings system for over the air digital chann...

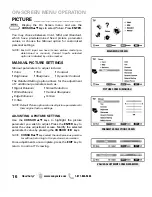
Page 16: ...l Balancer Noise Reduction White Balance Vertical Sharpness Edge Enhancer H Size V Size NOTE Default Picture option returns all picture parameters to their original factory settings MANUAL PICTURE SETTINGS NOTE CURSOR keys select the next previous parame ter without returning to the previous menu screen Display the On Screen menu and use the CURSOR keys to select Picture Press ENTER Use the CURSOR...

Page 17: ...ortion of screen is stretched less than the sides NOTE Pix5 has almost no stretching effect on a 16 9 image PIX SHAPE NOTE There are other possible aspect ratios that may be transmitted besides the most common 4 3 and 16 9 Pix6 Similar to Pix1 with no Overscan Pix7 Similar to Pix2 with no Overscan Overscan permits the image to slightly exceed bottom and top edge limitations NOTE Pix6 and Pix7 are ...

Page 18: ... can be personally adjusted Bass Treble Detailed Setting 4 Band Equalizer Personalize audio highs and lows NOTE Default Sound option returns all sound parameters to their original factory settings NOTE CURSOR keys select the next previous parame ter without returning to the previous menu screen Use the CURSOR keys to highlight the sound parameter you wish to adjust Press the ENTER key to enter the...

Page 19: ... screen display holding down the Fn or FN key while pressing the appropriate function key F5 F7 F8 etc should cycle through different display modes between the laptop and the HDTV Modes may include displaying only on the laptop screen on both the laptop and the HDTV or displaying only on the HDTV NOTE Fn key and function key symbols on the laptop s keyboard may vary from one brand to another Hold ...

Page 20: ...F from the Slide Show setup menu JPEG VIEWER USB MENU Press MENU when in Full View or Slideshow mode to display the USB On screen menu Picture Setting Adjust Color Tint Contrast Brightness Sharpness and Dynamic Contrast NOTE Picture Settings are separate configurations from the settings in TV and AV inputs View pictures on your HDTV with the use of a USB mass storage device not included Any of the...

Page 21: ...ring Corporation will replace any defective TV via exchange at the retailer To ensure proper warranty application keep the original dated sales receipt for evidence of purchase Return the defective TV to the retailer along with the receipt and the included accessories such as the remote control The defective TV will be exchanged for the same model or a replacement model of equal value if necessary...

Page 22: ...users This General Public License applies to most of the Free Software Foundation s software and to any other program whose authors commit to using it Some other Free Software Foundation software is covered by the GNU Lesser General Public License instead You can apply it to your programs too When we speak of free software we are referring to freedom not price Our General Public Licenses are desig...

Page 23: ...e use in the most ordinary way to print or display an announcement including an appropriate copyright notice and a notice that there is no warranty or else saying that you provide a warranty and that users may redistribute the program under these conditions and telling the user how to view a copy of this License Exception if the Program itself is interactive but does not normally print such an ann...

Page 24: ...ertinent obligations then as a consequence you may not distrib ute the Program at all For example if a patent license would not permit royalty free redistribution of the Program by all those who receive copies directly or indi rectly through you then the only way you could satisfy both it and this License would be to refrain entirely from distribution of the Program If any portion of this section ...

Page 25: ...pyright C year name of author This program is free software you can redistribute it and or modify it under the terms of the GNU General Public License as published by the Free Software Foundation either version 2 of the License or at your option any later version This program is distributed in the hope that it will be use ful but WITHOUT ANY WARRANTY without even the implied warranty of MERCHANTAB...

Page 26: ... caiga 13 Desconecte este aparato en caso de tormenta eléctrica o cuando no se use por un periodo de tiempo prolongado 14 Refiera todas las reparaciones a personal de servicio califi cado Se requiere de servicio cuando el aparato se ha daña do de cualquier forma como si el cordón de potencia se dañara de alguna forma se ha derramado líquido sobre el aparato o algún objeto le ha caído encima el apa...

Page 27: ... de las siguientes medidas Reorientar o mover la antena de recepción Aumentar la separación entre el equipo y el receptor Conectar el equipo a un enchufe en un circuito diferente al cual esté conectado el receptor Consultar al vendedor o a un técnico de radio y televisión con experiencia para más ayuda PRECAUCIÓN Regulaciones de la FCC advierten que modificaciones inadecuadas o cambios no autoriza...

Page 28: ...A COMENZAR Instalación de baterías al control 29 Conexión de antena aire cable 29 OPERACIÓN DEL CONTROL REMOTO 30 CONECTORES DEL PANEL TRASERO 31 CONEXIONES DE AUDIO VIDEO PANEL LATERAL 32 CONEXIONES DE AUDIO VIDEO PANEL TRASERO 33 CONEXIÓN A CORRIENTE 34 BÚSQUEDA INICIAL DE CANALES 34 OPERACIÓN DEL MENÚ EN PANTALLA Canal Entrada 35 Búsqueda de canales 35 Memoria de canales 35 Establecer entradas ...

Page 29: ...e firme y plana al colocar su HDTV No se coloque la HDTV en áreas confinadas Mantenga suficiente espacio para una buena ventilación No coloque la HDTV donde sea fácilmente accessible a niños pequeños y pueda presentar un riesgo de accidente Una persona con experiencia debe realizar el montaje en pared Para asegurar la HDTV a un kit de montaje en pared utilice los tornillos que usaría para ensam bl...

Page 30: ...ucción pueden reaccionar o no con otros aparatos aparte de la cámara Xacti Tecla POWER Prende o apaga su HDTV Tecla ECO Modifica el nivel del Ahorrador de Energía ver página 37 Tecla AUDIO Selecciona el tipo de audio Estéreo Mono o SAP de estar disponible Tecla ON TIMER Despliega la hora de encendi do automático ver Reloj Temporizador en la página 38 Tecla CAPTION Elegir entre los diferentes modos...

Page 31: ...mpuesta es posible por medio de VIDEO INPUT3 usando la entrada Y VIDEO y las de Audio L R ver Configuración de Video 3 pág 36 Entrada para PC y estéreo audio mini MONITOR RGB D SUB AUDIO R L conector estéreo mini NOTA Para conexiones y configuración de PC ver pág 43 1 2 3 4 5 6 7 8 Entrada USB Despliegue fotos en pantalla desde su memoria USB o conéctese al Internet usando el adaptador WiFi Entrad...

Page 32: ... red inalámbrica DVI HDMI INPUT1 DVI puede ser usado para conectar un aparato DVI utilizando un cable DVI a HDMI o un adaptador apropiado Las entradas de Audio de VIDEO3 también deben estar conectadas a las sali das de audio correspondientes del aparato DVI NOTA La entrada HDMI INPUT1 también puede ser usada para conectar cualquier aparato con salida HDMI sin la necesidad de usar las entradas de A...

Page 33: ... la entrada S Video de la HDTV La Salida de Audio Análogo L R se utiliza para conectar un amplificador estéreo externo Conecte las entradas de su estéreo a las salidas AUDIO OUTPUT de la HDTV con un par de cables de audio rojo y blanco NOTA No conecte bocinas externas directamente a la HDTV HDMI INPUT1 2 3 se utilizan para conectar aparatos digitales HD como reproductor Blu ray decodificador de Ca...

Page 34: ... video correcta que desee Presione la tecla CH si desea accesar una guía de ayuda en pantalla NOTA Este menú de ayuda en pantalla también es accesible desde el menú principal AYUDA EN PANTALLA OPCIONAL Presione la tecla CH para realizar una búsqueda de canales de una Antena o una conexión directa de Cable y una búsqueda de señales de dispositivos conectados a las entradas de la HDTV BÚSQUEDA DE CA...

Page 35: ...os y digitales También muestra canales Análogos que no se hallaron y pueden ser agregados Use el CURSOR para mover la barra de selección por todos los canales habilitados y deshabilitados o use la tecla CH para saltarse los deshabilitados Presione ENTER para habilitar marcar o deshabilitar desmarcar el canal seleccionado Memoria de Canales NOTA Para información sobre canales digitales locales visi...

Page 36: ...I habilitan funciones específicas como el proceso automático de encendido y apagado NOTA La función HDMI CEC de la cámara Xacti también debe ser encendida para habilitar el Xacti Link Con una cámara digital Xacti de Video Película marca Sanyo conectada a la entrada HDMI de la HDTV el confi gurar la Función HDMI CEC a Encendido habilita el uso de las teclas del control remoto GXEC para operar la cá...

Page 37: ...ergía apagado Nivel 2 Bajo consumo de energía Nivel 3 Consumo de energía aún más bajo Presione ENTER en el nivel deseado NOTA La tecla ECO también puede ser utilizada para modificar los valores sin accesar el menú Configuración de Energía Despliegue el menú en pantalla Use las teclas CURSOR para seleccionar Configuración Presione ENTER Los Subtítulos Digitales son información de texto oculta trans...

Page 38: ...cia de barrido de 120Hz Motion Sync es una función especial de Conversión de Cuadros por Segundo que ayuda a eliminar imágenes borrosas y distorsión debidos al movimiento y las escencas de acción rápida Encendido Aprovecha totalmente las capacidades de frecuencia de barrido de la TV para la mejor imagen Apagado Deshabilita la función de Motion Sync Motion Sync 120 Hz Esta función permite establece...

Page 39: ...stá diseñada para cumplir con regula ciones de la FCC para V Chip en los Estados Unidos de América Esta función pudiera no activarse con señales que originen de otros países AJUSTES A CONFIGURACIÓN V CHIP Elija Encendido y presione ENTER Elija Ajustar y pre sione ENTER NOTA Bloquear una clasificación bloqueará todas las clasifi caciones más altas Desbloquear una clasificación desbloqueará todas la...

Page 40: ...N ____________________ Parámetros de ajuste Manual Color Tinte Contraste Brillo Nitidez Contraste Dinámico La opción de Configuración Detallada permite el ajuste de 7 parámetros adicionales tales como Balanceo de señal Reducción de ruido Balance de blanco Nitidez Vertical Realce de orillas Tamaño H Tamaño V NOTA La opción de Valores originales regresa todos los parámetros a sus niveles de fábrica ...

Page 41: ... proporción lin ear dejando el centro de la pantalla menos estirado que los lados NOTA Pix5 no estira significativamente una imagen de 16 9 PIX SHAPE NOTA Hay otras relaciones de aspecto que pudieran ser transmitidas aparte de las más comunes de 4 3 y 16 9 Pix6 Similar a Pix1 sin Overscan Pix7 Similar a Pix2 sin Overscan Overscan permite que la imagen ligeramente exceda las limitaciones de las ori...

Page 42: ... el espectro de graves y agudos NOTA La opción de Valores Originales regresa todos los parámetros a su configuración original de fábrica SONIDO ____________________ OPERACIÓN DEL MENÚ EN PANTALLA NOTA Las teclas de CURSOR seleccionan al siguiente o previo parámetro sin regresar a la pantalla anterior Utilice las teclas de CURSOR para seleccionar el parámetro que desea ajustar Presione la tecla ENT...

Page 43: ...s modos de despliegue entre la laptop y la HDTV Los modos pueden incluir el desplegar la imagen sólo en la laptop tanto en la laptop como la HDTV o desplegar sólo en la HDTV NOTA Los símbolos de las teclas Fn y de función en el teclado de la laptop pueden variar entre una marca y otra Sostenga y presione Antes de conectar algún cable desenchufe de la toma AC los cables de corriente tanto de la HDT...

Page 44: ...resione MENU al estar en vista completa o en una presentación de diapositivas para desplegar el menú Ajustes de imagen Ajuste Color Tinte Contraste Brillo Nitidez y Contraste Dinámico NOTA Ajustes de imagen son configuraciones separadas a las de TV y entradas AV Despliegue fotos en su HDTV con el uso de un dispositivo de memoria USB Se pueden utilizar cualquiera de las dos entradas USB en el panel...

Page 45: ...dedor original Para asegurar la apropiada aplicación de la garantía conserve el recibo original de compra fechado como evidencia de compra Regrese la TV defectuosa al vendedor junto con su recibo de compra además de todos los accesorios incluídos como el control remoto La TV defectuosa será cambiada por una del mismo modelo o un modelo equivalente o de igual valor si es necesario El reemplazo de l...

Page 46: ...46 NOTES ANOTACIONES ...

Page 47: ...47 NOTES ANOTACIONES ...

Page 48: ......

Reviews: