background image

1

Safety instructions 

1. Instructions

Be sure to switch off the power supply before replacing or welding any components   or 
inserting/plugging in connection wire Anti static measures to be taken (throughout the entire 
production process!): 
a) Do not touch here and there by hand at will; 
b) Be sure to use anti static electric iron; 
c) It’s a must for the welder to wear anti static gloves. 
Please refer to the detailed list before replacing components that have special safety requirements. 
Do not change the specs and type at will. 

2. Points for attention in servicing of LCD 

2.1 Screens are different from one model to another and therefore not interchangeable. Be sure to 
use the screen of the original model for replacement.   
2.2 The operation voltage of LCD screen is 700-825V. Be sure to take proper measures in 
protecting yourself and the machine when testing the system in the course of normal operation or 
right after the power is switched off. Please do not touch the circuit or the metal part of the module 
that is in operation mode. Relevant operation is possible only one minute after the power is 
switched off.   
2.3 Do not use any adapter that is not identical with the TV set. Otherwise it will cause fire or 
damage to the set.   
2.4 Never operate the set or do any installation work in bad environment such as wet bathroom, 
laundry, kitchen, or nearby fire source, heating equipment and devices or exposure to sunlight etc. 
Otherwise bad effect will result.   
2.5 If any foreign substance such as water, liquid, metal slices or other matters happens to fall into 
the module, be sure to cut the power off immediately and do not move anything on the module lest it 
should cause fire or electric shock due to contact with the high voltage or short circuit. 
2.6 Should there be smoke, abnormal smell or sound from the module, please shut the power off at 
once. Likewise, if the screen is not working after the power is on or in the course of operation, the 
power must be cut off immediately and no more operation is allowed under the same condition.   
2.7 Do not pull out or plug in the connection wire when the module is in operation or just after the 
power is off because in this case relatively high voltage still remains in the capacitor of the driving 
circuit. Please wait at least one minute before the pulling out or plugging in the connection wire. 
2.8 When operating or installing LCD please don’t subject the LCD components to bending, twisting 
or extrusion, collision lest mishap should result.   
2.9 As most of the circuitry in LCD TV set is composed of CMOS integrated circuits, it’s necessary 
to pay attention to anti statics. Before servicing LCD TV make sure to take anti static measure and 
ensure full grounding for all the parts that have to be grounded.   
2.10 There are lots of connection wires between parts behind the LCD screen. When servicing or 
moving the set please take care not to touch or scratch them. Once they are damaged the screen 

Attention: 

This service manual is only for service personnel to take reference with. Before 

servicing please read the following points carefully. 

AAA

1

SAFETY INSTRUCTIONS

LCD-20XR1AU.indd   Sec1:1

LCD-20XR1AU.indd   Sec1:1

2006/07/13   11:59:16

2006/07/13   11:59:16

Summary of Contents for LCD-20XR1/AU

Page 1: ...ATIONS REFERENCE No SM0915003 Power supply AC 100 240V 50 60Hz Power Consumption 130 W Dimensions 568 W x 436 H x 172 D mm Weight 9 kg Screen 20 TV system channel coverage System VHF UHF CATV PAL B G 2 12 21 69 X Z 2 S1 S41 TV system PAL BG NTSC AV Speaker 8W 8Ωx2 LCD TV LCD 20XR1 AU ...

Page 2: ...ing The unit working principle analysis Block diagram IC block diagram Identification criteria for the bright spot and dark spot of the LCD screen Wiring diagram Troubleshooting charts Schematic diagram Exploded View Parts list Primary parts 1 3 5 7 10 11 12 16 17 18 21 27 28 CONTENTS ...

Page 3: ...2 5 If any foreign substance such as water liquid metal slices or other matters happens to fall into the module be sure to cut the power off immediately and do not move anything on the module lest it should cause fire or electric shock due to contact with the high voltage or short circuit 2 6 Should there be smoke abnormal smell or sound from the module please shut the power off at once Likewise i...

Page 4: ... residue on the screen as commonly called ghost shadow The extent of the residual picture varies with the maker of LCD screen This phenomenon doesn t represent failure This ghost shadow may remain in the picture for a period of time several minutes But when operating it please avoid displaying still picture in high brightness for a long time 3 Points for attention during installation 3 1 The front...

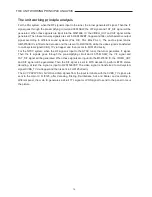
Page 5: ... board adjustment 3 3 1 IF amplifier adjustment a Turn off the J201 J202 J203 J204 J205 and J5 input 38MHz PAL SYSTEM and 45 75MHz N Write memory N300 and N400 To produce main board and power supply board Check power supply board and main adjustment All testing Connect with central signal source then check each function of TV Station missing system identification analog control etc check the outpu...

Page 6: ... 008 g Repeat e step to f step it must be measure a true value h The unit without VGA interface of 20 N system you should be rework c step enter VIDEO channel input Gray H 16 for NTSC system of VIDEO interface press 2 5 8 and 0 buttons to access factory menu perform reset ex factory set and auto color 4 Performance check a TV Interfaces Connect RF port to central signal source Enter station search...

Page 7: ...e antenna z Check if the antenna is properly connected Fringe in picture z Check if the antenna is correctly oriented z Maybe there is electric wave reflected from hilltop or building Picture is interfered by stripe shaped bright spots z Possibly due to interference from automobile train high voltage transmission line neon lamp etc z Maybe there is interference between antenna and power supply lin...

Page 8: ...re is whitish or too bright in the darkest area of the picture z Check if the setting for the brightness is too high z Possibly the brightness grade of DVD player broadcaster is set too high No picture or signal produced from the displayer if XXX in search appears z Check if the cable is disconnected z Check if it s connected to the proper terminal or if the input mode is correct There appears an ...

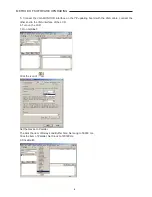
Page 9: ... Gprobe 5 0 The first Double click the GProbe5 1 0 0 15_S0006 EXE 09A to install it According to the prompt of Windows and follow the steps one by one to finish the installation The second Double click the GPorbe5 1 0 0 15Update1_S0006 EXE 10A to install it According to the prompt of Windows and follow the steps one by one to finish the installation 2 Copy the full directory of Isp_fastflash to an...

Page 10: ...ect the other end to the VGA interface of the LCD 6 Turn on the LCD 7 Run Gprobe5 Click the icon of Set the Device to Parallel The click the item of Delays and Buffer Size Set Long to 50000 ms Click the item of Parallel Set Clock to 120000 Hz 8 Click Batch 8 METHOD OF SOFTWARE UPGRADING ...

Page 11: ...ick the pull down menu to select the desired Batch file and execute it in the following screen Note Do not cut off the power or turn off the unit during the burning process or the flash may be damaged Check the following if you fail to update 1 Check whether all cables are properly connected 2 Check the settings of Gprobe 3 It is wrong if the Gprobe shows as the following icon Now just click the i...

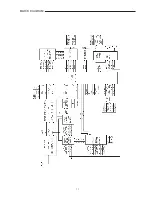
Page 12: ...25 directly For the NTSC system when the RF signal is input to the NTSC tuner the turner generates IF signal Then the IF signals goes through the pre amplifying circuit and 45 75M SAW the VIF signal and 1ST_SIF signal will be generated When these signals are input into the M52760E IC the VIDEO_OUT and SIF signal will be generated Then the SIF signal is sent to MTS decoder to perform BTSC stereo de...

Page 13: ...11 BLOCK DIAGRAM ...

Page 14: ...eo The audio signal from YPrPb YcrCb or VGA input interface is selective sent to R2S15900SP through the multi channel selector HEF4052BT while the audio signal from the AV inputs is sent to R2S15900SP directly After the processing of bass treble balance and AVL by R2S15900S all these processed audio signals will be output to audio amplifier TPA1517 for 15 inch models or AN5277 for other models to ...

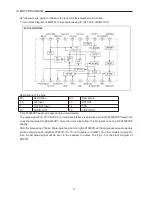
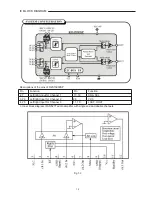
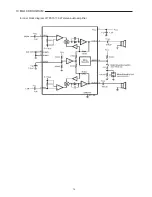
Page 15: ...nction 2 7 Left right input for Channel 1 17 18 SDA SCL 3 26 Left right input for Channel 2 28 VCC 4 25 Left right input for Channel 3 11 19 LOUT ROUT 3 Inner block diagram of AN5277 audio amplifier with single end and double channels Fig 1 3 13 IC BLOCK DIAGRAM ...

Page 16: ...14 4 Inner block diagram of TPA1517 6W stereo audio amplifier 14 IC BLOCK DIAGRAM ...

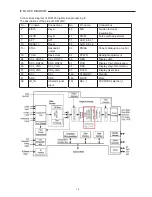
Page 17: ...RESETn Reset 52 AUD_SEL_2 15 XTAL Resonator output 63 PBIAS Panel s oblique line control 16 TCLK Basic clock 64 PPWR Backlight adjustment 24 SCL_RS232 SCL_RS232 90 DEN Display data 25 SDA_RS232 SDA_RS232 91 DVS Display V synchronization 26 SCL_VGA SCL_VGA 92 DHS Display H synchronization 27 SDA_VGA SDA_VGA 93 DCLK Display pixel clock 30 SCL SCL 148 STANDBY Standby 31 SDA SDA 149 MUTE Mute 38 IR_IN...

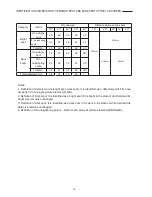
Page 18: ...t spot dark spot It is identified as a defected point if its area exceeds 1 2 of a single picture element R G B 2 Definition of bright spot It is identified as a bright spot if it is bright in the state of dark field and its bright size remains unchanged 3 Definition of dark spot It is identified as a dark spot if it is dark in the state of white field and its dark size remains unchanged 4 Definit...

Page 19: ...17 WIRING DIAGRAM Key board B Key board A Right speaker Left speaker Back light board Power board Main board Infrared board X307 ...

Page 20: ... up in red red indicator is controlled by 3 3VSTANDBY use the remote control or the unit s STANDBY to lights up the blue indicator Whether the IR board s red indicator lights up Power board s 3 3V is abnormal Whether the blue indicator lights up when press the STANDBY button Confirm the IR sensor and its powe r supply is normal Indicator damages or blue indicator 9V power is abnormal check 9V circ...

Page 21: ...ctual frequency Connect the signal cable manually adjust the frequency to conform to the actual frequency Enter into service menu check AFT value should be about 1 6V If the difference is serious the difference is larger than 0 4V open the cabinet and adjust the transformer until the value of AFT is 1 6V Increase the volume check whether every channel has no sound Check if the no sound channel fro...

Page 22: ...01 D501 breakdown Replace N501 D501 Check whether C512 has 18V Replace D502 Check whether pin1 of N501has wave Replace N502 Check whether N502 is damaged Replace N505 Check whether N505 is damaged Check whether N505 D507 is damaged Replace the damaged parts Y Y Y N Y N Y N Y N N Y 20 TROUBLESHOOTING CHARTS ...

Page 23: ...21 SCHEMATIC DIAGRAM 1 INTERFACE ...

Page 24: ...22 SCHEMATIC DIAGRAM 2 TUNER AUDIO ...

Page 25: ...23 TO INFRARED BORAD SCHEMATIC DIAGRAM 3 SCALER FLI8125 ...

Page 26: ...24 SCHEMATIC DIAGRAM 4 FLASH ...

Page 27: ...25 SCHEMATIC DIAGRAM 5 OUTPUT POWER KEY BOARD ...

Page 28: ...26 SCHEMATIC DIAGRAM 6 POWER BOARD INFRARED BOARD ...

Page 29: ...27 EXPLODED VIEW 1 2 3 4 5 6 7 8 9 10 11 12 13 14 15 16 17 18 19 20 21 22 23 ...

Page 30: ...0Y1920 Power board assy 1 10 XI3352000J00 Panel 1 11 XI3603004200 Power switch 1 12 XI30208120 Switch bracket 1 13 XI6C9273C2 Key board baffle 1 14 XI87030209120 Side AV bracket 1 15 XI667L20Y2105 Key board assy 1 16 XIP19WHH121 Back cabinet 1 17 XI102193C0 Decorative piece 1 18 XI60922120B AV baffle right 1 19 XI60924120 Back cabinet cover right 1 20 XI60921120 AV baffle left 1 21 XI60923120 Back...

Reviews: