background image

39

SETTING

On start

When this function is “On,” projector is automatically turned on just
by connecting AC Power cord to a wall outlet.

Note ; Be  sure to turn projector off properly (refer to section

“TURNING OFF PROJECTOR” on P22).  If projector is turned
off in wrong steps, On Start function does not operate
properly.

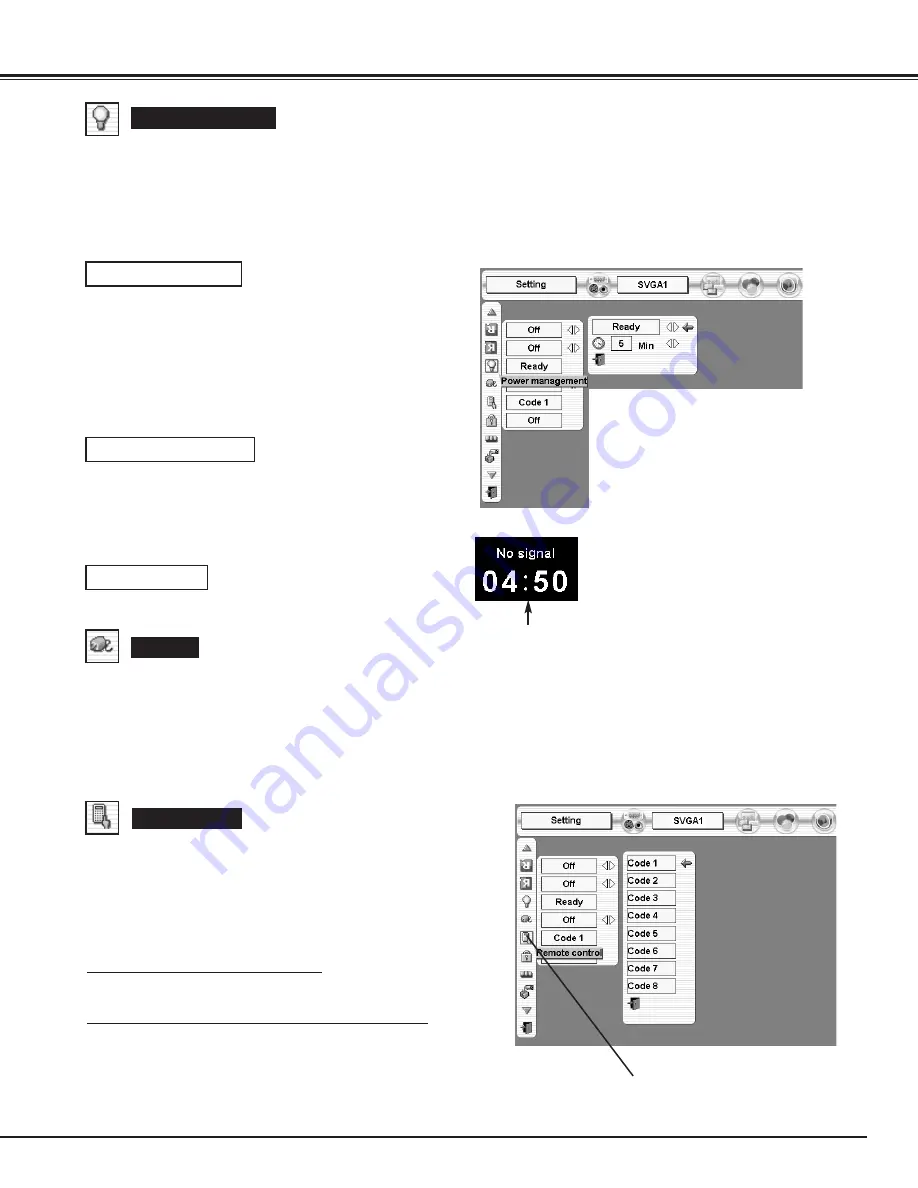
Power management

Time left until Lamp off.

Remote control

This projector has eight different remote control codes; the factory-
set normal code (Code 1) and the other seven codes (Code 2 to
Code 8).  This switching function prevents remote control operation
mixture (jam) when operating several projectors or video equipment
together.  
For example operating projector in “Code 7,”  both projector and
Remote Control Unit must be switched to “Code 7.”  

To change the code of Projector;

To change the Remote control code of the projector used in ON-
SCREEN MENU is selectable from Code 1 to Code 8.

To change the code of the Remote Control Unit;

While pressing the MENU button, press the IMAGE button number of
times corresponding to each remote control code number. (Refer to
P19.)

When pressing SELECT button at
Remote control, Remote control
code Menu appears.

This projector is equipped with a power management function. When the input signal is interrupted and any button is not
pressed for 30 seconds or more, the power management function operates in order to reduce power consumption and
conserve lamp operating time. The factory default settings for power management are "Ready" and "5 Min".

The power management function is canceled.

When a SELECT button is pressed,
the adjustment screen is displayed.

Use the POINT LEFT/RIGHT button(s)
to select the power management
function mode ("Off", "Ready" or "Shut
down").

Use the POINT DOWN button to move
the pointer to the time setting, and then
use the POINT LEFT/RIGHT button(s)
to set the time (1 minute to 30
minutes). 

If "Shut down" is selected

If "Off" is selected

If "Ready" is selected

OPERATION
1) If the input signal is interrupted and any button is not pressed for 30 seconds or more, the message "No signal" and the

timer display appears on the screen. Then the count-down starts for the time being set.

2) When the set time is elapsed, the lamp will be switched off

and lamp cooling starts. The READY indicator will be
switched off while the lamp cooling is in progress, and the
projector cannot be operated during this time.

3) When the lamp cooling is completed, the READY indicator

starts flashing to notify the operator that power
management mode is active. In this condition, the lamp
will turn on and images will be projected if a signal starts
being input or the projector is operated.

2) When the set time is elapsed, the lamp will be switched off

and lamp cooling starts. The READY indicator will be
switched off while the lamp cooling is in progress, and the
projector cannot be operated during this time.

3) When the lamp cooling is completed, the power switches

off.

Summary of Contents for HD150 - PLV - LCD Projector

Page 1: ...Owner s Manual PLV HD150 Multimedia Projector MODEL Projection lens is optional ...

Page 2: ...O REDUCE THE RISK OF FIRE OR ELECTRIC SHOCK DO NOT EXPOSE THIS APPLIANCE TO RAIN OR MOISTURE This projector produces intense light from the projection lens Do not stare directly into the lens as possible Eye damage could result Be especially careful that children do not stare directly into the beam This projector should be set in the way indicated If not it may result in a fire hazard Take appropr...

Page 3: ...cabinet slots as they may touch dangerous voltage points or short out parts that could result in a fire or electric shock Never spill liquid of any kind on the projector This projector should be operated only from the type of power source indicated on the marking label If you are not sure of the type of power supplied consult your authorized dealer or local power company Do not overload wall outle...

Page 4: ...the limits for a Class A digital device pursuant to Part 15 of FCC Rules These limits are designed to provide reasonable protection against harmful interference when the equipment is operated in a commercial environment This equipment generates uses and can radiate radio frequency energy and if not installed and used in accordance with the instruction manual may cause harmful interference to radio...

Page 5: ...OPERATION OF REMOTE CONTROL 18 REMOTE CONTROL CODE CHANGE AND OPERATING RANGE 19 REMOTE CONTROL BATTERIES INSTALLATION 19 OPERATING ON SCREEN MENU 20 HOW TO OPERATE ON SCREEN MENU 20 FLOW OF ON SCREEN MENU OPERATION 20 MENU BAR 21 DISPLAY ADJUSTMENTS 28 SCREEN ADJUSTMENTS 28 AUTO PC ADJUSTMENT 29 MANUAL DISPLAY ADJUSTMENTS 30 IMAGE ADJUSTMENTS 32 IMAGE LEVEL SELECT 32 IMAGE LEVEL ADJUSTMENTS 33 SE...

Page 6: ...uto PC Adjustment No complicated setup is necessary and projection is always precise Power Management Power Management function is provided to reduce power consumption while a projector is not in use This Power Management function operates to turn Projection Lamp off when a projector detects signal interruption and any button is not pressed Projection Lamp is automatically turned on again when a p...

Page 7: ...s operating power of Cooling Fans FRONT OF CABINET LAMP COVER ADJUSTABLE FEET This projector is equipped with cooling fans for protection from overheating Pay attention to following to ensure proper ventilation and avoid a possible risk of fire and malfunction Do not cover vent slots Keep bottom clear of any objects Obstructions may block cooling air AIR INTAKE VENTS PROJECTION LENS SPEAKERS INFRA...

Page 8: ...tral conductor To reduce risk of electrical shock do not plug into any other type of power system Consult your authorized dealer or service station if you are not sure of type of power supply being in use Connect a projector with peripheral equipment before turning a projector on Refer to pages 12 15 for connection CONNECTING AC POWER CORD To the AC Outlet 240 V AC ...

Page 9: ...LENS SHIFT ADJUSTMENT MOVED UP OR DOWN MOVED LEFT OR RIGHT Use LENS SHIFT button and POINT UP DOWN button to move image up or down Refer to page 23 Use LENS SHIFT button and POINT LEFT RIGHT button to move image left or right Refer to page 23 This projector is designed to project on a flat projection surface ROOM LIGHT Brightness in room has a great influence on picture quality It is recommended t...

Page 10: ...when moving a projector Moving it unproperly may result in damage of cabinet or person s injury Replace lens cover and retract feet to pre vent damage to lens and cabinet 1 2 3 Pull up lock buttons on each side of carrying handles and release locks CARRYING HANDLE LOCK BUTTONS Pull carrying handles out fully until it s locked with a click Move a projector by holding two handles by 2 or more people...

Page 11: ...long Guide to fit Plug into Socket 3 4 INPUT 1 INPUT 2 INPUT 3 DVI AUDIO CONTROL PORT CONTROL PORT AUDIO R Pr G Y B Pb H HV V MONO MONO R L R L MONO AUDIO OUT R L R C JACK USB SERIAL PORT IN SERIAL PORT OUT RESET INPUT 4 SDI IN1 SDI IN2 SDI OUT INPUT OUTPUT TERMINALS Screws Guide Socket Plug Figure shows DVI terminal SDI Terminal 5 BNC Terminal DVI Terminal 3 TERMINAL SLOTS Factory set NOTES ON OR...

Page 12: ...quipment to R Pr G Y and B Pb jacks or connect computer output 5 BNC Type Red Green Blue Horiz Sync and Vert Sync from computer to R Pr G Y B Pb H HV and V jacks Refer to P14 15 Connect computer output Digital Analog DVI I type to this terminal Connect digital video output from video equipment to this terminal Refer to P14 15 DVI INPUT TERMINAL INPUT OUTPUT TERMINALS AND JACKS INPUT 2 INPUT 3 INPU...

Page 13: ...trol Cable supplied Refer to page 18 R C JACK USB PORT Series B INPUT 1 INPUT 2 INPUT 3 DVI AUDIO CONTROL PORT CONTROL PORT AUDIO R Pr G Y B Pb H HV V MONO MONO R L R L MONO AUDIO OUT R L R C JACK USB SERIAL PORT IN SERIAL PORT OUT RESET INPUT 4 SDI IN1 SDI IN2 SDI OUT SERIAL PORT OUT TERMINAL SERIAL PORT IN TERMINAL This port is used to control a projector with computer Connect USB port of comput...

Page 14: ...n MAC VGA Adapter BNC Cable BNC x 5 Audio Cables RCA x 2 Audio Cable stereo NOTE When connecting cable power cords of both a projector and external equipment should be disconnected from AC outlet Turn a projector and peripheral equipment on before computer is switched on Terminals of a Projector Audio Amplifier Audio Speaker stereo External Audio Equipment Monitor Output DVI Cable BNC Cable Set sw...

Page 15: ...or NOTE When connecting cable power cords of both a projector and external equipment should be disconnected from AC outlet Turn a projector and peripheral equipment on before computer is switched on Audio Output Y Pb Cb Pr Cr R L External Audio Equipment AV AUDIO IN Pr Cr Y Pb Cb AUDIO OUT Component video output equipment such as DVD player or high definition TV source Component Video Output Audio...

Page 16: ...P25 Adjust focus P23 Adjust volume P24 Selects an item or adjusts value in the On Screen Menu P20 Executes the item selected P20 Turns the projector on or off P22 ZOOM buttons Select LENS SHIFT function P23 SELECT button POINT buttons LENS SHIFT button SIDE CONTROLS MENU button Open or close the On Screen Menu operation P20 21 INPUT 1 2 button Select input source either INPUT 1 or INPUT 2 P25 SIDE...

Page 17: ...This indicator is dim when a projector is turned on And bright when a projector is in stand by mode INDICATORS WARNING TEMP indicator This indicator flashes red when internal projector temperature is too high P41 WARNING TEMP READY LAMP REPLACE LAMP FRONT INDICATORS REAR INDICATORS This LAMP REPLACE indicator lights yellow when any of Projection Lamps is nearing its end and flashes when any of the...

Page 18: ... also used as VOLUME button P24 0 IMAGE 1 10 buttons Selects image levels IMAGE 1 IMAGE 10 P32 3 AUTO PC button Operates the Auto PC adjustment function P29 4 NO SHOW button Turns the picture into black image P23 5 MENU button Opens or closes the On Screen Menu P20 t FREEZE button Freezes the projected picture P23 y MUTE button Mutes sound P24 2 POWER ON OFF button Turns the projector on or off P2...

Page 19: ...l Unit toward projector Receiver Window whenever pressing any button Maximum operating range for Remote Control Unit is about 16 4 5m and 60 in front and rear of a projector 16 4 5 m 60 16 4 5 m 60 Code Change This projector has eight different remote control codes Code 1 Code 8 the factory set initial code Code 1 and the other seven codes Code 2 to Code 8 This switching function prevents remote c...

Page 20: ...stment on ON SCREEN MENU 2 MOVING POINTER 3 SELECT ITEM Move pointer see below or adjust value of item by pressing POINT button s on Side Control or on Remote Control Unit Select item or set selected function by pressing SELECT button OPERATING ON SCREEN MENU Pointer is a icon on ON SCREEN MENU to select item See fig ures on section FLOW OF ON SCREEN MENU OPERATION below MENU AUTO PC ADJUST IMAGE ...

Page 21: ...just sound volume Bass or Treble to select Built in SP On Off and Sound Mute Refer to P24 IMAGE ADJUST MENU Used to select image level among Standard AV Cinema Standard PC Real and Image 1 10 Refer to P32 Used to adjust image Contrast Brightness Color Tint Color Temp White Balance R G B Sharpness Detail Enhancer Gamma Noise Reduction Progressive Auto picture control Auto Lamp Control Color managem...

Page 22: ...y disappears after 30 seconds Press POWER ON OFF button again to turn off projector LAMP indicator lights bright and READY indicator turns off After approximate 90 seconds READY indicator will light green again and projector may be turned on by pressing POWER ON OFF button Cooling fans will operate for approximate 2 minutes after projec tor is turned off To power down completely turn MAIN ON OFF S...

Page 23: ...on Side Control or on the Remote Control Unit Message Lens shift is displayed 2 Press POINT UP button to move image up press POINT DOWN button to move image down press POINT LEFT to move image left and press POINT RIGHT to move image right Message disappears after 4 seconds Message disappears after 4 seconds Press FREEZE button on Remote Control Unit to freeze picture on screen To cancel FREEZE fu...

Page 24: ... LEFT RIGHT button s to cut off sound Dialog box display is changed to On and sound is cut off To restore sound to its previous level press POINT LEFT RIGHT button s again Press POINT DOWN button to move a red frame pointer to item that you want to select and then press SELECT button SOUND ADJUSTMENT DIRECT OPERATION MENU OPERATION Volume Mute Treble To adjust Treble sound press POINT RIGHT button...

Page 25: ...ECT INPUT 3 DVI TERMINAL Input 3 When your computer is connected to INPUT 3 DIGITAL terminal select RGB PC Digital RGB AV HDCP When your computer is connected to INPUT 3 ANALOG terminal select RGB Analog RGB Analog RGB PC Digital RGB Scart When video equipment is connected to INPUT 3 ANALOG terminal select RGB Scart If a HDCP compatible signal source is connected to the INPUT 3 DIGITAL terminal se...

Page 26: ...ection of computer and a projector is set correctly Refer to TROUBLESHOOTING on page 45 Auto SYSTEM SELECT Menu icon Displays system being selected SYSTEM MENU SELECT COMPUTER SYSTEM MANUALLY Press MENU button and ON SCREEN MENU will appear Press POINT LEFT RIGHT buttons to move a red frame pointer to SYSTEM SELECT Menu icon Press POINT UP DOWN button to move a red arrow pointer to system that you...

Page 27: ... Systems on this dialog box can be selected Custom Mode 1 15 set in DISPLAY ADJUST Menu P30 31 Projector automatically detects incoming Video signal and adjusts itself to optimize its performance When Video System is 1035i 1080i 50 or 1080i 60 select system manually first If projector cannot reproduce proper video image it is necessary to select a specific component video signal format among 480i ...

Page 28: ... changed to a 4 3 image even if the input signal is HDTV Aspect H Aspect V These adjust the horizontal and vertical scale and position of the screen When a SELECT button is pressed the mode changes to Scale or Position adjustment mode Use the POINT LEFT RIGHT button s to select whether you wish to adjust Scale or Position and then use the POINT UP DOWN button s to adjust the values DISPLAY ADJUST ...

Page 29: ...tore adjustment parameters Adjustment parameters from Auto PC Adjustment can be memorized in this projector Once parameters are memorized setting can be done just by selecting Mode in SYSTEM SELECT Menu P26 Refer to step 3 of MANUAL DISPLAY ADJUSTMENT section P31 NOTE Fine sync Total dots and Picture Position of some computers can not be fully adjusted with this Auto PC Adjustment function When im...

Page 30: ...nt dialog box will appear Press POINT LEFT RIGHT button to adjust value Adjusts an image as necessary to eliminate flicker from display Press POINT LEFT RIGHT button to adjust value From 0 to 31 Fine sync Adjust the number of total dots in one horizontal period Press POINT LEFT RIGHT button s and adjust number to match your PC image Total dots Adjusts horizontal picture position Press POINT LEFT R...

Page 31: ...hat you want to store and then press SELECT button Reset all adjust parameters on adjustment dialog box to previous figure Mode free To store adjustment data To clear adjustment data To clear adjustment parameters previously set move a red frame pointer to Mode free icon and then SELECT button Move a red arrow pointer to Mode that you want to clear and then press SELECT button Mode free icon Store...

Page 32: ...GE ADJUST Menu P33 36 IMAGE 1 10 IMAGE LEVEL SELECT DIRECT Select image level among Standard AV Cinema Standard PC Real and Image 1 Image 10 by pressing IMAGE button on Side Control or on Remote Control Unit Select image level Image 1 Image 10 by pressing IMAGE 1 IMAGE 10 buttons on Remote Control Unit IMAGE button Standard AV Cinema Standard PC Real Image 1 Image 10 Normal picture level preset on...

Page 33: ...press SELECT button IMAGE ADJUST Menu icon Press SELECT button at this icon to display previous items Press POINT LEFT RIGHT buttons to adjust value Press SELECT button at this icon to display next items Press POINT LEFT button to soften the image and POINT RIGHT button to sharpen the image From 0 to 15 Sharpness Press POINT LEFT button to lighten red tone and POINT RIGHT button to deeper tone Fro...

Page 34: ...ess SELECT button at this icon to display previous items DISPLAY ADJUST Color Management The Color management function can be used to adjust the level phase and gamma of the selected display colors on the screen and to replace these colors with other colors if required The projector lets you replace up to eight colors for each image 1 Press the POINT UP DOWN button to move the red frame point er t...

Page 35: ...ntrol You will need to reselect and re adjust the color in this case QUIT The COLOR MANAGEMENT menu will be exited and the display will return to the normal projection screen but any settings that have been changed will not be stored To store the changed settings be sure to select LIST using the POINT buttons and change to the next mode LIST mode LIST MODE The mode will return to COLOR SELECTION m...

Page 36: ... at this icon to store the adjustment Gamma balance The Gamma balance function can be used to adjust the R G B Gamma balance of the screen 1 Press the POINT UP DOWN button to move the red frame point er to Gamma balance and then press the SELECT button The Gamma balance adjust menu will appear 2 Use the POINT LEFT RIGHT buttons to move the adjust point R P1 R P2 R P3 G P1 G P2 G P3 B P1 B P2 B P3 ...

Page 37: ...NT LEFT RIGHT buttons to select SETTING and press SELECT button Setting dialog box appears 2 Press POINT DOWN button to move a red frame pointer to Lamp mode Set 4 lamps mode or 2 lamps mode by pressing POINT LEFT RIGHT button s When Lamp Mode is set from 4 lamps mode to 2 lamps mode image becomes little darker When Lamp Mode is set from 2 lamps mode to 4 lamps mode image become brighter gradually...

Page 38: ...reen Rear function Press SELECT button at this icon to display next items Press SELECT button at this icon to display previous items This function is used to adjust the on screen menu display position When a SELECT button is pressed the adjustment screen is displayed arrows appear Use the POINT UP DOWN LEFT RIGHT button s to adjust the position After making the adjustment press a SELECT button to ...

Page 39: ...rder to reduce power consumption and conserve lamp operating time The factory default settings for power management are Ready and 5 Min The power management function is canceled When a SELECT button is pressed the adjustment screen is displayed Use the POINT LEFT RIGHT button s to select the power management function mode Off Ready or Shut down Use the POINT DOWN button to move the pointer to the ...

Page 40: ...e MAIN ON OFF switch to OFF And then while pressing a SELECT button return the MAIN ON OFF switch to ON again This will cancel the projector s control panel lock Be sure to reset Lamp Counter when Lamp Assembly is replaced When Lamp Replace Counter is reset LAMP REPLACE indicator stops lighting Turn projector on press MENU button and ON SCREEN MENU will appear Press POINT LEFT RIGHT button s to mo...

Page 41: ... an event reposition a projector so that Ventilation Slots are not obstructed Air Filter may be clogged with dust particles Clean Air Filter by following section AIR FILTER CARE AND CLEANING on this page 1 2 If WARNING TEMP Indicator remains on after performing above checks Cooling Fans or Internal Circuits may be malfunctioning Contact the service station 3 The Warning Temp Indicator flashes red ...

Page 42: ...es unnatural replace lamp LAMP REPLACE indicator lights yellow LAMP REPLACE indicator flashes yellow Projection lamp is defective or fails to be turned on Restart a projector on and make sure lamp is on If this mark still appears replace lamp corresponding with number marked X LAMP STATUS DISPLAY Lamp Mode Changeover Lamp Management Function automatically changes combination of lighting lamp Lamp ...

Page 43: ... replaced on Lamp Status Display Figure shows case of replacing LAMP 2 LAMP 1 LAMP 2 LAMP 3 LAMP 4 CAUTION DO NOT OPERATE A PROJECTOR WHILE ANY OF LAMPS IS REMOVED IT MAY RESULT IN MALFUNCTIONS FIRE HAZARD OR OTHER ACCIDENTS NOTES ON LAMP REPLACEMENT To maintain quality of picture better balance of color and brightness in entire screen we recommend replacing all 4 lamps at a time LAMP REPLACEMENT ...

Page 44: ...nect the projector s AC plug from the AC outlet immediately Contact an authorized service station for a checkup of the unit and replacement of the lamp Additionally check carefully to ensure that there are no broken shards or pieces of glass around the projector or coming out from the cooling air circulation holes Any broken shards found should be cleaned up carefully No one should check the insid...

Page 45: ...when turning a projector back on NOTE After pressing Power ON OFF button to OFF make sure a projector works as follows 1 LAMP indicator lights bright and READY indicator turns off 2 After 90 seconds READY indicator lights green again and a projector may be turned on by pressing Power ON OFF button Check WARNING TEMP and READY indicator If both WARNING TEMP and READY indicator flashes a projector c...

Page 46: ...mber and explain difficulty We will advise you how to obtain service This symbol on the nameplate means the product is Listed by Underwriters Laboratories Inc It is designed and manufactured to meet rigid U L safety standards against risk of fire casualty and electrical hazards Remote Control Unit does not work Check batteries Make sure nothing is between Infrared Remote Receiver and Remote Contro...

Page 47: ... the projector can be turned on The WARNING TEMP indicator keeps flashing Check and clean the Air Filter The projector is being cooled down It cannot be turned on until the READY indicator lights green Projector Condition The projector is operating normally The projector is cooled down enough and the temperature returns to normal When turning on the projector the WARNING TEMP indicator stops flash...

Page 48: ... 768 1152 x 864 1280 x 720 1280 x 1024 Quit 1600 x 1200 Yes No 1 1080i 50 1035i Auto 1080i 60 575p 480p 720p 575i Mode 1 Mode 20 640 x 480 Reset SYSTEM 2 Input 3 RGB Analog RGB Scart SYSTEM 1 RGB PC Digital SYSTEM 2 SYSTEM 1 MENU TREE SDI 2 SYSTEM 3 RGB AV HDCP SYSTEM 2 480i Custom 3 System 1035i 1080i 60 480i 575i 720p 1080i 50 1080p 30 1080psf 30 Custom Screen Normal Anamorphic Full Aspect H Pos...

Page 49: ...s No Factory default Blue back On Off Display Rear Code 2 Image adjust Contrast Brightness Color Red Green Blue Sharpness Store Quit 0 63 0 63 0 63 0 63 0 63 0 63 0 15 Image 1 Image 2 Image 3 Image 4 Image 5 Tint 0 63 Gamma Noise reduction 0 15 Off L1 L2 L3 Reset Yes No Auto picture control Off L1 L2 Progressive Off On Color temp XLow Low Mid High Treble 0 63 Bass 0 63 Normal Double Menu size Quit...

Page 50: ...t BNC Type x 3 SDI Input 1 SDI Input 2 and SDI Output Input 1 Jacks BNC Type x 5 R Pr G Y B Pb H HV and V RCA Type Audio R and L and DIN 8 pin Control port Input 2 Jacks DVI I Terminal Digital Analog RCA Type Audio R and L and DIN 8 pin Control port Input 3 Jacks Specifications are subject to change without notice LCD panels are manufactured to the highest possible standards At least 99 99 of the ...

Page 51: ...1 Shield 5V Power Ground for 5V Hot Plug Detect 9 13 10 12 11 14 15 16 T M D S Data0 No Connect T M D S Data0 No Connect T M D S Data0 Shield T M D S Clock Shield T M D S Clock T M D S Clock 17 21 18 20 19 22 23 24 Analog Red Input Analog Ground R G B Analog Green Input Analog Horiz sync Analog Blue Input C1 C5 C2 C4 C3 RxD TxD Ground 1 2 3 4 5 6 7 8 9 1 2 3 4 5 6 7 8 9 Connect serial port output ...

Page 52: ...0 87 17 SXGA 4 1280 x 1024 64 20 70 40 SXGA 5 1280 x 1024 62 50 58 60 SXGA 6 1280 x 1024 63 90 60 00 SXGA 7 1280 x 1024 63 34 59 98 SXGA 8 1280 x 1024 63 74 60 01 SXGA 11 1152 x 900 71 69 67 19 SXGA 12 1152 x 900 81 13 76 107 SXGA 13 1280 x 1024 Interlace 63 98 60 02 SXGA 14 1280 x 1024 Interlace 61 20 65 20 71 40 75 60 50 00 86 00 720p Progressive 50 00 94 00 45 00 60 00 XGA 1 1024 x 768 XGA 2 10...

Page 53: ... 00 60 00 D 1035i 1920 x 1035 Interlace 33 75 30 00 When a input signal is digital from DVI terminal refer to chart below D 1080i 60 1920 x 1080 Interlace 33 75 30 00 D 1080i 50 1920 x 1080 Interlace 28 125 25 00 D WXGA1 1366 x 768 48 36 60 00 D WXGA2 1360 x 768 47 70 60 00 D WXGA3 1376 x 768 48 36 60 00 D WXGA4 1360 x 768 56 16 60 00 D UXGA 1600 x 1200 75 00 60 00 OPTIONAL PARTS The parts listed ...

Page 54: ...Printed in Japan Part No 610 324 0190 1AA6P1P4945 M4ZA SANYO Electric Co Ltd ...

Reviews: