background image

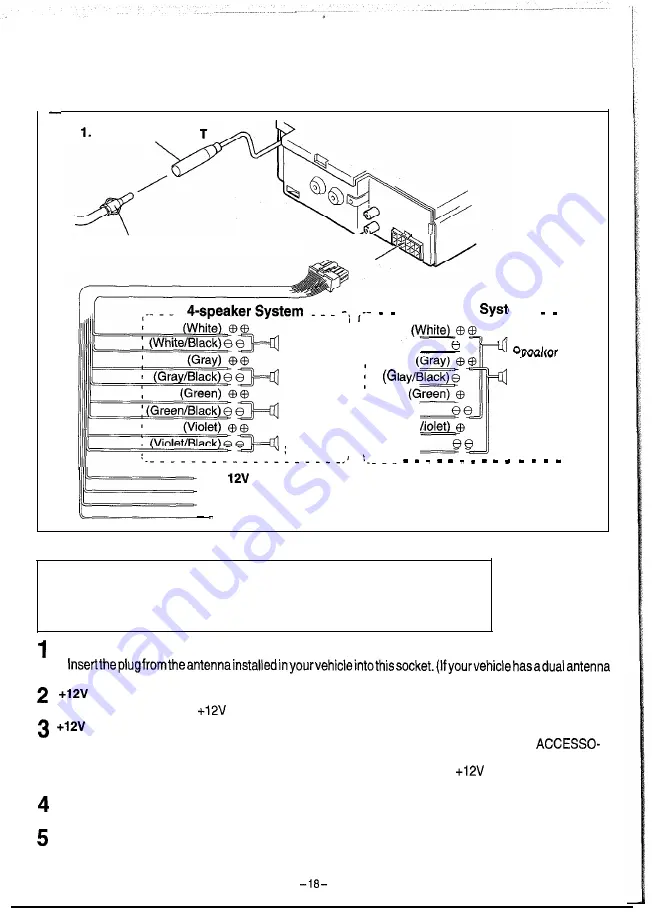
ELECTRICAL CONNECTIONS

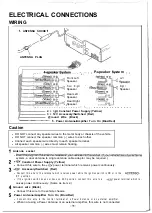
WIRING

 ANTENNA SOCKE

ANTENNA PLUG


Front Left
Speaker

F r o n t   R i g h t
Speaker

Rear Left
Speaker

Rear Right
Speaker


P-speaker 


(Violet) 


2. + 

 Constant Power Supply (Yellow)

 @round Wire (Black)

3 + 12V Accessory/Switched (Red)

5. Power Antenna/Amplifier Turn On (Blue/Red)

em   

L e f t

R i g h t

Speaker


Caution

DO NOT connect any speaker wires to the metal body or chassis of the vehicle.

DO NOT connect the speaker common (-) wires to each other.

Connect each speaker wire directly to each speaker terminal.

All speaker common (-) wires must remain floating.

 Antenna socket

system, a dual antenna to single antenna cable adaptor may be required.)

 Constant Power Supply (Yellow)

Connect this wire to the 

 power terminal which receives power continuously.


 Accessory/Switched (Red)

l  

C o n n e c t   t h i s   w i r e   t o   t h e   t e r m i n a l   w h i c h   r e c e i v e s   p o w e r   w h i l e   t h e   i g n i t i o n   s w i t c h   i s   O N   o r   i n   t h e  

R Y   p o s i t i o n .

l  

I f   t h e   i g n i t i o n   s w i t c h   d o e s   n o t   h a v e   o n   A C C   p o s i t i o n ,   c o n n e c t   t h i s   w i r e   t o   a  

  p o w e r   t e r m i n a l   w h i c h   r e -

ceives power continuously. (Same as item 2.)

 Ground wire (Black)

Connect this wire to the vehicle chassis.

Power Antenna/Amplifier Turn On (Blue/Red)

l  

C o n n e c t   t h i s   w i r e   t o   t h e   c o n t r o l   t e r m i n a l   o f   a   P o w e r   A n t e n n a   o r   a n   e x t e r n a l   a m p l i f i e r .

When not using a Power Antenna or an external amplifier, this wire is not connected.

Summary of Contents for FXD-603GD

Page 1: ...drm DIGITAL AUDIO FXD 603GD High Power AM FM Stereo Receiver Compact Disc Player IS0 Mounting with Removable Trim Ring ...

Page 2: ...cy Clock CD Track Number Electronic Control Preset Station Number Electronic Control Display SAFETY CERTIFICATION This Compact Disc Player is made and tested to meet exacting safety standards It meets FCC requirements and complies with safety performance standards of the U S Department of Health and Human Services 4 l ...

Page 3: ...t l This Compact Disc Player should not be adjusted or repaired by anyone expect qualified service personnel If servicing is required return the unit to an authorized SANYO mobile audio dealer l When the power supply cable is connected for the first time press the reset button l Use of Controls or adjustments or performance of procedures otherthan those specified herein may result in hazardous rad...

Page 4: ...to collect dust and debris Small dust particles will have no effect on reproduction quality l Do not insertadiscwhich iscracked intothe unit l Do not apply paper or write anything on the surface of the disc 4 l To prevent warping the disc do not expose it to direct sunlight high humidity or high temperatures for extended periods of time l Never use chemicals such as record clean ing sprays antista...

Page 5: ... Press the SEL button 0 to select the audio functions as shown in the table below To adjust the volume press the AUDIO CONTROL button 0 while in the volume mode To adjust the bass treble balance or fader press the SEL button to select the desired operation then press the 0 or side of the AUDIO CONTROL button c Note While no other mode is displayed the AUDIO CONTROL button functions as a volume con...

Page 6: ... original display returns after approximately five se conds RESET BUTTON 8 The RESET button I is recessed to prevent accidental engagement Gently press the RESET button with a pointed object to reset the unit under the following conditions l When the unit is first installed after all wiring connections have been completed l If the unit will not load or eject a compact disc When the reset button is...

Page 7: ...ess the 0 button for less than 0 5 seconds To quickly scan up or down in frequency press and hold the or 0 button Release the button when thedisplayapproachesthedesiredfrequency then pressand release the button repeatedly until the desired frequency is displayed STORING PRESET STATIONS 3 The preset buttons can be used to store 6 stations in each band FM1 FM2 and AM for convenient access to your fa...

Page 8: ...edesired ATP preset Each time the ATP button is pressed the next ATP preset is selected If a total of six stations cannot be preset will be dis played for the empty channels l To scan programmed stations See PRESET SCAN BUTTON OPERATION Notes l If no station can be received appears in the display l If fewer than 6 stations can be received the system will memorize as many stations as possible then ...

Page 9: ...witch back to CD mode or turn on the ignition again the CD resumes play from the point where you last stopped When the CD is switched on again teh mechanism requires approximately 5 seconds to initialize before play resumes LOADING A DISC 3 Insert a CD into the disc slot 0 with the label side facing up The loading mechanism automatically pulls the disc into the unit and play starts with the first ...

Page 10: ... vehicle ignition is turned off then on again l If the power is switched off then on again with the ON OFF button SCAN MODE PLAYING THE BEGINNING OF EACH TRACK 7 This function plays the first 10 seconds of each track sequentially Press the SCN button 0 to begin the SCAN mode The system will remain in this mode until it is cancelled To cancel this mode press the SCN button 0 again r Note Scan mode ...

Page 11: ...failed 1 Insert the disc oroperlv I The disc was inserted incorrectlv I Insert the disc txoperlv I The disc is diry The disc is defective Clean the disc Use another disc Note l If the unit does not work at all press the RESET button l When EOl or E07 is displayed a CD is ejected automatically In this case remove the CD from the disc slot and load it again or press the RESET button IO ...

Page 12: ...pressing the CLOCK button 0 To adjust the hour press the 0 button To adjust the minutes press the button To advance the time rapidly hold the or button continuously CLOCK RESET 194 You can reset the clock to the nearest half hour while the time is displayed even when the power is switched Off Press the PRESET button 6 I while holding the CLOCK button to skip to the nearest half hour as follows Exa...

Page 13: ...e disc or the player If this occurs wait for the road surface to improve before using the CD player l Safety Forsaferdriving keep thevolumeatamoderatelevel toenableyou to hearoutsidesounds suchasemergen cy vehicle sirens l Cleaning the unit Cleanthe unitwithasoft drycloth Stainsshould beremoved bywipingthesurfaceswithasoftclothimmersed in lukewarm water and wrung dry Never use strong chemicals or ...

Page 14: ...en affected by electrical Play noise Press the RESET button The sound from the CD The road surface is rough Wait for the road surface to player skips improve before playing a disc The unit is not mounted Install the unit securely Be sure to securely use the rear strap if the vehicle does not provide support for the rear of the unit See page 16 The disc is defective Try another disc If it plays pro...

Page 15: ...WARE INSTALLATION Mounting Bracket Half Sleeve x I M o u n t i n g G r o m m e t X l SET REMOVAL Rear Strap Brace x 1 Mounting Screw M5 X l Screw M5 x 14 Hex bolt M5 x 8 x 2 x 4 Removable Trim Ring x l Unlock Levers x 2 14 ...

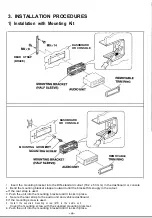
Page 16: ...erate unless this screw has been removed B When mounting the unit in a car keep the unit as level as possible If the unit must be mounted at an angle due to the design of the vehicle make sure the unit does not tilt by more than 30 2 IS0 MOUNTING WITH REMOVABLE TRIM RING When mounting the unit into a DIN standard cutout 182 x 53 mm in the dashboard or console attach the provided Removable Trim Rin...

Page 17: ...the mounting bracket stopper outward until the bracket fits snugly in the cutout If the rear strap is used 3 Push the unit into the mounting bracket until it locks in place 4 Secure the rear strap to the audio unit and vehicle dashboard If the mounting screw is used 3 Install the supplied mounting screw M5 in the audio unit Cover the mounting screw with the supplied mounting grommet 4 Push the uni...

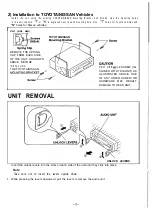
Page 18: ...AN REMOVE THE SPRING CLIP FROM EACH SIDE OF THE UNIT AS SHOWN ABOVE BEFORE I N S T A L L I N G THE TOYOTA NISSAN O N L Y U S E M5 x8 SCREW IN CLUDED WITH THIS UNIT AS ILLUSTRATED ABOVE USE OF ANY OTHER SCREW OR HARDWARE MAY RESULT DAMAGE TO HEAD UNIT UNIT REMOVAL UNLOCK LEVERS Insert the unlock levers into the slots on each side of the unit until they click into place Note Take care not to insert ...

Page 19: ...eantennainstalledinyourvehicleintothissocket Ifyourvehiclehasadualantenna system a dual antenna to single antenna cable adaptor may be required 2 12V Constant Power Supply Yellow l Connect this wire to the 12V power terminal which receives power continuously 3 12V Accessory Switched Red l Connect this wire to the terminal which receives power while the ignition switch is ON or in the ACCESSO RY po...

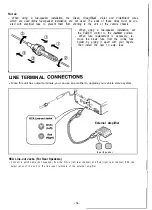
Page 20: ...position l When fuse replacement is necessary re move the blown fuse from the in line fuse holder by prying it apart with your fingers Then install the new 10 amp fuse L LINE TERMINAL CONNEC NS l Since this unit has output terminals you can use an amplifier to upgrade your vehicle stereo system External Amplifier R e a r S p e a k e r RCA Line out Jacks For Rear Speakers l Connect a patch cable no...

Page 21: ...mmunications However there is no guarantee that interference will not occur in a particular installation If this equipment does cause harmful interference to radio or television reception which can be determined by turning the equipment off and on the user is encouraged to try to correct the interference by one or more of the following measures Reorient or relocate the receiving antenna Increase t...

Page 22: ...mpling frequency 44 1 kHz Digital filter 8 x Oversampling D Aconverter Dual l bit Pickup Optical 3 beam semiconductor laser Outputfilter Active Frequencyresponse 5Hz 20kHz Total harmonic distortion 0 03 1 kHz Dynamicrange 95dB Signal to noise ratio 95dB Wow and flutter Below measurable limits Channel separation 1 kHz 85dB AUDIO SECTION RMS Power Rating l THD 14Wx2 Maximum Output Power 35W x 2 Load...

Page 23: ...SANYO Electric Printed in Japan 1 ED 6Pl OA07400 REV 0 co ...

Reviews: