background image

9

Need help? 

www.sanyoctv.com              

1-800-877-5032

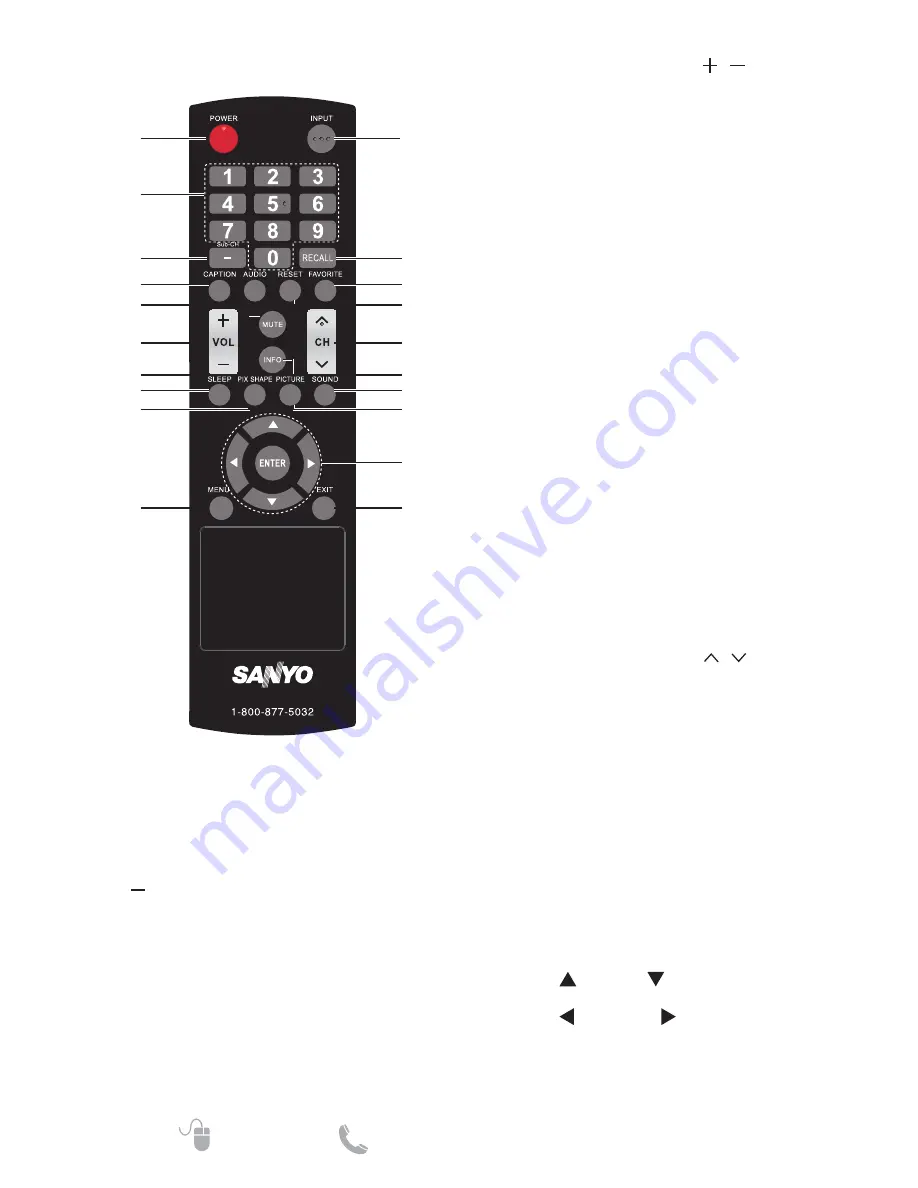
Wireless Remote Control

1

2

3
4

6

8

10

7

5

9

11

12
13

15

17

20

19

16

14

18

1.  POWER

 - Press to power on the TV. 

2.  Numeric Buttons

 - Press to select a 

channel. 

Example: Press 6 then ENTER button to 

select channel 6. Press 6 and 1 then ENTER 

button to select channel 61.

3. 

 Button - Press numeric button then press 

this button followed by the desired digital 

sub-channel.

4.  CAPTION

 - Press this button to switch 

CC mode among 

CC Off

CC On

, and 

CC 

On When Mute

. Digital Captions can be 

changed through the the Digital setting from 

Closed caption menu.

5.  AUDIO

 - Press to select the desired audio 

mode, if available.

6.  VOLUME UP / DOWN

 (VOL   /  ) - Press 

to decrease or increase the audio volume.

7.  MUTE

 - Press to mute or restore the sound.

8.  SLEEP

 - Press to set 

Off Timer

 function 

among 

Off

5

10

15

30

60

90

120

180

or 

240

 minutes.

NOTE: The 

Off Timer

 will be canceled when 

the LCD TV is turned off or when a power 

failure occurs.

9.  PIX SHAPE

 - Press to choose aspect ratio: 

Normal

Zoom

Wide

Cinema

, or 

Auto

Available options depend on the signal and 

the aspect ratio of the broadcast.

10.  MENU

 - Press to display on-screen menu.

11.  INPUT

 - Press to select the input source to 

view.

12.  RECALL

 - 

In TV mode: Press to switch between the last 

and current TV channel.  

In none-TV mode: Press to switch between 

the last and current none-TV input-source

13.  FAVORITE

 - Accesses the Favorites channel.

14.  RESET

 - Press twice to display RESET 

menu. Select "Yes" to reset to Factory 

Default settings. 

NOTE: All the channel memory will be 

erased. You will have to run the Initial Setup 

again. Please refer to page 12 for running 

Initial Setup.

15.  CHANNEL UP / DOWN

 (CH   /  ) - Press 

to switch to the previous or next channel.

16.  INFO

 - Press to display channel information 

banner. 

Digital Banner may contain: Channel 

Number, Channel Title, Video Resolution, 

and Program Rating. 

Analog Banner may contain: Channel 

Number, Channel Title, NTSC, and Program 

Rating.

17.  SOUND

 - Press to select one of the preset 

audio modes: 

Standard

Movie

Music

News

, or 

Custom

.

18.  PICTURE

 - Press to select one of the preset 

picture modes: 

Vivid

Natural

Standard

Cinema

, or 

Custom

.

19.  Cursor

   (UP) and   (DOWN) - Press to 

move the cursor up and down.  

Cursor

   (LEFT) and   (RIGHT) - Press to 

move the cursor left and right.  

ENTER

 - Press to select an option from the 

menu, when required.

20.  EXIT

 - Press to exit from the menu.

Summary of Contents for FVM4612

Page 1: ...ENGLISH Need help www sanyoctv com 1 800 877 5032 FVM4612 46 LED 1080p HDTV LCD TV ...

Page 2: ...n reduce the service life of your LCD TV and can also be dangerous 1 Read these instructions 2 Keep these instructions 3 Heed all warnings 4 Follow all instructions 5 Do not use this apparatus near water 6 Clean only with dry cloth 7 Do not block any ventilation openings Install in accordance with the manufacturer s instructions 8 Do not install near any heat sources such as radiators heat registe...

Page 3: ...on télévision ordinaire Canada BETS 7 NTMR 7 ENERGY STAR User Information ENERGY STAR User Information Statement the factory default settings of this television meet ENERGY STAR requirements Changing Picture Settings may increase energy consumption possibly beyond the limits required for ENERGY STAR qualification To ensure your television is operating at an optimal energy efficiency select default...

Page 4: ...emote Control 7 Antenna Connection for Off air Signals 7 Controls and Jacks 8 Wireless Remote Control 9 Connection 10 HDMI to HDMI Connection 10 Component YPbPr Connection 10 Video Connection Shared With Component Y 11 Digital Audio Connection 11 PC Connection 11 USB Connection 12 Power Connection 12 Initial Setup 12 OSD Menu Operation 14 Video Menu 14 Audio Menu 15 Channels Menu 15 Setup Menu 16 ...

Page 5: ... strong enough to support the weight of the LCD TV and its stand The desk must be larger than the LCD TV s screen size The desk s surface must be flat and covered with soft material such as a blanket for protecting the screen surface Before putting the LCD TV on the desk make sure there is no object on it Leaving any object under the screen may cause damage on the screen The LCD TV with this stand...

Page 6: ...a screw to secure the LCD TV to desktop Screw type 20 Wall Mounting Optional Before mounting the LCD TV on wall remove the 4 screws that were originally threaded into the wall mounting inserts on the back of your LCD TV VESA standard interface 400 x 400mm Screw type M6x20 NOTE 1 Wall mounting kit is not supplied 2 Wall mounting kit shall be able to sustain at least 3 times of set weight We suggest...

Page 7: ... are incorrectly replaced Replace batteries only with the same or equivalent type Operating Range of the Remote Control Point the top of the remote control toward the TV s sensor within a distance of less than 6m 20ft and a horizontal vertical angle of less than 30 degrees The remote control may not function properly if the TV s sensor is under direct sunlight or strong illumination or when there ...

Page 8: ...screen 4 INPUT Select the input source 5 POWER Turn the TV On or Off standby 6 HDMI HDMI1 DVI HDMI2 HDMI3 Connect your HDMI devices 7 PC IN Connect your PC video 8 PC DVI IN AUDIO Connect your PC DVI audio 3 5mm stereo 9 COMPONENT AV IN Connect digital video equipment to the Video Green Y Blue Pb Red Pr jacks and matching Audio White L and Red R jacks 10 SPDIF Use a digital audio cable to connect ...

Page 9: ... aspect ratio of the broadcast 10 MENU Press to display on screen menu 11 INPUT Press to select the input source to view 12 RECALL In TV mode Press to switch between the last and current TV channel In none TV mode Press to switch between the last and current none TV input source 13 FAVORITE Accesses the Favorites channel 14 RESET Press twice to display RESET menu Select Yes to reset to Factory Def...

Page 10: ...ows transmission of copy protected digital content The signal can also include PCM audio when available SATELLITE RECEIVER DVD PLAYER 1 Connect the HDMI input and your external device with HDMI cable 2 Press the INPUT button to select HDMI1 HDMI2 or HDMI3 as the input signal Component YPbPr Connection Connect Digital devices such as a HD Cable Box HD Satellite Receiver DVD Player and Game System S...

Page 11: ...nnel receiver as shown NOTE Dolby Digital audio signal is available from the Digital Audio output terminal only when receiving as part of a Digital input on the screen PC Connection DVI to HDMI Connection PC Audio Out DVI 1 Use an adapter not supplied to connect a DVI device to an HDMI input jack 2 Press the INPUT button to select HDMI1 as the input signal NOTE Only HDMI1 input supports this funct...

Page 12: ...ars 1 Select the language used for the OSD On Screen Display Menu Setup Wizard 1 6 Please select language Move Select ENTER English Spanish French Cancel 2 Select either Home or Shop mode Setup Wizard 2 6 Previous Cancel Please select Home Shop Home mode default settings are recommended for in home use ENERGY STAR qualified Shop mode is intended for in store display and resets video settings at Po...

Page 13: ...g channels next The scanning process will show how many channels in total have been found Please wait while the scanning process is searching for the available channels in your area To cancel the process press ENTER button on the remote control Setup Wizard 5 6 Searching CH Digital Channels Found Analog Channels Found Channel 4 8 8 Searching Please wait Select Cancel 50 ENTER NOTE Once you cancel ...

Page 14: ...viewing in a normally lit room Standard Provides a less power consuming settings Cinema Provides a soft film like picture for watching movies in a darkened room Custom Any changes made to the other modes will be applied to this mode Brightness Adjust picture brightness Contrast Adjust picture contrast Color Adjust picture color Advanced Video Select advanced video settings Color Temperature Select...

Page 15: ...anguage Select language options in digital channels Reset Audio Settings Reset Audio settings to factory default settings Channels Menu Video Audio Channels Setup Photos Auto Channel Scan Signal Strength Add Skip Channels Favorite Channels Channel Labels Audio Only Auto Aspect On Off Adjust channel options Move Select ENTER MENU Previous Exit EXIT Auto Channel Scan Automatically search the availab...

Page 16: ...d television programs based on ratings systems used in the USA that you feel may be inappropriate due to its content The Region 5 option will operate for Digital Channels ATSC only Reset Region 5 Clear the downloaded RRT5 rating information and restore to the factory default settings Closed Caption Adjust the Closed Caption settings The options are CC Mode Analog Captions Digital Captions Digital ...

Page 17: ...rotate the image clockwise When press enter to rotate the photo the rotation situation will change to Zoom Fill style Press PIX SHAPE to zoom the image Press MENU to return to the Folder Photo List View To control while in photo slideshow Press ENTER to play or pause slideshow Press MENU to stop the slideshow and return to photo browser Data Format for USB Photo Viewer Data format JPEG JPG JPE Max...

Page 18: ...tion trouble no signal broadcast MUTE function may be turned ON No Caption Check if station is broadcasting a Closed Caption signal Select another channel Cannot display picture on a full screen Press the PIX SHAPE button on the remote control to change settings Poor Picture Sound watching Analog Check if the program is in color Check the antenna external connections Color or Tint may be misadjust...

Page 19: ... Mid band 145 00 to 424 00MHz High band 425 00 to 861 00MHz Horizontal frequency 30 80 KHz Vertical frequency 56 75 Hz Inputs Outputs DIGITAL AUDIO OUT S PDIF COMPONENT AV IN ANTENNA DTV TV PC IN D Sub PC DVI AUDIO IN HDMI HDMI1 DVI HDMI2 or HDMI3 USB Audio Output 8W 8W Dimensions Including Stand 1056 2 L x 214 9 W x 673 3 H mm Net Weight Including Stand 15 8 kg Operating Environment Operating Tem...

Page 20: ...0x400 70Hz 31 469 70 087 28 322 800x600 60Hz 37 879 60 317 40 000 1024x768 60Hz 48 363 60 004 65 000 1280x720 60Hz 44 772 59 855 74 500 1280x768 60Hz 47 396 59 995 68 250 1280x1024 60Hz 63 981 60 020 108 000 1440x900 60Hz 55 469 59 901 88 750 1680x1050 60Hz 65 290 59 954 146 250 720x480i 59 94 60Hz 720x480P 59 94 60Hz 720P 59 94 60Hz 1080i 59 94 60Hz 1080P 24Hz 1920x1080 60Hz 67 500 60 000 148 500...

Page 21: ...lability and at the sole discretion of Sanyo Manufacturing Corporation THE FOREGOING WARRANTY IS EXCLUSIVE AND IN LIEU OF ALL OTHER WARRANTIES OF MERCHANTABILITY OR FITNESS FOR A PARTICULAR PURPOSE OBLIGATIONS For one year from the date of purchase Sanyo Manufacturing Corporation warrants this product to be free from defects in material and workmanship under normal use and conditions During the fi...

Page 22: ...Need help www sanyoctv com 1 800 877 5032 Sanyo Manufacturing Corp 3333 Sanyo Road Forrest City AR 72335 Printed in China 2013 ...

Reviews: