Sanyo DSR-C100 Instruction Manual Download Page 40

SETTING THE RECORDING METHOD

Before using this camera, make sure that you set the current date and time. Recording will not be
possible if they have not been set. (See page 22)

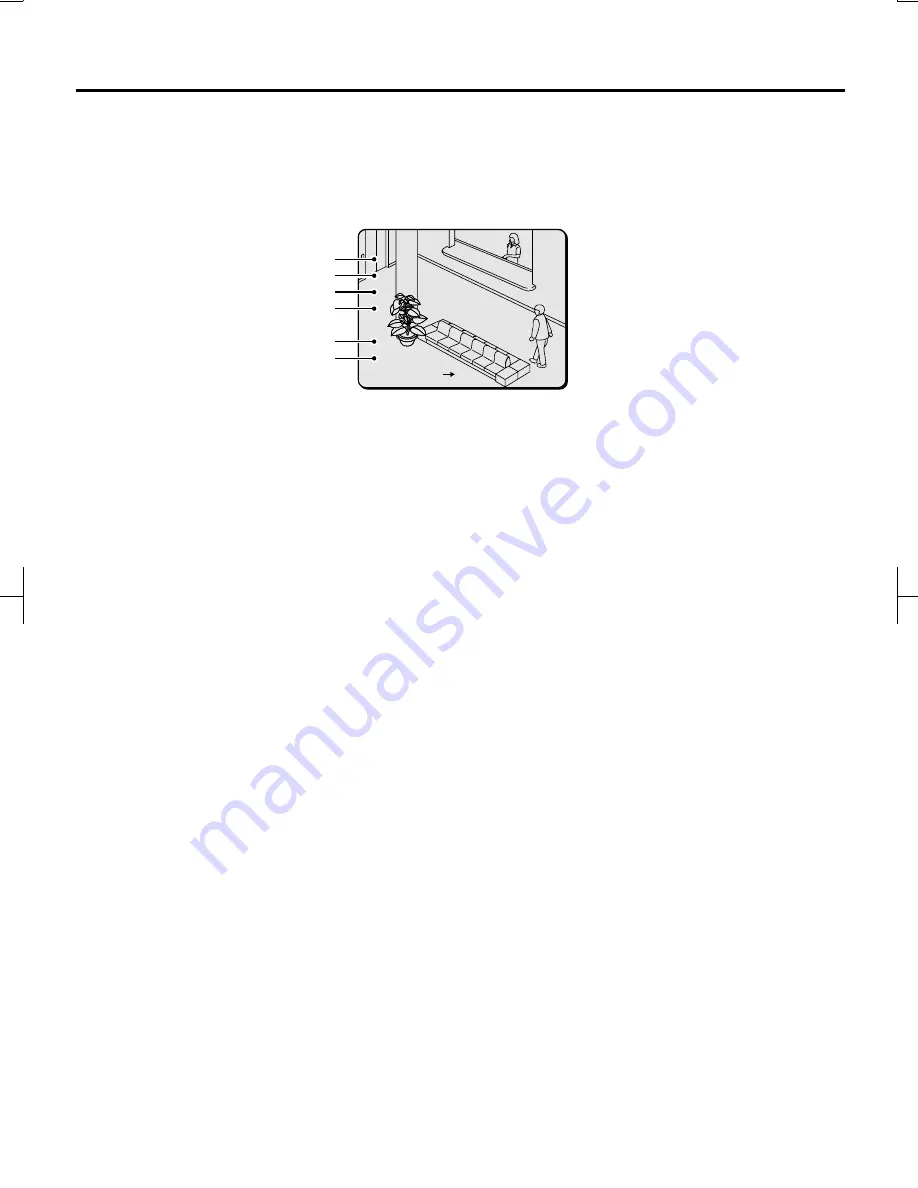
The images which are recorded by this camera (three images per second) are saved onto the hard disk. The initial
settings for the hard disk are shown in the illustration, but each of the settings can be changed if required.

For details on changing the hard disk settings, refer to “

HDD SET

” in the SETTINGS screen. (See page 

24

)

1

Number of images that can be stored in the
suspicion recording area

2

Total recording time available in the alarm
recording area

3

Recording time available in the pre-alarm
recording area

4

Recording time available in the post-alarm
recording area

5

Used for changing the alarm time (automatic or
number of suspicion images)

6

Used for hard disk initialization

The two available methods of recording the
captured images are alarm recording and
suspicion recording.

If the 

H

 (HOLD-UP) switch at the rear of the camera is

not operated while recording images in the alarm
recording area, then once recording has continued for
the full length of time that has been set, it starts again
automatically from the beginning of the hard disk and
the images which are already on the hard disk are
overwritten. This operation is continually repeated until
recording is stopped.
For example, if new images are recorded at the
beginning of the hard disk over the top of old images,
then once 2 minutes and 30 seconds of new images
have been recorded, 5 minutes’ worth of old images
will be deleted automatically.

Alarm recording

Alarm recording can be divided into pre-alarm
recording, post-alarm recording and backup recording.
For each method, images are recorded in the alarm
recording area of the hard disk. The recording time
can be set to between 10 and 90 minutes.

Pre-alarm (PRE1) recording

This is the normal method used for recording images.
When “

RECORD START

” is selected, pre-alarm

recording starts automatically. Images are recorded in
the pre-alarm (PRE1) recording area of the hard disk.
For example, if the ALARM TIME recording period is
set to the initial setting of 45 minutes, continuous
recording to the pre-alarm area for 45 minutes occurs
if no post-alarm recording is carried out. However, if
the 

H

 (HOLD-UP) switch at the rear of the camera is

turned on, the images recorded during the first 30
minutes of the 45-minute pre-alarm recording period
are deleted, and this space then becomes the
post-alarm recording area (POST ALARM 30 min) and
is used for post-alarm recording. The pre-alarm
recording area (PRE ALARM 15 MIN) is maintained
according to the settings.

Post-alarm (POST-1) recording

A switch must be connected to the 

H

 (HOLD-UP)

terminal at the rear of the camera for post-alarm
recording to be carried out. Post-alarm recording is
then carried out while the hold-up (H) switch is turned
on.
If the switch which is connected to the 

H

 terminal is

pressed and held during pre-alarm recording, the
recording mode changes from pre-alarm recording to
post-alarm recording. The images are recorded in the
post-alarm (POST1) recording area of the hard disk.

          (HDD SET)

          (HDD SET)

  <SUSPICION SHOTS: 6834PCS>

  <SUSPICION SHOTS: 6834PCS>

  <ALARM TIME         45MIN>

  <ALARM TIME         45MIN>

  <PRE ALARM          15MIN>

  <PRE ALARM          15MIN>

  <POST ALARM         30MIN>

  <POST ALARM         30MIN>

  SPACE SET

  SPACE SET

  INITIALIZE

  INITIALIZE

      [MENU]  (SETTINGS)

      [MENU]  (SETTINGS)

1
2
3
4

5
6

          (HDD SET)

  <SUSPICION SHOTS: 6834PCS>

  <ALARM TIME         45MIN>

  <PRE ALARM          15MIN>

  <POST ALARM         30MIN>

  SPACE SET

  INITIALIZE

      [MENU]  (SETTINGS)

L42A4/US (DSR-C100)  GB  2001, 4, 16

English

39

Summary of Contents for DSR-C100

Page 1: ...his unit please read this manual carefully Be sure to keep it handy for later reference À propos de ce manuel Avant d installer et d utiliser cet appareil veuillez lire ce manuel attentivement Assurez vous de le garder à portée de la main pour référence ultérieure Acerca de este manual Antes de instalar y usar este aparato lea detenidamente este manual Asegúrese de guardarlo a mano para futuras re...

Page 2: ...3 HARD DISK CAPACITY SETTINGS HDD SET 24 Hard disk initialization 24 Changing the alarm capacity 25 SUMMER TIME SETTINGS SUMMER TIME DAYLIGHT SET 26 KEY WORD SETTING KEY WORD SET 28 Entering a file ID 1 character 29 Setting a camera ID 5 characters 30 Entering a comments up to 36 characters 31 Entering a password for deleting files CHANGE PASSWORD DELETE 32 Setting a password for initializing the ...

Page 3: ...hive recording area of the hard disk 68 Saving images recorded at times such as during an emergency situation onto a memory card 70 Formatting the memory card 72 Deleting Images DELETE 73 Deleting all images in the ALARM recording area 73 Deleting all images in the PRE ALARM PRE1 recording area 74 Deleting all images in the SUSPICION recording area 75 Deleting all images of a SUSPICION group 76 De...

Page 4: ... harmful interference to radio or television reception which can be determined by turning the equipment off and on the user is encouraged to try to correct the interference by one or more of the following measures Reorient or relocate the receiving antenna Increase the separation between the equipment and receiver Connect the equipment into an outlet on a circuit different from that to which the r...

Page 5: ...rating devices such as spotlights or where the camera could be subject to direct sunlight as that could cause deformation discoloration or other damage Be careful when installing close to the ceiling in a kitchen or boiler room as the temperature may rise to high levels Install where the temperature range will stay between 5 C and 40 C no condensation Cleaning Dirt can be removed from the cabinet ...

Page 6: ...arm recording area of the hard disk when the first post alarm recording session ends backup recording then starts Suspicion recording When a suspicion switch which is connected to the S SUSPICION terminal at the rear of the camera is operated images such as those of suspicious individuals are saved in the suspicion area of the hard disk Multi playback function The captured images in hard disk can ...

Page 7: ... button is used to select items in the menu screens and to change settings In addition it is used to select images to be played back and to select playback functions 3 SET button This button is used to accept items selected in the menu screens and setting values 4 Extension port This port is used to copy images to removable media such as a CompactFlash card 5 EJECT button See page 70 6 NTSC PAL se...

Page 8: ...ooling fan is provided in order to prevent the inside of the camera from overheating If the cooling fan stops stop the camera and check the cause of the problem 1 Control terminals These terminals are used to connect extra items such as hold up and suspicion switches a warning indicator or a 13 8 V DC power supply 2 RS 232C connector RS 232C This connector is used to connect the camera to a comput...

Page 9: ...isk error or if there is a problem with the backup battery GND GND GND WARNING DC13 8V H S 1 2 3 4 5 6 7 Terminal Signal Input output voltage 1 H HOLD UP Alarm switch input signal 2 5 V or higher when alarm switch off 0 4 V or lower when alarm switch on 2 GND Alarm switch and suspicion switch ground 0 V 3 S SUSPICION Suspicion switch input signal 2 5 V or higher when suspicion switch off 0 4 V or ...

Page 10: ...me status and contact the place of purchase Monitor display Indicator Camera status Warning Caution ON Caution OFF Off Off Off Hard disk at standby Lights Lights Off When MAIN MENU screen displayed When SETTINGS screen displayed During playback During pre alarm or post alarm recording Lights Fast flashes Off During suspicion recording Slow flashes Lights Off 1 When post alarm recording is complete...

Page 11: ...nnected NO BATT When there is a problem with the Ni Cd battery LOW BATT When time setting has not been carried out During hard disk initialization ö During memory card initialization Note If you do not need the caution indicator to operate lighting or flashing you can set it to remain off at all times by setting CAUTION LED to OFF in the SYSTEM SET screen However the ö mark indicates times when th...

Page 12: ... to the hard disk may result If the camera power supply is turned off or a power outage occurs after the battery has only been charging for a short time it may cause the clock setting to be re initialized If this happens the camera will not operate Never open the rear cover while power is being supplied to the camera Always be sure to set the hard disk to the standby condition before opening the r...

Page 13: ... as it may explode Do not expose the battery to moisture Do not place the battery into water or let the terminals of the battery get wet DANGER The following precautions must be observed at all times otherwise the battery may leak overheat or explode Never peel off or scratch the outer tube Do not use in any other appliance except for this camera Do not carry the battery by holding the connectors ...

Page 14: ...cially available monitoring lamp to the warning signal output terminal This will light or flash in the same way as the warning indicator on the rear of the camera for checking purposes Connecting the power supply 1 Connect a commercially available cable to the relay connector supplied and then connect the cable to the power supply connector 13 8 V GND of the camera 2 Insert the plug of the AC adap...

Page 15: ...rate conversion adaptor depending on the type of computer being used When connecting a USB cable take note of the differences in the shapes of the connectors at the computer end and at the camera end Only connect a cable to the USB connector when using the application software If the USB cable is connected to the camera at other times normal operations such as recording cannot be carried out 13 8 ...

Page 16: ...the number of images saved in image folder 2 during suspicion recording reaches 99 then the next image folder 1 is created 8 Suspicion recording image folders 2 A new image folder 2 is created each time suspicion recording is carried out Up to 99 image folders can be created 9 Archiving image folders This folder is used to store copies of images which have been recorded during alarm playback and s...

Page 17: ...llowing in order to minimize the risk of data losses Do not subject the hard disk to shocks Do not use the camera in places which are unstable or subject to vibration Do not move the camera while the power is still turned on Do not disconnect the power cord from the power supply while recording or playback is in progress Do not use the camera in places which are prone to sudden changes in temperat...

Page 18: ...Set the date and time See page 22 PLAYBACK ALARM SUSPICION ARCHIVE EXTENSION MENU MAIN MENU CLOCK SET YEAR 2002 MONTH 08 DAY 02 HOUR 15 MINUTE 15 SECOND 20 FORM MM DD YYYY CLOCK START YES CLOCK START 08 02 2002 15 15 20 MENU SETTING 5 Play back the recorded images See page 49 6 View details of the time and the hard disk recording capacity See page 37 7 1 Turn on the power See page 1 3 MAIN MENU RE...

Page 19: ...en the hard disk is in standby mode This operation DISK CLOSING cannot be carried out using the camera control unit sold separately Canceling standby mode If you press the MENU button the MAIN MENU screen will be displayed To start pre alarm recording select RECORD START and then press the SET button Furthermore if the MAIN MENU screen remains displayed for 30 seconds the camera will change automa...

Page 20: ...MEMO English 19 ...

Page 21: ...MENU SETTINGS ...

Page 22: ...ICION SHOTS 6834PCS ALARM TIME 45MIN PRE ALARM 15 MIN POST ALARM 30 MIN INITIALIZE YES DO NOT POWER OFF INITIALIZING NOW b Hard disk area capacity setting b Summer time daylight settings b Keyword settings SUMMER TIME DAYLIGHT SET MODE OFF START END WEEK 1ST LAST SUN SUN MONTH 04 10 HOUR 02 02 MINUTE 00 00 SUMMER TIME DAYLIGHT SET MODE ON START END START WEEK 1ST LAST 1ST SUN SUN SUN MONTH 04 10 0...

Page 23: ...08 5 Use the CURSOR l button to select DAY 01 and then use the CURSOR d or c button to set the day to 02 6 Use the CURSOR l button to select HOUR 00 and then use the CURSOR d or c button to set the hour to 15 7 Use the CURSOR l button to select MINUTE 00 and then use the CURSOR d or c button to set the minutes to 15 8 Use the CURSOR l button to select SECOND 00 and then use the CURSOR d or c butto...

Page 24: ...ights OFF The caution indicator stays switched off The screen display will also disappear during recording 5 Use the CURSOR l button to select SUSPICION FRAMERATE 3 and then use the CURSOR d or c button to select 1 1 FPS Images are recorded at the rate of 1 per second 3 FPS Images are recorded at the rate of 3 per second 6 Use the CURSOR l button to select SUSPICION LOOP OFF and then use the CURSO...

Page 25: ...ted to enter the password 4 Use the CURSOR button and the SET button to select the password characters from the character palette ö characters will appear in the password entry box 5 Use the CURSOR j or l button to select END and then press the SET button The HDD INITIALIZE screen will be displayed 6 Use the CURSOR button to set the capacity of the alarm recording area Example 1 Set the PRE ALARM ...

Page 26: ... CURSOR button to reset the capacity of the alarm recording area Example 1 Set the PRE ALARM item to 30 minutes 2 Set the POST ALARM item to 40 minutes The SUSPICION SHOTS and ALARM TIME settings will be made automatically Note If some images have already been recorded in the suspicion recording area the setting time for the alarm recording capacity will change 5 Use the CURSOR j or l button to se...

Page 27: ...rt time setting 4 Use the CURSOR l button to select START 5 Use the CURSOR l button to select WEEK 1ST and then use the CURSOR d or c button to select LAST Display 1ST 2ND 3RD 4TH LAST 6 Use the CURSOR l button to select WEEK SUN Display SUN MON TUE WED THU FRI SAT 7 Use the CURSOR l button to select MONTH 04 and then use the CURSOR d or c button to set the month to 03 Display 1 2 3 12 8 Use the C...

Page 28: ...ou try to set the time in this way the time displayed will be changed automatically to a setting which is one hour after the time that you have actually set Furthermore if you change the current time to a time which is at least one hour before the time when summer time has been set to end the time will be displayed exactly as you have set it For example If summer time has been set to start at 2 00...

Page 29: ... enter a comment of up to 36 characters to describe the setting up location for the camera 4 CHANGE PASSWORD DELETE If necessary you can set a password which must be entered in order to delete files This password can be up to eight characters long 5 CHANGE PASSWORD INITIAL You can set a password which must be entered in order to initialize the hard disk This password can be up to eight characters ...

Page 30: ...een 4 Use the CURSOR button to select the letter P from the character palette and then press the SET button When the character has been set the cursor will move automatically to END 5 Press the SET button The display will return to the KEY WORD SET screen 6 When all settings have been completed press the MENU button to return to the KEY WORD SET screen Keep pressing the MENU button to return to th...

Page 31: ...Use the CURSOR button to select the characters H in order from the character palette and the press the SET button Enter ALL1 in same way When five characters have been selected the cursor will move automatically to END 5 Press the SET button The display will return to the KEY WORD SET screen 6 When all settings have been completed press the MENU button to return to the SETTINGS screen Keep pressin...

Page 32: ...me way 2 Use the CURSOR button to select the blank character below the letter N and then press the SET button A space will be inserted after SANYO Enter DIGITAL RECORDING CAMERA in the same way Enter spaces in the first line in order to move to the second line 3 Use the CURSOR button to select END and then press the SET button The display will return to the KEY WORD SET screen 5 When all settings ...

Page 33: ...nd then press the SET button The initial setting END will be cleared and the cursor will move to the NEW PASSWORD box 5 Use the CURSOR button to select C and then press the SET button The selected letter will appear as ö Enter AMERA in the same way SET KEY WORD SET FILE ID P CAMERA ID HALL1 COMMENT SANYO DIGITAL RECORDING CAMERA CHANGE PASSWORD DELETE CHANGE PASSWORD INITIAL CHANGE PASSWORD DELETE...

Page 34: ...n select END and press the SET button The display will return to the KEY WORD SET screen and the password for deleting images will be set to CAMERA 8 When all settings have been completed press the MENU button to return to the SETTINGS screen Keep pressing the MENU button to return to the MAIN MENU screen SET CHANGE PASSWORD DELETE OLD PASSWORD NEW PASSWORD VERIFICATION ABCDEFGHIJKLM NOPQRSTUVWXYZ...

Page 35: ...ing END will be cleared and the cursor will move to the NEW PASSWORD box 5 Use the CURSOR button to select C and then press the SET button The selected letter will appear as ö Enter MR in the same way SET KEY WORD SET FILE ID P CAMERA ID HALL1 COMMENT SANYO DIGITAL RECORDING CAMERA CHANGE PASSWORD DELETE CHANGE PASSWORD INITIAL CHANGE PASSWORD INITIALIZE OLD PASSWORD NEW PASSWORD VERIFICATION ABCD...

Page 36: ... and press the SET button The display will return to the KEY WORD SET screen and the password for initializing the hard disk will be set to CMR 8 When all settings have been completed press the MENU button to return to the SETTINGS screen Keep pressing the MENU button to return to the MAIN MENU screen SET CHANGE PASSWORD INITIALIZE OLD PASSWORD NEW PASSWORD VERIFICATION ABCDEFGHIJKLM NOPQRSTUVWXYZ...

Page 37: ...to select END from the character palette and then press the SET button When inserting spaces between characters move the cursor to the blank character below the letter N and then press the SET button KEY WORD SET CAMERA ID HALL1 ABCDEFGHIJKLM NOPQRSTUVWXYZ 0123456789 END CHANGE PASSWORD DELETE OLD PASSWORD NEW PASSWORD VERIFICATION ABCDEFGHIJKLM NOPQRSTUVWXYZ 0123456789 BS END KEY WORD SET COMMENT...

Page 38: ...ecording area and the total recording number set right 3 Checking the SYSTEM SET settings FRAMERATE Shows the frame rate for suspicion recording 1 FPS 1 still image recording per second 3 FPS 3 still images recording per second 4 Checking the SUMMER TIME DAYLIGHT SET settings ON Summer time is currently being used OFF Summer time is not currently being used 5 Checking the KEY WORD SET settings FIL...

Page 39: ...object being recorded If the object being recorded is moving and the resulting images are out of focus increase the amount of illumination Image quality The images on the monitor screen comply with a digital image format VGA equivalent 640 x 480 dots so the resolution will appear less sharp than images which are displayed on a computer screen ...

Page 40: ...cording post alarm recording and backup recording For each method images are recorded in the alarm recording area of the hard disk The recording time can be set to between 10 and 90 minutes Pre alarm PRE1 recording This is the normal method used for recording images When RECORD START is selected pre alarm recording starts automatically Images are recorded in the pre alarm PRE1 recording area of th...

Page 41: ...to a computer and clear the images from the alarm recording area or re initialize the hard disk If the pre alarm and post alarm recording areas become full When post alarm 2 POST2 recording is complete because this is the final recording area used If the available recording time for alarm recording is reduced to 20 minutes or less Suspicion recording This recording method is used at times such as ...

Page 42: ... ALARM REC POST1 ALARM REC POST1 ALARM REC POST1 ALARM REC POST1 ALARM REC POST1 ALARM REC POST1 ALARM REC POST1 ALARM REC POST1 ALARM REC POST1 ALARM REC POST1 ALARM REC POST1 ALARM REC POST1 ALARM REC POST1 ALARM REC POST1 ALARM REC POST1 ALARM REC REMAIN SHOTS 6834 REMAIN SHOTS 6834 REMAIN SHOTS 6834 REMAIN SHOTS 6834 REMAIN SHOTS 6834 REMAIN SHOTS 6834 REMAIN SHOTS 6834 REMAIN SHOTS 6834 REMAI...

Page 43: ...m recording will then start automatically 2 Use the CURSOR j or l button to select RECORD START and then press the SET button PRE1 ALARM REC will be displayed and pre alarm PRE1 recording will start The warning indicator and caution indicator both light during pre alarm recording Note Pre alarm recording will continue with the images being recorded in the pre alarm PRE1 area of the hard disk until...

Page 44: ...ost alarm recording will stop when the hold up switch is released or when the post alarm recording time which was initially set has passed 4 Release the H HOLD UP switch to stop recording If there is 20 minutes or more of available recording time remaining in the post alarm recording area pre alarm 2 PRE2 recording starts automatically When the recording area becomes full ALARM REC FULL will be di...

Page 45: ...tion has ended release the H HOLD UP switch ALARM REC FULL will be displayed and alarm recording will end Note When post alarm 2 POST2 recording has ended there will not be any more space available for recording and so it will not be possible to continue alarm recording To re start pre alarm recording transfer the image data to a computer and then carry out either one of the following two operatio...

Reviews: