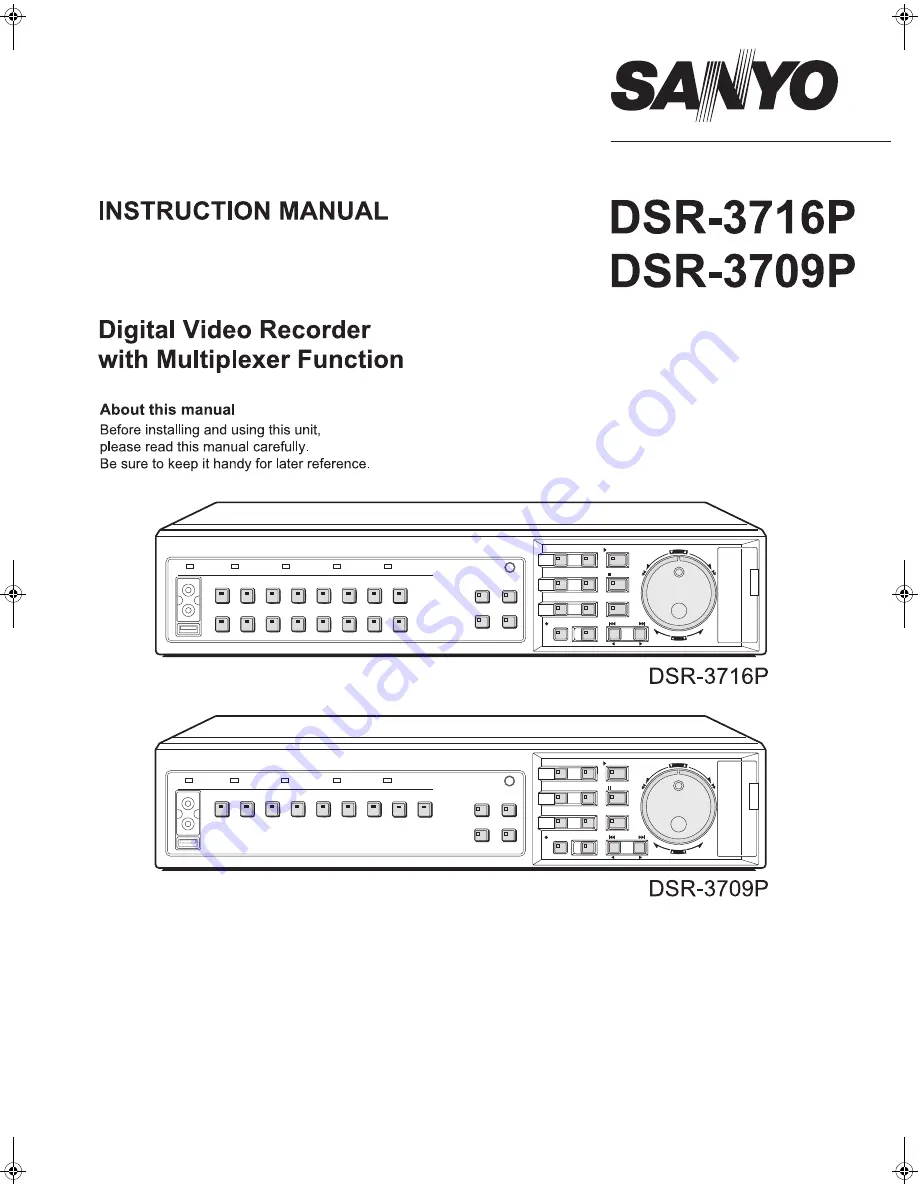
background image


CARD

CARD

MENU

RESET

EJECT


CARD

CARD

MENU

RESET

EJECT

z

Refer to the included CD-ROM for the German, French, Spanish and Italian “INSTRUCTION MANUAL”.

z

Die “BEDIENUNGSANLEITUNG” in den Sprachen Deutsch, Französisch, Spanisch und Italienisch 
finden Sie auf der beiliegenden CD-ROM.

z

Utilisez le CD-ROM fourni pour consulter le “MANUEL D’INSTRUCTIONS” en allemand, français, 
espagnol et italien.

z

Consulte en el CD-ROM suministrado el “MANUAL DE INSTRUCCIONES” en alemán, francés, español e 
italiano.

z

Per il “MANUALE DI ISTRUZIONI” in Tedesco, Francese, Spagnolo e Italiano, fare riferimento al CD-
ROM allegato.

e00_l8hbg_xe_7.book  Page 1  Friday, November 5, 2004  10:21 AM

Summary of Contents for DSR-3709P

Page 1: ...ch Französisch Spanisch und Italienisch finden Sie auf der beiliegenden CD ROM z Utilisez le CD ROM fourni pour consulter le MANUEL D INSTRUCTIONS en allemand français espagnol et italien z Consulte en el CD ROM suministrado el MANUAL DE INSTRUCCIONES en alemán francés español e italiano z Per il MANUALE DI ISTRUZIONI in Tedesco Francese Spagnolo e Italiano fare riferimento al CD ROM allegato ...

Page 2: ... Grasp it by the plug If any liquid is spilled on the unit unplug the power cord immediately and have the unit inspected at a factory authorised service centre Do not place anything directly on top of this unit SERVICE This unit is a precision instruments and if treated with care will provide years of satisfactory performance However in the event of a problem the owner is advised not to attempt to...

Page 3: ...ithin the archive area z Searching for intruder motion using motion detection search Two level security lock function lets you restrict users for data and equipment management JP 89 Expandable can be connected to a PC z Recorded video can be copied to CompactFlash cards and CD R RW z A built in LAN terminal provides support for network control thus facilitating live monitoring camera control playb...

Page 4: ...WING VIDEO FROM A CAMERA 19 Viewing on a full screen 19 Viewing on quad screens 19 Viewing on multi screens 9 screens 16 screens 20 Viewing on plus screen 20 Viewing with automatic screen selection 21 Viewing on the monitor 2 21 3 RECORDING 23 Normal recording 23 Timer recording 23 Alarm recording 24 Pre alarm recording 25 4 PLAYBACK 26 Playing video on a full screen 26 Fast forward and fast rewin...

Page 5: ...ration and display 84 Canceling alarms 85 4 GENERAL SET 86 General settings 86 Setting data display 86 Setting display for video loss 87 Setting the buzzer 88 Setting the security lock 89 Setting and initializing the hard disk 92 Expanding the hard disk capacity 93 Network settings 93 Setting RS 485 96 Setting camera control 97 5 SCREEN SET 100 Setting quad multi 9 and 16 display 100 Setting the p...

Page 6: ...hey are subjected to sudden impact or vibration It is recommended that you place the HDD on a soft level surface with the printed circuit board facing upward after it has been unpacked z Take care to avoid subjecting the HDD to sudden impact or vibration when removing and tightening screws as part of the HDD replacement procedure Tighten all screws securely to ensure that they do not loosen z The ...

Page 7: ... recorder or any connected devices z As a precaution against malfunction or accidents it is advisable to periodically back up important recordings or to perform mirroring Protection of the hard disk The hard disk is checked automatically when the power is turned on If an abnormality is detected the POWER indicator will begin to flash or an error message will be displayed If you need initialize the...

Page 8: ...s rear panel and the appropriate CAMERA SELECT button is pressed the corresponding indicator lights up and the video feed from that camera is displayed on screen z During quad multi 9 or 16 screen display The indicators corresponding to the cameras being displayed on the monitor are lit up z If video is lost The indicator starts to flash z If an alarm occurs The indicator for the corresponding cam...

Page 9: ...The search menu can be closed by pressing this button once again 17 STILL button and indicator JP 28 When the STILL button is pressed during playback the current frame is displayed as a still image and the indicator lights up Playback can be resumed by pressing this button once again 18 SEQUENCE button and indicator JP 21 The SEQUENCE button can be pressed during monitoring to automatically switch...

Page 10: ...t is used to house a CompactFlash card or Microdrive 26 MENU RESET button JP 48 The MENU RESET button is used to default menu settings When setting motion sensors furthermore all sensors on the same line as the cursor can be turned on simultaneously by pressing this button 27 Audio output terminal Audio output is the same as that of the rear panel AUDIO OUT terminal 28 Video output terminal This t...

Page 11: ...on USB LAN TERMINATE RS 485 OFF ON A RS 485 B ALARM IN AC IN SENSOR ALARM OUT DO NOT CONNECT TO PHONE LINE C C L O C K IN C L O C K O U T A L A R M O U T A L A R M R E S E T A L A R M F U L L N O N R E C O U T W A R N I N G O U T F U L L S E R IE S O U T E X I T T I M E R I N S E R IE S IN REMOTE CONTROL C 1 2 3 4 5 6 7 8 9 10 11 12 13 14 15 16 C 1 2 3 4 5 6 7 8 9 10 11 12 13 14 15 16 C R1 R2 1 IN...

Page 12: ...NOT CONNECT TO PHONE LINE C C L O C K IN C L O C K O U T A L A R M O U T A L A R M R E S E T A L A R M F U L L N O N R E C O U T W A R N I N G O U T F U L L S E R IE S O U T E X I T T I M E R I N S E R IE S IN REMOTE CONTROL C 1 2 3 4 5 6 7 8 9 10 11 12 13 14 15 16 C 1 2 3 4 5 6 7 8 9 10 11 12 13 14 15 16 C R1 R2 1 IN OUT ALL RESET AUDIO MONITOR OUT MON2 MIC IN IN OUT 2 3 4 5 6 7 8 9 10 11 12 13 1...

Page 13: ...end devices z Set the RS 485 termination switch of both end devices to ON z Be sure to set the RS 485 termination switches of all devices in between devices other than the first and last devices to OFF z If you don t make the correct termination settings the incorrect data will be transmitted to each device Example RS485 DO NOT CONNECT TO PHONE LINE B A To other connector A To other connector A St...

Page 14: ...al and the MIC IN terminal cannot be performed simultaneously If both terminals have devices connected the MIC IN terminal is used When using external alarms i e intruder sensors and the like external switches are to be connected to the ALARM IN terminals The DSR 3709P can be used between 1 and 9 Connecting SANYO protocol devices Dome Cameras Camera Connecting an amplifier Connecting ALARM IN term...

Page 15: ...anation will be displayed In these cases contact a Sanyo service center z The power cord s ground terminal is not provided for enhanced safety rather it can be used to reduce the level of interference when the digital video recorder is connected to analog devices If a large amount of noise is generated when the digital video recorder is connected to analog devices connect this terminal to the buil...

Page 16: ... the ALARM REC MODE SET menu item the alarm display area presents the following information z When alarm recording is set ALARM is displayed ALARM is flashed during alarm recording z When pre alarm recording is set PRE is displayed When an alarm occurs PRE disappears ALARM is displayed and the number of alarms is shown The total number is indicated in the alarm display z When performing playback f...

Page 17: ... display area Changing the language Item Setting Description LANGUAGE ENGLISH Sets the language to English FRANCAIS Sets the language to French DEUTSCH Sets the language to German ESPAÑOL Sets the language to Spanish 01 02 03 04 01 01 04 00 00 00 REC REPEAT EN A ALARM 0000 01 01 04 00 00 00 REC REPEAT EN A ALARM 0000 Operation display area Top default Bottom Hidden MAIN MENU 1 INITIAL SET 2 RECORD...

Page 18: ... 2004 hour 08 and minute 30 When you have set the minute the cursor moves to MODE under SUMMER TIME SET and the clock starts counting from 00 seconds z The week day is set automatically z The clock is stopped during date and time settings 7 Press the EXIT OSD button The setting procedure is ended and the display returns to the normal screen Setting the time REGL LANGUE FRANCAIS REGL HORLOGE 01 01 ...

Page 19: ... STOP button Timer recording Automatic Recording is carried out in accordance with timer settings Recording mode Recording method Alarm recording Automatic Recording is carried out when alarm recording is set to ENABLED Specifi cally alarm images are recorded in the alarm recording area in response either to operation of a switch that has been connected to an alarm input ter minal or to detection ...

Page 20: ... video from four separate cameras is displayed simultaneously Video from Camera No 1 through Camera No 4 is displayed 2 To view video from other cameras press the QUAD button again Each time this button is pressed the four images on the quad screen change in order of cameras No 1 4 5 8 9 12 and 13 16 On the DSR 3709P the images change in order of cameras No 1 4 5 8 9 3 etc 3 To return to full scre...

Page 21: ...ss the PLUS button PLUS indicator lights and one camera image is enlarged 2 Press the corresponding CAMERA SELECT button to change enlarged camera image The video from the selected camera is enlarged 3 Press MULTI button to switch from multi 6 screen display to multi 13 screen display Operation can be performed solely with DSR 3716P 4 Press PLUS button to return to the previous display z The time ...

Page 22: ... button once again Automatic selection ends and normal quad screen display returns z Automatic selection cannot be used with playback video When a monitor 2 is connected to the monitor 2 output terminal on the digital video recorder s rear panel this monitor can be used to view video from a single camera or to automatically scroll through video from all cameras even if the main monitor is currentl...

Page 23: ...itor 2 is not synchronized with the connected cameras vertical picture instability may occur upon the switching of camera video 1 Set MON 2 DISPLAY from ALARM OPERATION SET to ON JP 84 When an alarm occurs the corresponding video is displayed in full screen format on the monitor 2 1 Press the MON2 button The MON2 indicator turns off z Playback video cannot be viewed on the monitor 2 Selecting Came...

Page 24: ...ssible until a time has been set for the digital video recorder Make sure to set the time JP 17 1 Press the TIMER button The TIMER indicator lights up and the digital video recorder enters timer recording standby mode 1 See P 74 for more details on timer recording settings 2 At the time specified for the start of timer recording the REC STOP indicator lights up REC appears on screen i e the record...

Page 25: ...d display content 3 End alarm recording When the alarm duration has expired default setting 20 seconds both REC and ALARM finish flashing from the operation display and recording stops z When the space remaining in the alarm recording area drops below a preset value the ALARM FULL indicator on the digital video recorder s front panel starts to flash If recording is continued beyond this point the ...

Page 26: ...ng rate see P 71 z When the space remaining in the alarm recording area drops below a preset value the ALARM FULL indicator on the digital video recorder s front panel starts to flash If recording is continued beyond this point the alarm recording area will become full recording will stop and the ALARM FULL indicator will stop flashing and remain lit In such a case use the RECORDING AREA SET menu ...

Page 27: ...the point of recording The digital video recorder prioritizes recording operations and as a result video playback may pause temporarily 1 Turn the shuttle dial clockwise or counter clockwise during video playback When turned clockwise the symbol appears in the operation display area and fast forward playback is started When turned counter clockwise the symbol appears in the operation display area ...

Page 28: ...display area and the speed of reverse playback increases z Turn the jog dial clockwise appears in the operation display area and the speed of reverse playback decreases 2 Returning to normal playback Press the SHUTTLE HOLD button to turn off SHUTTLE HOLD indicator Turn the shuttle dial either clockwise or counter clockwise to display in the operation display area Normal video playback is restored ...

Page 29: ...n is not possible on monitor 2 or during quad screen multi screen 9 screens 16 screens or plus screen display z Magnified video has a slightly coarser appearance when compared with normal video 1 Press the STILL button during playback The STILL indicator lights up and playback video is paused The symbol appears in the operation display area 2 Press the STILL button once again Normal playback is re...

Page 30: ...ndicator lights up and the monitor display is divided in four 2 Press the QUAD button Each time this button is pressed the content of the split screen will toggle between video from cameras No 1 through No 4 and video from cameras No 5 through No 8 No 9 through No 12 and No 13 through No 16 On the DSR 3709P the images change in order of cameras No 1 4 5 8 9 3 etc Returning to full screen display P...

Page 31: ...deo of moving objects detected by motion sensors Archive area Alarm recording area Normal recording area CARD CARD MENU RESET EJECT ALARM buttons SEARCH button Shuttle dial Jog dial SEARCH ALARM SEARCH ALARM THUMBNAIL SEARCH TIME DATE SEARCH ARCHIVE AREA SEARCH MOTION DETECTION SEARCH MOVE JOG SELECT SHUTTLE 1 2 3 4 5 ALARM SEARCH NO DATE TIME CH TOTAL ALARMS 0016 05 01 09 53 1 00016 0015 05 01 09...

Page 32: ...ss the SEARCH button SEARCH indicator turns off 4 Turn the shuttle dial clockwise The selected recording is played back in full screen mode To view pre alarm video After beginning playback of an alarm recording identified by an alarm search use the shuttle dial to reverse playback 1 Press the appropriate ALARM button during playback z Each time the button is pressed playback will skip to the prece...

Page 33: ...e To view pre alarm video After beginning playback of an alarm recording identified by an alarm search use the shuttle dial to reverse playback z In the same way as for alarm searching playback is only possible within each individual alarm recording Press the appropriate ALARM button to play the previous or next recording z You can use the front panel buttons the shuttle dial and the jog dial to p...

Page 34: ...huttle dial clockwise once again The cursor moves to PREVIEW 4 Turn the shuttle dial clockwise After searching the recording for the date and time settings is displayed in the preview screen z If no recording exists for the specified time The closest recording to the specified time is displayed z To leave search mode Press the SEARCH button The display returns to the normal screen 5 Turn the jog d...

Page 35: ...ordingly z Up to eight recordings can be displayed in the ARCHIVE AREA SEARCH screen z To leave search mode Press the SEARCH button SEARCH indicator turns off 5 Turn the shuttle dial clockwise The selected recording is played back on the full screen By setting the motion sensor for recordings from the normal recording area i e normal recordings and timer recordings or alarm recording area variatio...

Page 36: ...ng area s 3 MOTION SENSOR Indicates the motion sensor setting 4 PREVIEW Displays the selected start image 5 VIEW Plays the selected recording on the full screen Setting Description ALARM Searching will only be performed for recordings in the alarm recording area NORMAL Searching will only be performed for recordings in the normal recording area ALARM NORMAL Searching will be performed for recordin...

Page 37: ... ON OFF 3 Use the jog dial in the same way to set sensors at other locations z All sensors on the same line as the cursor can be turned on simultaneously by pressing the MENU RESET button 3 Turn the jog dial to move the cursor to LEVEL and then turn the shuttle dial clockwise OFF flashes 4 Turn the jog dial to select OFF or a sensitivity level between 1 and 10 and then turn the shuttle dial clockw...

Page 38: ...r the specified recording z By specifying a camera number or channel and performing MOTION DETECTION SEARCH playback can be carried out for only the specified camera number In such a case the title information date information and or time information may partially disappear z To playback a recording from a different camera stop the current playback and then repeat the setting process from the begi...

Page 39: ...mporarily stored in the archive area before being copied from there to each media Consequently the amount of free space in the archive area is the maximum amount that can be copied Note however that this video will not be retained in the archive area z If archive area becomes full copy important video to a CompactFlash card a Microdrive or CD R RW JP 41 Following this delete data from the archive ...

Page 40: ...he jog dial to set HOW MANY to 10 Any value between 1 and 60 can be set Copying video to the hard disk s archive area Example Copying a specified 10 second portion of video CARD CARD MENU RESET EJECT COPY button Shuttle dial Jog dial STILL button STILL COPY COPY TO ARCHIVE AREA HOW MANY 1 PICTURES START FORMAT COMPACT FLASH FORMAT START CHANGE JOG SET SHUTTLE Setting Description ARCHIVE AREA Video...

Page 41: ...tion Press the COPY button to cancel the current copy Setting Description PICTURES The specified number of images after the specified location will be copied SECONDS The specified duration in seconds after the specified location will be copied MINUTES The specified duration in minutes after the specified location will be copied COPY TO ARCHIVE AREA HOW MANY 10 PICTURES START FORMAT COMPACT FLASH F...

Page 42: ...to select SECONDS Copying video to a CompactFlash card or Microdrive Example Copying a specified 10 second portion of video CARD CARD MENU RESET EJECT COPY button Shuttle dial Jog dial 2 1 3 1 2 3 1 Open the cover 2 Ensuring that it is correctly oriented insert the CompactFlash card into the CompactFlash card slot 3 Fold down the lever 1 Raise the lever 2 Push in the lever 3 Remove the CompactFlas...

Page 43: ...ing the INDEX HTM file z Images copied to a CompactFlash card Since images copied to a CompactFlash card contain embedded coding for the detection of manipulation these codes can be detected using a suitable software application For more information contact the dealer from whom you purchased this digital video recorder z Use a FAT16 CompactFlash card The digital video recorder will not recognize F...

Page 44: ...the Manual for Remote Operation by Network Connection 1 Insert a CompactFlash card See P 41 for inserting a CompactFlash card z Use a FAT16 CompactFlash card The digital video recorder will not recognize FAT32 CompactFlash cards Format cards with the digital video recorder before use 2 Pause playback on the image to be copied and then press the COPY button The COPY screen is displayed 3 Turn the j...

Page 45: ...t is not printed z When CF PRINT is selected copying may take twice as long as COMPACT FLASH with approximately 30 seconds required for each megabyte of data z Copies will be limited to 999 when CF PRINT is selected Example Copying ends at 999 even when set to 10 minutes z Images copied with CF PRINT settings cannot be played on the DVR Viewer To cancel a copy operation Press the COPY button to ca...

Page 46: ...e jog dial to set HOW MANY Any value between 1 and 60 can be set 6 Turn the shuttle dial clockwise PICTURES flashes 7 Turn the jog dial to select the unit Settings indicates default setting Copying video to CD R RW COPY TO ARCHIVE AREA HOW MANY 1 PICTURES START FORMAT COMPACT FLASH FORMAT START CHANGE JOG SET SHUTTLE COPY COPY TO ARCHIVE AREA HOW MANY 1 PICTURES START FORMAT COMPACT FLASH FORMAT S...

Page 47: ... the date on which images were copied to is created 4 Under the date folder folders with titles starting from IMG00001 are created Up to 200 images can be saved on each folder 5 To view images on your PC open the file INDEX HTM found in each date folder using a browser i e Internet Explorer 5 0 or later You will then be able to view the JPEG images individually or in slide show format etc Use DVR ...

Page 48: ...s z Menu settings cannot be changed during the recording process Accordingly recording will have to be stopped in order to allow changes to be made Basic menu operations Moving from the MAIN MENU to a sub menu or setting screen CARD CARD MENU RESET EJECT EXIT OSD button Jog dial Shuttle dial MENU button MENU MAIN MENU 1 INITIAL SET 2 RECORD SET 3 GENERAL SET 4 SCREEN SET 5 POWER LOSS USED TIME 6 I...

Page 49: ...tion in sub menus and setting screens 1 To move the cursor up or down Turn the jog dial 2 To move the cursor right or to confirm an item Turn the shuttle dial clockwise 3 To change a setting value Turn the jog dial Entering numbers with the numeric keys Numbers to be entered Button guide 1 to 9 No 1 to No 9 CAMERA SELECT buttons 0 QUAD button RECORDING AREA SET TOTAL CAPACITY 82GB NORMAL RECORDING...

Page 50: ... whether overwriting is to be performed by deleting old video or recording is to be stopped when any of the hard disk s recording areas become full Also sets series recording and auto delete 4 NORMAL REC MODE SET JP 71 Sets the recording quality audio recording the recording rate and program recording 5 PROGRAM REC SET JP 73 Sets program recording for cameras and the program recording rate 6 TIMER...

Page 51: ...isplay a hard disk initialization and area reset log JP 108 Displays a record of hard disk initialization and each area resetting 7 COPY MENU SETTINGS This sub menu is used to store or load menu settings JP 109 Saves and loads menu settings Sub menu Setting item Settings or display content SCREEN SET 1 MULTI SCREEN NORMAL QUAD POSITION SET MULTI 9 POSITION SET MULTI 16 POSITION SET 2 SEQUENCE SET ...

Page 52: ...n be displayed on screen P 55 4 HOLIDAY SET Sets specific dates as holidays to have the operation for Sunday used on those days also P 56 INITIAL SET 1 LANGUAGE CLOCK SET 2 CAMERA DETECT 3 TITLE SET 4 HOLIDAY SET 5 TIME PERIOD SET MOVE JOG SELECT SHUTTLE LANGUAGE LANGUE SPRACHE IDIOMA ENGLISH CLOCK SET 01 01 2004 THU 00 00 00 SUMMER TIME SET MODE USE WEEK MONTH TIME ON LST SUN 03 02 00 OFF LST SUN...

Page 53: ...onth 8 Sets the time 8 Turn the shuttle dial clockwise LST flashes 9 Turn the jog dial to select the desired week and then turn the shuttle dial clockwise The cursor moves to the day of the week 10Turn the jog dial to select the desired day of the week and then turn the shuttle dial clockwise The cursor moves to the month Setting Description USE Time is automatically adjusted to summer time NO USE...

Page 54: ...OCK SET and then turn the shuttle dial clockwise The LANGUAGE LANGUE SPRACHE IDIOMA screen is displayed 5 Turn the jog dial and move the cursor to ADJUST TIME 6 Turn the shuttle dial clockwise 01 flashes 7 Set time with the jog dial or numeric keys and turn the shuttle dial clockwise Example 05 00 8 Press the EXIT OSD button The setting procedure for the first digital video recorder is ended and t...

Page 55: ...have not been connected 1 Press the MENU button The MENU indicator lights up and the MAIN MENU is displayed 2 Turn the jog dial to select 1 INITIAL SET and then turn the shuttle dial clockwise The INITIAL SET screen is displayed 3 Turn the jog dial to select 2 CAMERA DETECT and then turn the shuttle dial clockwise 4 Turn the jog dial to select YES and then turn the shuttle dial clockwise Connected...

Page 56: ...dial clockwise The first position for title setting flashes 6 Turn the jog dial to select H Characters change in the following sequence as the jog dial is turned 7 Turn the shuttle dial clockwise The character selection is confirmed and the cursor moves one position to the right z When changing a character move the cursor to that character by turning the shuttle dial clockwise or counter clockwise...

Page 57: ...with the jog dial or numeric keys 3 Turn the shuttle dial clockwise to flash month 4 Set to 11 with the jog dial or numeric keys 5 Turn the shuttle dial clockwise after setting The cursor moves to 2 6 Use the same procedure to set other holidays 7 Press the EXIT OSD button The setting procedure is ended and the display returns to the normal screen The default setting is all z If DLY is set using t...

Page 58: ... automatically selected camera to display video from and the switching interval To do this set 2 SEQUENCE SET from SCREEN SET JP 102 Masking camera video using a gray pattern Use 3 MASK SET from SCREEN SET to specify which cameras are to be displayed on the monitor and which are not JP 104 Alarm recording using motion sensors Alarm recording is activated by motion sensor To detect camera alarms se...

Page 59: ... and turn the shuttle dial clockwise 00 from T 2 flashes indicating the hour 7 Set T 2 indicating the hour to 11 with the jog dial or numeric keys and turn the shuttle dial clockwise 00 from T 2 flashes indicating the minutes 8 Set T 2 indicating the minutes to 30 with the jog dial or numeric keys and turn the shuttle dial clockwise 00 from T 3 flashes indicating the hour Repeat steps 4 through 7 ...

Page 60: ...ckwise TIME PERIOD A flashes 2 Turn the jog dial to select TIME PERIOD A and then turn the shuttle dial clockwise The cursor moves to MASK 3 Set the time period for MASK and MOTION SENSOR in the same way 4 Press the EXIT OSD button The setting procedure is ended and the display returns to the normal screen Automatic selection masking and motion sensors are all set to TIME PERIOD A by default z As ...

Page 61: ... recording P 67 4 NORMAL REC MODE SET Sets the picture quality audio recording the recording rate and the program period P 71 5 PROGRAM REC SET Sets program recording for cameras P 73 RECORD SET 1 NORMAL REC EASY SET 2 RECORDING AREA SET 3 RECORDING CONDITIONS SET 4 NORMAL REC MODE SET 5 PROGRAM REC SET 6 TIMER SET 7 ALARM REC MODE SET 8 ALARM OPERATION SET MOVE JOG SELECT SHUTTLE NORMAL REC EASY ...

Page 62: ...l or numeric keys and turn the shuttle dial clockwise The cursor moves to TIMER RECORDING DLY 7 Turn the shuttle dial clockwise OFF flashes Setting based on recording days MENU RECORD SET 1 NORMAL REC EASY SET 2 RECORDING AREA SET 3 RECORDING CONDITIONS SET 4 NORMAL REC MODE SET 5 PROGRAM REC SET 6 TIMER SET 7 ALARM REC MODE SET 8 ALARM OPERATION SET MOVE JOG SELECT SHUTTLE NORMAL REC EASY SET REC...

Page 63: ...ding area this area s overall capacity will reduce accordingly 11Turn the shuttle dial counter clockwise The WARNING screen is displayed 12Turn the jog dial to select YES and then turn the shuttle dial clockwise The display returns to the NORMAL REC EASY SET screen 13Press the EXIT OSD button The setting procedure is ended and the display returns to the normal screen Setting Description BASIC BA 1...

Page 64: ...e timer operation turn the jog dial to select ON and then turn the shuttle dial clockwise The cursor moves to START If timer recording has been set to ON set the timer s START and STOP with the jog dial or numeric keys The following settings are carried out with the shuttle dial and jog dial z Vertical cursor movement Turn the jog dial z Cursor movement to the right Turn the shuttle dial clockwise...

Page 65: ... hard disk s total recording capacity and also the allocation for each recording area 1 Press the MENU button The MENU indicator lights up and the MAIN MENU is displayed 2 Turn the jog dial to select 2 RECORD SET and then turn the shuttle dial clockwise The RECORD SET screen is displayed 3 Turn the jog dial to select 2 RECORDING AREA SET and then turn the shuttle dial clockwise The RECORDING AREA ...

Page 66: ... however that menu settings and display content will have an effect on the maximum number of recordings that can be made in reality z When the normal recording area is set to 0 Alarm recording can be performed for as long as space is left in the alarm recording area When searching for video this area can be searched in the same way as the normal recording area using time date searches fast forward...

Page 67: ...cording and not overwrite data when the normal recording area and alarm recording area become full Setting recording conditions JP 67 Default setting is to automatically overwrite If the setting to not overwrite is selected recording stops at the point where remaining capacity runs out In this case recording can be continued using the following steps to authorize overwriting Also data is not overw...

Page 68: ...re erased when AREA FULL RESET is performed for the archive area Use the following setting procedure to indicate whether overwriting is to be performed deleting old video or recording is to be stopped when any of the hard disk s recording areas become full 1 Turn the jog dial to select OVERWRITE for normal recording area and then turn the shuttle dial clockwise ON flashes RECORDING AREA SET TOTAL ...

Page 69: ...r flashes for the alarm recording area When the remaining memory runs out the indicator switches to a permanently lit condition and recording stops automatically Make a new AREA FULL RESET setting for NORMAL RECORDING AREA and ALARM RECORDING AREA on the RECORDING AREA SET screen JP 66 Setting Description OFF Recording is stopped when the normal recording area becomes full ON Overwriting automatic...

Page 70: ...order Be sure to connect to the same channel Connect to other digital video recorders in the following order using the VIDEO OUT terminal 3 Connecting audio input terminals For audio recording connect audio devices such as amps and microphones to the various digital audio recorder audio input terminals or microphone input terminals z An audio device cannot be connected from the audio output termin...

Page 71: ... Backup important images before starting series recording Type of recording Description Normal recording 1 Set image quality audio recording recording rate and program recording with NORMAL REC MODE SET 2 When using program recording use PROGRAM REC SET to set recording rate for each camera Timer recording 1 Set date start and end time program recording and recording rate with TIMER SET and turn t...

Page 72: ...ding quality audio recording and recording rate Alternatively a program number set using PROGRAM REC SET can be specified to set these parameters 1 Press the MENU button The MENU indicator lights up and the MAIN MENU is displayed 2 Turn the jog dial to select 2 RECORD SET and then turn the shuttle dial clockwise The RECORD SET screen is displayed 3 Turn the jog dial to select 4 NORMAL REC MODE SET...

Page 73: ... Default setting 12 5 FPS Example 6 25 Allowable recording time is dependent on the setting made for PICTURE QUALITY For more details see the Table of recording rate and times JP 115 z When pre alarm recording is set to ON the recording rate is limited to 25 FPS and a setting of 50 FPS cannot be made 8 Set REC PROGRAM GROUP See JP 73 for more details regarding program recording Example P 1 Setting...

Page 74: ...al clockwise P 1 flashes 4 Turn the jog dial to select a program number P 1 for example and then turn the shuttle dial clockwise The cursor moves to 0 5 from SELECT INDIVIDUAL CAMERA RATE FPS 5 Turn the shuttle dial clockwise 0 5 recording rate flashes Setting program recording PROGRAM REC SET PROGRAM P 1 SELECT INDIVIDUAL CAMERA RATE FPS 01 0 5 02 0 5 03 0 5 04 0 5 05 0 5 06 0 5 07 0 5 08 0 5 09 ...

Page 75: ...ngs When a day in the WEEK column is flashing it can be set to another day The 7th line default SAT and 8th line default DLY are used for timer recording settings of over 24 hours 2 START These fields are used to enter the time 24 hour time at which to start timer recording 3 STOP These fields are used to enter the time 24 hour time at which to stop timer recording If the stop and end times are on...

Page 76: ...hanged and then turn the jog dial to change the setting 6 Press the EXIT OSD button when all of the necessary settings have been made The display returns to the normal screen To set different recording times and or recording rates for each day of the week Set the desired recording times and recording rate for each day z If specific days are set as holidays the operation for Sunday will be used on ...

Page 77: ...e 8 automatically changes to TUE i e the day after that set on line 7 and flashes Items that do not need to be set are displayed as 4 Set the day and time to stop recording using WEEK and STOP and also make settings for FPS and SET 1 Turn the jog dial to change TUE to WED and then turn the shuttle dial clockwise 2 Set to 20 with the jog dial or numeric keys and turn the shuttle dial clockwise 3 Se...

Page 78: ...e displayed within the operation display area while a signal is being received with a pulse width of 1 second or more via the EXT TIMER ON terminal and monitoring video will be recorded in the normal recording area z External timer recording and normal timer recording can be combined z Connect the signal line from the external timer to the external timer recording terminal External timer recording...

Page 79: ...ng is always carried out regardless of whether or not timer recording is being performed AL REC ON TIMER Alarm recording is carried out only during timer recording AL REC OFF TIMER Alarm recording is carried out only when timer recording is not being performed OLY AL RC ON TMR Alarm recording is carried out only for the amount of time set by the timer Timer recording is not performed ALARM REC MOD...

Page 80: ...nclud ing an alarm and video from all connected cameras Item Setting Description REC RATE 25 to 0 033 FPS Sets the recording rate DURATION 5 SEC 10 SEC 20 SEC 40 SEC 1 MIN 2 MIN 3 MIN 4 MIN 5 MIN 10 MIN 15 MIN CC 1 Sets the recording time per alarm ALARM REC MODE SET ALARM RECORDING ENABLED PICTURE QUALITY ENHANCED AUDIO RECORDING ON ALARM INTERLEAVE ONLY REC RATE A 12 5FPS DURATION 20SEC PRE ALAR...

Page 81: ...of alarm occurrence use the shuttle dial to move back into the area of pre alarm recording z When normal recording and pre alarm recording are performed simultaneously audio will not be recorded together with pre alarm video Setting Description OFF Pre alarm recording is not carried out ON Pre alarm recording is carried out WARNING REC RATE SETTING IN THE MENU WILL BE AUTOMATICALLY ADJUSTED ARE YO...

Page 82: ...OFF No motion sensor has been set 1 to 10 A motion sensor is set Lower values correspond to higher sensitivity levels and vice versa 5 MODE Sets the detection method for the motion sensors JP 81 z Refer to NAMES AND FUNCTIONS OF PARTS for more details regarding operation of the jog dial and shuttle dial JP 9 Setting the alarm trigger Setting Description ALARM Alarm recording is performed when an e...

Page 83: ...ht 7 Use this procedure to set other sensor positions z All sensors on the same line as the cursor can be modified simultaneously by pressing the MENU RESET button A B 8 Turn the jog dial to move the cursor to T 1 and then turn the shuttle dial clockwise T 1 flashes 9 Turn the jog dial to select T 1 T 2 T 3 or T 4 and then turn the shuttle dial clockwise The cursor moves to LEVEL 10Turn the shuttl...

Page 84: ...d Turn the sensitivity level OFF Setting Description OFF Motion sensing is not carried out 1 to10 Motion sensing is carried out Lower values correspond to higher sensitivities A CH01 T 2 LEVEL 1 MODE A A CH01 T 2 LEVEL 1 MODE A Setting Description A The motion sensor alarm is triggered when a moving object is detected in A B The motion sensor alarm is triggered when a moving object is detected in ...

Page 85: ...MON DISPLAY and then turn the shuttle dial clockwise FULL starts to flash for MAIN MON DISPLAY Settings indicates default setting Setting alarm operation and display MENU ALARM OPERATION SET ALARM RETRIGGER OFF MAIN MON DISPLAY FULL ALARM PRIORITY LAST MON 2 DISPLAY OFF Setting Description OFF Even if a new alarm is received on the same channel during alarm recording the duration is not extended O...

Page 86: ...ibly cancel an alarm during alarm operation press the CAMERA SELECT button for the camera inputting the alarm and hold it for approximately 3 seconds Alternatively connect a switch between the alarm reset terminal and C the grounded terminal and turn on the switch to cancel any alarm that is occurring Setting Description LAST When a number of alarms are occurring the most recent alarm video is giv...

Page 87: ...ettings can also be made for mirroring P 92 5 NETWORK SET Allows the digital video recorder to be connected to a PC via a network P 93 GENERAL SET 1 DISPLAY SET 2 BUZZER SET 3 SECURITY LOCK SET 4 HDD SET 5 NETWORK SET 6 RS 485 SET 7 CAMERA CONTROL SET MOVE JOG SELECT SHUTTLE DISPLAY SET DATE ON TIME ON QUALITY ON AUDIO ON ALARM COUNT ON ALARM TYPE ON TITLE ON VIDEO LOSS ON BUZZER SET ALARM OFF DIS...

Page 88: ...isplayed The content of the operation display area changes when the setting for ALARM RECORDING JP 77 from ALARM REC MODE SET is switched When turned OFF The alarm count and type are not displayed When turned ENABLED The operation display area changes as follows z ALARM is displayed when alarm video is recorded or played back z PRE is displayed when pre alarm video is recorded or played back z ARC...

Page 89: ... hard disk error occurs 4 LOCK WARNING default setting ON Sounds a buzzer if a button is pressed while the security lock is on Specifically the buzzer sounds twice with an interval of approximately 0 5 seconds 5 KEY IN default setting OFF Sounds the buzzer when a button is pressed 6 NON REC default setting OFF A buzzer is sounded upon signal loss 3 Turn the shuttle dial clockwise OFF flashes for A...

Page 90: ...istrator password to enable all operations z If administrator and user are both OFF all operations are enabled no matter the security lock Default setting value Passwords comprise between 4 and 8 alphanumeric characters Characters that can be entered in passwords 0 to 9 A to Z Example Setting 123456AB as a password 1 Press the MENU button and turn the jog dial to select 3 GENERAL SET and then turn...

Page 91: ... playback operations may be set Example Setting AB123456 1 Turn the jog dial to move the cursor to USER 2 Turn the shuttle dial clockwise The first password entry bar flashes Turn the jog dial to display A 3 Turn the jog dial clockwise The second password entry bar flashes Turn the jog dial to display B Use the same procedure as for the administrator password to set 123456 4 Following this turn th...

Page 92: ...entry screen appears for about 5 seconds 3 Enter your password while the password entry screen is displayed Use the jog dial and the shuttle dial to perform this procedure z Enter the password set for administrators or users such as 123456AB Be sure to enter the correct password for the operation s to be carried out JP 89 4 Turn the shuttle dial clockwise The security lock is cancelled and the dis...

Page 93: ...ockwise The HDD SET screen is displayed The cursor moves to DISK INITIALIZE 3 Turn the shuttle dial clockwise WARNING screen is displayed NO flashes 4 Turn the jog dial to select YES 5 Turn the shuttle dial clockwise The HDD INITIALIZING screen is displayed and the hard disk is initialized When initialization has been completed the display returns to the HDD SET screen 6 Press the EXIT OSD button ...

Page 94: ...disk used for playback z If hard disk expansion has been carried out initialization is performed for both hard disks simultaneously and all data will be lost z All important recordings should be copied to CompactFlash cards or another storage medium before hard disk expansion z If a hard disk not provided by Sanyo is used Sanyo cannot be responsible for failures in performance or operation Use the...

Page 95: ...ATUS ON IP ADDRESS 192 168 0 1 SUBNET MASK 255 255 255 0 GATEWAY 0 0 0 0 PORT 00080 ID PASSWORD 4 8 ID1 1111 ID2 2222 ID3 3333 NETWORK SET NETWORK CONTROL ON NETWORK NETWORK STATUS ON IP ADDRESS 192 168 0 1 SUBNET MASK 255 255 255 0 GATEWAY 0 0 0 0 PORT 00080 ID PASSWORD 4 8 ID1 1111 ID2 2222 ID3 3333 NETWORK SET NETWORK CONTROL ON NETWORK NETWORK STATUS ON IP ADDRESS 192 168 0 1 SUBNET MASK 255 2...

Page 96: ...TWORK CONTROL ON NETWORK NETWORK STATUS ON IP ADDRESS 192 168 0 1 SUBNET MASK 255 255 255 0 GATEWAY 0 0 0 0 PORT 00080 NETWORK SET NETWORK CONTROL ON NETWORK NETWORK STATUS ON IP ADDRESS 192 168 0 1 SUBNET MASK 255 255 255 0 GATEWAY 0 0 0 0 PORT 00080 NETWORK SET NETWORK CONTROL ON NETWORK NETWORK STATUS ON IP ADDRESS 192 168 0 1 SUBNET MASK 255 255 255 0 GATEWAY 0 0 0 0 PORT 00080 NETWORK SET NET...

Page 97: ...og dial to set DATA SPEED and then turn the shuttle dial clockwise The cursor moves to STATUS INFO Settings indicates default setting 4 Turn the shuttle dial clockwise and turn the jog dial to set STATUS INFO and then turn the shuttle dial clockwise The cursor moves to ALARM INFO Settings indicates default setting Setting RS 485 NETWORK SET NETWORK CONTROL ON NETWORK NETWORK STATUS ON IP ADDRESS 1...

Page 98: ... the shuttle dial clockwise The GENERAL SET screen is displayed 2 Turn the jog dial to select 7 CAMERA CONTROL SET and then turn the shuttle dial clockwise The CAMERA CONTROL SET screen is displayed 3 Turn the jog dial to select a channel connected to a camera and then turn the shuttle dial clockwise The PROTOCOL field flashes Setting Description ON Alarm information is transmitted OFF Alarm infor...

Page 99: ...d For supported cameras check the Sanyo homepage or ask at your local Sanyo dealer Sanyo website URL http www sanyosecurity com Setting Description OFF Camera control is disabled SANYO COAX Camera control is enabled using SANYO SSP protocol coaxial super imposition SANYO RS485 Camera control is enabled using SANYO SSP protocol RS 485 BBV COAX Camera control is enabled using BBV protocol PELCO COAX...

Page 100: ...internal menu screen 3 PRESET button QUAD button Switches to preset access mode indicator flashes Press CAMERA SELECT button to move the camera to preset position and disable preset access mode indicator remains lit 4 AUTO PAN button MULTI button Starts automatic panning Perform another operation to stop automatic panning 5 SEQUENC E button MON2 button Starts automatic camera selection Perform ano...

Page 101: ...LOSS USED TIME 6 INITIALIZATION LOG 7 COPY MENU SETTINGS MOVE JOG SELECT SHUTTLE Main Menu CARD CARD MENU RESET EJECT EXIT OSD button Jog dial MENU button Shuttle dial QUAD button Setting quad multi 9 and 16 display Setting multi screen positions 06 05 02 01 02 01 04 03 05 02 01 04 02 01 03 06 SCREEN SET 1 MULTI SCREEN NORMAL QUAD POSITION SET MULTI 9 POSITION SET MULTI 16 POSITION SET 2 SEQUENCE ...

Page 102: ...turn the shuttle dial clockwise QUAD 1 pattern is displayed Pressing the QUAD button changes the display in the order QUAD B J C J D Turn the shuttle dial counter clockwise to return to the QUAD POSITION SET screen 8 Press the EXIT OSD button The setting procedure is ended and the display returns to the normal screen QUAD POSITION SET MENU QUAD1 QUAD2 QUAD3 QUAD4 CHECK THE SCREEN 01 02 05 04 03 06...

Page 103: ... SET 2 Turn the shuttle dial clockwise The SEQUENCE SET screen is displayed 3 Set items with the jog dial and turn the shuttle dial clockwise to select Select INDIV to set automatic selection time for each camera Example Specifying a monitor to display each camera s video at the set period as indicated by TIME PERIOD A and TIME PERIOD B 1 Make timer settings for TIME PERIOD A and TIME PERIOD B fro...

Page 104: ... B on P 57 SCREEN SET 1 MULTI SCREEN CHANGE QUAD POSITION SET MULTI 9 POSITION SET MULTI 16 POSITION SET 2 SEQUENCE SET 1S SEQUENCE SET MAIN MON 2 MONITOR SET 3 MASK OFF MASK SET 4 COLOR LEVEL SET MAIN MON 2 MONITOR SET TIME PERIOD T 1 06 00 11 30 CH 01 02 03 04 05 06 07 08 MAIN MON ON ON ON ON ON ON ON ON MON 2 ON ON ON ON ON ON ON ON CH 09 10 11 12 13 14 15 16 MAIN MON ON ON ON ON ON ON ON ON MO...

Page 105: ... monitor 2 and network video Setting masks 01 04 MENU SCREEN SET 1 MULTI SCREEN CHANGE QUAD POSITION SET MULTI 9 POSITION SET MULTI 16 POSITION SET 2 SEQUENCE SET 1S SEQUENCE SET MAIN MON 2 MONITOR SET 3 MASK OFF MASK SET 4 COLOR LEVEL SET SCREEN SET 1 MULTI SCREEN CHANGE QUAD POSITION SET MULTI 9 POSITION SET MULTI 16 POSITION SET 2 SEQUENCE SET 1S SEQUENCE SET MAIN MON 2 MONITOR SET 3 MASK ON MA...

Page 106: ...ng ID2 and ID3 will be able to display all channels Use the following procedure to adjust the color of video displayed on monitors 1 Press the MENU button turn the jog dial to select 4 SCREEN SET and then turn the shuttle dial clockwise The SCREEN SET screen is displayed The cursor moves to 1 MULTI SCREEN 2 Turn the jog dial to select 4 COLOR LEVEL SET and then turn the shuttle dial clockwise The ...

Page 107: ...4 Turn the jog dial to select a COLOR LEVEL 1 through 10 and then turn the shuttle dial clockwise Settings indicates default setting 5 Press the EXIT OSD button The setting procedure is ended and the display returns to the normal screen Setting Description 1 to10 5 Manual adjustment to one of 10 levels Light 1 to Dark 10 COLOR LEVEL SET CH02 COLOR LEVEL 5 EXIT OSD ...

Page 108: ... number 999 is displayed 2 DISK1 USE Displays the total amount of running time for disk 1 3 DISK2 USE Displays the total amount of running time for disk 2 When only one hard disk is installed is displayed 4 POWER Displays the amount of power on time for the digital video recorder 2 Press the EXIT OSD button The display returns to the normal screen MAIN MENU 1 INITIAL SET 2 RECORD SET 3 GENERAL SET...

Page 109: ...ther of the following zINITIALIZED zAREA RESET z INITIALIZED is displayed when recording areas have been changed 2 Press the EXIT OSD button The display returns to the normal screen MAIN MENU 1 INITIAL SET 2 RECORD SET 3 GENERAL SET 4 SCREEN SET 5 POWER LOSS USED TIME 6 INITIALIZATION LOG 7 COPY MENU SETTINGS MOVE JOG SELECT SHUTTLE Main menu CARD CARD MENU RESET EJECT EXIT OSD button Jog dial MEN...

Page 110: ... the shuttle dial clockwise WARNING screen is displayed 2 Turn the jog dial to select YES and then turn the shuttle dial clockwise 1 The saving process begins 2 When this has been completed SAVING FINISHED is displayed A file named MENUCOPY TXT is created in the CompactFlash directory MAIN MENU 1 INITIAL SET 2 RECORD SET 3 GENERAL SET 4 SCREEN SET 5 POWER LOSS USED TIME 6 INITIALIZATION LOG 7 COPY...

Page 111: ... jog dial to select COPY RECORDING AREA SETTINGS and then turn the shuttle dial clockwise NO flashes 2 Turn the jog dial to select YES and then turn the shuttle dial clockwise The cursor returns to SAVE MENUS TO CF 3 Turn the jog dial to select LOAD MENUS FROM CF 4 Turn the shuttle dial clockwise WARNING screen is displayed 5 Turn the jog dial to select YES and then turn the shuttle dial clockwise...

Page 112: ...tocol SANYO protocol is used Use of a special controller for operation is recommended To obtain this controller contact a Sanyo service center RS 485 specifications Mode Asynchronous Character length 8 bits Data transmission speed 2 400 4 800 9 600 19 200 bps Parity check None Stop bit 1 bit ...

Page 113: ...ECURITY LOCK OFF B NAK C GROUP SET D GROUP CHECK E GROUP CLEAR F STOP STILL Left digit Right digit 8 9 A B C D E F 0 FULL1 CLOCK ADJUST 1 FULL2 MENU RESET 2 MULTI MPX FULL3 3 QUAD MPX FULL4 4 PLUS1 MPX FULL5 5 ZOOM MPX DVR FULL6 6 FULL7 7 SEQUENCE MPX FULL8 STATUS SENSE 8 MONITOR2 MPX FULL9 9 FULL10 CLOCK DOWNLOAD A ALARM RESET FULL11 CAMERA CONTROL MPX REC REC DUB REQUEST B FULL12 FF ALARM F C CH...

Page 114: ... unbalanced 3 5 mm monaural pin jack x1 Front AV output Video output terminal 1 0 Vp p 75 Ω unbalanced RCA x 1 Audio output terminal 8 dBs 600 Ω unbalanced RCA x 1 CompactFlash card slot CompactFlash Type 2 front panel x1 Terminals LAN terminal 10BASE T 100BASE TX RJ 45 x1 Compatible protocol UDP TCP IP HTTP server RS 485 terminal RJ 11 x2 with a termination switch USB terminal USB 1 1 series A te...

Page 115: ...SPECIFICATIONS 2 114 English OTHER Units mm Dimensions CARD CARD MENU RESET EJECT CARD CARD MENU RESET EJECT 420 86 86 420 365 365 DSR 3716P DSR 3709P ...

Page 116: ...17H 238H 173H 146H 2 50 497H 352H 264H 192H 162H 2 27 547H 387H 290H 211H 179H 1 92 647H 458H 343H 250H 211H 1 67 746H 529H 396H 288H 244H 1 47 846H 599H 449H 327H 276H 1 32 945H 670H 502H 365H 309H 1 19 1045H 740H 555H 403H 341H 1 09 1145H 811H 608H 442H 374H 1 00 1244H 881H 661H 480H 406H 0 50 2489H 1763H 1322H 961H 813H 0 33 3734H 2645H 1983H 1442H 1220H 0 25 4978H 3526H 2645H 1923H 1627H 0 20 ...

Page 117: ...H 307H 4 17 1126H 798H 598H 435H 368H 3 57 1314H 931H 698H 507H 429H 3 13 1502H 1064H 798H 580H 491H 2 78 1690H 1197H 898H 653H 552H 2 50 1878H 1330H 997H 725H 614H 2 27 2066H 1463H 1097H 798H 675H 1 92 2441H 1729H 1297H 943H 798H 1 67 2817H 1995H 1496H 1088H 921H 1 47 3193H 2261H 1696H 1233H 1043H 1 32 3568H 2527H 1895H 1378H 1166H 1 19 3944H 2793H 2095H 1523H 1289H 1 09 4320H 3060H 2295H 1669H 1...

Page 118: ... 778 11 2 778 11 2 5 11 2 5 12 2 5 12 2 273 12 2 273 13 2 273 13 1 923 13 1 923 14 1 923 14 1 667 14 1 667 15 1 667 15 1 471 15 1 471 16 1 471 16 1 316 16 1 316 17 1 316 17 1 190 17 1 190 18 1 190 18 1 087 18 1 087 19 1 087 19 1 19 1 20 1 20 0 5 21 0 5 21 0 333 22 0 333 22 0 25 23 0 25 23 0 2 24 0 2 24 0 1 25 0 1 25 0 05 26 0 05 26 0 033 27 0 033 Display sequence Recording rate FPS field sec 1 Not...

Page 119: ...ange will be restricted to that available for the selected duration For example if the alarm duration is set to 3 seconds only 25 FPS will be selectable for the recording rate When setting fast recording rates it may be necessary to first of all change the alarm duration setting Table of pre alarm recording times Recording rate FPS field sec Recording time Display of time on menu screens s seconds...

Page 120: ...TL6 Alarm output Open collector 1kΩ Low level active max 500mA CTL7 Alarm reset input No volt contacts 0V Open ground input 100ms or more 10k 100k 5V 1k IC 74HC597 Terminal 0V Open Detect motion sensor Stop alarm recording 1k IC BU209 Terminal 1k 5V 4 7k Remote control terminal Sub micro processor 0V Open ground input 100ms or more 10k 100k 5V 1k IC 74HC597 Terminal 0V 5V Approx 1 second 1k 4 7k 5...

Page 121: ...5V 5 7kΩ Active Low Input output terminals Signal level Input output circuit 0V 5V Warning conditions established HDD error FAN error detected 1k 4 7k 5V IC BU209 Terminal 0V 5V Warning conditions established no space in normal recording area 1k 4 7k 5V IC BU209 Terminal 0V 5V Warning conditions established no space in alarm recording area 1k 4 7k 5V IC BU209 Terminal 0V 5V 300ms or more 10k 100k ...

Page 122: ...2 12 3 13 4 14 5 15 6 16 7 17 8 18 9 19 10 20 NORMAL REC MODE SET PICTURE QUALITY ENHANCED AUDIO RECORDING OFF REC RATE 12 5FPS 42H REC PROGRAM GROUP OFF ALARM REC MODE SET ALARM RECORDING OFF PICTURE QUALITY ENHANCED AUDIO RECORDING OFF ALARM INTERLEAVE ONLY REC RATE 12 5FPS DURATION 20SEC PRE ALARM RECORDING REC RATE FPS DURATION 01731 ALARMS CAN BE RECORDED ALARM TRIGGER ALARM MOTION SENSOR TIM...

Page 123: ... CAMERA CONTROL ADMIN HDD SET DISK1 82GB DISK2 GB DISK INITIALIZE CAUTION ALL RECORDING WILL BE ERASED MIRRORING OFF PLAYBACK DRIVE CAUTION RECORDING SPEED WILL BE LIMITED BY MIRRORING NETWORK SET K NETWORK CONTROL OFF NETWORK STATUS ON IP ADDRESS 192 168 0 1 SUBNET MASK 255 255 255 0 GATEWAY 0 0 0 0 PORT 00080 ID PASSWORD 4 8 ID1 1111 ID2 2222 ID3 3333 RS 485 SET K DATA SPEED 19200 STATUS INFO ON...

Page 124: ...ET 86 H Hard disk settings 92 I INITIAL SET 51 INITIALIZATION LOG 108 Initializing the hard disk 92 IP ADDRESS 95 K KEY IN 88 L LEVEL 83 LOCK indicator 7 LOCK WARNING 88 M MAIN MENU 47 Main monitor 102 MENU RESET button 48 MIRRORING 93 MODE 83 Monitor 2 MON2 21 102 Motion detection search 34 MOTION SENSOR 81 Multi screen 20 N Network settings 93 NORMAL REC EASY SET 60 Normal recording 23 Normal re...

Page 125: ...or video loss 87 Setting holidays 56 Setting masks 104 Setting normal recording 71 Setting program recording 73 Setting quad positions 100 Setting recording conditions 67 Setting the color level 105 Setting time periods 57 SHUTTLE HOLD 27 SUBNET MASK 95 T Time date search 32 Timer recording 23 Timer settings 74 U USER 90 Z ZOOM 27 ...

Page 126: ......

Reviews: