background image

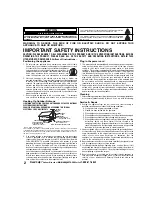
Positioning the appliance

1. Do not place your appliance on an unstable cart, stand, shelf or table.

Serious injury to an individual, and damage to the appliance, may result
if it should fall. Your salesperson can recommend approved
carts and stands or shelf and wall mounting instructions. An
appliance and cart combination should be moved with care.
Quick stops, excessive force, and uneven surfaces may
cause the appliance and cart combination to overturn.

2. Slots and openings in the cabinet and in the back or bottom are 

provided for ventilation. To ensure reliable operation of the appliance and
to protect it from overheating, these openings must not be blocked or
covered. The openings should never be covered with a cloth or other
material, and the bottom openings should not be blocked by placing the
unit on a bed, sofa, rug, or other similar surface. This appliance should
never be placed near or over a radiator or heat register. This appliance
should not be placed in a built-in installation such as a bookcase unless
proper ventilation is provided.

3. Do not expose the appliance to rain or use near water . . . for example,

near a bathtub, swimming pool, kitchen sink, in a wet basement, etc.

Hooking Up Outdoor Antenna

LIGHTNING PROTECTION FOR YOUR ANTENNA AND SET AS PER NATIONAL
ELECTRICAL CODE INSTRUCTIONS.

4. If an outside antenna is connected to the receiver, be sure the antenna

system is grounded so as to provide some protection against voltage
surges and built up static charges. Article 810 of the National Electrical
Code, ANSI/NFPA 70, provides information with respect to proper
grounding of the mast and supporting structure, grounding of the lead in
wire to an antenna discharge unit, size of grounding conductors, 
location of antenna discharge unit, connection to grounding electrodes,
and requirements for the grounding electrode.
An outside antenna system should not be located in the vicinity of over-
head power lines or other electric light or power circuits, or where it can
fall into such power lines or circuits. When installing an outside antenna
system extreme care should be taken to keep from touching such power
lines or circuits as contact with them might be fatal.

Plug in the power cord

5. This product should be operated only from the type of power source indi-

cated on the marking label. If you are not sure of the type of power
supply to your home, consult your product dealer or local power
company. This product is equipped with a polarized alternating current
line plug (a plug having one blade wider than the other). This plug will fit
into the power outlet only one way. This is a safety feature.  If you are
unable to insert the plug fully into the outlet, try reversing the plug. If the
plug should still fail to fit, contact your electrician to replace your 
obsolete outlet. Do not defeat the safety purpose of this polarized plug.
Do not overload wall outlets, extension cords, or integral convenience
receptacles as this can result in a risk of fire or electric shock.

6. Power-supply cords should be routed so that they are not likely to be

walked on or pinched by items placed upon or against them, paying 
particular attention to cords at plugs, convenience receptacles, and the
point where they exit from the product.

Cleaning

7. Before cleaning, unplug the unit from the wall outlet. Do not apply liquid clean-

ers or aerosol cleaners directly to the unit. Use a dry cloth for cleaning.

Service & Repair

8. Unplug the appliance from the wall outlet and refer servicing to 

qualified service personnel under the following conditions:

A. If the power cord or plug is damaged or frayed.
B. If liquid has been spilled into the appliance.
C. If the appliance has been exposed to rain or water.
D. If the appliance has been dropped or the cabinet has been damaged.
E. If the appliance exhibits a distinct change in performance.
F. If the appliance does not operate normally by following the operating

instructions, adjust only those controls that are covered in the 
operating instructions. Improper adjustment of other controls may
result in damage and will often require extensive work by a qualified
technician to restore the appliance to normal operation.

9. Upon completion of any service or repair, request the service technician’s

assurance that only Factory Authorized Replacement Parts that have the
same characteristics as the original parts were used, and that routine
safety checks have been performed to determine that the 
appliance is in safe operating condition. Unauthorized substitutions may
result in fire, electrical shock, or other hazards.

10. Never add accessories that have not been specifically designed for use

with this appliance as they may cause hazards.

11. For added protection during a lightning storm, or when the set is left

unattended and unused for long periods of time, unplug it from the wall
outlet and disconnect the antenna. This will prevent damage to the set
due to lightning or power line surges.

12. Never push objects of any kind into this product through openings as

they may touch dangerous voltage points or short-out parts that could
result in a fire or electric shock. Never spill liquid of any kind on the
product.

EXAMPLE OF ANTENNA GROUNDING ACCORDING TO NATIONAL 
ELECTRICAL CODE, ANSI/NFPA 70

CAUTION

RISK OF ELECTRIC SHOCK DO NOT OPEN

CAUTION: TO REDUCE THE RISK OF ELECTRIC SHOCK, DO NOT REMOVE COVER (OR BACK).
NO USER-SERVICEABLE PARTS INSIDE. REFER SERVICING TO QUALIFIED SERVICE 
PERSONNEL.

THIS SYMBOL INDICATES THAT DANGEROUS VOLTAGE CONSTITUTING
A RISK OF ELECTRIC SHOCK IS PRESENT WITHIN THIS UNIT.

THIS SYMBOL INDICATES THAT THERE ARE IMPORTANT OPERATING
AND MAINTENANCE INSTRUCTIONS IN THE LITERATURE ACCOMPANY-
ING THIS UNIT.

WARNING: TO REDUCE THE RISK OF FIRE OR ELECTRIC SHOCK, DO NOT EXPOSE THIS 
APPLIANCE TO RAIN OR MOISTURE.

IMPORTANT SAFETY INSTRUCTIONS

CAUTION: PLEASE ADHERE TO ALL WARNINGS ON THE PRODUCT AND IN THE OPERATING INSTRUCTIONS. BEFORE
OPERATING THE PRODUCT, PLEASE READ ALL OF THE SAFETY AND OPERATING INSTRUCTIONS. RETAIN THIS 
LITERATURE FOR REFERENCE. 

Follow all instructions...

“Note to CATV system installer:
This reminder is provided to call the CATV system installer’s attention to Article 820-40
of the NEC that provides guidelines for proper grounding and, in particular, specifies that
the cable ground shall be connected to the grounding system of the building, as close to
the point of cable entry as practical.”

NEC

 - NATIONAL ELECTRICAL CODE

ANTENNA
LEAD IN
WIRE

GROUNDING CONDUCTORS
(NEC SECTION 810-21)

GROUND CLAMPS

ANTENNA
DISCHARGE UNIT
(NEC SECTION 810-20)

GROUND
CLAMP

ELECTRIC
SERVICE
EQUIPMENT

POWER SERVICE GROUNDING
ELECTRODE SYSTEM
(NEC ART 250, PART H)

2

Need help? 

Visit our Web site at 

www.sanyoctv.com

or Call 

1-800-877-5032

Summary of Contents for DS2722 DS27225

Page 1: ...g 12 V Guide Parental Control 13 14 Care and Cleaning 14 Helpful Hints problems solutions 15 Warranty Mexico 16 Warranty U S A and Canada 17 Child Safety Matters Back Cover ESPAÑOL 18 35 Contenido 18 FRANÇAIS 36 51 Table des matières 36 CONTENTS DS27225 Printed in U S A SMC September 2005 Impreso en U S A SMC Septiembre 2005 Imprimé aux É U SMC septembre 2005 Part No No de Parte No de pièce 1JC6P1...

Page 2: ...efore cleaning unplug the unit from the wall outlet Do not apply liquid clean ers or aerosol cleaners directly to the unit Use a dry cloth for cleaning Service Repair 8 Unplug the appliance from the wall outlet and refer servicing to qualified service personnel under the following conditions A If the power cord or plug is damaged or frayed B If liquid has been spilled into the appliance C If the a...

Page 3: ... in 589mm DEPTH DIM Thickness 20 5 in 522mm WEIGHT Approx 66 7 lbs 30 3 Kg SOUND 2 Speakers Size 8 cm AMPLIFIER Built in with 1W ch AUDIO VIDEO INPUT JACKS Video Input Audio Input 2 sets R L Front Rear S Video Input 480i COMPONENT VIDEO INPUT JACKS Component Video Inputs Y Pb Pr R L CAUTION FCC Regulations state that improper modifica tions or unauthorized changes to this unit may void the user s ...

Page 4: ...tically search for available channels Therefore the initial start up requires that you press the MENU key enabling the TV to auto matically go through the channel search process before you can operate the TV After the initial channel search is com pleted you must press the MENU key again to complete the channel search process This may take several minutes After the channel search process is com pl...

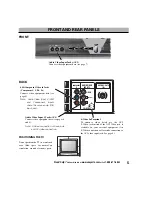
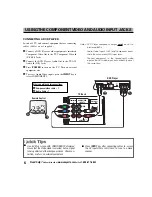
Page 5: ... the AV2 S Video jack instead of the AV2 Video jack if available on your external equipment An S Video connection will override connection to the AV2 video input jack See page 8 480i Component Video In Jacks Component 2 Y Pb Pr Connect video equipment here see page 6 Note Audio Video Input 2 AV2 and Component inputs share the same audio R L input jacks POWER MENU MENU VOL VOL VOL VOL CH CH CH CH V...

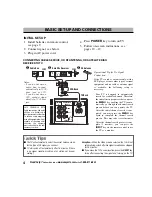
Page 6: ...ut or the AV2 video input but not both types at the same time AUDIO VIDEO INPUT 2 R L UHF VHF CATV 75Ω PR PB Y VIDEO MONO S VIDEO COMPONENT 2 Y PB CB CR PR COMPONENT VIDEO OUT AUDIO OUT R L DIGITAL OUT COAXIAL S VIDEO OUT VIDEO OUT VIDEO OUT SELECT S VIDEO COMPONENT DVD Player TV Back What you will need for connections Component video cable 1 Audio Cable 1 1 2 3 RESET INPUT POWER 1 2 3 Remote Cont...

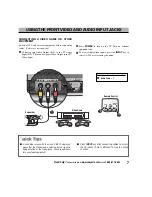
Page 7: ...MENU VOL VOL VOL VOL CH CH CH CH VIDEO IN L AUDIO R MENU MENU VIDEO IN L AUDIO R Camcorder Video Game What you will need for connections Audio Cable 1 USINGTHE FRONTVIDEO AND AUDIO INPUT JACKS A solid Blue screen with the word VIDEO1 displayed means that the Video mode is selected but no signal is being detected at the Video jacks Check connections turn on external equipment Press INPUT key after ...

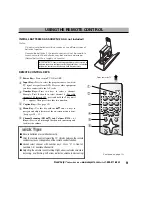
Page 8: ...PR PB Y VIDEO S VIDEO COMPONENT 2 Y PB CB CR PR COMPONENT VIDEO OUT AUDIO OUT R L DIGITAL OUT COAXIAL S VIDEO OUT VIDEO OUT VIDEO OUT SELECT S VIDEO COMPONENT 3 4 R AUDIO L R AUDIO L VIDEO VIDEO VHF UHF TO TV FROM ANT RF CHANN EL IN OUT IN OUT Back View of VCR Rear TV AV Input Jacks DVD Player 8 Need help Visit our Web site at www sanyoctv com or Call 1 800 877 5032 USINGTHE REAR AUDIO VIDEO INPUT...

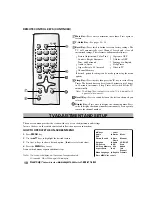
Page 9: ...res of the on screen menu system See pages 10 12 Channel Scanning CH and Volume VOL Keys Press to scan through the channels in memory and to adjust the volume IMPORTANT NOTE Spent or discharged batteries must be recycled or disposed properly in compliance with all applicable laws For detailed information contact your local County Solid Waste Authority Continued on page 10 USINGTHE REMOTE CONTROL B...

Page 10: ...ute increments Sleep Timer will switch off the TV automatically Note The SleepTimer cancels when theTV is turned off or if a power failure occurs Recall Key Press to switch between the last two channels you selected Display Key Press once to display the channel number Press twice to display the channel number continuously Press again to remove the channel number The on screen menu provides the vie...

Page 11: ...rvice installed 1 Choose Start from the Ch Search menu options ADDING OR DELETING CHANNELS 1 Press the MENU key 2 Use the keys to highlight CH Scan Memory 3 Press the key to highlight channel number entry area 4 Enter the channel number you want to add or delete example C34 For cable channels above 99 press and hold the 1 key until C1 appears Then enter the other two numbers 5 Press the key to cha...

Page 12: ...UPPER 30 s WEST WIND AROUND 20 MPH SHIFT ING TO NORTHWEST AROUND MIDNIGHT FRIDAY MOSTLY CLOUDY AND COLDER WITH A 50 PERCENT CHANCE OF RAIN HIGH IN THE MID 50 s Text1 2 Captioning is text information transmitted along with the picture and sound so it can be displayed on the TV screen Because different types of captions can be transmitted with the TV signal separate captioning modes are provided The...

Page 13: ...g for young children This television can be set to automatically block programs with content you deem as inappropriate for your children to view including suggestive dialog adult lan guage sexual situations violence and fantasy violence The ability of the television to block the reception of spe cific programming content depends upon several conditions 1 The program must be rated 2 Networks must b...

Page 14: ...Ratings TV Parental Guidelines Press MENU key to set Use keys to select Press V GUIDE key to exit TVMA B TV14 B TVPG B TV G B TVY7 U TV Y U C C C Co o o on n n nt t t te e e en n n nt t t t D Suggestive Dialog L Adult Language S Sexual Situations V Violence FV Fantasy Violence T T T TV V V V1 1 1 14 4 4 4 B B B B TVPG B Press MENU key to BLOCK Use keys to select Press V GUIDE key to exit The surfa...

Page 15: ...eo2 or Component2 displayed Check Audio Video connections Check external equipment Check external equipment setting Check DVD setting Press INPUT key Switch on external equipment Set external equipment output connections to match input connections 6 8 No TV Stereo or SAP sound Check if station is broadcasting a true MTS stereo signal or a SAP signal Select STEREO or SAP from Audio on screen menu 1...

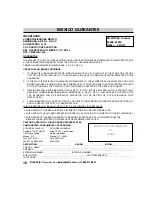
Page 16: ...EPAIR OF PRODUCT AND THE RESPECTIVE COST OF TRANSPORTATION THIS GUARANTEE WILL BE NULL AND VOID IN THE FOLLOWING CIRCUMSTANCES WHEN PRODUCT HAS BEEN USED IN A DIFFERENT CONDITION THAN ITS NORMAL USE WHEN PRODUCT HASN T BEEN OPERATING CORRECTLY ACCORDING TO THE INSTRUCTIONS IN THIS MANUAL WHEN PRODUCT HAS BEEN CHANGED OR REPAIRED BY PERSONS NOT AUTHORIZED FROM THE MANUFACTURER IMPORTER OR MERCHANT ...

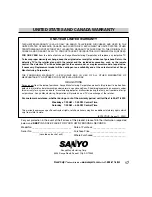
Page 17: ...turing Corporation warrants this product to be free from defects in material and workmanship under normal use and conditions Should replacement be necessary under this warranty for any reason due to manufacturing defect or malfunction during the first year from date of origi nal purchase Sanyo Manufacturing Corporation will provide a new TV via exchange at the retailer For customer assistance whet...

Page 18: ... Transmisión Captada 32 Cuidado y Limpieza 32 Sugerencias Útiles problemas soluciones 33 Garantía México 34 Garantía Estados Unidos y Canadá 35 Bienvenido al mundo SANYO Gracías por comprar un Televisor a Color Sanyo Usted hizo una excelente selección por Funcionamiento Estilo Confiabilidad y Precio El TV esta diseñado con instrucciones de fácil ajuste y operación en pantalla Lea este manual antes...

Page 19: ...do con cordón de potencia polarizado una de las navajas de la clavija es más ancha que la otra Esta clavija debe de ajustar en el toma corriente de una manera solamente Esta característica es una medida de seguridad Si usted no puede insertar la clavija totalmente en el toma corriente trate invirtiendo la clavija Si la clavija continua floja en el toma corriente llame a su electricista para reempl...

Page 20: ...OLUCIÓN DE IMAGEN 260 Líneas Entrada de Video 400 Líneas ENTRADA UHF VHF CATV 75Ω FRECUENCIA DE OPERACION 60Hz TENSION DE ALIMENTACION 120 V CONSUMO DE CORRIENTE 85 watts DIMENSIÓN HORIZONTAL Ancho 26 1 in 664mm DIMENSIÓN VERTICAL Alto 23 2 in 589mm DIMENSIÓN EN PROFUNDIDAD Grosor 20 5 in 522mm PESO APROX 66 7 lbs 30 3 Kg SONIDO 2 Bocinas Tamaño 8 cm AMPLIFICADOR Interon 1W canal ENTRADAS DE AV En...

Page 21: ...a mente con un DVD o algún otro equipo externo y la señal de cable o antena no esta disponible entonces la condición siguiente ocurrirá La TV esta diseñada para buscar los canales disponibles automáticamente Por lo tanto al inicio se requiere que se presione la tecla MENU permitiendo que la TV vaya al proceso de búsqueda antes de que la TV pueda ser operada Después de que la búsqueda inicial de ca...

Page 22: ...le en su equipo de vídeo externo La conexión de S Vídeo se sobrepondrá a la conex ión de Video Vea página 25 Entradas Componente 480i Audio Video Y Pb Pr Component2 Conecte aquí otro equipo externo de video vea página 23 Nota La Entrada de Audio Video 2 AV2 y las Entradas de Componente comparten las mismas entradas de audio R L AUDIO VIDEO INPUT 2 R L UHF VHF CATV 75Ω PR PB Y VIDEO MONO S VIDEO CO...

Page 23: ... de Componente2 o AV2 pero no ambas al mismo tiempo Parte Posterior de DVD Entradas de componente de video del TV Y Pb Pr Lo que necesitas para las conexiones Cable de componente de video 1 Cable de Audio 1 AUDIO VIDEO INPUT 2 R L UHF VHF CATV 75Ω PR PB Y VIDEO MONO S VIDEO COMPONENT 2 Y PB CB CR PR COMPONENT VIDEO OUT AUDIO OUT R L DIGITAL OUT COAXIAL S VIDEO OUT VIDEO OUT VIDEO OUT SELECT S VIDE...

Page 24: ... VIDEO IN L AUDIO R MENU MENU VIDEO IN L AUDIO R Cámara de Vidéo Video Juego Lo que necesitas para las conexiones Cable de AV 1 24 Necesita ayuda Visite nuestro sitio en internet www sanyoctv com o Llame 1 800 877 5032 Una pantalla de color azul con la palabra VIDEO1 o desplegada significa que el modo de Video esta selec cionado pero la señal no ha sido detectada en el conector de Video Presione l...

Page 25: ...2 R L UHF VHF CATV 75Ω PR PB Y VIDEO S VIDEO COMPONENT 2 Y PB CB CR PR COMPONENT VIDEO OUT AUDIO OUT R L DIGITAL OUT COAXIAL S VIDEO OUT VIDEO OUT VIDEO OUT SELECT S VIDEO COMPONENT 3 4 R AUDIO L R AUDIO L VIDEO VIDEO VHF UHF TO TV FROM ANT RF CHANN EL IN OUT IN OUT Parte Posterior de VCR Las entradas de Audio Video de la TV Parte Posterior de DVD 25 Necesita ayuda Visite nuestro sitio en internet...

Page 26: ... hacia el lado derecho indica que el volumen esta aumen tando La flecha parpadeante hacia la izquierda indica que el volumen esta disminuyendo Consejos Rápidos USANDO EL CONTROL REMOTO Tecla de Encendido POWER Presione esta tecla para encender o apagar la TV Tecla del modo de INPUT Presione para selec cionar la fuente del programa que va a ser desplegado en la pantalla La señal de TV o señales pro...

Page 27: ...al Se cambia el lenguaje a Inglés Cronometro para Dormir Se elimina modo de Juego Video Si quiere personalizar los ajustes estos pueden ser hechos nuevamente usando el menú de opciones Tecla de Sleep Presione esta tecla y posteriormente la tecla de 0 para ajustar el Cronometro para dormir El lapso de tiempo deseado puede ser ajustado de 30 minutos a 3 horas El Cronometro para Dormir apagará la TV ...

Page 28: ... DE IMAGEN SONIDO Para los ajustes automáticos de Imagen Sonido Seleccione Auto de las opciones de Imagen Sonido Para personalizar manualmente la Imagen Sonido 1 Seleccione Manual de las opciones de Imagen Sonido 2 Presione MENU para activar los submenús controles 3 Use las teclas de para resaltar el control que se quiere ajustar 4 Use las teclas de para hacer los ajustes Para selección automática...

Page 29: ... S S S Se e e el l l le e e ec c c cc c c ci i i io o o on n n ne e e e c c c ca a a an n n na a a al l l le e e es s s s c c c co o o on n n n o o o o 0 0 0 0 9 9 9 9 U U U Us s s se e e e M M M ME E E EN N N NU U U U p p p pa a a ar r r ra a a a s s s sa a a al l l li i i ir r r rs s s se e e e B B B Bu u u us s s sc c c ca a a ar r r r C C C Ca a a an n n na a a al l l le e e es s s s C C C C 3...

Page 30: ...e V GUIDE para salirse X B NC17 B R R R R B B B B PG13 U PG U G U 30 Necesita ayuda Visite nuestro sitio en internet www sanyoctv com o Llame 1 800 877 5032 Use las teclas de CANALES y las teclas de VOLUMEN para navegar a través del menú La función de V Guide es accesible solamente por el control remoto El desplegado de V Guide se mantendra en pantalla aprox imadamente por 20 segundos Si este desa...

Page 31: ...iones de con tenido de clasificación de los Ordenamientos del control de TV Paternal Guia V TV Supervision Paternal MPAA Seleccion Peliculas Use MENU para BLOQUEAR Use para seleccion Use V GUIDE para salirse TVMA B TV14 B TVPG B T T T TV V V V G G G G B B B B TVY7 U TV Y U Content Guia V TV Supervision Paternal MPAA Seleccion Peliculas Use MENU para ajuste Use para seleccion Use V GUIDE para salir...

Page 32: ...iona la tecla de MUTE en el control remoto para desactivar el sonido de la TV los subtítulos se desplegarán automáticamente presione MUTE nuevamente para restaurar el sonido los subtítulos desaparecerán Quikcap desplegará programas subtítulados en el modo de Caption1 AJUSTANDO LA FUNCIÓN DE CAPTION 1 Presione la tecla de CAPTION en el control remoto 2 Presione la tecla de 0 en el control remoto Pa...

Page 33: ...la de CAPTION para transmisión captada 32 No Transmisión Captada Cheque que la difusora transmita la señal de Transmisión Captada Seleccione Caption1 o Caption2 32 No puede registrar o seleccionar algunos canales El canal puede estar eliminado en la memoria Cheque la conexión de antena V Guide esta programado para bloquear la programación Seleccione en la función de Buscar Canales en Memoria y agr...

Page 34: ...RA DE LA REPARACIÓN ASÍ COMO GASTOS DE TRANSPORTACIÓN RESPECTIVOS ESTA GARANTIA SERA NULA EN LOS SIGUIENTES CASOS CUANDO EL PRODUCTO SE HUBIESE UTILIZADO EN CONDICIONES DISTINTAS A LAS NORMALES CUANDO EL PRODUCTO NO HUBIESE SIDO OPERADO DE ACUERDO CON EL INSTRUCTIVO DE USO QUE SE LE ACOMPAÑA CUANDO EL PRODUCTO HUBIESE SIDO ALTERADO O REPARADO POR PERSONAS NO AUTORIZADAS POR EL FABRICANTE NACIONAL ...

Page 35: ...a que este producto esta libre de defectos en materiales y mano de obra bajo condiciones normales de uso El reemplazo solo será necesario bajo esta garantía por cualquier razón debido a defecto de manufactura o mal funcionamiento durante el primer año a partir de la fecha de compra original Sanyo Manufacturing Corporation proveerá de una TV nueva vía intercambio al vendedor Para asistencia al clie...

Page 36: ... 48 Entretien et nettoyage 49 Conseils pratiques problèmes et solutions 49 50 Garantie Canada et É U 51 Bienvenue dans l univers de Sanyo Nous vous remercions d avoir acheté un téléviseur Sanyo Vous avez fait un choix excellent du point de vue du fonctionnement du style de la fiabilité et du rapport qualité prix Ce téléviseur est fourni avec des instructions d installation et de fonctionnement sim...

Page 37: ...seule façon sur une prise électrique Lorsque vous utilisez le téléviseur avec des jeux vidéo ne saturez pas la luminosité ni le contraste Avec le temps ceci pourrait causer l impression permanente de l image du champ de jeu sur l écran Ne placez pas cet appareil sur un chariot support ou table instable Il risquerait de tomber de s endommager et d entraîner de graves blessures N utilisez qu un char...

Page 38: ... retardé Sous titres Réinitialisation Menu Guide V Entreé DIMENSION DU TUBE IMAGE en diagonale Écran 27 po RÉSOLUTION D IMAGE 260 lignes Video 400 lignes ENTRÉE ANTENNE 75 ohms UHF VHF télé par câble ALIMENTATION 120 V CA 60 Hz CONSOMMATION 85 watts DIMENSION HORIZONTALE LARGEUR 26 1 po 664mm DIMENSION VERTICALE HAUTEUR 23 2 po 589mm PROFONDEUR 20 5 po 522mm POIDS APPROX KG LB 66 7 lbs 30 3 Kg SON...

Page 39: ...iv antes se produiront Votre téléviseur est conçu pour la recherche automatique des canaux disponibles Ainsi pour le démarrage initial il faut appuyer sur la touche MENU et permettre à l appareil de com pléter son processus de recherche de canaux avant de le faire fonctionner Quand le processus de recherche initiale de canaux est achevé vous devez appuyer sur la touche MENU de nouveau pour fermer ...

Page 40: ...éo extérieur en est équipé La connexion vidéo S neutralise les connexions à la prise vidéo arrière Voir la page 43 Prise d entrée audio vidéo de composant 480i Component2 Y Pb Pr Branchez ici l équipement vidéo extérieur voir la page 41 Remarque les entrées audio vidéo 2 AV2 et les entrées des composants partagent les mèmes prises audio R L AUDIO VIDEO INPUT 2 R L UHF VHF CATV 75Ω PR PB Y VIDEO MO...

Page 41: ...ées des composants partagent les mêmes prises audio R L Branches l équipment au Composant2 ou aux entrées AV2 mais non aux deux en même temps Lecteur de DVD Prises vidéo de composant du téléviseur Y Pb Pr Ce qu il vous faut pour les branchements Câble vidéo pour composant 1 Câble audio 1 AUDIO VIDEO INPUT 2 R L UHF VHF CATV 75Ω PR PB Y VIDEO MONO S VIDEO COMPONENT 2 Y PB CB CR PR COMPONENT VIDEO O...

Page 42: ...our choisir la JEUX ou choisissez Jeu au menu à l écran POWER AS MENU MENU VOL VOL VOL VOL CH CH CH CH VIDEO IN L AUDIO R MENU MENU VIDEO IN L AUDIO R Caméscope Juex vidéo Ce qu il vous faut pour les branchements Câble audio vidéo 1 UTILISATION DES PRISES D ENTRÉE AV AVANT Un écran bleu uni avec le mot Vidéo affiché indique que vous avez choisi le mode VIDÉO1 mais qu aucun signal n est détecté à l...

Page 43: ...ent les mêmes prises audio R L AUDIO VIDEO INPUT 2 R L UHF VHF CATV 75Ω PR PB Y VIDEO S VIDEO COMPONENT 2 Y PB CB CR PR COMPONENT VIDEO OUT AUDIO OUT R L DIGITAL OUT COAXIAL S VIDEO OUT VIDEO OUT VIDEO OUT SELECT S VIDEO COMPONENT 3 4 R AUDIO L R AUDIO L VIDEO VIDEO VHF UHF TO TV FROM ANT RF CHANN EL IN OUT IN OUT Arrière du magnétoscope Prises arrière d entrée audio vidéo du téléviseur Lecteur de...

Page 44: ...esoin d aide Visitez notre site web à www sanyoctv com ou appelez le 1 800 877 5032 Touche marche arrêt Appuyez sur cette touche pour mettre le téléviseur en marche ou l arrêter Touche de l entrée Appuyez sur cette touche pour choisir le programme qui apparaîtra à l écran signal de télé ou signal de l appareil branché dans les prises AV Touches numériques Vous devez appuyer sur deux touches pour c...

Page 45: ...nt Le cas échéant vous pouvez reprendre les réglages personnels à l aide des options de menu Touche d arrêt retardé S utilise avec la touche 0 pour régler l arrêt retardé Choisissez la durée désirée à l aide de 30 minutes à 3 heures L arrêt retardé coupe automatiquement le téléviseur Remarque l arrêt retardé est annulé si vous arrêtez le téléviseur ou s il y a une panne d électricité Touche de rap...

Page 46: ...les options d image son Pour ajuster manuellement l image son 1 Choisissez Manuel dans les options d image son 2 Appuyez sur la touche MENU pour accéderau sous menu des commandes 3 Mettez en évidence la commande que vous désirez régler à l aide des touches 4 Faites les réglages à l aide des touches Pour le réglage automatique des jeux 1 Choisissez Jeu dans les options du menu image son L écran et ...

Page 47: ...t pas le cas choisissez VHF UHF Vous pouvez choisir avec les touches numériques les canaux supprimés de la mémoire de balayage Pour rétablir les canaux supprimés utilisez le menu à l écran pour ajouter manuellement des canaux ou com mencer la recherche de canal CH à partir du menu ou appuyez deux fois sur la touche RESET La recherche des canaux disponibles peut prendre quelques minutes 47 Besoin d...

Page 48: ... SOUS TITRES1 2 Ce soir ciel se couvrant 40 pour cent de chance de pluie Frais avec minima entre 35 et 40 vent de l ouest à 20 milles h environ tournant au nord ouest vers minuit Vendredi nuageux et plus froid avec 50 pour cent de chance de pluie Maxima vers 55 Deux retraits et deux prises TEXTE1 2 REMARQUE CETTE FONCTION PERMET DE RESPECTER LA RÉGLEMENTATION SUR LA PUCE V DE LA FCC DES ÉTATS UNIS...

Page 49: ... vaporisez jamais de liquide sur l écran car il peut dégoutter sur le châssis et endom mager les composants Ce genre de problème n est pas couvert par la garantie suite à la page 50 ENTRETIEN ET NETTOYAGE CONSEILS PRATIQUES problèmes et solutions Probléme Vèrifiez les points suivants Essayez les solutions suivants Page Le téléviseur s arrête automatiquement Vérifiez le branchement du câble de l an...

Page 50: ...es appareils périphériques à la même con figuration que les connexions d entrée 41 43 Pas de son stéréo ou programme secondaire du téléviseur Vérifiez si la station émet effectivement un signal stéréo MTS ou SAP Choisissez Stereo ou SAP au menu son à l écran 46 La télécommande ne fonctionne pas Vérifiez les piles Vérifiez si le téléviseur est branché Remplacez les piles Dirigez la télécommande ver...

Page 51: ...de matériaux et de fabrication s il est utilisé normalement dans des conditions appropriées Si pour quelque raison que ce soit un remplacement s avère nécessaire dans le cadre de la présente garantie à cause d un défaut de fabrication ou de mauvais fonctionnement pendant la première année à partir de la date de l achat initial Sanyo Manufacturing Corporation fournira un téléviseur neuf à titre d é...

Page 52: ...rnational CES and is a Sector of the Electronic Industries Alliance The Issue It Makes A Difference Where Your TV Stands Congratulations on your purchase As you enjoy your new product please keep these safety tips in mind The Issue Sanyo Cares Tune Into Safety 1 2 3 4 5 6 7 CEA 2500 Wilson Boulevard Arlington VA 22201 Tel 703 907 7600 FAX 703 907 7690 www CE org CEA is the Sponsor Producer and Man...

Reviews: