background image

25

English

can minify the image and press exit again can to 
original size.

Note:

CURSOR

ŻŹŸ83DQGź'RZQEXWWRQVFDQ

scroll over the screen only in Zoom mode(x2,x4)

5

Use the 

EXIT

 button to exit this function.

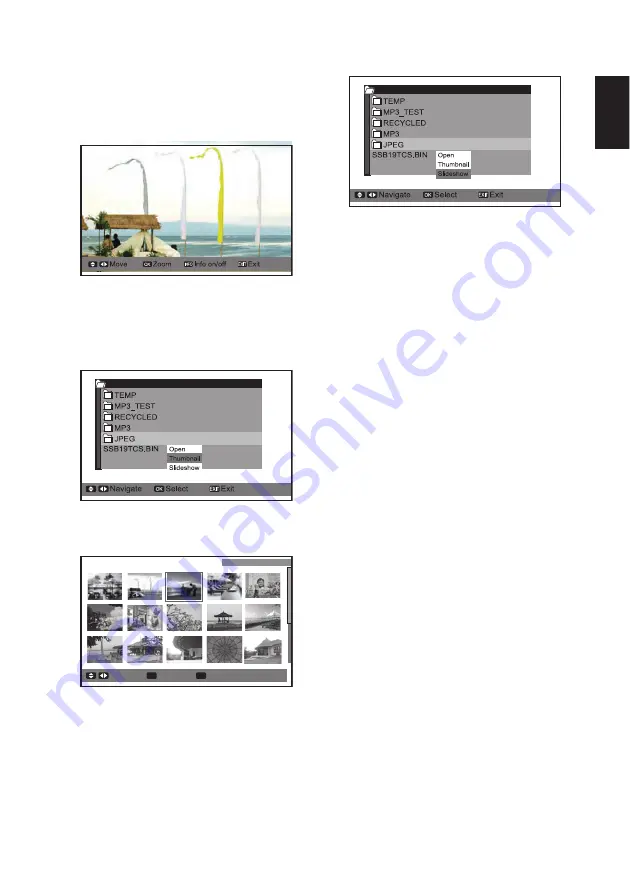
MULTI VIEW (Thumbnail)

1

Use the

CURSOR

Ÿ

(UP) and 

ź

(Down) buttons to 

select

Thumbnail

. Press the 

OK

 button.

2

Press the 

OK

 button then use the

CURSOR

Ż

Ź

Ÿ

(UP) and 

ź

(Down) buttons to select JPEG file. 

Press the 

OK

 button.

Page

Select

OK

Exit

EXIT

PAGE

(1/2)

Page

Select

OK

Exit

EXIT

PAGE

(1/2)

3

If the JPEG file more than 15 files. Use the 

CURSOR

ŻŹŸ83DQGź'RZQEXWWRQVWRVHOHFWQH[W

page JPEG file. Press the 

OK

 button.

4

Use the

EXIT

 button to exit this function.

SLIDESHOW

1

Use the

CURSOR

Ÿ

(UP) and 

ź

(Down) buttons to 

select

Slideshow

. Press the 

OK

 button.

2

Use the

EXIT

 button to exit this function.

SETTINGS (for Slideshow function) OPERATION

1

Use the

CURSOR

Ÿ

(UP) and 

ź

(Down) buttons to 

highlight

Settings

. Press the 

OK

 button.

2

Use the

CURSOR

Ÿ

(UP) and 

ź

(Down) buttons to 

highlight

Slideshow Interval

.

Use the

CURSOR

ŻŹ

 buttons to select 

3sec,

5sec

or

 10sec

.

3

Use the

CURSOR

Ÿ

(UP) and 

ź

(Down) buttons to 

highlight

Slideshow Effect

.

Use the

CURSOR

ŻŹ

 buttons to select 

Off, Wipe 

Right, Wipe Down, Comb Side, Comb UpDown, 
Checker, Mosaic, Fade, Blind Left, Blind Down,
Box In 

and

 Box Out.

4

Use the

CURSOR

Ÿ

(UP) and 

ź

(Down) buttons to 

highlight

Slideshow Repeat

.

Use the

CURSOR

ŻŹ

 buttons to select 

On

or

Off

.

NOTES:

‡

The operation bar of JPEG viewer (OSD) will disappear 
within three seconds. 

Press the INFO button to display the operation bar again.

‡

Use the 

CURSOR

ŻŹ

 buttons to view Next or Previous 

picture . 

‡

Use the INFO button to close OSD information

Summary of Contents for DP42410 OM-English

Page 1: ......

Page 2: ...ipment be sure the antenna system is grounded so as to provide some protection against voltage surges and built up static charges In the U S Selection 810 21 of the National Electrical Code provides information with respect to proper grounding of the mast and supporting structure grounding of the lead in wire to an antenna discharge unit size of grounding conductors location of antenna discharge u...

Page 3: ... the factory default settings of this television meet ENERGY STAR requirements Changing Picture Settings may increase energy consumption possibly beyond the limits required for ENERGY STAR qualification To ensure your television is operating at an optimal energy efficiency select default picture mode TRADEMARKS Manufactured under license from Dolby Laboratories Dolby and the double D symbol are tr...

Page 4: ...TIAL CHANNEL SCAN 11 GETTING STARTED POWER CONNECTION CHANNEL SEARCH 11 ADVANCED AV CONNECTIONS 12 ADVANCED DIGITAL SIGNAL CONNECTIONS HDMI TO HDMI 12 DVI TO HDMI 12 Only HDMI1 is compatible with this function 12 DIGITALAUDIO 12 AUDIO OUT JACKS 12 PC CONNECTIONS 13 PC MONITOR OPERATION 13 SPORTS MODE 14 ON SCREEN MENU OPERATION 15 MENU NAVIGATION MAP 15 CHANNELADJUSTMENT 15 CHANNEL LIST OPERATION ...

Page 5: ...n flat unlevel or unstable cart or stand The display may fall causing not only serious damage to the products but serious injury to a person SAFETY NOTE For correct installing mounting and uninstalling of the LCD TV Stand it is strongly recommended to use a trained authorized dealer Failure to follow correct procedures could result in damage to the equipment or injury to the installer Installing S...

Page 6: ... MOUNTING OPTIONAL Use the screws that are threaded into the stand mounting inserts on the back of your HDTV to secure it to a wall mounting kit NOTE 1 Wall Mounting kit is not supplied 2 Wall mounting kit shall be able to sustain at least 3 times of set weight VESA standard interface TV 200 x 400mm Wall Mounting Inserts Mounting screws measurements 42 TV M4 Diameter Length 13mm min 16mm max Wall ...

Page 7: ...l Please recycle used up rechargeable batteries 2 Antenna Connection for off air signals THE TUNER IN THIS HDTV CAN RECEIVE a Digital and Analog off air signals from an antenna OR b Analog or Clear QAM cable channels from a direct Cable TV connection NOTES You must use the on screen MENU to Search for Clear QAM Cable channels see page 11 For the best picture connect your Cable box or Satellite rec...

Page 8: ... Type Coaxial Digital Audio Out Cable to connect Digital Audio Output to an advanced stereo home theater system equipped with Dolby Digital Analog Digital Antenna Input PAGE 7 Connect an RF antenna or Analog Cable system to this jack GETTING STARTED CONTROLS AND JACKS LEFT SIDE PANEL BACK SIDE PANEL HDMI Input INPUT1 INPUT2 or INPUT3 PAGE 12 A digital AV interface that accepts uncompressed video s...

Page 9: ...t from the menu 1 Button Press numeric button then press this button to select TV digital channel GUIDE Button Press to show window with the guide information displayed on your HDTV screen digital channel only INFO Button Press to display Channel Banner information Digital Banner may contain Channel Number CC State Channel Title Video Resolution Video Ratio Signal Strength Digital Sound informatio...

Page 10: ... ANALOG DEVICE 4 Component Signal Connections VIDEO3 YPbPr Connect Digital devices such as a HD Cable Box HD Satellite Receiver DVD Player and Game System The Component jacks on this HDTV will accept HDTV EDTV and SDTV video signals making Component a great choice when connecting your compatible external devices 1 Connect a COMPONENT cable to a set of Green Blue and Red video jacks VIDEO3 YPbPr on...

Page 11: ... SCAN automatically Store This mode is for the retail display setup Home This mode qualifies for ENERGY STAR Move Enter OK INITIAL CHANNEL SCAN NOTE Skip the following process if there is no cable or antenna being plugged in to tuner connector 8 Use the CURSOR Ÿ 83 DQG ź RZQ EXWWRQV to highlight the Channel Scan Press the OK button Choose the Scan to start the channel scanning The scanned channels...

Page 12: ...al inputs to select HDMI1 HDMI2 or HDMI3 DVI TO HDMI ONLY HDMI1 IS COMPATIBLE WITH THIS FUNCTION 1 Use an adapter not supplied to connect a DVI device to a HDMI1 input jack NOTE HDMI Audio setting is necessary refer page 20 2 Connect the audio out of the device to the PC AUDIO INPUT BACK SIDE VIEW OF HDTV SATELLITE RECEIVER PC DIGITAL AUDIO 1 Connect the Digital Audio output to a multichannel rece...

Page 13: ...egular monitor PC MENU AUTO ADJUSTMENTS OPERATION 1 Use the CURSOR Ÿ UP and ź Down buttons on the remote control to highlight the Auto Adjust in the PC menu mode Press the OK button 2 Highlight Auto Adjust and press the OK button to start the automatically adjust function PC MENU MANUAL ADJUSTMENTS OPERATION The Clock Phase Horizontal Position and Vertical Position are set automatically when Auto ...

Page 14: ...wimming diving programs etc Sparkling blue of sea azure sky Delightful splashing and surf sounds Ŷ Indoor Sports For basketball boxing programs etc Alive reddish flesh Clear announcements powerful banging sounds NOTE When the SPORTS button is pushed an OSD showing the current sports mode will appear on the the bottom left of the screen Once the channel or the input source is changed the sports mod...

Page 15: ...tal cable channels 1 Press the MENU button on the remote control to display the Main menu Use the CURSOR Ż Ź buttons to highlight CHANNEL Press the OK button 2 Highlight Air or Cable Press the OK button 3 Use the CURSOR Ÿ UP and ź Down buttons to highlight All Press the OK button A red hook will appear beside the select item 4 Use the CURSOR Ÿ UP and ź Down buttons to highlight Channel Scan Press ...

Page 16: ...ns to highlight the Channel List Press the OK button 2 Use the CURSOR Ż Ź EXWWRQV WR FKDQJH SDJHV 3 Use the CURSOR Ÿ UP and ź Down buttons to select and highlight the channel you want to delete 4 Press the VOL button to delete the channel from the Channel List A white Y will disappear in the squared region This means the channel has been deleted from the Channel List RENAMING CHANNELS FROM THE CHA...

Page 17: ... casting setting within MPAA and TV Rating option in PARENT menu Lock Block the broadcast of the current displayed channel directly or current source input 1 Press the MENU button and then use the CURSOR Ż Ź buttons to highlight PARENT Press the OK button 2 Enter your password If the password is correct it will automatically return to the PARENT menu If the password is wrong you can enter the pass...

Page 18: ... the OK button A white mark will appear in the squared region NOTE Press the OK button to make or cancel the selected settings A lock symbol will appear beside the selected rating option indicating that it is blocked REGION NAME OPERATION Region Name Region Name for V Chip Regional Rating 5 RRT5 is an advanced V Chip ratings system for digital channels that are received with an antenna When the HD...

Page 19: ...CURSOR Ż Ź EXWWRQV WR KLJKOLJKW PICTURE Press the OK button 3 Use the CURSOR Ÿ UP and ź Down buttons to highlight Color Temperature Press the OK button 4 Use the CURSOR Ÿ UP and ź Down buttons to select Warm Normal or Cool Press the OK button VIDEO3 OPERATION 1 Press the MENU button to display the Main menu Press the OK button 2 Use the CURSOR Ż Ź EXWWRQV WR KLJKOLJKW PICTURE Press the OK button 3...

Page 20: ...ital Auto During this setting the system will analyze HDMI1 signal type by info frame to detect if this input source is pure HDMI or DVI signal Then it will select the audio input signal from HDMI port or PC AUDIO INPUT port automatically refer to page 13 Digital During this setting the audio input signal will be fixed to the HDMI1 port NOTE If the HDMI is a DVI signal type there will be no sound ...

Page 21: ...to display the Main menu 2 Use the CURSOR Ż Ź EXWWRQV WR KLJKOLJKW ADVANCED Press the OK button 3 Use the CURSOR Ÿ UP and ź Down buttons to select Pix Shape Press the OK button 4 Use the CURSOR Ÿ UP and ź Down buttons to select Standard WaterGlass Zoom1 Full or Zoom2 Press the OK button NOTE The remote controls of HD cable and satellite boxes also have similar zoom choices Try having the TV settin...

Page 22: ...ous ADVANCED menu PREVIOUS PAGE OPERATION PREVIOUS PAGE Return to previous page 1無 Press the MENU button on the remote control to display the Main menu 2無 Use the CURSOR buttons to highlight ADVANCED Press the OK button 3無 Use the CURSOR UP and Down buttons to select the Previous Page 4無 Press the OK button can return to previous page SYSTEM LANGUAGE OPERATION Language Choose from English Français...

Page 23: ... and ź Down buttons to highlight Digital CC Press the OK button 4 Use the CURSOR Ÿ UP and ź Down buttons to select CS1 CS2 CS3 CS4 CS5 or CS6 Press the OK button A red hook will appear in the squared and blank region CC STYLE SETTING OPERATION CC Style Setting Caption is a textual information transmitted along with the picture and sound Turning captioning ON causes the HDTV to open these captions ...

Page 24: ...cking the record of the Firmware Code version and release Date kept in your HDTV memory 1 Use the CURSOR Ż Ź EXWWRQV WR KLJKOLJKW SYSTEM Press the OK button 2 Use the CURSOR Ÿ UP and ź Down buttons to highlight System Info Press the OK button 3 Use the MENU button to return to SYSTEM menu or use the EXIT button to close the ON Screen menu USB PHOTO VIEWER MEDIA BROWSER OPERATION 1 Press the INPUT ...

Page 25: ...to select Slideshow Press the OK button 2 Use the EXIT button to exit this function SETTINGS for Slideshow function OPERATION 1 Use the CURSOR Ÿ UP and ź Down buttons to highlight Settings Press the OK button 2 Use the CURSOR Ÿ UP and ź Down buttons to highlight Slideshow Interval Use the CURSOR Ż Ź buttons to select 3sec 5sec or 10sec 3 Use the CURSOR Ÿ UP and ź Down buttons to highlight Slidesho...

Page 26: ...and 8192x4320 Width x Height or less x 1 32 Larger than 8192x4320 Width x Height x1 64 Character code supported in file system library Symbol _ Number 0 1 2 3 4 5 6 7 8 9 Alphabet A B C D E F G H I J K L M N O P Q R S T U V W X Y Z a b c d e f g h i j k l m n o p q r s t u v w x y z No operation is guaranteed for use Symbol only as a directory name or file name NOTES Connectivity is not guaranteed...

Page 27: ...t Picture in the PICTURE menu Adjust the Volume and or Image 7 9 19 20 No Signal message appears on screen Check the Audio Video connections Check the external equipment connections Check the external equipment settings Check the antenna connection Press the INPUT button on the remote control 7 13 Pixilation of Digital image Press the INFO button and check signal strength Turn antenna install sign...

Page 28: ... 00 to 144 00MHz Mid band 145 00 to 424 00MHz High band 425 00 to 861 25MHz Sound Output 10W 10W Dimensions Including Stand W 1023 x H 697 x D 250 mm Net Weight Including Stand 16 3 kg Operating Environment Operating Temperature 5 C to 35 C Operating Humidity 0 to 90 Storage Temperature 0 C to 40 C Storage Humidity 0 to 90 non condensing Ŷ Specifications are subject to change without notice Ŷ The ...

Page 29: ...280x768 60 47 78 79 5 SXGA 1280x1024 60 63 981 108 NOTE Ŷ In principle the TV can not display signal modes not described in the above column However it can sometimes display a signal very similar with one of the modes described Ŷ It is not the trouble of the TV if interference appears on the picture while switching the signal mode Ŷ The Dot Clock of the computer s signal must be less than 108 MHz ...

Reviews: