background image

Note:
-

Do not connect the mains lead to an AC outlet until all connec-
tions have been made.

-

The system is not completely disconnected from the mains when
the 

z

/ON button is set to the 

z

 position.

Speakers

Connect the connector of the left speaker lead to the “L” SPEAKERS
socket and the connector of the right speaker lead to  the “R” socket.
If you have difficulty inserting the speaker lead connector, turn it over
and reinsert it.

FM Aerial

FM indoor aerial is sufficient to receive broadcasts. Extend the aerial
wire as straight as possible and, while listening to the sound from the
system, secure it in a position which yields minimal distortion and
noise.

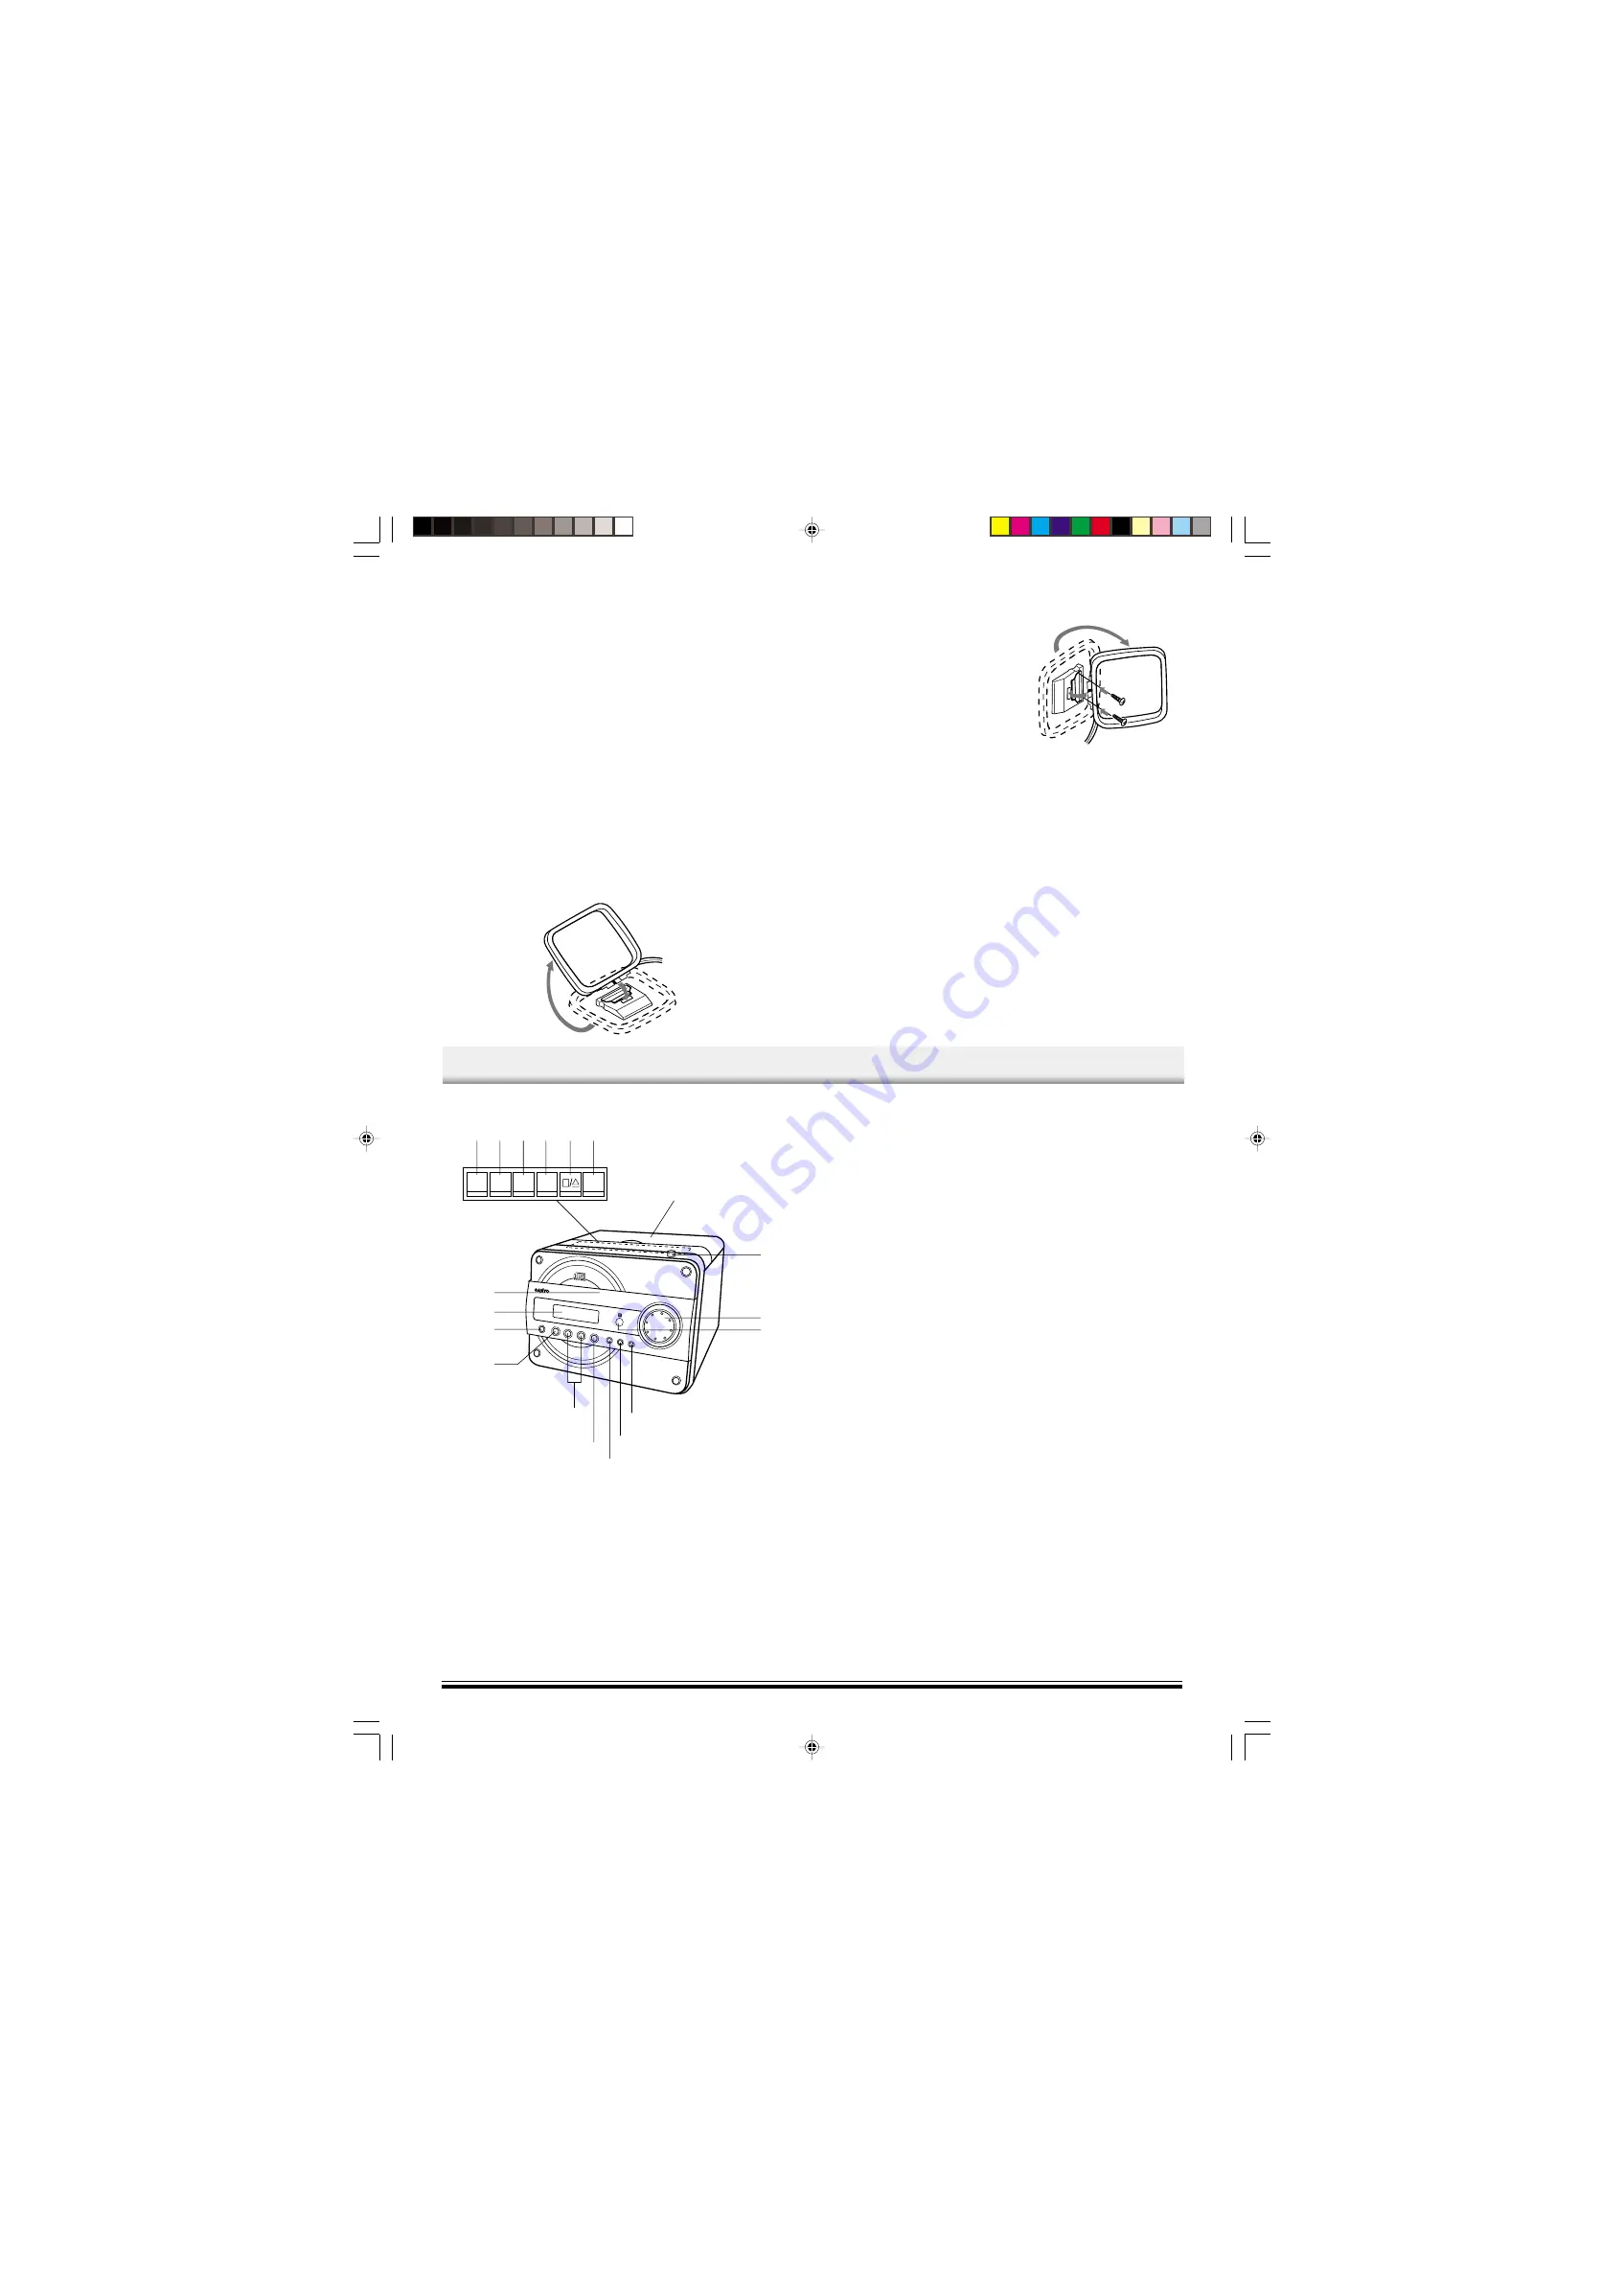
AM Loop aerial

Assemble the loop aerial as shown in figure.

Unwind the aerial wires, then connect
them to the AM LOOP terminals. Place
the loop aerial in a position which
yields the best AM reception, or attach
it to a wall or other surface as shown
in figure.

Note:
To minimize noise, the speaker, mains
and any other leads should not come
close to the indoor or external aerial
lead and AM loop aerial. Do not place
the aerial leads close to the system.

Headphones

Connect stereo headphones (not supplied) to the PHONES socket for
monitoring or for private listening. The speakers are automatically dis-
connected when headphones are connected.

Screws (not supplied)

CONTROLS

-2-

  1. Power button (

z

/ON)

  2. Display
  3. CD compartment
  4. Record button (REC)
  5. Play button (PLAY)
  6. Rewind button (REW)
  7. Fast forward button (FFWD)
  8. Stop/Eject button (STOP/EJECT)
  9. Pause button (PAUSE)
 10. Cassette button lid/Cassette holder
 11. Open button for CD compartment lid (CD DOOR OPEN)
 12. Volume control (VOLUME)
 13. Remote sensor (IR)
 14. Function button (FUNCTION)
 15. Memory button (MEMORY)
 16. Clock/Timer button (CLOCK/TIMER)
 17. Stop button (

N

)

 18. Skip/Search/Tuning buttons (

F

/TUNING -, 

E

/)

 19. Play/Pause button (

I

)

M

A D C

K

1

19

2

3

4

5

6

7

8

9

10

11

12
13

14

15

16

17

18

DC-MCR60/AU

12/10/03, 9:59 AM

3

Summary of Contents for DC-MCR60

Page 1: ...INSTRUCTION MANUAL Micro Component System 1 2 3 4 5 6 7 8 9 0 FM MODE REPEAT TUNER BAND REMOTE CONTROLLER RB MCR60 DC MCR60 DC MCR60 AU 12 10 03 9 59 AM 1 ...

Page 2: ...es or video tapes etc near the speakers Do not install this equipment in a confined space such as a book case or built in cabinet No objects filled with liquids such as vases shall be placed on the apparatus CAUTION USE OF CONTROLS OR ADJUSTMENTS OR PERFORMANCE OF PROCEDURES OTHER THAN THOSE SPECIFIED IN THE OPERATING INSTRUC TIONS MAY RESULT IN HAZARDOUS RADIATION EXPOSURE THIS PRODUCT SHOULD NOT...

Page 3: ...r attach it to a wall or other surface as shown in figure Note To minimize noise the speaker mains and any other leads should not come close to the indoor or external aerial lead and AM loop aerial Do not place the aerial leads close to the system Headphones Connect stereo headphones not supplied to the PHONES socket for monitoring or for private listening The speakers are automatically dis connec...

Page 4: ...ory button MEMORY 7 Number buttons 1 9 0 8 Tuner function Band select button TUNER BAND 9 FM mode Repeat button FM MODE REPEAT 10 Surround button SURROUND 11 Stop button N 12 Play Pause button I 13 Skip Search Tuning buttons F TUNING E TUNING 14 Function button FUNCTION 15 Bass expander button BASS Number buttons 1 9 0 These buttons are used to select the track numbers on a disc or pre set radio s...

Page 5: ...to commands from the remote control Direct start function If the following buttons are pressed when the unit is in standby the unit turns on automatically and the function is set CD section I Remote control I TUNER BAND Selecting the function Press the FUNCTION button to select the desired function Each time the button is pressed the display changes as follows CD v Tuner FM v Tuner AM v TAPE v CD ...

Page 6: ...to conventional 12 cm CDs this system can be used to play 8 cm CDs without an adapter This unit can play back the CD R RW that have recorded music data as well However some CD R RWs can not be played back depending on the recording conditions The CD R RW can t be recorded in this unit 1 Press the FUNCTION button to select CD function 2 Press the CD DOOR OPEN button OPEN appears The CD compartment ...

Page 7: ...esired channel number The number buttons on the remote control can also be used Press two number buttons within 2 seconds Preset scan tuning Remote control only 1 Press the TUNER BAND button to select AM or FM 2 Press and hold down the TU PRESET button for at least 1 second The preset stations are selected in sequence for approximately five seconds each 3 Press the TU PRESET button when the desire...

Page 8: ...ch off the power during a timer controlled operation press the z ON button The timer will be set in the standby mode To release the timer After turning the power on press the CLOCK TIMER button twice 0 disappears To set the timer again with the same settings 1 Press the CLOCK TIMER button repeatedly to display 0 2 Press the z ON button to switch off the power Note The timer operation is released i...

Page 9: ...d cleaning fluid and then clean Cleaning the CD player lens The lens should never be touched If dust is on the lens blow it off using a camera lens blower Consult your dealer Cleaning the unit Clean the outside of the unit with a clean soft cloth moistened with lukewarm water Do not use benzene thinner or alcohol since they will mar the finish of the surfaces 1 2 5 4 3 1 Cotton swab 2 Capstan 3 Pi...

Page 10: ...y response 80 Hz to 15 kHz Signal to noise ratio 40 dB Wow flutter 0 15 WRMS Fast forward rewind time Approx 110 sec C 60 General Output power 4 W x 2 at 4 ohms 10 distortion Outputs SPEAKERS 4 ohms PHONES 8 32 ohms Power requirements AC 230 240V 50 Hz Power consumption 18 W Dimensions 205 W x 166 H x 212 D mm Weight 2 3 kg Speaker systems Type Full range bass reflex Unit used 10 cm cone type Maxi...

Reviews: