background image

-7-

LISTENING TO TAPES

If a cassette is loaded, you can turn the unit on and begin play
immediately by pressing the TAPE 

a

 button.

1.

Press the FUNCTION button on the remote control to select “TAPE”
function.

2.

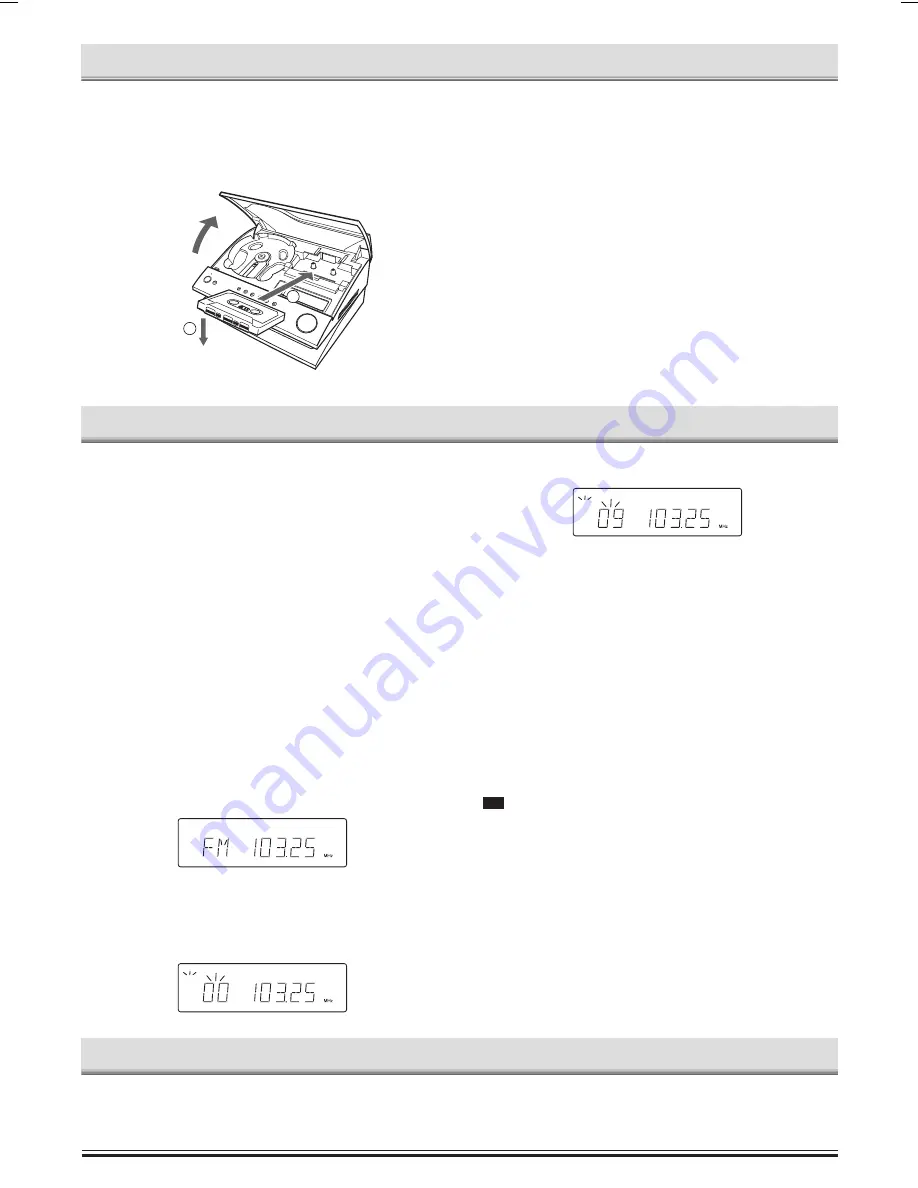
Press the the DOOR OPEN/CLOSE button to open the top
compartment.

3.

Load the cassette.

After loading the cassette, close the top compartment.

4.

Press the TAPE 

a

 button to begin playback.

5.

Press the 

n

 button to stop playback at any time.

When the end of the tape has been reached, automatic stop will
be activated.

Note:
-

Use the normal tape (TYPE 1).

-

Endless tapes cannot be used.

-

Do not use C-100 (or longer) tapes. They may jam in the
mechanism.

Fast forward and rewind

Press the 

c

 (or 

e

 on the unit), “ FF ” appears and “ 

a

 ” blinks. Press

the 

d

 button (or 

f

 on the unit), “REW” appears and “ 

b

 ” blinks.

When the desired location has been reached, press the 

n

 button.

Pause

Press 

j

 button to temporaily stop playback or recording. Press it

again to resume operation.

LISTENING TO THE RADIO

Before use

When the unit is shipped from the factory, its AM frequency band is set
as “522 - 1710 kHz (in 9 kHz steps)”.
If your local AM broadcast system is organized in 10 kHz steps, change
the frequency band to “520 - 1710 kHz (in 10 kHz steps)” as follows.
1.

Press FUNCTION button to the main unit to select “AM”.

2.

While pressing the 

n

 button on the main unit, press the DOOR

OPEN/CLOSE button. The frequency band will be changed.

Note:
To return the original setting, repeat steps above.

Automatic/Manual tuning

1.

Press the FUNCTION button to select FM or AM. The radio fre-
quency appears on the display.
-

When using the remote control, use the TUNER/BAND button.

2.

Automatic tuning

Press the TUNING – or  button for at least 1 second to
tune in a station. The unit will scan up or down the band and re-
ceive the next receivable station. Press the button again to
continue.
-

When using the remote control, use the + or – TUNING button.

Manual tuning

Press the TUNING – or  button briefly until the desired
frequency is displayed.

To preset stations

Up to 20 stations for FM band, 20 stations for AM band can be preset.
1.

Tune in the station to be preset as described above.

2.

Press the MEMORY button.

3.

While “PROG.” is blinking, press the PRESET button on the re-
mote control to select the channel to be preset.

4.

While “PROG.” is blinking, press the MEMORY button.
-

In this example, “103.25 MHz” FM station is preset on FM chan-
nel 9.

-

The number button(s) on the remote control can be used to
preset the station directly. In this example, press 9 after the
step 2 above.

5.

Repeat steps above to add more preset stations.

When presetting a new station, the previous preset station is cleared.

Listening to preset stations (Remote control only)

1.

Press the FUNCTION button to select FM or AM.

2.

Press the PRESET button on the remote control to select the de-
sired channel number.
-

The number button(s) on the remote control can also be used.

To receive FM stereo broadcasts

“ 

 ST

  ” appears when an FM stereo broadcast is received under stereo

receiving  mode.
-

If the signal from an FM stereo station is weak and reception is
poor, press the FM MODE button to change to the monaural mode.
The reception may be improved, but the sound will be monaural.

When beat interference is heard (Using the main unit)

A high-pitched noise called “beat” is sometimes heard during reception
of radio broadcasts. It this occurs,
While the 

n

 button is being pressed, press the 

f

 button to select “DC-

1” or “DC-2”. Select the setting that gives the best result.

PROG.

CH

PROG.

CH

LISTENING TO OTHER SOURCES

1.

Press the FUNCTION button on the remote control to select
“VIDEO”.

2.

Follow  the instructions supplied with the video/auxiliary equipment.

1

2

DC-MCR300_AU

7/07/2004, 16:39

7

Summary of Contents for DC-MCR300

Page 1: ...N MANUAL DC MCR300 Micro Component System VOL VOL SLEEP z ON FUNCTION MEMORY BASS 1 2 3 4 5 6 7 8 9 0 i n PRESET OVER SOUND TUNING f e TUNER BAND a d c n TAPE FM MODE REPEAT r j REMOTE CONTROLLER RB MCR300 CD RANDOM ...

Page 2: ...unit If this happens take out the disc leave the unit for about 1 hour and then pro ceed to operate The system s speakers use powerful magnets Do not place timepieces credit cards cassette tapes or video tapes etc near the speakers Do not install this equipment in a confined space such as a book case or built in cabinet No object filled with liquids such as vase shall be placed on the apparatus CL...

Page 3: ...a position which yields minimal distortion and noise In fringe areas or where reception is distorted or noisy an FM outdoor aerial not supplied should be connected instead of the simple indoor aerial Consult your dealer AM Loop aerial Assemble the loop aerial as shown in figure CONNECTIONS Unwind the aerial wires then connect them to the AM LOOP terminals Place the loop aerial in a position which ...

Page 4: ...Remote sensor IR 8 Function button FUNCTION 9 Volume button VOLUME 10 Sound preset SOUND PRESET 11 Display Cassette deck 1 Tape function Forward play button TAPE a 2 Record Record pause button j 3 Rewind Fast forward buttons f e CD player Tuner 1 Play Pause button CD i 2 Stop button n 3 CD repeat button CD REPEAT 4 FM mode button FM MODE 5 Skip Search Tuning buttons f TUNING e 1 2 3 4 5 7 8 9 10 6...

Page 5: ... 12 CD Play Pause button i 13 Preset button PRESET 14 Function button FUNCTION 15 Sleep button SLEEP 16 Memory button MEMORY Number buttons 1 9 0 These buttons are used to select the track numbers on a disc or preset radio stations If the function is CD the buttons select the track numbers on a disc If the function is TUNER the buttons select preset radio stations With any other function the butto...

Page 6: ...he minutes 5 Press the MEMORY button The clock starts The time can be set accurately by pressing the MEMORY but ton when a time signal is heard To display the clock during operation press the CLOCK TIMER button briefly After a few seconds the original display returns If a power failure occurs or the mains lead is disconnected when re connect the power the clock display blinks Reset the time again ...

Page 7: ...CD i button Track skip Skipping forward Press the e button briefly during play to skip to the next track A track is skipped each time the button is pressed Skipping back Press the f button briefly during play to skip back to the beginning of the track currently play Press the button again immediately to skip back to the beginning of the previous track Repeat play Press the REPEAT button or the CD ...

Page 8: ...t will scan up or down the band and re ceive the next receivable station Press the button again to continue When using the remote control use the or TUNING button Manual tuning Press the TUNING or TUNING button briefly until the desired frequency is displayed To preset stations Up to 20 stations for FM band 20 stations for AM band can be preset 1 Tune in the station to be preset as described above...

Page 9: ... remains lit and a blinks on the display To add another 5 second blank space press the r button again To resume recording press the TAPE a button Safeguards against accidental erasure Accidental erasure can be prevented by breaking out the tabs on the end of the cassette tape where the tape is not exposed using a screwdriver or similar implement Fig 9 If a tab is broken out in error and you wish t...

Page 10: ...the timer OFF time arrives the power turns off and the timer is set to the standby mode Timer operation repeats this cycle every day To check the timer settings Turn on the power then press the CLOCK TIMER button repeatedly The timer settings are displayed in the following order Present time Timer on time Timer off time Original preset function Original display returns MAINTENANCE Cleaning the tap...

Page 11: ...7 5 108 MHz AM 522 1710 kHz 9 kHz steps 520 1710 kHz 10 kHz steps General Output power 30 W x 2 at 6 ohms 10 distortion Input VIDEO AUDIO IN 900mV 50kΩ Outputs SPEAKER 6 ohms PHONES 8 32 ohms Power requirements AC 230 240V 50 Hz Power consumption 48 W Dimensions 280 W x 135 H x 293 D mm Weight 4 3 kg Speaker systems magnetic shield Type 2 way bass reflex Unit used Woofer 10 cm cone type Tweeter 3 ...

Page 12: ... 11 SANYO Electric Co Ltd Printed in China AU 1AD6P1P1957 GA ...

Reviews: