background image

15

5

Press the 

MENU

button to return to 

normal TV display.

Tuning of the Channels

1

Enter to SEMI-AUTO or MANUAL 
tuning mode.

(Refer to page 13.)

When there is a position you do not use, Position 4
for example, by setting the SKIP Channel function
it is possible to jump over this position, when you
are selecting a channel using the 

PROGRAMME

UP/DOWN

or 

CHANNEL SCAN

button.

3

4

5

Skip

For example, to set programme position
“4” as Skip channel ;

3

Select “SKIP” by pressing the        

PROGRAMME UP 

or

DOWN

button, 

then press the 


or

-

button 

to set SKIP to ON. To cancel Skip 
Channel function, set to OFF.

2

Press remote control “

4

” button to select

Programme Position 4.

Use the 

Digit 

button and 

PROGRAMME SELECTOR

(Number buttons) to enter Programme Number.
Do not use the 

or 

-

button to enter

programme position in this settings.

4

Select “MEMORY” by pressing the

PROGRAMME UP 

or

DOWN

button,

then press the 


or

-

button

for memory.

Any number of channels maybe set as Skip
Channels.

Skip Channel Set and Cancel

SEARCH

SKIP
MEMORY

MODE

POSITION

SEMI
START
4
OFF

- -

SELECT       ADJUST      BACK

P P

M

EXIT

SEARCH

SKIP
MEMORY

MODE

POSITION

SEMI
START
4
ON
- -

SELECT       ADJUST      BACK

P P

M

EXIT

SEARCH

SKIP
MEMORY

MODE

POSITION

SEMI
START
4
ON

OK

SELECT       ADJUST      BACK

P P

M

EXIT

INST. MANUAL-C2GW(Aus)  02.7.19 10:29 AM  Page 15

Summary of Contents for CP21AF2X

Page 1: ...P29AF2X Flat Screen CATV Hyper Band 100 Programmes with Automatic Tuning AV Stereo Sound System AV stereo sound system can reproduce a stereo sound only when a stereo signal is inputted from audio input jacks of the AV terminal Surround Sound System ...

Page 2: ...t Jacks 20 AV Connection to the Aerial Socket 20 Helpful Hints Problems Solutions 21 Specifications 22 Contents 2 For position 1 through to position 30 the picture settings Colour Brightness and Contrast and the volume level that you choose can be stored separately in memory for each position Thus you can enjoy watching TV channels with optimum picture and volume settings even if you change from o...

Page 3: ...ncelled at any time by pressing the MENU button This procedure only appears at the first switch on time 1 Connect power cord of the TV set to a wall outlet and turn on the TV set by pressing the Mains ON OFF button Self automatic tuning system will be started as follows Let s start NO STATION PLEASE CONNECT ANTENNA PLUG If no TV stations are found the display shown below will appear Please check i...

Page 4: ...trol Mains ON OFF Button Remote Control Detector Stand by and Power Indicator Audio Input Jack Right AV2 Audio Input Jack Left AV2 Video Input Jack AV2 Headphone Jack Mini Stereo Jack For personal listening a headphone can be connected to the headphone jack Programme UP DOWN VOLUME P MENU TV AV Pull to open L AUDIO R VIDEO AV2 INPUT Model CP21AF2X MENU Model CP29AF2X P MENU TV AV Pull to open Main...

Page 5: ...he television receiver to direct sunlight and other source of the heat Do not stand the television receiver directly on other products which give off heat E g video cassette players audio amplifiers Do not block the ventilation holes in the back cover Adequate ventilation is essential to prevent failure of electrical components Do not squash power supply cord under the television receiver Warning ...

Page 6: ...ries may leak and damage the unit The normal life of batteries should be from nine to ten months Battery Cover Battery installation of the Remote Control Transmitter 0 7 1 4 8 5 2 3 6 9 P P JXMYA P P TV AV A B CH SCAN TIMER MENU PIC MODE SWAP BASS SURROUND SOUND MUTE TV AV Selector Digit RECALL COLOUR SYSTEM VOLUME PROGRAMME DOWN ALTERNATE CHANNEL SCAN TIMER POWER ON OFF Programme Selector PROGRAM...

Page 7: ... position if the power failure occurs while viewing This TV set incorporates the AUTO SHUT OFF function Even if the TV is left on after you have gone to sleep the TV set changes to the standby mode within 10 minutes after all broadcasts have ended OFF 0 10 Press the Programme UP P button to select the next programme position Press the Programme DOWN P button to select the previous programme positi...

Page 8: ...button to select the following picture modes PERSONAL DYNAMIC NATURAL ECO and GAME Select picture modes to suit pic ture type you are watching Each time the PICTURE MODE button is pressed picture settings changes as follows Emphasize very vibrant colours Suitable for AV mode in brightly lit room condition Emphasize original colours PERSONAL GAME ECO DYNAMIC NATURAL Low power mode 29 OFF 0 30 ON 3 ...

Page 9: ... OFF 0 01 will be display on the screen To cancel the OFF TIMER select OFF 0 00 by pressing the VOLUME or button When the ON TIMER is set TV will auto matically be switched on to the selected programme position when the specified time has elapsed Setting programme position for when TV is switched on by ON TIMER 1 Press the TIMER button twice ON TIMER setting mode ON 0 00 2 2 Press the VOLUME or bu...

Page 10: ...d in TV mode Will not be displayed in AV mode Picture Adjustment Menu PERSONAL Note The picture adjustment data Colour Brightness Contrast Tint and Sharpness is automatically stored in PERSONAL mode of the Quick Picture Controls See page 8 These settings will be used when PERSONAL mode is selected 1 Press the MENU button for MAIN menu display Basic picture adjustment operation 4 Select desired con...

Page 11: ...V mode surround mode is changed as follows SURROUND 1 SURROUND 2 and SURROUND OFF SURROUND 1 is normal surround mode Selection of SURROUND 2 obtains a deeper surround effect To return to Main menu press the ALTERNATE button To return to normal TV mode press the MENU button Or will automatically return to normal TV mode after 20 seconds Audio Adjustment Menu SELECT ADJUST BACK P P M EXIT TREBLE BAL...

Page 12: ...e channels are automatically tuned in and memorized in consecutive programme position 2 Semi Auto Tuning Use to preset a receivable channel in any desired programme position e g the position with the same number as the channel 3 Manual Tuning Manually tune a channel if it cannot be auto matically tuned such as when the signal is poor 1 Press the MENU button for MAIN menu display 2 Select PRESET by...

Page 13: ...ies and the VOLUME button will move tuning toward the lower frequencies 6 Select SEARCH by pressing the Programme UP or DOWN button Semi Auto Tuning Press and release the VOLUME or button to search for required TV station Once a station is located tuning will automatically stop Continue till desired channel is located Manual Tuning Press and hold the VOLUME or button to search for required TV stat...

Page 14: ...channels will now have changed places Use this channel swapping feature to swap the channels between two stored programme position This feature is particularly useful after automatic tuning 1Select programme position 6 2 Press the SWAP button For example to swap the channel between programme position 6 and programme position 12 6 12 6 SWAP 6 AND 3 Press the Digit button 1 button and then 2 button ...

Page 15: ...r button to set SKIP to ON To cancel Skip Channel function set to OFF 2 Press remote control 4 button to select Programme Position 4 Use the Digit button and PROGRAMME SELECTOR Number buttons to enter Programme Number Do not use the VOLUME or button to enter programme position in this settings 4 Select MEMORY by pressing the PROGRAMME UP or DOWN button then press the VOLUME or button for memory An...

Page 16: ...the programme position 15 as the private position 1 Select programme position 15 15 2 Press and hold the RECALL COLOUR SYSTEM button for more than 2 seconds 15 The programme number 15 will shift to centre of the screen 15 The picture will disappear and X 15 will be display on the screen The private position setting is now completed 3 Press the MENU button X15 Private position is used to restrict o...

Page 17: ...necting to the Rear AV1 Input Jacks If the audio signal from a VCR is stereo be sure to connect the right and left channels to the respective right and left AUDIO IN terminals Then select L R channel of the audio channel in the TV set with the remote control STEREO MONO button L R TV mode Each time the TV AV Selector is pressed AV position is changed as follows AV1 AV2 28 Each time the STEREO MONO...

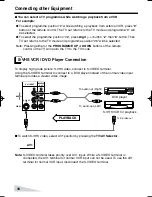
Page 18: ...connect to S VIDEO terminal Using the S VIDEO terminal to connect to a DVD player instead of the normal video input terminal provides a clearer video image S VHS VCR DVD Player Connection You can select a TV programme while watching a playback from a VCR For example To select programme position 9 while watching a playback from external VCR press 9 button of the remote control The TV set returns to...

Page 19: ... AV equipment being used it may be necessary to select colour system In this case press the RECALL COLOUR SYSTEM button and select a suitable colour system Selecting the Colour System in AV mode Video Camera TV Game etc It is convenient to use the AV2 input jack on the front panel for equipment that is often connected and disconnected Connecting to the Front AV2 Input jacks To video and audio outp...

Page 20: ... the AV1 terminal input select AV1 position by pressing the TV AV Selector Recording TV broadcasts or tape dubbing VCR for recording To record TV programme select TV mode by pressing the TV AV Selector and record the desired programme TV mode To video and audio inputs AV1 15 Connecting to the Monitor Output Jacks The picture signal being displayed on the TV screen is output through the Monitor Out...

Page 21: ...rial connection Poor picture sound OK No colour Picture OK Adjust Colour or Tint control Adjust Fine Tuning See page 10 Check aerial connection Is the programme in colour Try a different channel Weak picture No sound or poor sound Sound Mute may be on Press the SOUND MUTE button on the remote control Adjust Volume May be station trouble Try a different channel Remote Control will not work Check ba...

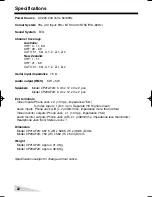
Page 22: ... terminals Video Inputs Phone Jack x 2 1 0Vp p impedance 75 Ω S Video Input x 1 Din 4 pin Separate Y C Signals Input Audio inputs Phone Jack L R x 2 436mVrms impedance more than 40KΩ Video monitor outputs Phone Jack x 1 1 0Vp p impedance 75 Ω Audio monitor outputs Phone Jack L R x 1 436mVrms impedance less than 600Ω Headphone Jack Mini Stereo Jack x 1 Dimension Model CP21AF2X 587 5 W x 596 5 H x 4...

Page 23: ...23 Memo ...

Page 24: ...Part No 1AA6P1P3615 C2GW FC3 A SANYO ELECTRIC Co Ltd ...

Reviews: