background image

ON 

         Central heating and Hot water is ON continuously 

AUTO           Central heating and Hot water will be switched ON or OFF as 
  programmed
ALL DAY     

Central heating and Hot water will be switched ON only once each  


day between the first ON time and last OFF time.

OFF 


Central heating and Hot water continuously OFF


SETTING THE TIME

- Press the SET button (1) once. The configuration setting will appear on

  the screen.

- Press the SET button (1) again. The clock icon (2) on the screen will flash. 

- Press the +/- buttons (3) to adjust the time. Time will change quicker if pressed 
  continually.
- Press SET (1) once to move on to setting the DATE or press multiple times to return 
  to RUN mode.
 

SETTING THE DATE

- Press the SET button (1) until the Y:XX icon (year) appears and the D (DATE) 

  icon (4) flashes.

- Press the +/- button (3) to set the year.
- Press NEXT button (5). M:XX appears (month).
- Press +/- button (3) to set month.
- Press NEXT button (5). D:XX appears (Day).
- Press +/- button (3) to set day.
 

You can review or edit the date you have set just by pressing NEXT button (5) again 

and repeating the sequence above. To confirm the date and move on to PROGRAM 

mode press SET button (1) once or press SET button (1) multiple times to return to 
RUN mode.

CHANGING PROGRAMME TIMES

 
The built in programmes can easily be changed to better suit your lifestyle. 

To change the times:
 

Press SET button (1) until PROGRAM (2) flashes in the display and 1 ON (5) appears. 
This indicates the time shown on the display is the first ON time.

By pressing the +/- buttons (3) you can alter the ON time to the time you want.

Press NEXT button (4), display will now show 1 OFF (5).
By pressing the +/- buttons (3) you can alter the OFF time to the time you want.
Press NEXT button (4) to access remaining ON/OFF periods and alter in same manner 
as above. 
To return to RUN mode, press the SET button until the display indicates RUN on the 
display

NOTE:

 Programming is in 10 minute segments.
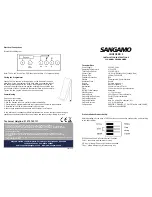
(2) (4)

(1) (3)

(5)

(2) (5)

(1) (3)

(4)

4

5

Summary of Contents for choice pr 1

Page 1: ...the bottom of the programmer into position ensuring the connection pins on the back of the unit locate into the terminal slots in the back plate Tighten the two captive screws to fix the unit securely Commisioning Switch on mains supply Referring to the user guide 1 Use the buttons to ensure correct product functionality 2 Set timing and programme details in accordance with customer requirements 3...

Page 2: ...e IT IS ESSENTIAL that the metal be earthed DO NOT use a surface mounting box No earth connection is required as the product is double insulated but ensure continuity of earth throughout the system NEVER fit or remove the unit to a live wall plate Fitting Back Plate Direct Wall Mounting 1 Position the wall plate terminals along top edge with 60mm min clearance to its right 25mm min above 90mm min ...

Page 3: ...ilure the screen will go blank but the back up battery ensures that the programmer continues to keep the time and retain your stored programme When power is restored if there has been no change to the rear DIP switch the programmer then goes to RUN mode If the configuration setting on the rear DIP switch has been altered during the power interruption the screen will initially show the new configur...

Page 4: ... Configuration Display 2 ON OFF Pumped System 2PU 3 ON OFF Pumped System 3PU The 24 hour or 5 day 2day or 7 day programming option as set up by the installer can also be verified at this stage by how the Monday to Sunday indicators are displayed Programming option Monday to Sunday Indicators flash 7 DAY Mon to Sun individually shown 5 2 DAY Mon to Fri together then Sat Sun together shown 24 HOUR M...

Page 5: ...rammer the initial programme displayed will be for Monday to Friday Pressing the DAY button will take you to the programme for Saturday and Sunday The ON OFF times can be changed for each day group as described above in the section CHANGING PROGRAMME TIMES If you press COPY button the current programme will be copied onto the next day group 24 hour programmer option If the unit is installed as a 2...

Page 6: ...utton 3 to set month Press NEXT button 5 D XX appears Day Press button 3 to set day You can review or edit the date you have set just by pressing NEXT button 5 again and repeating the sequence above To confirm the date and move on to PROGRAM mode press SET button 1 once or press SET button 1 multiple times to return to RUN mode CHANGING PROGRAMME TIMES The built in programmes can easily be changed...

Reviews: