background image

9

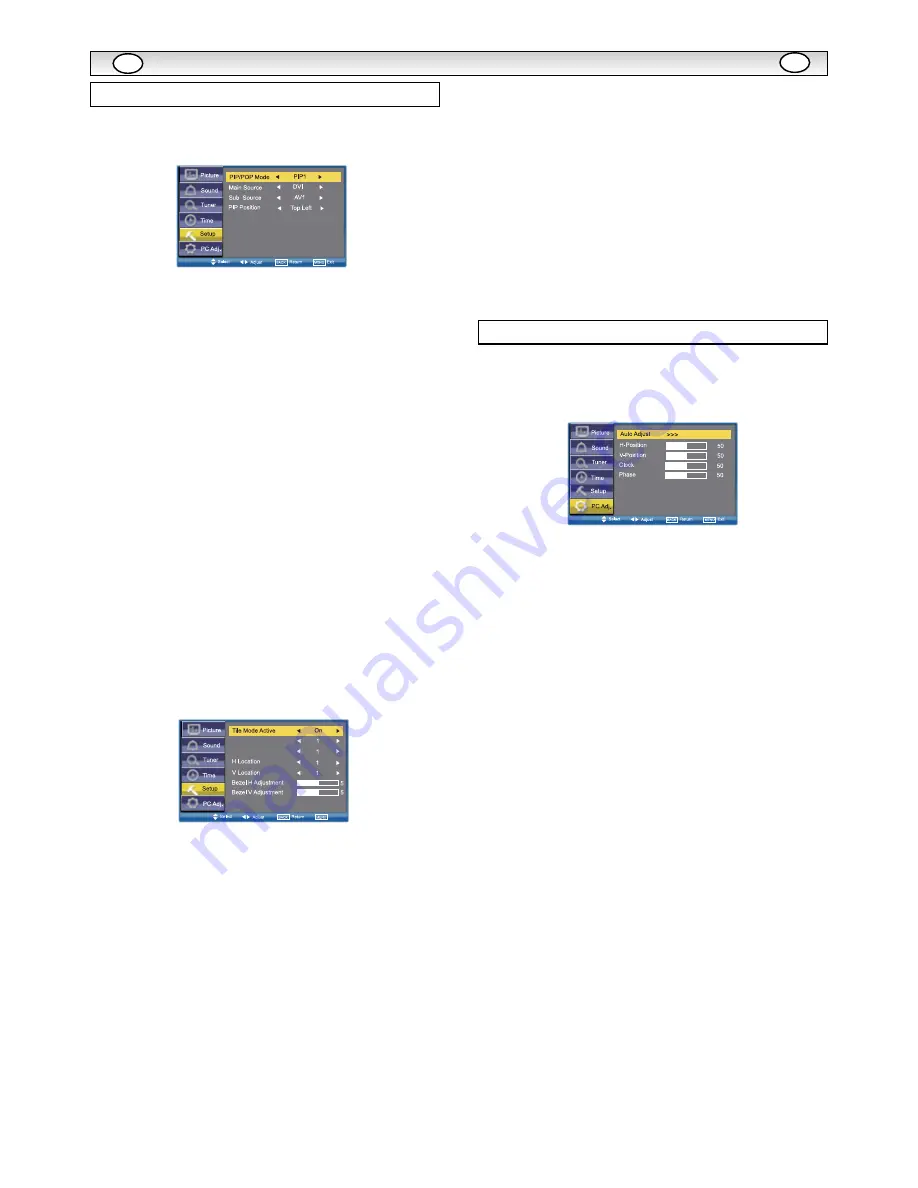
PIP/POP Setup

Use the 

5

or 

6

button to select PIP/POP Setup and press the

1

or 

2

button to enter the sub menu.

PIP/POP Mode: Using the 

1

or 

2

button select the most

suitable mode PIP1PIP2POP or Off. (Please refer to page 12.)


When Mode is set to OffSub Source and PIP Position will not 
work. 

Main Source is used to select input source (AV1, RGB,  AV2, AV3,
PC, DVI or Network ) for main picture by using the 

1

or 

2

button.

Sub Source is used to select input source (AV1, AV2, AV3, PC or
DVI ) for sub picture by using the 

1

or 

2

button.


For a combination of main picture and sub picture: only DVI or
Network input can assemble with other input source. For 

example, if main source is selected as AV1 input, then the sub 
source must be DVI or Network input.

PIP Position:  Using the 

1

or 

2

button it can be selected

Top LeftTop RightBottom Right or Bottom Left.

Initial Settings

This function returns all setting values except for Installation Mode. 

Text Language  

Use the 

5

or 

6

button to select Text Language and press the

1

or 

2

button to select Western, Eastern, Russian, Arabic or

Farsi.


Tile Mode

This function allows you to split an image to suit your monitor grid
format to create a video wall.
Use the 

5

or 

6

button to select Tile Mode and press the 

1

or 

2

button to enter the sub menu as follows.

Tile Mode Active can be set On or Off using the 

1

or 

2

button.

H_Sets is used to divide the horizonal picture into more than one
part, but the most is 5 parts (5 monitors).

V_Sets is used to divide the vertical picture into more than one part,
and the most is also 5 parts (5 monitors). Using the 

1

or 

2

button to set.

H Location is used to select one part of the horizonal picture to 
display on the current LCD Monitor using the 

1

or 

2

button.

V Location is used to select one part of the vertical picture to 
display on the current LCD Monitor using the 

1

or 

2

button.

Bezel H Adjustment is used to align the image horizontally with
respect to the other monitors in the video wall to accomodate the
bezel width using the 

1

or 

2

button. (0~10) 

Bezel V Adjustment is used to align the image vertically with
respect to the other monitors in the video wall to accomodate the
bezel width using the 

1

or 

2

button. (0~10)


AV2 Setting

Use the 

5

or 

6

button to select AV2 Setting and press the

1

or 

2

button to select YPbPr or RGBHV.

Connect your PC to either PC-IN or RGBHV on the rear of the set. 
Once connected select PC mode or AV2 (RGBHV, see page 5 for 
AV2 input settings) via the INPUT button on your remote control.  
The set will become a monitor for the PC.


Native Resolution

Use the 

5

or 

6

button to select Native Resolution and press

the 

1

or 

2

button to select XGA or WXGA 1366 x 768.


PC Power Save

Use the 

5

or 

6

button to select PC Power Save and press the

1

or 

2

button to select ON or OFF.

Press the MENU button and select PC Adj. using the

5

or 

6

buttons, press the 

1

or 

2

button to enter. Press the BACK

button to return to the previous menu. Press the MENU button to exit
menu operation.

Auto Adjust is used to automatically detect incoming signal, and  

adjust itself to optimize its performance by using the 

1

or 

2

button. If the image is not displayed properly, a manual adjustment 
is required (Refer to following adjustments).

H-Position is used to move the horizontal picture position by using 
the 

1

or 

2

button.

V-Position is used to move the vertical picture position by using the   

1

or 

2

button.

Clock is used to eliminate flicker from the image by using the 

1

or 

2

button.

Phase is used to eliminate disorder from the image by using the  

1

or 

2

button.

MENU OPERA

MENU OPERA

TION

TION

GB

GB

Setup menu

PC Adj. menu

H_Sets

V_Sets

Summary of Contents for CE52LH1R - 16:9

Page 1: ...ours of pleasure from your new LCD monitor Veuillez lire attentivement ce mode d emploi avant d utiliser votre moniteur d affichage à cristaux liquides Nous espérons que votre nouveau dispositif d affichage vous procurera de nombreux instants de bonheur Lea este manual de instrucciones antes de usar su nuevo monitor Deseamos que disfrute de él muchas horas English Page 2 15 Français Page 16 28 GB ...

Page 2: ...leaners or aerosol cleaners directly onto the LCD monitor Use a damp cloth for cleaning ADDITIONAL FOR NORTH AMERICA AND CANADA This monitor must NOT be permanently mounted to the building structure It must be mounted in such a way that it can be removed using basic tools The power supply cord must NOT be attached to the building sur face The power supply cord must NOT be routed through walls ceil...

Page 3: ...repair and service jobs to an authorised service technician He will exclusively use such spare parts that are complying with the same safety standards as applicable to the original parts The use of original spare parts can prevent fire shock and other hazards Unplug the LCD monitor from the wall outlet and refer servicing to qualified service personnel under the following conditions If the power c...

Page 4: ...ns Disclaimer 1 The Software is to the extent permitted by law supplied as is and SANYO and its suppliers expressly exclude all warranties express or implied including but not limited to warranties of satisfactory quality fitness for purpose and non infringement save to the extent that the same are not capable of exclusion at law 2 In no circumstances will SANYO be liable for any direct indirect c...

Page 5: ...PC input via the BNC terminals Both options support a large range of resolutions page 15 4 AV3 Composite CVBS signal input AV3 OUT is to output the composite video signal from the VIDEO IN so that you can connect monitors with the use of a loop through function 5 DVI D Digital Video Interface This monitor has a DVI connector This is located at the back of the monitor next to the phono sockets This...

Page 6: ...ence mode Standard Normal viewing mode Dynamic Suitable for brightly lit rooms Soft Low contrast setting Eco Suitable for dimly lit rooms and gives a cinema like effect F OK To confirm the initial setting in the menu Freeze To switch picture still on or off TXT TV To select Teletext mode Main Sub Picture Swap To swap Main and Sub picture ON OFF To switch OFF PIP 1 PIP 2 POP mode in turn Refer to p...

Page 7: ...on Press the 1 or 2 button to enter Set the picture settings for your personal preference 2 Use the 5 or 6 button to select eg Brightness and the 1 or 2 button to adjust levels White Tone May be used to adjust the color tone of the picture Use the 5 or 6 button to select White Tone and press the 1 or 2 but ton to enter the sub menu You can select Personal Cool Standard or Warm settings by using th...

Page 8: ... Time Use to set the current time using the Numeric buttons Other items in Time Menu should not be selected until Current Time has been set Schedule Use to set up to 20 separate time schedules select 1 20 using the 1 or 2 button Weekday Use to set any weekday from Sunday through to Saturday or Everyday using the 1 or 2 button Time Use to set any time using the Numeric buttons Action Use to set Pow...

Page 9: ...ng the 1 or 2 button V Location is used to select one part of the vertical picture to display on the current LCD Monitor using the 1 or 2 button Bezel H Adjustment is used to align the image horizontally with respect to the other monitors in the video wall to accomodate the bezel width using the 1 or 2 button 0 10 Bezel V Adjustment is used to align the image vertically with respect to the other m...

Page 10: ...ition OFF Child Lock You can prevent unwanted operation of the LCD monitor via the buttons on the rear of the monitor Select using the 5 or 6 button Press the 1 button to select On or OFF The Child Lock OSD will appear if buttons are pressed when child lock is On Standby operates normally when childlock is set On Address Set the address for the LCD monitor 0 999 Baud rate Select Baud rate using th...

Page 11: ...the top and bottom are cropped Zooms in slightly cropping the top and bottom Zooms in slightly cropping the top and bottom The black bars top and bottom are smaller and the picture height is compressed slightly Normal Natural Wide 4 3 14 9 16 9 Letterbox Video The correct ratio is maintained with black bars on the left and right Black bars left and right picture height is stretched Black bars left...

Page 12: ...icture Swap but ton will switch the location for main and sub picture Only the sound on the main picture is heard from the monitor speaker The sound on the sub picture cannot be heard The details for PIP POP operation eg location for sub picture or input source for any picture etc please refer to page 9 The left picture is main picture the right picture is sub picture OPERA OPERATION TION GB GB PI...

Page 13: ...of TEXT superimposed are displayed simultaneously CANCEL mode TEXT MIX MODE is cancelled temporarily and AV image is displayed If the signal is removed or disconnected the monitor will revert to a blue back ground with No signal message on the screen If the TXT TV button is pressed during the CANCEL mode the CANCEL mode will be cancelled and full text will resume Text Size Press Text Size button t...

Page 14: ...splay Native Resolution 1920X1080 Viewing angles H 176 V 176 Dimensions WxHxD 1304 x 800 x 234mm Weight kg 68 NO PICTURE NO SOUND Check if monitor is plugged in Check monitor is not in standby mode POOR PICTURE Adjust BRIGHTNESS CONTRAST LEVELS too low NO COLOUR PICTURE OK Adjust COLOUR control Check lead connections Does the signal input have colour REMOTE CONTROL DOES NOT WORK Check batteries ar...

Page 15: ...60 00 63 79 60 18 63 74 60 01 63 34 59 98 63 370 60 01 34 50 60 32 75 00 55 38 38 00 60 51 53 67 85 06 60 00 48 50 60 31 61 00 68 68 60 24 60 00 60 00 50 00 79 976 75 025 75 08 85 00 75 70 74 92 60 02 The monitor can be automatically adjusted in pc mode when receiving a standard VESA signal It will be displayed as XGA when the monitor is receiving a XGA or WXGA signal 37 5 Resolution Horizontal Fr...

Page 16: ... Status of Color CR TINT Status of Tint CR SHARP Sharpness CR WBAL Status of White Balance Mode information CR WBAL R Status of White Balance Red CR WBAL G Status of White Balance Green CR WBAL B Status of White Balance Blue CR NZRED Status of Noise reduction setting CR FILM Status of Film mode setting CR IMAGE Status of Image selection The same as PICTURE mode CR DCDI Status of DCDi setting CR AC...

Page 17: ...tatus of AV auto shut OFF Information CR CHILDLOCK Statuses of Child lock Information CR RCINHIBITION Status of RC Inhibit Information Other Read Command Table Status read command Item CR STATUS Status of the operation of the monitor CR SIGNAL Status of with or without signal CR FREEZE Status of Freeze setting CR FANLOCK Statuses of fun lock error CR TEMP Status of current temperature value UK5 Re...

Page 18: ...Printed in U K Part No 1KA6P1P0423 C N5VV 1 ...

Reviews: