background image

7

■ 

Remove a channel.

1. Highlight a channel to be removed.

2. Press Red button and it will be deleted, the screen shows a red

line through it. To deselect a deleted channel press Red button
again.

✐ 

Red button refers to coloured buttons Red, Green, Yellow and
Blue. Do not get confused with larger Red Standby button.

3. Add more channels, move selection, rename list, remove or swap

or press the OK button to finish the list or MENU to exit.

■ 

Swap channels. 

1. Choose a channel that you wish to swap with another by pressing

the 

e

e


or 

d

d


buttons . Press the Yellow button to enter the Swap

screen.

2. Use 

7

7


8

8


and numeric buttons to enter channel number and

press OK to swap.( When in swap screen you can press RETURN
repeatedly to take you back a screen).

3. Add more channels, move selection, rename list, remove or swap

or press the OK button to finish the list or MENU to exit.

4. Press Menu to return to normal picture.

When watching a digital channel. Press the 

8

8


button. A title bar

appears at the bottom of the screen with each press of the

8

8


but-

ton it will select All channels and all your set user lists.

Use the 

e

e


or 

d

d


buttons to browse through the list, the TV will

switch to this channel. ( Only channels in the selected list will be
browsed).

Parental lock can be used to block entry into the Menu functions and
to allow you to block access to selected channels.

The first time you use this function the code numbers are 1 2 3 4.
If you forget the code there is a default code 6 9 3 1 this will always
give you access to Parental lock.

● 

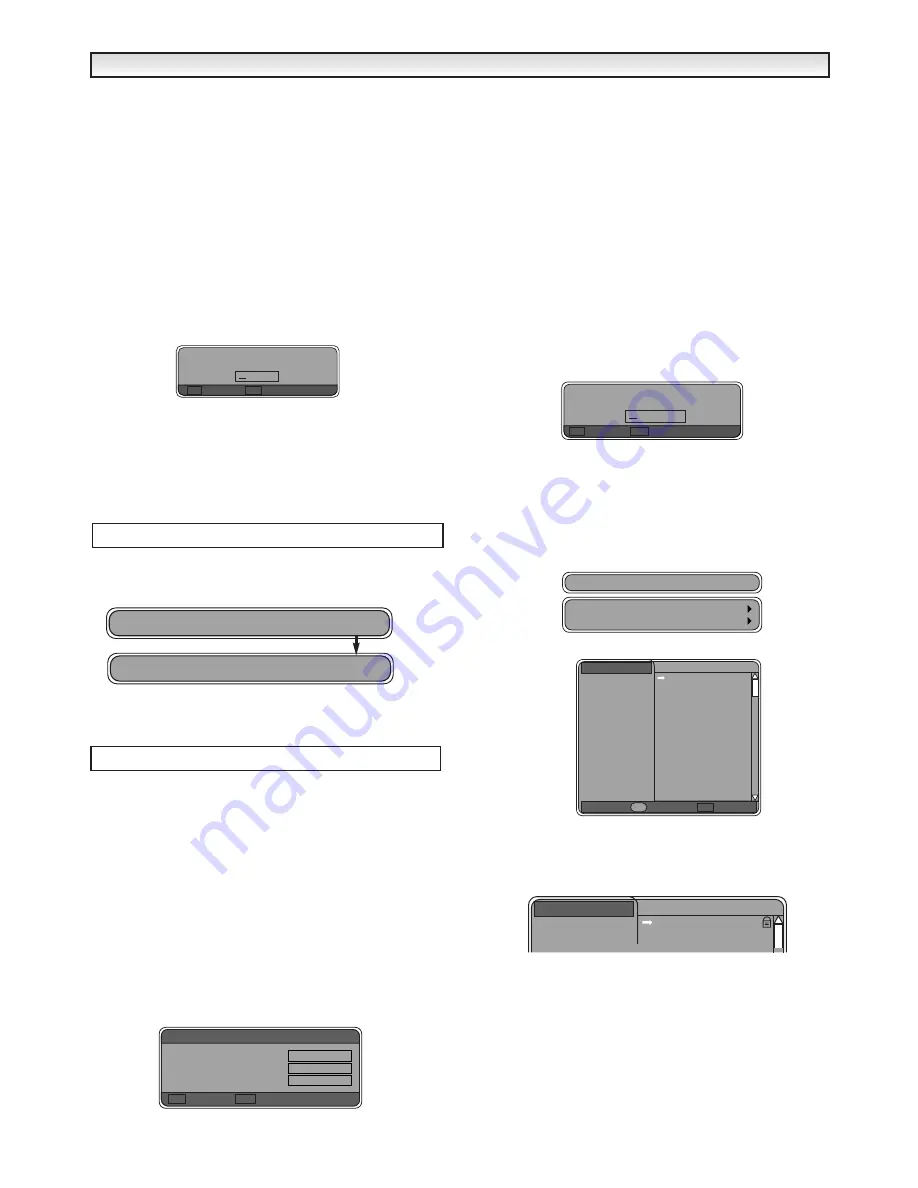
How to change the code to your own preference.

1. Press MENU to select Main Menu.

2. Using 

e

e


or 

d

d

buttons select Configuration and press 

8

8

to enter.

3. Press  

d

d

to select Change parental code. Press 

8

8

to enter.

4. Enter Old code into yellow box which is highlighted, using the 0-9

numeric buttons (If this is the first time you have selected this
function it will be 1 2 3 4). Use 

7

7


button to go back and re-enter

an incorrect digit.

5. Select New code by pressing 

d

d

button, and enter your new code

eg. 4 3 2 1.

6. Select Confirm new code by pressing the 

d

d

button, and re-enter

the code 4 3 2 1.

7. If you are happy with the new code press OK to select. A prompt

Save new code? will appear. Press the Red button to confirm. 

✐ 

If Invalid code! appears you have entered the incorrect old code.
Press RETURN button and try again.

Press MENU to return to normal picture.

● 

To activate parental lock.

1. Press the MENU button to select Main menu.

2. Using 

e

e


or 

d

d

buttons select Parental lock. Press  

8

8


to enter.

3. Enter your code and press OK to save. If wrong code is entered

Invalid code! will appear and you have to repeat 1-3 again.

✐ 

Parental lock is now activated you will now have to enter the code
every time before you can enterMain menu unless parental lock is
deactivated. See page 8.

● 

Blocking access to selected channels.

1. Press the MENU button to select Main menu.

2. Using 

e

e


or 

d

d

buttons select Channel List. Press  

8

8


to enter.

3. Select Lock channels Using 

e

e


or 

d

d

buttons. Press  

8

8


to enter.

4. Using

e

e


or 

d

d

buttons select a Channel you wish to lock.

5. Press Yellow button, a locked symbol will appear  to show it is

selected. To  de-select press Yellow button again. Repeat until all
channels you wish to lock are selected.

6. Press OK to Save.

This takes you back to Channel List Menu.

To return to normal picture press MENU button.

Swap

?

OK Save

RET Cancel

Using User Lists

1  BBC ONE                                    All Channels

2  BBC TWO                                    MY LIST 1

DIGIT

DIGIT

AL

AL

OPERA

OPERA

TION

TION

Parental lock

Old code
New code
Confirm new code

OK Select

RET Cancel

Change parental code

* * * *

* * * *

* * * *

Enter parental code

?

OK Save

RET Cancel

Lock channels

All channels

BBC ONE

BBC ONE
BBC TWO
ITV 1
Channel 4
five
ITV 2
BBC THREE
Teletext
BBC FOUR
Sky Travel
UK History
Ch 14
CH 15
QVC
TV Travel  Shop

1
2
3
4
5
6
7
8
9
10
11
12
13
14
15

OK Save

Parental lock

Y

Edit channel list

All channels

BBC ONE

BBC ONE
BBC TWO

1
2

Lock channels

Channel list

Scan for channels

Summary of Contents for CE28DFN2-B

Page 1: ...CE28DFN2 B CE32DFN2 B Please read this Instruction book before using your television We wish you many hours of pleasure from your new television Colour Television INSTRUCTION MANUAL ...

Page 2: ...tware applications utilities and modules embedded within the Product which is owned by Sanyo or its licensors Before using the product please read the End User Licence Conditions detailed below If you do not agree to the terms and conditions of the End User Licence Please do not pro ceed to use the Product repack the Product unused and return it to your supplier together with proof of purchase for...

Page 3: ...h an approved non rewireable UK mains plug To change a fuse in this type of plug proceed as follows 1 Remove the fuse cover and fuse 2 Fit a new fuse which should be a BS1362 5Amp A S T A or BSI approved type 3 Ensure that the fuse cover is correctly refitted If the fuse cover is lost or damaged the plug must NOT be used but replaced with a serviceable plug If the fitted plug is not suitable for y...

Page 4: ...r cable is installed please follow the description TUNING on page 13 This procedure only appears the first time you switch on Press 5 and 6 increases or decreases the programme position Press 1 or 2 increases or decreases the sound volume Mains ON OFF Power indicator Front terminals To select the AV3 mode press the v button repeatedly When the headphones are inserted the sound from the TV speakers...

Page 5: ...sound from the speakers The sound changes as follows Normal volume Half volume Mute Programme up and down To select the next programme number or previous programme number Volume up down To adjust the sound level Bass selection To get an emphasised bass sound ON or OFF Standby Power on off To switch the TV on and off Also see page 14 Cursors To select the sub menu items in the menu display Up Down ...

Page 6: ...highlight chan nel selection Press OK to add to your list a X will appear next to the channel 6 Repeat to add all the channels you want in your list 7 Press Blue button to save selection 8 Add more channels move selection rename list remove or swap or press the OK button to finish the list or MENU to exit Move selection To change the order of channels in your list 1 Select the channel you wish to ...

Page 7: ...cted this function it will be 1 2 3 4 Use 7 7 button to go back and re enter an incorrect digit 5 Select New code by pressing d d button and enter your new code eg 4 3 2 1 6 Select Confirm new code by pressing the d d button and re enter the code 4 3 2 1 7 If you are happy with the new code press OK to select A prompt Save new code will appear Press the Red button to confirm If Invalid code appear...

Page 8: ...ish to be shown when available then select your preference for the first language Example as shown will give you English first language if not available Welsh may be shown 5 To change press e e or d d buttons to highlight the box and press 7 7 or 8 8 to select your preferred First language and repeat for Second language 6 Press d d button to select Subtitle display This can be set ON or OFF by pre...

Page 9: ...Press Return or OK button to go back to Technical information screen Software upgrade 1 Press d d button to select Software Upgrade screen Press 8 8 to enter This looks for any new software upgrades that maybe transmitted at any time 2 Press Return button to go back to Technical information screen 3 Select Product Data by using e e or d d buttons and press 8 8 to enter This is useful to service en...

Page 10: ...9 Press OK to save settings you can repeat again or press RETURN button to go back to Main menu Press MENU to exit Once you have set the timer recording 5 minutes before the selected time the following screen appears You can either press the Red button and delete press the Green button and the channel will change at the due time press the Yellow button to change to the channel now or press the Blu...

Page 11: ...E button to go to the full guide Press the 5 or 6buttons to change to the channel From time to time upgrades will become available When this hap pens the following screen appears To upgrade press the OK button and the following screen will appear Press OK to start this automatically downloads for you The follow ing screen appears The following screen appears to show that the upgrade it nearly fini...

Page 12: ... such as current programme number stereo status and remaining time if set for about 5 seconds Picture mode selector To access a series of picture modes PERSONAL STANDARD ECO and DYNAMIC Sound mute To switch the sound from the speakers The sound changes as follows Normal volume Half volume Mute Programme up and down To select the next programme number or previous programme number Channel mode selec...

Page 13: ...ers colour changes to green The tick appears as shown above and its colour changes to yellow If you have set the off timer then one minute before the TV switches a display appears on the screen 4 Press the MENU button repeatedly to exit the menu If the TV set is switched off by the Mains Switch 4 or you enter the preset mode the timer settings will be cancelled Child lock You can prevent small chi...

Page 14: ...ipped when e or d button is pressed To select Skip Press d and press 7 or 8 to set to ON or OFF You can still view a programme position that has been skipped by using the numeric buttons to select the programme position directly 6 Select memory by pressing the d Press 8 a tick indicates the chan nel is now stored Press MENU button repeatedly to exit and return to normal TV picture Swap Use this ch...

Page 15: ...e screen The 4 coloured buttons give access to the corresponding subjects or pages Direct access to a page All the numeric buttons can be used to select a page number directly If you need page 301 press 3 then 0 then 1 Index page selector To call up the Index pages eg P100 Page up and down To select the next page number or previous programme number Teletext TV selector To switch TV MIX and Teletex...

Page 16: ... switch off is displayed on the screen No signal will also appear in digital mode When the TV set is switched on by using the ON Timer function with no signal being received this function will be ignored Use of Audio Output Jacks This TV provides the audio monitor output jacks on the rear of the cabinet back You can connect your audio equipment to these jacks to give you sound through your audio e...

Page 17: ...he top and bottom Zooms in slightly cropping the top and bottom The black bars top and bottom are smaller and the picture height is compressed slightly ZOOM 14 9 4 3 14 9 16 9 Letterbox Video As zoom 14 9 but bottom is compressed even more to allow subtitles to be seen As zoom 14 9 but bottom is compressed even more to allow subtitles to be seen As zoom 14 9 but bottom is compressed even more to a...

Page 18: ...rea INTERFERENCE Interference may be caused by electrical appliances car ignition systems etc This should normally be a temporary condition but should this interference persist contact your dealer TV specifications TV SPECIFICA TV SPECIFICATIONS TIONS Your television is fully transistorised and does not contain any user serviceable components You must not remove the rear cover of the TV by yoursel...

Page 19: ...This warranty supersedes any other form of guarantee that may inadvertently have been enclosed with or attached to the product Dear Customer Thank you for buying SANYO This equipment should give you many years of pleasure and faithful service but in the event that a fault occurs the following notes for you guidance may be helpful 1 PLEASE RETAIN YOUR PURCHASE RECEIPT WHICH WILL BE REQUIRED FOR SER...

Page 20: ...Part No 1KA6P1P0046 C C6AD BD Printed in U K ...

Reviews: