5
Instruction Manual for HRV
1-888-726-8869
www.sanuvox.com
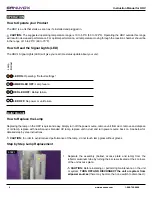
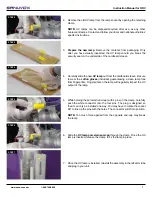
3. After you have visually inspected the UV lamp, break the security
seal on the underside of the cardboard sleeve. Carefully slide the UV
lamp out from the cardboard sleeve. Wear the cotton gloves (included)
guaranteeing a clean lamp free from fingerprints.
NOTE: Fingerprints on the lamp will negatively impact the UV output of
the lamp.
4. Take the assembly (ballast and access door) to install the UV lamp.
Grasp the lamp through the porcelain endcap (with 4 pins) and carefully
push the white connector onto the four pins. The plug is designed so
that it can only be installed one way. You may have to rotate the socket
90° to line up the pins with the holes. The connector will fit into position.
NOTE: Too much force applied from the opposite endcap may break the
lamp.
6. Gently replace the assembly (ballast, access door and lamp) in the
reflector tube, taking care not to hit the lamp. Once the assembly is in
place, turn the 4 tightening screws using a flat screwdriver: make sure
that the access plate is securely attached to the tube.
STEP 3
STEP 4
STEP 6
STEP 5
STEP 7
5. Opening the clamp with one hand, slide the UV lamp
porcelain endcap
(with 4 pins)
through the clamp. Once the UV lamp is inserted, release
the clamp onto the porcelain to fix the lamp in place.
7. Plug the unit to a power source. By default, the unit works on 120V.
Once powered, the LED should light up: RED indicating that the ballast
works, AMBER for the lamp.
You are now ready to power ON your new
HRV and enjoy great air quality
for you and your family.

