background image


10.


Now the frame is separated at the couplings. For the new Z-couplings, only a 5 mm Allen wrench is needed to release 
the couplings, while a special S&S wrench is needed for the older S&S couplings. 

a)


First remove the bottom tube out of the tandem frame by loosening the 5 mm Allen screws on the underside of 
the bottom tube until it can be removed from the frame.  

b)


Then loosen (the lateral) and the top tube at the couplings on the side of the  captain seat post. The front and 
rear sections can now be separated. 

c)


Finally, remove the remaining couplings from the rear frame.  

11.


Remove the captain and stoker saddles, including the seat posts. (Tip: Mark saddle height with a marker on the saddle 
tube attachment. This save having to adjust the saddle height when reassembling later).  

12.


Now the handlebar of the stoker is loosened from the stoker stem with a 5 mm Allen wrench. (Tip: The position of the 
handlebar  can  also  be  marked  with  a  marker.  This  save  having  to  re-adjust  the  correct  handlebar  position  when 
reassembling). At the removed handlebars still loosen the handlebar bolts, so that it can be stored flat and space-
saving in the case. 

13.


Now the packing into the tandem case takes place. First, remove the foam layers 2-6 (these are numbered at the 
top right). 


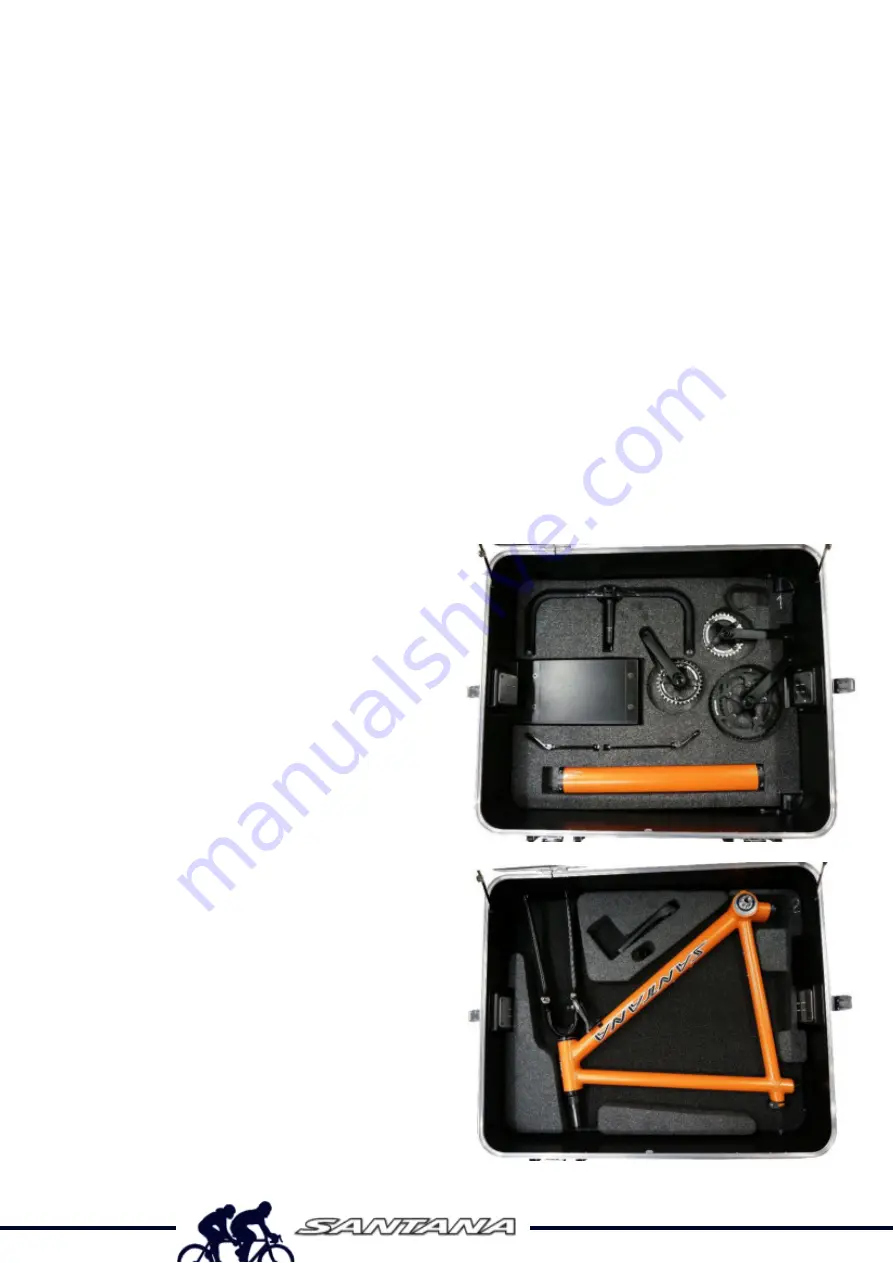
Packing into the Santana SafeCase 

First remove the foam layers one by one and place them on top of each other. The bottom foam layer (1st layer) remains 
in the case. 


Layer 1


Bottom tube (+ lateral tube) 


Quick release / thru axles front and rear 


Stoker handlebars 


Stoker  cranks  and  the  left  captain  crank  (SPD 
pedals do not need to unscrew). 


Layer 2


Captain crank 


Place  the  captain  frameset  with  the  fork  facing 
upwards (if necessary, pad the right brake caliper 
so  that  the  down  tube  does  not  get  scratched 
and put a protective cap on the bottom bracket 
axle facing upwards). 


If the tandem is equipped with a rack, this is now 
inserted with the left side at the lower end, under 
the foam of the 2nd layer, while the upper side of 
the rack rests against the edge of the case. The 
foam must be cut out at the required points for 
this purpose.  


Summary of Contents for Tandem

Page 1: ...ke caliper is loosened and the sleeve nut 5 mm Allen on the back side of the fork crown is unscrewed in succession the entire brake caliper b To remove the handlebars first loosen the stem bolts 4 or 5 on the side of the steerer tube and then remove the headset cap by unscrewing the center 5 Allen screw c Afterwards screw the cap of the headset back into the steerer tube to avoid losing it d The h...

Page 2: ...his save having to re adjust the correct handlebar position when reassembling At the removed handlebars still loosen the handlebar bolts so that it can be stored flat and space saving in the case 13 Now the packing into the tandem case takes place First remove the foam layers 2 6 these are numbered at the top right Packing into the Santana SafeCase First remove the foam layers one by one and place...

Page 3: ...yer 5 Place the rear frame with the rear derailleur facing down Pad the cassette towards the chainstay and if necessary rotate the rear wheel underneath slightly so that the rear derailleur finds room between the spokes Captain and stoker saddle Push the front wheel with released air into the rear frame like installing the rear wheel Layer 6 Top tube Plastic box with tools a belt can be placed loo...

Page 4: ...Nm a coupling wrench is required for S S couplings This prevents unwanted tensions caused by uneven tightening of the screws 7 Next the cranks are mounted The length of the crank tells you which of the left cranks belongs to the captain and which to the stoker The captain crank is 5 mm longer than the stoker crank a At the beginning the rear chain is placed on the chainring of the Stoker crank The...

Page 5: ...guide and screw it together by hand with the left brake cable coming from the rear b The shift cable of the rear derailleur is led from the front through the middle cable guide under the captain bottom bracket and connected with the shift cable of the rear derailleur coming from the right rear side Make sure that the lowest gear is selected so that the tension of the cable is minimized c Finally t...

Page 6: ...isc brake e The rear shifting is adjusted by turning the barrel adjuster on the underside of the down tube Unscrewing the adjuster will pull the chain down on the cassette while screwing the adjuster will pull the chain up on the cassette f Adjusting the front derailleur is done similarly by turning the barrel adjuster on the underside of the down tube g If the tandem is equipped with an electric ...

Reviews: