


17
EN
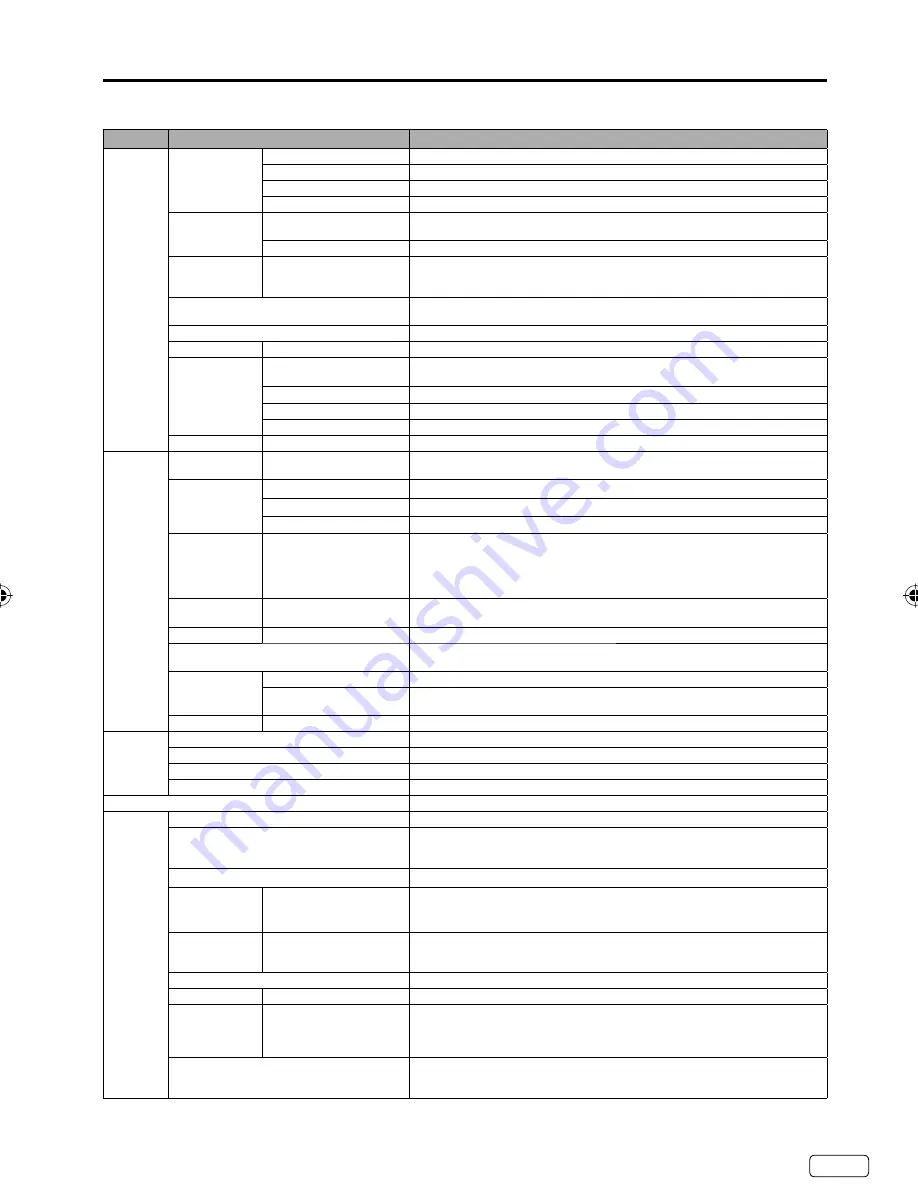
Convenience functions
You can change the default settings by pressing the
MENU
button on your remote, then select the one of the icons at the left
of the menu - follow the On-Screen prompts to set your preferences.
Icon
Selected Items
Setup hint
Picture Picture
Preference
Sports
Bright and dynamic picture (factory-set)
Standard
Standard picture quality (factory-set)
Movie
Movie-like picture setting (factory-set)
Memory
Your personal preferences (set by you; see “Picture Setting”)
Picture Setting Brightness /Contrast /
Sharpness / Color / Tint
You can adjust the picture quality to your preference.
Color Temperature
Cool (Bluish) / Standard (Neutral) / Warm (Reddish)
DBC
On/Eco/Off
Use this feature to change the Black level automatically according to the
brightness of an image. The Black level will become dark in a dark scene. If “Eco”
is selected, the power consumption is reduced and “Backlight” will be skipped.
Backlight*
2
The Backlight feature adjusts the screen brightness for improved
picture clarity.
Picture Size
See page 22.
Film Mode
On/Off
A smoother motion may be obtained by setting the Film Mode to “On” (480i only).
PC Setting
Hor Position /
Ver Position
To adjust the horizontal / vertical position of the image on the PC monitor
screen. Each video standard will require a different value for this setting.
Clock
To minimize any vertical bars or stripes visible on the screen background.
Phase
This must be adjusted after the frequency has been set optimize picture quality.
Auto Adjust
To adjust the all PC settings automatically.
DNR
On/Off
DNR (Digital Noise Reduction) can reduce the roughness of the picture.
Audio
Equalizer Mode Standard/Music/Movie/
News/Memory/Flat
You can adjust the Equalizer Mode to your preference.
Audio Setting Bass/Treble
You can adjust the sound quality to your preference. (Flat mode only)
Equalizer Setting
100Hz/250Hz/500Hz/1kHz/2kHz/4kHz/10kHz (Not available in Flat mode)
Balance
You can adjust the sound quality to your preference.
MTS
Stereo / SAP / Mono
The multi-channel TV sound (MTS) feature provides high-fidelity
stereo sound. MTS also can transmit a second audio program (SAP)
containing a second language or other audio information.
When the TV receives a stereo or SAP broadcast, the word “Stereo” or
“SAP” displays on-screen every time you press
DISPLAY
.
Surround
On/Off
The dynamic presence and sound created offers a thoroughly
enjoyable listening experience.
Auto Volume
On/Off
Volume level can be adjusted automatically by the sound level.
Audio Language
When two or more audio languages are included in a digital signal, you can select
one of the audio languages. (This function is available only for digital broadcast.)
HDMI1 Audio HDMI
When you connect the HDMI device to the TV, select this setting.
DVI
When you connect the DVI device to the TV with analog audio cords,
select this setting.
Speakers
On/Off
Use this feature to turn the TV speakers off when you connect an audio system.
Channel Add / Delete
See page 18.
DTV Signal
See page 19.
Auto Ch Memory
See page 18.
Ch Label
See page 19.
Lock
See page 20.
Setup
Closed Caption
See page 21.
Language
You can choose from three different languages (English, Français (French) and
Español (Spanish)) for the on-screen displays.
Select the language you prefer first, then proceed with the other menu options.
Video Label
See page 19.
On Timer
Off / 0h30m / 1h00m
/ 1h30m / 2h00m /
3h00m
⋅⋅⋅
12h00m
You can set the On Timer to automatically turn on the TV. To cancel the
On Timer select “Off”.
Auto Shut
Off*
1
On/Off
If the Auto Shut Off feature is On, a station being viewed stops
broadcasting and the TV is not operated, the TV will automatically shut
itself off after 15 minutes.
Auto Setup
See page 15.
Power On LED On/Off
When you turn on the TV, Power indicator on the front of the TV will light.
PC Standby
On/Off
In PC mode, if no signal is received or no operation performed for 1
minute, the TV will turn to standby mode automatically (LED light will
flash red). When an input signal is received or an operation performed
on the PC, the TV will return to the On mode.
Reset*
2
The Reset function returns your Picture/Audio settings to the factory settings.
“Picture Size”, “MTS” , “Audio Language”, “HDMI1 Audio” and “Speakers”
cannot be reset by this function.
NOTE:
*
1
If there is no input signal in the PC mode, after 1 minute Auto Shut Off will be activated. In PC mode the “PC Standby”
setting takes precedence.
*
2
The device may not conform to the Energy Star standard after Reset is performed or the Backlight is adjusted.
J3PF0121A_EN.indd 17
J3PF0121A_EN.indd 17
8/14/12 5:22:56 PM
8/14/12 5:22:56 PM


