background image

6

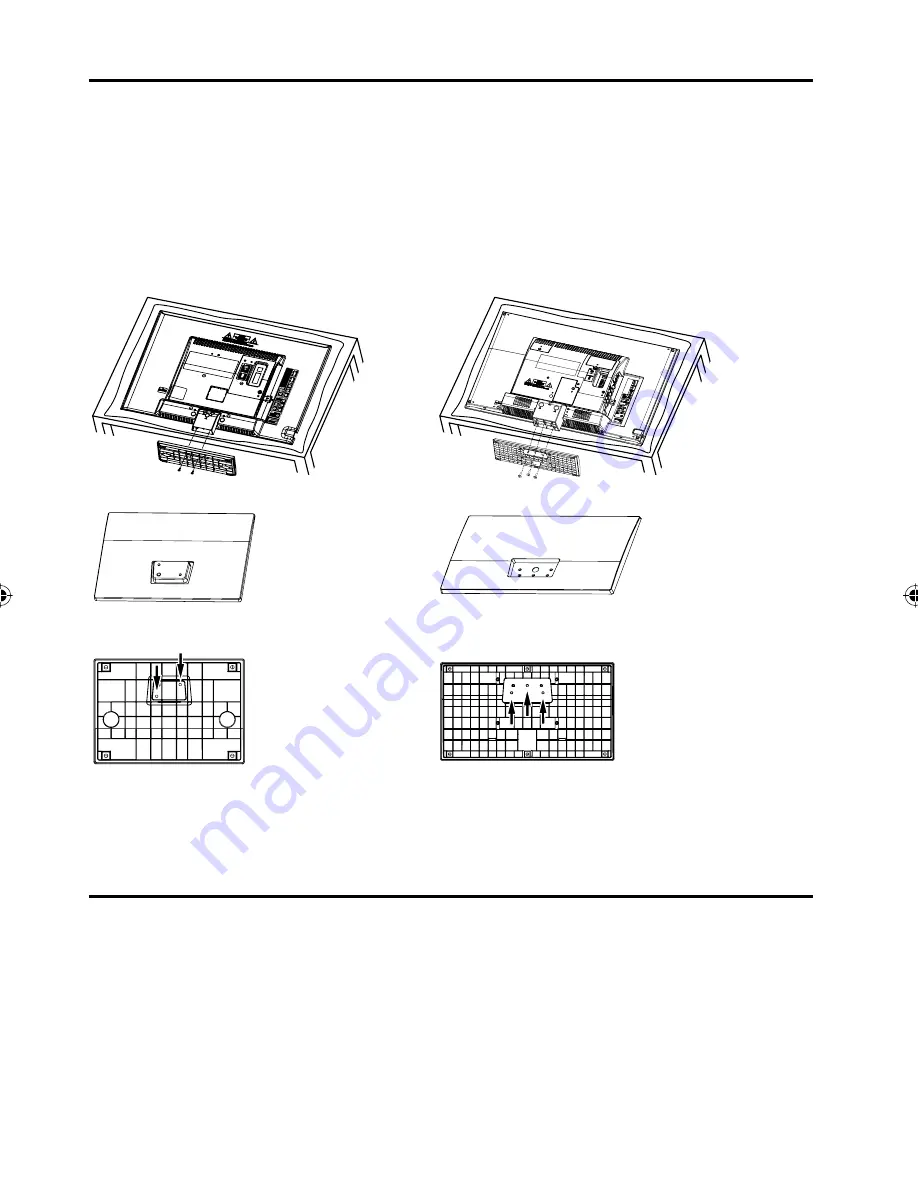
How to attach the stand

How to remove the stand

When you transport this product, remove the stand and pack 

fl

 at against the back of the unit in the carton. To 

remove the stand, perform these steps in reverse order.

For wall mounting, the base must be removed. To disconnect the base/stand remove the 3 screws from the back 

(see page 5).

LCD PANEL SIDE

NOTE:

•  Unplug the AC cord from the AC INPUT terminal.
•  Before beginning this process, assure that the TV is laid on a clean, safe, and cushioned surface to avoid 

any damage to the unit.

•  Do not touch or press the LCD screen, glass might break under pressure.

Place the TV on its front onto a table.
Align the stand’s bottom-plate (supplied) as seen here.
It will 

fi

 t in only one direction.

Hold the unit and attach the stand slowly.

Finally secure the bottom-plate with screws (supplied).

Be sure to follow the instructions. Incorrect installation of the stand will not support your unit correctly, and 

could result in damage or injury.

SLED2280A

2 screws

LCD PANEL SIDE

SLED2480

3 screws

3AV0721B_En.indd   6

3AV0721B_En.indd   6

9/3/10   11:50:50 AM

9/3/10   11:50:50 AM

Summary of Contents for SLED2280A

Page 1: ...his menu option to the Air position Lorsque l appareil sort de l usine l option Signal Type est en mode Cable c blodistribution Si vous n utilisez pas la c blodistribution s lectionnez l option Air Be...

Page 2: ...instructions may cause harmful interference to radio communications However there is no guarantee that interference will not occur in a particular installation If this equipment does cause harmful int...

Page 3: ...t in fire or electric shock Never spill or spray any type of liquid into the unit 19 If an outside antenna or cable system is connected to the unit be sure the antenna or cable system is grounded to p...

Page 4: ...the display and wall mount manufacturers If you have any doubts about your ability to safely install your flat panel display contact your retailer about professional installation Make sure that the wa...

Page 5: ...s may cause skin inflammation If the liquid gets in your mouth immediately gargle and consult with your doctor Also if the liquid gets in your eyes or touches your skin consult with your doctor after...

Page 6: ...ginning this process assure that the TV is laid on a clean safe and cushioned surface to avoid any damage to the unit Do not touch or press the LCD screen glass might break under pressure Place the TV...

Page 7: ...screen programming NOTE Please make sure to insert the cord securely at both the LCD TV and the wall outlet The AC cord has a polarized type AC line plug If the supplied AC cord does not match your A...

Page 8: ...nnections 11 Connections to other equipment 12 TV operation Starting setup 15 TV operation 15 Quick guide for menu operation 16 Convenience functions 17 Memorizing channels 18 Checking the digital sig...

Page 9: ...e menu screen operations PC DVI AUDIO IN jack VIDEO IN jacks VIDEO AUDIO L MONO R COMPONENT IN jacks Y Pb Pr AUDIO L MONO R HDMI2 IN jack PC MONITOR IN jack Parts and functions AC INPUT jack Right sid...

Page 10: ...PLAY Button When you press this button the current information will be displayed on a screen To remove the display from the screen press this button again 3 Direct Channel Selection Buttons 0 9 Allows...

Page 11: ...For subscribers to unscrambled Cable TV service with scrambled premium channels If you subscribe to a Cable TV service in which basic channels are unscrambled and premium channels require the use of...

Page 12: ...omponent OUT Audio cord not supplied Component video cord not supplied To COMPONENT AUDIO IN Rear of the unit To COMPONENT IN To Audio OUT NOTE Component Video input of the unit are for use with a dev...

Page 13: ...VGA cable to the video cord of the computer and the other end to the VGA connector PC MONITOR IN on the rear of the TV Attach the connectors firmly with the screws on the plug In case of a Multimedia...

Page 14: ...plied To DVI output To HDMI out or HDMI device DVI device To HDMI IN To PC DVI AUDIO IN NOTE When using HDMI to connect your HDMI or DVI devices you must select the corresponding audio input source HD...

Page 15: ...will be delayed for a few seconds TO SELECT ANALOG CHANNELS 1 9 Press 1 9 as needed Example to select channel 2 press 2 then press ENTER 10 99 Press the 2 digits in order Example to select channel 12...

Page 16: ...TV s sound will be silenced and Mute will appear on the screen The sound can be switched back on by pressing this button again or the VOL or SLEEP To set the TV to turn off after a preset amount of t...

Page 17: ...The multi channel TV sound MTS feature provides high fidelity stereo sound MTS also can transmit a second audio program SAP containing a second language or other audio information When the TV receives...

Page 18: ...vance for several minutes please be patient NOTE Memorizing channels is best accomplished during evening PRIMETIME hours as more stations are broadcasting digital signals Memorizing channels can only...

Page 19: ...to select a channel you want to label then press Ch Label Label Clear Adjust Ch Label Channel Number 15 1 Select 4 Press or repeatedly until the character you want appears in the first space Label Cl...

Page 20: ...above TV MA 17 years old and above Genre ALL All D Dialogue L Language S Sex V Violence FV Fantasy Violence Movie Rating G PG PG 13 R NC 17 X ENTER Set Movie Rating Select G All ages PG Parental guida...

Page 21: ...r to select Closed Caption then press or ENTER The Closed Caption menu will appear 3 Press or to set CC Setting to On On Captions will be displayed on the screen Off Captions will not be displayed on...

Page 22: ...ral 4 Full 3 Cinema Wide3 NOTE Selectable picture sizes may vary depending on the input source or broadcast signal Picture Size menu also can be displayed by pressing PICTURE SIZE on the remote contro...

Page 23: ...ARIATION A slight picture size variation is normal when you adjust the CONTRAST or BRIGHTNESS settings Most types of television interference can be remedied by adjusting the height and position of the...

Page 24: ...t for an hour then plug it back in Poor sound or no sound Station or Cable TV experiencing problems tune to another station Check sound adjustments Volume and Mute Check for sources of possible interf...

Page 25: ...14 69 CATV 14 36 A W 37 59 AA WW 60 85 AAA ZZZ 86 94 86 94 95 99 A 5 A 1 100 135 100 135 01 4A Tuner type Frequency synthesized Inputs Video RCA 1 V p p 75 ohms Audio RCA 8 dBm 50k ohms Component vid...

Page 26: ...of other manufacturers This warranty does not cover a Damage to equipment not properly connected to the product b Costs incurred in the shipping of the product to an ORION authorized Independent Serv...

Page 27: ...Memo...

Reviews: