background image

EN

 26

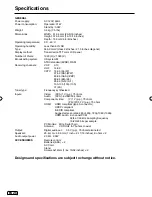
GENERAL

Power supply:

AC 120V, 60Hz

Power consumption:

Operation: 31W

Stand by: 0.3W

Weight:

3.4 kg (7.5 lbs)

Dimensions:

Width:  516.4 mm (20-5/16 inches)

Height:  376.5 mm (14-13/16 inches)

Depth:  168 mm (6-5/8 inches)

Operating temperature:

5

˚

C - 40

˚

C

Operating humidity:

Less than 80% RH

Type:

546.9 mmV (class 22 inches / 21.5 inches diagonal)

Display method:

Transmission TFT color LCD panel

Number of Pixels:

1920 (H) × 1080 (V)

Broadcasting system:

US system M

ATSC standard (8VSB), QAM

Receiving channels:

VHF 

2-13

UHF 14-69

CATV 14-36 

(A)-(W)

 37-59 

(AA)-(WW)

 60-85 

(AAA)-(ZZZ)

 86-94 

(86)-(94)

 95-99 

(A-5)-(A-1)

 100-135 

(100)-(135)

 01 

(4A)

Tuner type:

Frequency synthesized

Inputs:

Video:  (RCA) 1 V (p-p), 75 ohms

Audio:  (RCA) –8 dBm/50k ohms

Component video:    (Y) 1 V (p-p), 75 ohms


  (Pb)/(Pr) 0.7 V (p-p), 75 ohms

HDMI:  HDMI compliant (type A connector)

 HDCP 

compliant

 E-EDID 

compliant


Suggested scan rates: 480i, 480p, 720p,1080i,1080p


HDMI Audio:  2-channel PCM


32/44.1/48 kHz sampling frequency


16/20/24 bits per sample

PC Monitor:  Mini-Dsub 15pin

Antenna: 

VHF/UHF In 75 ohms coaxial

Output:

Digital audio out: 

0.5 V (p-p), 75 ohms terminated

Speakers:

25.4 mm × 68.6 mm (1 inch × 2-11/16 inches), 8 ohms × 2

Audio output power:

2.0W + 2.0W

ACCESSORIES

Remote control

Batteries (AAA) × 2

AC Cord

Stand

Screws 3x12mm (1/8 × 15/32 inches) × 2

Specifications 

Designs and specifications are subject to change without notice.

J3KY0821A_EnFr.indb   26

J3KY0821A_EnFr.indb   26

6/7/12   9:19:51 AM

6/7/12   9:19:51 AM

Summary of Contents for SLED2237

Page 1: ...on Lorsque l appareil sort de l usine l option Signal Type est en mode Cable câblodistribution Si vous n utilisez pas la câblodistribution sélectionnez l option Air Before operating the unit please read this manual thoroughly Avant de faire fonctionner l appareil veuillez lire le présent guide attentivement IF CONTACT WITH CUSTOMER SERVICE IS REQUIRED PLEASE HAVE THE MODEL NUMBER READY PRIOR TO TH...

Page 2: ...which can be determined by turning the equipment off and on the user is encouraged to try to correct the interference by one or more of the following measures Reorient or relocate the receiving antenna Increase the separation between the equipment and receiver Connect the equipment into an outlet on a circuit different from that to which the receiver is connected Consult the dealer or an experienc...

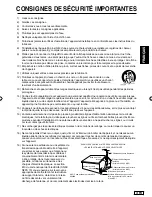
Page 3: ... shock Never spill or spray any type of liquid into the unit 19 If an outside antenna or cable system is connected to the unit be sure the antenna or cable system is grounded to provide some protection against voltage surges and built up static charges Section 810 of the National Electrical Code ANSI NFPA 70 provides information with respect to proper grounding of the mast and supporting structure...

Page 4: ...y the display and wall mount manufacturers If you have any doubts about your ability to safely install your flat panel display contact your retailer about professional installation Make sure that the wall where you are mounting the display is appropriate to support the weight of the unit product and wall mount If you are unsure contact a professional installer A minimum of two people are required ...

Page 5: ...d gets in your mouth immediately gargle and consult with your doctor Also if the liquid gets in your eyes or touches your skin consult with your doctor after rinsing for at least 15 minutes or longer in clean water Possible Adverse Effects on LCD Panel If a fixed non moving pattern remains on the LCD Panel for long periods of time the image can become permanently engrained in the LCD Panel and cau...

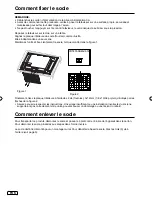
Page 6: ...ly as shown in Figure 1 Finally secure the bottom plate with 2 screws supplied 3x12mm 1 8 x 15 32 inches as indicated by the arrows in Figure 2 Be sure to follow the instructions Insufficient tightening or incorrect installation of the stand will not support your unit correctly and could result in damage or injury from tip over How to remove the stand When you transport this product remove the sta...

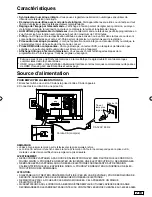
Page 7: ...screen programming NOTE Please make sure to insert the cord securely at both the TV and the wall outlet The AC cord has a polarized type AC line plug If the supplied AC cord does not match your AC outlet contact a qualified electrician WARNING DO NOT CONNECT THIS UNIT TO THE POWER USING ANY DEVICE OTHER THAN THE SUPPLIED AC CORD THIS COULD CAUSE FIRE ELECTRICAL SHOCK OR DAMAGE DO NOT USE WITH A VO...

Page 8: ...ions 11 Connections to other equipment 12 TV operation Starting setup 15 TV operation 15 Quick guide for menu operation 16 Convenience functions 17 Memorizing channels 18 Checking the digital signal strength 19 Labeling channels 19 Labeling video inputs 19 Setting the V Chip 20 Closed Caption 21 CC advanced 21 Setting the picture size 22 Time Shift 23 Additional information Reception disturbances ...

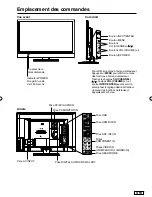
Page 9: ...he menu screen Press MENU button to display the menu screen CH CHANNEL buttons VOL VOLUME buttons and INPUT ENTER button can be used to select the desired setting during the menu screen operations AC INPUT jack PC DVI AUDIO IN jack VIDEO IN jacks VIDEO AUDIO L MONO R COMPONENT IN jacks DIGITAL AUDIO COAXIAL OUT jack ANT RF IN jack HEADPHONE jack PC MONITOR IN jack HDMI DVI IN jack USB input ...

Page 10: ... Allows direct access to any channel of the TV 3 Button This button is used when selecting digital channels 4 SLEEP Button To set the TV to turn off after a preset amount of time use the SLEEP button on the remote control 5 CH CHANNEL CURSOR Buttons Use to operate the menu functions of the TV and to change the channels of the TV 6 MENU Button Use to display the On Screen menu function 7 AUDIO Butt...

Page 11: ...For subscribers to unscrambled Cable TV service with scrambled premium channels If you subscribe to a Cable TV service in which basic channels are unscrambled and premium channels require the use of a Converter Descrambler box you may wish to use a signal Splitter and an A B Switch box available from the Cable TV company or an electronics supply store Follow the connections shown below With the sw...

Page 12: ...AUDIO IN To Component OUT Audio cord not supplied Component video cord not supplied To AUDIO IN Left of the unit To COMPONENT IN To Audio OUT NOTE Component Video input of the unit are for use with a device which output 480i 1080i interlaced signals and 480p 720p progressive signals VCR DVD To connect the TV to a camcorder or a game console To playback from a camcorder connect the camcorder to the...

Page 13: ...he TV can operate as the computer monitor Monitor Display modes MODE Resolution Refresh rate VGA 640x480 60 72 75 Hz VGA 720x400 70Hz SVGA 800x600 56 60 72 75 Hz XGA 1024x768 60 70 75 Hz WXGA 1280x768 60Hz WXGA 1280x720 60Hz WXGA 1360x768 60Hz SXGA 1280x1024 60Hz WXGA 1440x900 60Hz FHD 1920x1080 60Hz To return to normal mode Press INPUT SELECT again NOTE The on screen displays will have a differen...

Page 14: ... cords required Connections to other equipment NOTE When using HDMI DVI IN to connect your HDMI or DVI devices you must select the corresponding audio input source HDMI or DVI on the menu screen see page 17 Otherwise you will only see the image with no sound Rear and left of the unit HDMI to DVI adapter cable HDMI type A connector not supplied Audio cord not supplied HDMI cable type A connector no...

Page 15: ...en It may take approx 10 seconds for a picture to appear on screen 2 Adjust the volume level by pressing VOL or The volume level will be indicated on the screen by green bars As the volume level increases so do the number of bars If the volume decreases the number of green bars also decreases 3 Set the Signal Type option to the appropriate position see Air Cable selection on page 18 4 Press the Di...

Page 16: ...PLAY again to clear the call display NOTE After a few seconds DISPLAY screen will return to normal TV operation automatically SLEEP To set the TV to turn off after a preset amount of time press SLEEP on the remote control The clock will count up 10 minutes for each press of the SLEEP but ton Off 0h 10m 0h 20m 2h 0m After the sleep time is programmed the display will appear briefly every ten minute...

Page 17: ...so can transmit a second audio program SAP containing a second language or other audio information When the TV receives a stereo or SAP broadcast the word Stereo or SAP displays on screen every time you press DISPLAY Surround On Off The dynamic presence and sound created offers a thoroughly enjoyable listening experience Auto Volume On Off Volume level can be adjusted automatically by the sound le...

Page 18: ... digital signals Memorizing channels can only be accomplished while a station is broadcasting a digital signal to set that channel into memory If you are unsure of the digital channels available in your area you may visit www antennaweb org to receive a list based on your address or zip code Should you require further assistance you may call our toll free customer service line at 1 800 289 0980 Ne...

Page 19: ...ss or repeatedly until the character you want appears in the first space Label Clear Ch Label Channel Number 15 1 Ch Label CH 1 CH The characters rotation as follows SPACE If the character which you desire appears press ENTER Repeat this step to enter the rest of the characters If you would like a blank space in the label name you must choose the empty space from the list of characters 4 Repeat st...

Page 20: ...arental guidance TV 14 14 years old and above TV MA 17 years old and above When you select TV Y7 TV PG TV 14 or TV MA press DISPLAY to explain the rating Genre D Dialogue L Language S Sex V Violence FV Fantasy Violence Movie Rating Movie Rating G PG PG 13 R NC 17 X G All ages PG Parental guidance PG 13 Parental guidance less than 13 years old R Under 17 years old parental guidance suggested NC 17 ...

Page 21: ... CS6 4 Press or to select the desired Closed Caption mode for both Digital and Analog Caption 5 Press or to select CC Priority then press or to select Digital CC or Analog CC NOTE Depending on the broadcast signal some Analog Captions will function with a Digital broadcast signal This step prevent that two kind of captions are overlapping NOTE If the program or video you selected is not closed cap...

Page 22: ...remote control Natural In some cases this image will display the size of standard 4 3 with a black side bar Cinema Wide1 for 4 3 format programs To fill the screen the right and left edges are extended however the center of the picture remains near its former ratio The top and bottom edges of the picture may be hidden Cinema Wide2 for letter box programs The entire picture is uniformly enlarged it...

Page 23: ...the Time Shift operation buttons The status display will appear USB Memory Information Delay Time 00 02 09 Message Now Play View Playback status PLAY STOP PAUSE SKIP SKIP Recording Delayed time from the current program or Playing time in the play mode If there are no recorded program in the USB memory will appear Message display Now Live View Viewing live program Now Play View Viewing recorded pro...

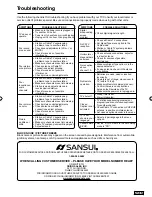
Page 24: ...IATION A slight picture size variation is normal when you adjust the CONTRAST or BRIGHTNESS settings Most types of television interference can be remedied by adjusting the height and position of the VHF UHF antenna Outdoor antennas are recommended for best results The most common types of television interference are shown below If one of these symptoms appear when the TV is connected to a Cable TV...

Page 25: ...rcuit breaker Unplug unit for an hour then plug it back in Poor sound or no sound Station or Cable TV experiencing problems tune to another station Check sound adjustments VOL or MUTE Check for sources of possible interference Poor picture or no picture Station or Cable TV experiencing problems tune to another station Make sure channels are set into memory Check antenna or Cable TV connections adj...

Page 26: ... 99 A 5 A 1 100 135 100 135 01 4A Tuner type Frequency synthesized Inputs Video RCA 1 V p p 75 ohms Audio RCA 8 dBm 50k ohms Component video Y 1 V p p 75 ohms Pb Pr 0 7 V p p 75 ohms HDMI HDMI compliant type A connector HDCP compliant E EDID compliant Suggested scan rates 480i 480p 720p 1080i 1080p HDMI Audio 2 channel PCM 32 44 1 48 kHz sampling frequency 16 20 24 bits per sample PC Monitor Mini ...

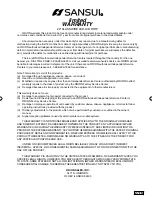
Page 27: ...ent of other manufacturers This warranty does not cover a Damage to equipment not properly connected to the product b Costs incurred in the shipping of the product to an ORION authorized Independent Service Center or ORION Factory Service Center c Damage or improper operation of unit caused by customer abuse misuse negligence or failure to follow operating instructions provided with the product d ...

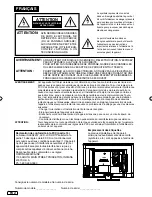
Page 28: ... se servir de cet appareil RISQUE DE CHOC ELECTRIQUE NE PAS OUVRIR ATTENTION Le symbole représentant un éclair dans un triamgle équilatéral a pour but d avertir l utilisateur du danger présenté par des pièces non isolées à l intérieur de l appareil et dont la tenstion est suf fisante pour provoquer des décharges électriques dangeruses Le point d exclamation dans un triangle équilatéral a pour but ...

Page 29: ...u qui est tombé 15 L appareil ne doit pas être exposé à des égouttements d eau ou des éclaboussures et de plus aucun objet rempli de liquide tel que des vases ne doit être placé sur I appareil 16 L antenne extérieure ne doit pas être placée à proximité de lignes d alimentation aériennes ni de circuits électriques ni de telle façon qu elle puisse toucher ces lignes ou fils en tombant Faites preuve ...

Page 30: ...vous profitez de votre nouveau produit n oubliez pas les conseils de sécurité suivants LE PROBLÈME L expérience du cinéma maison se répand et les gens achètent des écrans plats de plus en plus grands Cependant les écrans plats ne sont pas toujours posés sur des socles adaptés ou installés conformément aux recommandations du fabricant Les écrans plats qui sont mal placés sur une commode une bibliot...

Page 31: ... caractéristiques techniques Dans les cas énoncés ci après aucun recours à la garantie d usine ne pourra être réclamé L écran ACL à cristaux liquides de ce téléviseur est constitué de cellules minces et est le fruit d une technologie très pré cise Bien que les écrans soient produits avec plus de 99 9 de cellules actives il peut y avoir des cellules qui n émettent pas de lumière ou qui restent allu...

Page 32: ...xez lentement le socle tel que montré dans la figure 1 Comment enlever le socle Pour transporter ce produit démontez le socle et posez le à plat contre l arrière de l appareil dans le carton Pour démonter le socle procédez aux étapes dans l ordre inverse Le socle doit être démonté pour un montage mural Pour déboîter la base le socle ôtez les trois 3 vis à l arrière voir page 5 Finalement fixez la ...

Page 33: ...OYER L ALIMENTATION CA Branchez la fiche du cordon CA dans la prise d entrée CA de l appareil Connectez le cordon CA à une prise CA 1 2 Fabriqué sous licence de Dolby Laboratories Le terme Dolby et le sigle double D sont des marques commerciales de Dolby Laboratories HDMI le logo HDMI et High Definition Multimedia Interface sont des marques commerciales ou déposées de HDMI Licensing LLC aux États ...

Page 34: ...ordement à un autre appareil 12 Fonctionnement du téléviseur Configuration au démarrage 15 Fonctionnement du téléviseur 15 Guide rapide pour les opérations menu 16 Réglages personnalisés 17 Mise en mémoire des canaux 18 Vérification de la force du signal numérique 19 Attribution d un nom aux différents canaux 19 Étiquetage des entrées vidéo 19 Utilisation de la V Chip 20 Sous titrage 21 Sous titra...

Page 35: ...eur Appuyez sur MENU pour afficher le menu des fonctions à l écran du téléviseur Touchez les boutons CH CHANNEL boutons VOL VOLUME et bouton INPUT ENTER peuvent servir à sélectionner le réglage désiré à l intérieur du menu des fonctions du téléviseur apparaissant à l écran Prise DIGITAL AUDIO COAXIAL OUT Indicateur POWER Rouge En veille Vert En marche Prises VIDEO IN VIDEO AUDIO L MONO R Prise ANT...

Page 36: ...r 3 Bouton Cette touche sert lors de la sélection de canaux numériques 4 Bouton SLEEP Pour programmer le téléviseur pour qu il s éteigne automatiquement après une période prédéterminée utilisez la touche SLEEP sur la télécommande 5 Boutons CH CHANNEL CURSEUR Pour commander les fonctions de menu du téléviseur et pour sélectionner les canaux à partir du téléviseur 6 Bouton MENU Appuyez sur cette tou...

Page 37: ...ns brouillage avec des canaux payants brouillés Si vous êtes abonné à un service de câblodistribution dont les canaux de base ne sont pas brouillés et les canaux payants exigent l utilisation d un convertisseur débrouilleur il est recommandable d utiliser un séparateur de signaux et une boîte de commutation A B vendus par le câblodistributeur ou dans un magasin d électronique Suivez les raccordeme...

Page 38: ... 480p 720p Gauche de l appareil Vers la sortie Vidéo Audio Câble Vidéo Audio non compris Vers l entrée VIDEO AUDIO Vers la sortie en composantes Câble Audio non compris Câble de Vidéo en composantes non compris Vers l entrée AUDIO Gauche de l appareil Vers l entrée COMPONENT Vers la sortie Audio Magnétoscope DVD CONSOLE DE JEUX ou Raccordement du téléviseur à un caméscope ou à un console de jeux P...

Page 39: ...téléviseur a été vérifié peut apparaître en fonction de l ordinateur utilisé Dans ce cas le réglage Auto Adjust ou les autres fonctions d ajustement de la position peuvent échouer à corriger la position de l image Pour résoudre ce problème changez les réglages de l ordinateur et choisissez une autre résolution Raccordement du téléviseur à un PC ordinateur personnel Avant de connecter le présent té...

Page 40: ...udio analogiques séparés sont nécessaires Arrière et gauche de l appareil Câble adaptateur HDMI DVI connecteur HDMI de type A non compris Câble HDMI connecteur de type A non compris Vers la sortie DVI Vers la sortie HDMI Dispositif HDMI Dispositif DVI Vers l entrée HDMI DVI REMARQUE Lorsque vous employez HDMI DVI IN pour raccorder vos dispositifs HDMI ou DVI vous devez sélectionner la source d ent...

Page 41: ...T pour visionner les changements Fonctionnement du téléviseur 1 Pour allumer l appareil appuyez sur POWER Le voyant d alimentation POWER à l avant de l appareil passe au vert Une image apparaît à l écran au bout d environ 10 secondes 2 Réglez le volume au niveau désiré en appuyant les touches de réglage du VOL ou Le niveau d intensité de la reproduction sonore sera indiqué à l écran par des barres...

Page 42: ...arrêt différé Format image Données sonores Stereo SAP ou Mono Résolution Appuyez de nouveau sur DISPLAY pour faire disparaître les informations à l écran REMARQUE Au bout de quelques secondes l écran DISPLAY rétablit automatiquement le fonctionnement normal du téléviseur MINUTERIE D ARRÊT DIFFÉRÉ SLEEP Pour programmer le téléviseur pour qu il s éteigne automatiquement après une période prédétermin...

Page 43: ...io SAP contenant une deuxième langue ou d autres données sonores Lorsque le téléviseur reçoit une émission stéréophonique ou en SAP le mot Stereo ou SAP est affiché chaque fois qu on appuie sur DISPLAY Surround On Off La présence dynamique et sonore ainsi créée procure une reproduction sonore des plus agréables Auto Volume On Off Le niveau du volume peut être ajusté automatiquement par le mouvemen...

Page 44: ... la mémorisation des canaux soit possible il faut qu une station diffuse au même moment un signal numérique de canal Si vous n êtes pas certain quels canaux numériques sont offerts dans votre région vous pouvez consulter www antennaweb org pour recevoir une liste pertinente à votre adresse ou à votre code postal Si vous avez besoin d aide supplémentaire vous pouvez composer notre numéro sans frais...

Page 45: ...5 1 CH 1 CH 3 Appuyez de façon répétée sur ou jusqu à ce que le caractère que vous souhaitez apparaisse dans le premier espace Label Clear Ch Label Channel Number 15 1 Ch Label CH 1 CH Le caractère change comme suit ESPACE Si le caractère désiré apparaît appuyez sur ENTER Répétez cette étape pour entrer le reste des caractères Si vous voulez laisser un blanc dans le nom vous devez sélectionner l e...

Page 46: ...sification des émissions télévisées TV Rating TV Y TV Y7 TV G TV PG TV 14 TV MA Vous pouvez régler la classification en fonction du niveau d âge et du genre Âge TV Y Tous les enfants TV Y7 Enfants de 7 ans et plus TV G Auditoire général TV PG Supervision des parents TV 14 Enfants de 14 ans et plus TV MA Enfants de 17 ans et plus Dans le cas de TV Y7 TV PG TV 14 ou TV MA appuyez sur DISPLAY pour co...

Page 47: ...t la moitié de l écran avec un calendrier de programmation ou d autres informations 1 Sélectionnez Setup Closed Caption puis appuyez sur ou ENTER 2 Appuyez sur ou pour réglage CC Setting sur On On Les sous titres apparaissent à l écran Off Les sous titres n apparaissent pas à l écran 3 Appuyez sur ou pour sélectionner Analog Caption ou Digital Caption Lorsque vous sélectionnez Analog Caption vous ...

Page 48: ...nslucent Flashing Couleur D arrière Plan Background Color Auto Noir Black Blanc White Rouge Red Vert Green Bleu Blue Jaune Yellow Magenta Cyan Opacité de Fond Background Opacity Auto Solide Solid Transparent Translucide Translucent Flashing REMARQUE Il n est pas possible de définir la même couleur pour le texte et le fond Text Color et Background Color Il n est pas possible de sélectionner Transpa...

Page 49: ...r de l image peuvent être cachés A B C D E F G A B C D E F G Full pour émissions de format 16 9 Full affiche l image à sa taille maximale Native pour mode PC seulement La résolution du signal de l image est détectée et affichée à l écran avec le même nombre de pixels REMARQUE Il se peut que certaines émissions numériques haute définition et ou les deux ne vous permettent pas de modifier le format ...

Page 50: ...es touches de programmation Le statut du périphérique s affichera USB Memory Information Delay Time 00 02 09 Message Now Play View Pour supprimer l enregistrement Déconnectez le périphérique USB sans sauvegarder l émission ou éteignez le téléviseur Remarque La fonction de programmation n est pas disponible pour les appareils à signal analogique ou pour les entrées externes Si vous modifiez le sign...

Page 51: ...cran est normale lorsque vous ajustez les réglages du contraste CONTRAST ou de la luminosité BRIGHTNESS Il est possible de remédier à la plupart des interférences subies par le téléviseur en réglant la hauteur et en changeant la position de l antenne VHF UHF Pour obtenir les meilleurs résultats il est recommandé d utiliser une antenne extérieure Les types les plus courants de brouillage en télévis...

Page 52: ...ngez la position de l antenne Réglez le décodeur de sous titres dans le menu L affichage des fonctions à l écran n apparaît pas dans la langue sélectionnée Sélectionnez la langue désirée parmi les options du menu Impossible d éliminer E POP Réglez E POP Demo du menu Auto Setup sur Off PROBLÈME SOLUTIONS POSSIBLES L appareil ne fonctionne pas Assurez vous que le cordon d alimentation est branché Es...

Page 53: ...5 100 135 01 4A Type de tuner Synthétiseur de fréquences Entrées Vidéo RCA 1 V p p 75 ohms Audio RCA 8 dBm 50k ohms Vidéo en composantes Y 1 V p p 75 ohms Pb Pr 0 7 V p p 75 ohms HDMI Compatible HDMI connecteur de type A Compatible HDCP Compatible E EDID Taux de balayage préconisés 480i 480p 720p 1080i 1080p Audio HDMI PCM 2 voies Fréquence d échantillonnage 32 44 1 48 kHz 16 20 24 bits per échant...

Page 54: ... Memo ...

Page 55: ... Memo ...

Page 56: ...J3KY0821ASH 12 03 K Printed in Thailand Imprimé en Thailande ...

Reviews: