background image

7

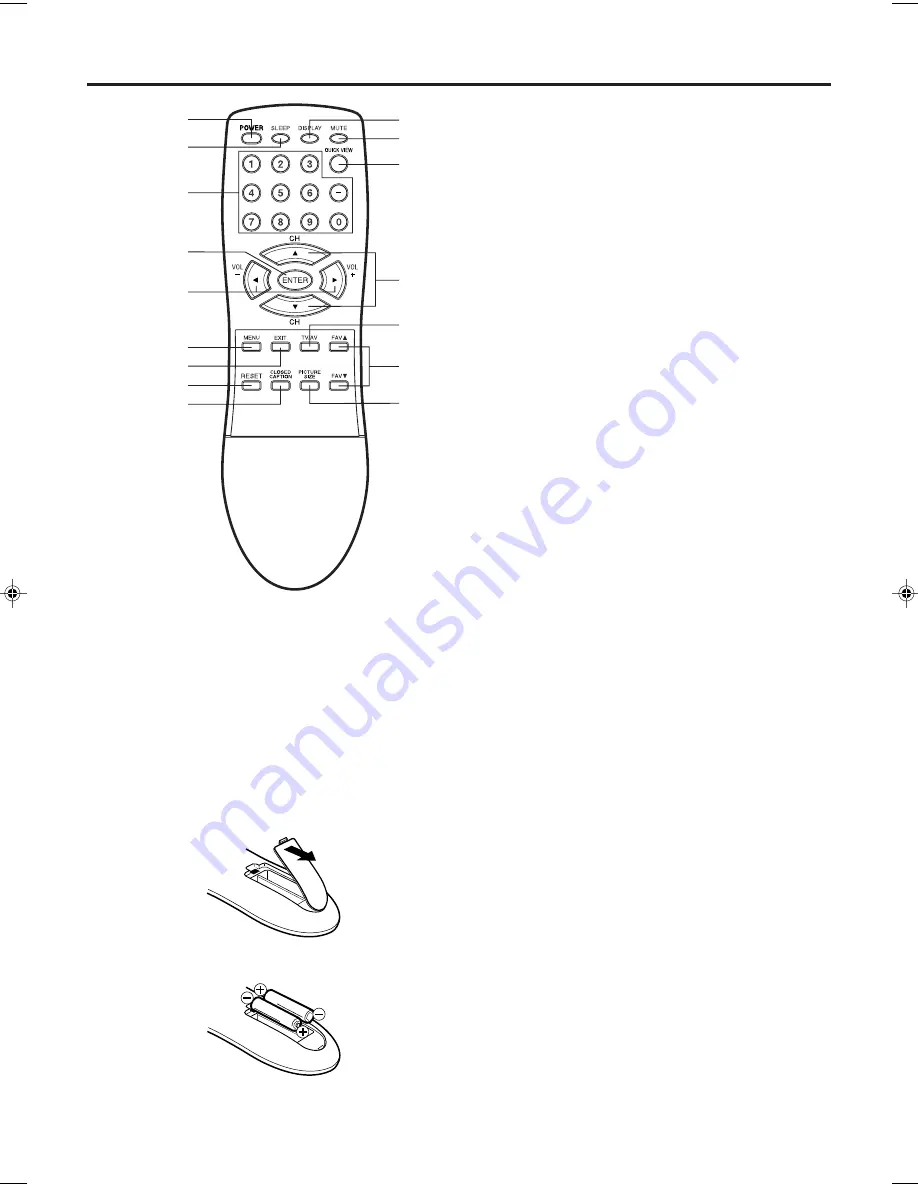
1. Open the battery compartment cover.

2. Install two “AAA” batteries (not supplied).

HOW TO INSTALL BATTERIES

Before using the remote control, batteries must first be installed.

BATTERY PRECAUTIONS

These precautions should be followed when using batteries
in this device:
• Use only the size and type of batteries specified.
• Be sure to follow the correct polarity when installing the

batteries as indicated in the battery compartment.
Reversed batteries may cause damage to the device.

• Do not mix different types of batteries together (e.g.

Alkaline and Carbon-zinc) or old batteries with fresh ones.

• If the device is not to be used for a long period of time,

remove the batteries to prevent damage or injury from
possible battery leakage.

• Do not try to recharge batteries not intended to be re-

charged; they can overheat and rupture (follow battery
manufacturer's directions).

Use two “AAA” size batteries. The batteries may last
approximately one year depending on how much the remote
control is used. For best performance, it is recommended
that batteries should be replaced on a yearly basis, or when
the remote operation becomes erratic. Do not mix old and
new batteries or different types.

Remote control

1

2

4

5

6
7
8
9

3

10


11

13

14

15

16

12

3. Replace the battery compartment cover.

4. ENTER button -

 Press to enter or select information for

menu screen operations.

5. VOL (VOLUME) + / – buttons -

 Press the 

+

 button to

increase, or the 

 button to decrease the volume level.

Use to select the desired setting during the menu
screen operation.

6. MENU button -

 Press to display the menu screen

function.

7. EXIT button -

 Press to exit from the menu screen.

8. RESET button -

 Press to reset the menu screen

picture and sound adjustments to their factory preset
positions, while in the adjustment menu.

9. CLOSED CAPTION button -

 Press this button to

display CLOSED CAPTION menu.

10. DISPLAY button -

 When TV receives an analog signal

and press this button, the current information will
appear in the screen. When TV receives a digital signal,
press once, the digital information will appear. Press
twice, the analog information will appear. To remove
display from the screen, press again.

11. MUTE button -

 To turn off the sound, press this button

once. The TV will be silenced and the symbol “MUTE”
will appear on the screen. The muting feature can be
released by pressing the MUTE button again or one of
the VOL 

+

 or 

 buttons.

12. QUICK VIEW button -

 This button allows you to go back

to the previous channel selected by pressing the
QUICK VIEW button. Press this button again to return
to the channel you were watching.

13. CH (CHANNEL)

 ▲ 

/

 ▼ 

buttons -

 Press the 

 button

to change to a higher numbered channel set into
memory. Press the 

 button to change to a lower

numbered channel set into memory.
Use to select the desired setting during the menu
screen operation.

14. TV/AV button - 

Press this button to display SOURCE

SELECTION menu to select the video input source.

15. FAV

 ▲ 

/

 ▼ 

buttons -

 Press to select your favorite

channels.

16. PICTURE SIZE button - 

Press this button to display

PICTURE SIZE menu.

1. POWER button -

 Press to turn the TV on. Press

again to turn the TV off.

2. SLEEP button -

 To set the TV to turn off after a

preset amount of time, press this button.

3. Direct Channel Selection buttons (0-9) -

 Allows

direct access to any channel. The “–” button is
used to select digital channels.

 3R90101c_En_p02-09

4/25/05, 7:33 PM

7

Summary of Contents for HDTV2600

Page 1: ...efore operating the unit please read this manual thoroughly ATTENTION If you purchase a universal remote control from your local retailer please contact the remote manufacturer for the required progra...

Page 2: ...urn 9 VENTILATION Slots and openings in the cabinet back or bottom are provided for ventilation to ensure reliable operation of the unit and to protect it from overheating These openings must not be b...

Page 3: ...e 18 SERVICING Do not attempt to service this unit yourself as opening or removing covers may expose you to dangerous voltage or other hazards Refer all servicing to qualified service personnel 19 DAM...

Page 4: ...Modulation SVM 36 Resetting your picture adjustment 36 Closed Caption 37 CC advanced 38 Selecting stereo 39 Second Audio Program SAP 39 Sound control adjustment 39 Selecting the BBE 40 Selecting the...

Page 5: ...E BBE gives you vivid sound with incredible presence 2 sets of S Video Component Video jacks A VCR DVD player satellite receiver or other audio video component can be connected to this unit Video Inpu...

Page 6: ...1 IN jacks VOLUME buttons POWER button CHANNEL buttons POWER indicator Remote sensor AUDIO L R VIDEO IN jacks VIDEO3 AUDIO L R VIDEO IN jacks VIDEO1 AUDIO L R VIDEO IN jacks VIDEO2 To display the menu...

Page 7: ...menu screen function 7 EXIT button Press to exit from the menu screen 8 RESET button Press to reset the menu screen picture and sound adjustments to their factory preset positions while in the adjustm...

Page 8: ...te VHF UHF Antennas 75 ohm VHF Cable and 300 ohm UHF Twin lead Wires RF IN jack RF IN jack RF IN jack Combiner RF IN jack Combiner Connect the 75 ohm Cable from the Combination VHF UHF Antenna to the...

Page 9: ...75 ohm CABLE TV Cable A B Switch 75 ohm Cable to unit Incoming 75 ohm CABLE TV Cable 75 ohm Cable to unit Converter Descrambler RF IN jack RF IN jack RF IN jack Converter Descrambler This unit has an...

Page 10: ...DVD player You can select ANT VIDEO1 VIDEO2 VIDEO3 on the front panel COMPONENT1 or COMPONENT2 depending on which input jacks you used to connect your devices SOURCE SELECTION 0 ANT 1 VIDEO1 2 VIDEO2...

Page 11: ...ith component video If your DVD player has component video out jacks connect your TV to a DVD player using a component video cord It can greatly enhance picture quality and performance Rear of the TV...

Page 12: ...DTV receiver set top box If you connect a DTV receiver set top box connect your TV to a DTV receiver set top box using a component video cord Rear of the TV To Component OUT To Audio OUT Audio cord n...

Page 13: ...you make the connection above on the AV Amplifier do not set DOLBY DIGITAL to DOLBY DIGITAL or MPEG to MPEG ON If you do a loud noise will emit from the speakers possibly causing damage to your heari...

Page 14: ...hook up variations required they have not all been included in the suggested connection diagrams You ll need to consult each component s Owner s Manual for additional information To playback from a c...

Page 15: ...s you select the menu language specify the TV CABLE setting and program channels automatically When you make a menu selection your changes occur immediately You do not have to press EXIT to see your c...

Page 16: ...SETUP LANGUAGE ENGLISH ENGLISH FRAN AIS ESPA OL CLOCK SET 12 00 AM TV CABLE CABLE AUTO CH MEMORY ADD DELETE SELECT ADJUST Press MENU The menu screen will appear 5 Setting the language You can choose f...

Page 17: ...memory This TV can receive up to 250 VHF UHF channels and 500 cable TV channels To use this TV with an antenna set the TV CABLE menu option to the TV mode When shipped from the factory this menu optio...

Page 18: ...LOG ADD 3 ANALOG DELETE 4 ANALOG DELETE 5 ANALOG ADD 5 001 DIGITAL ADD 5 002 DIGITAL ADD CLEAR ALL SETUP MENU SELECT ADJUST 4Select the desired channel to be memorized or deleted using or Press or to...

Page 19: ...for up to 11 additional channels To watch your favorite channels Press FAV or on the remote control to select your favorite channels To delete your favorite channels 1 Select a channel you want to re...

Page 20: ...also de creases 1 2 3 4Press the Direct Channel Selection buttons to select the channel TO SELECT ANALOG CHANNELS 1 9 Press 0 twice then 1 9 as needed Example to select channel 2 press 0 0 2 10 99 Pr...

Page 21: ...nel you were watching ANT ABCD 7 MUTE Press MUTE to switch off the sound The unit s sound will be silenced and MUTE will appear on the screen The sound can be switched back on by pressing this button...

Page 22: ...from viewing or hearing violent scenes or picture that you may choose to exclude The restriction applies to TV RATING and MOVIE RATING if this data is transmitted You may set this restriction separat...

Page 23: ...ng Press or to select the desired rating you want Press or to select the setting ON or OFF Press or to select MOVIE RATING Then press or to display the desired rating OFF MOVIE RATING is not set G All...

Page 24: ...ss ENTER 5 1 Press or to display the password entering mode Use the number buttons 0 9 to enter your password then press ENTER The LOCKS menu appears Press MENU then press or to select LOCKS menu 3Pre...

Page 25: ...ock the front panel Press and hold VOLUME on the front panel of TV for about 10 seconds until the message FRONT PANEL LOCK OFF appears on the screen 3Press or to select FRONT PANEL LOCK then press or...

Page 26: ...blank space in the label name you must choose the empty space from the list of characters otherwise a dash will appear in that space When you finish inputting label name press ENTER 4 5Press EXIT to...

Page 27: ...ult label name VCR Video cassette recorder DVD DVD video DTV Digital TV set top box SAT Satellite box CBL Cable box Press EXIT to return to the normal screen 5 OPTION ON OFF TIMER OFF FAVORITE CH CH L...

Page 28: ...or to set the hour Please note if the hour is AM or PM and choose desired setting Then press to select the minute position You must set the clock correctly for the ON OFF TIMER to activate at the corr...

Page 29: ...the TV will automatically shut itself off after 15 minutes To cancel ON TIMER Select CLEAR in step 6 Press EXIT to return to normal screen After a power failure or disconnection of the power the timer...

Page 30: ...ired hour then press Please note if the hour is AM or PM and choose desired setting Press or to set the desired minutes and press or to select DAILY then press ENTER NOTE To cancel OFF TIMER press to...

Page 31: ...on the next page then press ENTER You can view 480i and 480p format programs in a variety of picture sizes NATURAL CINEMA WIDE1 CINEMA WIDE2 CINEMA WIDE3 and FULL Natural picture size example CINEMA W...

Page 32: ...the width of the screen it is extended horizontally However it is only slightly extended at the top and the bottom The top and bottom edges of the picture may be hidden To view the hidden areas such a...

Page 33: ...elect PICTURE SCROLL You can scroll the picture in CINEMA WIDE2 and CINEMA WIDE3 Setting the picture scroll NOTE The scroll amounts are as follows 480i 480p signal source CINEMA WIDE1 Not adjustable C...

Page 34: ...n Adjusting the picture preference PICTURE PICTURE PREFERENCE SPORTS SPORTS STANDARD MOVIE MEMORY BRIGHTNESS 25 CONTRAST 50 COLOR 25 TINT 0 SHARPNESS 25 SELECT ADJUST PICTURE PICTURE PREFERENCE MOVIE...

Page 35: ...to adjust the setting 1 2 3 Picture control adjustment After your desired setting press EXIT to return to normal screen SHARPNESS BRIGHTNESS CONTRAST COLOR TINT decrease brightness decrease contrast p...

Page 36: ...to return to the normal screen 3 Selecting the Scan Velocity Modulation SVM The SVM feature enhances picture contrast and sharpness This feature has three modes HIGH LOW and OFF Press or to select SV...

Page 37: ...tion WHAT IS CLOSED CAPTIONING This television has the capability to decode and display Closed Captioned television programs Closed Captioning will display text on the screen for hearing impaired view...

Page 38: ...select the item you want to adjust then press or 4 Press or to select desired setting then press ENTER 5 You can select from among the following items and parameters TEXT SIZE AUTO SMALL STANDARD LARG...

Page 39: ...V speakers will output the second audio program instead of normal audio Sound control adjustment Sound controls are factory preset but you can adjust them individually as follows BASS Press or to adju...

Page 40: ...to return to the normal screen Selecting the BBE By correcting the phase delay and distortion naturally generated by speaker systems the BBE sound feature ensures that the sound that reaches your ear...

Page 41: ...ss or to display the AUDIO LANGUAGE menu 4Press EXIT to return to the normal screen Press or to select your desired language then press ENTER Press or to select RESET then press Press MENU then press...

Page 42: ...ormal TV operation automatically Checking the Digital signal strength You can view the digital signal meter 1 2 3 Press MENU then press or to select SETUP menu Press or to select SIGNAL METER Press or...

Page 43: ...s off check fuse or circuit breaker Unplug unit for an hour then plug it back in Station or CABLE experiencing problems tune to another station Check sound adjustments Volume and Mute Check for source...

Page 44: ...V p p 75 ohms PB 0 7 V p p 75 ohms Output VIDEO 1 V p p 75 ohms AUDIO 150 mV rms Antenna input VHF UHF In 75 ohm coaxial Picture tube 26 inches 656 7 mm diagonal Tuner type Quartz PLL Frequency Synthe...

Page 45: ...ass of product or by the ORION Factory Service Center d Damaged because it is improperly connected to the equipment of other manufacturers This warranty does not cover a Damage to video disc b Damage...

Page 46: ...46 Memo...

Page 47: ...47...

Page 48: ...Printed in Thailand 05 05 K J3R90101C SH...

Reviews: