Sansui HDLCD1912 Owner'S Manual Download Page 14

14

Connections to other equipment 

(continued)

Using an AV Amplifier with built

-

in digital surround

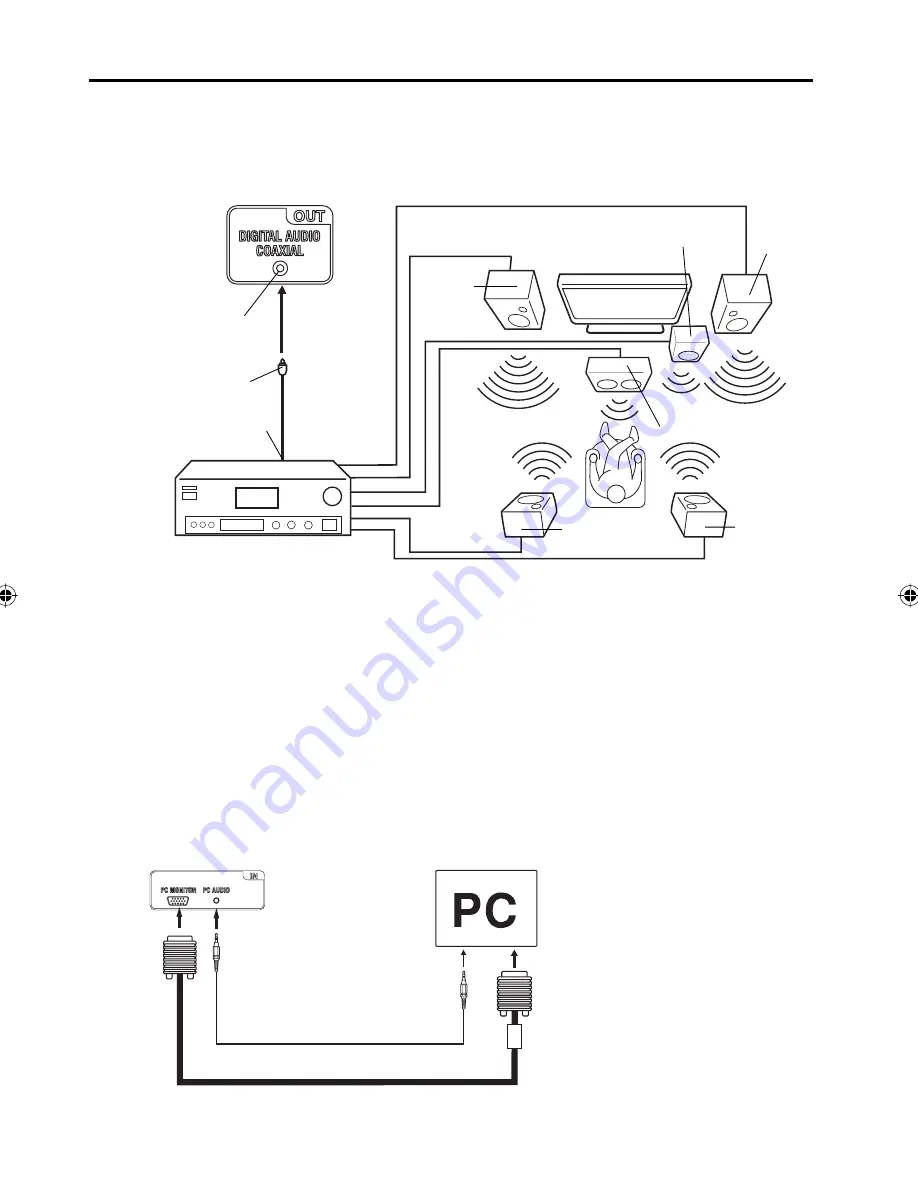
If you are using an Amplifier with built-in digital surround sound, you can enjoy various audio systems including 

Dolby Digital Surround audio that sounds just like the movie.

Connect an AV amplifier with built

-

in Dolby Digital decoder, etc. as shown below.

Coaxial digital cable

 (not supplied)

AV Amplifier with built-in digital surround 

decoder as listed above

Center Speaker

Coaxial Digital 

Audio Output

To Coaxial 

Digital Audio Input

Rear of the unit

Front 

Speaker 

(Left)

Front 

Speaker 

(Right)

Subwoofer

Surround 

Speaker (Left) 

Surround 

Speaker 

(Right)

TV

NOTE:

When you are viewing digital broadcast, this unit will not work in conjunction with DTS audio or MPEG audio. 

There will be no sound output if connected to an AV amplifier with a built-in DTS decoder or MPEG decoder.

VGA cable (not supplied)

To connect the TV to a PC (Personal Computer)

Before you connect this TV to your PC, change the adjustment of your PC’s Resolution and 

Refresh rate (60 Hz).

Connect one end of a (male to male) VGA cable to the video card of the computer and the other end to the VGA 

connector PC MONITOR on the rear of the TV. Attach the connectors firmly with the screws on the plug. In case 

of a Multimedia computer, connect the audio cord to the audio output of your Multimedia computer and to the 

AUDIO connector of the PC AUDIO IN jack of the TV. Press 

INPUT SELECT

 on the remote control to select PC 

mode. Switch on the computer. The TV can operate as the computer monitor.

Monitor Display modes

MODE Resolution Refresh rate
VGA 

640x480

60/ 72/ 75 Hz

VGA

720x400

70Hz

SVGA 800x600

56/ 60/ 72/ 75 Hz

XGA

1024x768 60/ 70/ 75 Hz

WXGA 1280x768 60Hz
WXGA 1280x720 60Hz
WXGA 1360x768 60Hz

To return to normal mode

Press 

INPUT SELECT

 again.

To PC AUDIO IN

NOTE:

The on-screen displays will have a different appearance in PC mode than in TV mode.

If there is no video signal from the PC when the unit is in PC mode, “No signal” will appear on the TV-screen.

Rear of the unit

Audio cord (not supplied)

To PC

MONITOR 

IN

37I0121C_En.indd   14

37I0121C_En.indd   14

5/5/09   5:44:00 PM

5/5/09   5:44:00 PM

Summary of Contents for HDLCD1912

Page 1: ...n mode If not using Cable TV set this menu option to the Air position Lorsque l appareil sort de l usine l option Signal Type est en mode Cable c blodistribution Si vous n utilisez pas la c blodistrib...

Page 2: ...munications However there is no guarantee that interference will not occur in a particular installation If this equipment does cause harmful interference to radio or television reception which can be...

Page 3: ...t in fire or electric shock Never spill or spray any type of liquid into the unit 19 If an outside antenna or cable system is connected to the unit be sure the antenna or cable system is grounded to p...

Page 4: ...the display and wall mount manufacturers If you have any doubts about your ability to safely install your flat panel display contact your retailer about professional installation Make sure that the wa...

Page 5: ...cause skin inflammation If the liquid gets in your mouth immediately gargle and consult with your doctor Also if the liquid gets in your eyes or touches your skin consult with your doctor after rinsi...

Page 6: ...Press it in direction of arrow until you hear a click How to remove the stand When you transport this product remove the stand and pack flat against the back of the unit in the carton To remove the s...

Page 7: ...watch the DVD player or the video devices with high quality picture On Screen 3 Language Display You can select one of 3 languages English French or Spanish for on screen programming NOTE Please make...

Page 8: ...ble TV connections 12 Connections to other equipment 13 TV operation Starting setup 15 TV operation 15 Quick guide for menu operation 16 Convenience functions 17 Memorizing channels 18 Checking the di...

Page 9: ...Press MENU button to display the menu screen CHANNEL buttons VOLUME buttons and INPUT ENTER button can be used to select the desired setting during the menu screen operations AC INPUT jack PC AUDIO I...

Page 10: ...al channels Also can display the current channel number when viewing the program 4 SLEEP Button To set the LCD TV to turn off after a preset amount of time use the SLEEP button on the remote control 5...

Page 11: ...o the antenna jack If your combination VHF UHF antenna has a 300 ohm twin lead wire the use of the 300 75 ohm matching transformer may be necessary Connect the UHF 300 ohm twin lead wire to the Combin...

Page 12: ...uire the use of a Converter Descrambler box you may wish to use a signal Splitter and an A B Switch box available from the Cable TV company or an electronics supply store Follow the connections shown...

Page 13: ...your DVD player with the COMPONENT video cables not supplied Rear of the unit To Video Audio OUT Video Audio cord not supplied To VIDEO AUDIO IN To S Video OUT To Audio OUT Audio cord not supplied S...

Page 14: ...r Before you connect this TV to your PC change the adjustment of your PC s Resolution and Refresh rate 60 Hz Connect one end of a male to male VGA cable to the video card of the computer and the other...

Page 15: ...ttons to select the channel If you press only channel number channel selection will be delayed for a few seconds TO SELECT ANALOG CHANNELS 1 9 Press 1 9 as needed Example to select channel 2 press 2 t...

Page 16: ...V s sound will be silenced and Mute will appear on the screen The sound can be switched back on by pressing this button again or the VOL or SLEEP To set the TV to turn off after a preset amount of tim...

Page 17: ...e Reduction can reduce the roughness of the picture Audio Bass Treble Balance You can adjust the sound quality to your preference MTS Stereo Mono SAP The multi channel TV sound MTS feature provides hi...

Page 18: ...nce for several minutes please be patient NOTE Memorizing channels is best accomplished during evening PRIMETIME hours as more stations are broadcasting digital signals Memorizing channels can only be...

Page 19: ...ppear 3 Press or to select a channel you want to label then press Ch Label Label Clear Adjust Ch Label Channel Number 15 1 Select 4 Press or repeatedly until the character you want appears in the firs...

Page 20: ...ars old and above TV MA 17 years old and above Genre ALL All D Dialogue L Language S Sex V Violence FV Fantasy Violence Movie Rating G PG PG 13 R NC 17 X ENTER Set Movie Rating Select G All ages PG Pa...

Page 21: ...s or to select Closed Caption then press or ENTER The Closed Caption menu will appear 3 Press or to set CC Setting to On On Captions will be displayed on the screen Off Captions will not be displayed...

Page 22: ...elect 0 Natural 4 Full 3 Cinema Wide3 NOTE Selectable picture sizes may vary depending on the input source or broadcast signal Picture Size menu also can be displayed by pressing SCREEN SIZE on the re...

Page 23: ...ARIATION A slight picture size variation is normal when you adjust the CONTRAST or BRIGHTNESS settings Most types of television interference can be remedied by adjusting the height and position of the...

Page 24: ...ake sure the power cord is plugged in Try another AC outlet Power is off check fuse or circuit breaker Unplug unit for an hour then plug it back in Poor sound or no sound Station or Cable TV experienc...

Page 25: ...UHF 14 69 CATV 14 36 A W 37 59 AA WW 60 85 AAA ZZZ 86 94 86 94 95 99 A 5 A 1 100 135 100 135 01 4A Tuner type Frequency synthesized Inputs S Video Y Input 1 0 V p p 75 ohms C Input 0 3 V p p 75 ohms V...

Reviews: