background image

INSTRUCTION FOR USING THE SPA OUTDOORPOOL

55

PROGRAMMING INSTRUCTIONS

56

THE PANEL BUTTONS:

THE OPERATING INSTRUCTIONS:

1.

First press           button, the system enters Radio status (the indicator light of it is green); 
Second press             button, the system enters Bluetooth status (the indicator light of it is 
blue); Third press

  button to turn off the player.

2.

When the system enters the radio (FM) mode, long press          button for 3 seconds, 
the system starts searching and store radio channels automatically and then return to first 
channel. Pressing            button and           button to select the stored radio channels.

3.

When the system enters the Bluetooth status, scan and find the player in your cell phone with 
the name “

YS-02

”. After the pairing is completed, play the music in your cell phone. Pressing 

                button to next song and            button to previous song.
4.

When the player is in Radio or Bluetooth status, press            button and then             button 
and            button to adjust the sound volume. 

1

2

3

4

5

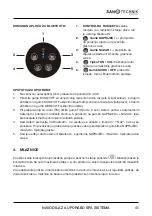
1.

INDICATOR LIGHTS: 

green light is in

radio status; blue light is in Bluetooth
status;

2.

PREVIOUS / INCREASING 

button:

change to previous song or increase 
sound volume

3.

NEXT / DECREASING button:

change to next song or decrease sound 
volume

4.

TUN / VOL button: 

Radio channel

searching and sound volume setting

5.

MODE / OFF button: 

switch among 

Radio, Bluetooth and Power off.

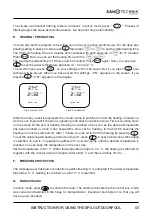
PROGRAMMING INSTRUCTIONS

56

THE PANEL BUTTONS:

THE OPERATING INSTRUCTIONS:

1.

First press

button, the system enters Radio status (the indicator light of it is green); 

Second press             button, the system enters Bluetooth status (the indicator light of it is 
blue); Third press

  button to turn off the player.

2.

When the system enters the radio (FM) mode, long press          button for 3 seconds, 
the system starts searching and store radio channels automatically and then return to first 
channel. Pressing            button and           button to select the stored radio channels.

3.

When the system enters the Bluetooth status, scan and find the player in your cell phone with 
the name “

YS-02

”. After the pairing is completed, play the music in your cell phone. Pressing        

button to next song and

button to previous song.

4.

When the player is in Radio or Bluetooth status, press

button and then

button 

and

button to adjust the sound volume. 

1

2

3

4

5

1.

INDICATOR LIGHTS: 

green light is in 

radio status; blue light is in Bluetooth 
status;

2.

        PREVIOUS / INCREASING 

button: 

change to previous song or increase 
sound volume

3.

        NEXT / DECREASING button: 

change to next song or decrease sound 
volume

4.

         TUN / VOL button: 

Radio channel 

searching and sound volume setting

5.

        MODE / OFF button: 

switch among 

Radio, Bluetooth and Power off.

2.

1.

5.

3.

4.

THE OPERATING INSTRUCTIONS:

Kommand panel: Bluetooth

4. MASSAGE NAVES/MASSAGE PUMP

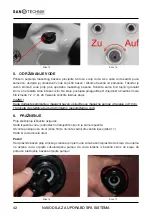
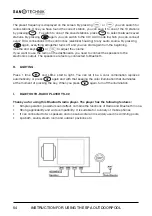
To activate or deactivate the massage pump in active mode press          . The massage pool is 
designed to provide maximum enjoyment and take up minimal space. There are several different 
massage nozzles. With most massage nozzles (not all!) pressure can be further adjusted by turning 
the external chromed ring (Picture 15). Thus, the effect of the massage can be adjusted to the 
individual user. In addition to changing the pressure of the massage jet, a jet can be added with 
the switch (Picture 14).


On the base control panel switch to the position CD/AUX

Summary of Contents for SanoSpa SPA08

Page 1: ...A08 SPA09 SPA10 SPA11 SPA12 SPA13 SPA 14 SPA15 BEDIENUNGSANLEITUNG SPA OUTDOORPOOL GER NAVODILA ZA UPORABO SPA SISTEMA SLO NAVODILA ZA UPORABO SPA SISTEMA HR INSTRUCTION FOR USING THE SPA OUTDOORPOOL ENG ...

Page 2: ......

Page 3: ...BEDIENUNGSANLEITUNG OUTDOORPOOL SPA08 SPA09 SPA10 SPA11 SPA12 SPA13 SPA14 SPA15 GER ...

Page 4: ...MMUNGEN 6 D TRANSPORTWEGE 6 E ELEKTRISCHERANSCHLUSS 7 F ABDECKUNG 9 3 BEDIENUNGSANLEITUNG 9 A BEFÜLLEN DES WHIRLPOOLS 9 B ERSTINBETRIEBNAHME AKTIV PASSIV MODUS 10 C EINSTELLEN DER UHRZEIT 11 D FILTERZEITEN REINIGUNG 11 E HEIZEN VORHEIZEN 12 F FROSTWÄCHTER 13 G RADIO CD BZW AUX 13 H BELEUCHTUNG 13 I BLUETOOTH RADIO YS 02 13 4 JETS DÜSEN MASSAGEPUMPE 14 5 ENTLEERUNG 15 6 REINIGUNG 16 A REINIGUNG DER...

Page 5: ...des Pools verzichtet werden Wer jedoch trotzdem nicht auf die Nutzung verzichten möchte sollte die Wassertemperatur auf max 38 C einstellen Vor der Nutzung des Pools sollte die Wassertemperatur mit einem Thermometer überprüft werden da die Regeleinheit des Pools von der Tatsächlichen Temperatur abweichen kann Der Konsum von Alkohol Drogen oder Medikamenten kann zur Bewusstlosigkeit und zum Ertrink...

Page 6: ...age liegender Oberfläche aufgestellt werden Es sollte ein Standort sein an dem man min eine Elektroanschluss und im besten Fall einen Wasseranschluss und einen Abfluss hat Wenn möglich sollte man an alle 4 Seiten des Pools herankommen B PRIVATSPHÄHRE UND WINDSCHUTZ Falls Sie den Pool in Sichtweite Ihres oder Ihrer Nachbarn aufstellen möchten sollten Sie mit Diesen vorher darüber sprechen Sie könnt...

Page 7: ...en Um eine Ordnungsgemäße Verbindung herzustellen nutzen Sie bitte die dafür vorgesehenen Anschlüsse auf der Platine innerhalb der Controllerbox siehe Seite 9 Alle Leitungen bis auf die Stromversorgung sind vormontiert Es ist nicht gestattet z B extra Löcher in die Controllerbox oder ähnliche Gegenstände zu bohren Machen Sie es dennoch kann es zum Erlöschen der Garantie kommen Öffnen der Verkleidu...

Page 8: ...rchsichtigen Schutz von den Anschlüssen Abbildung 6 Entfernen Sie nun die Transparente Abdeckung von den Anschlüssen in dem Sie sie einfach abziehen Bild 6 Der Steuerkasten enthält 4 Anschlüsse und einen Erdungsanschluss der sich unten befindet Abbildung 7 Schließen Sie den elektrischen Leiter durch das Loch 20 das zum Schutz des Beckenbodens gebohrt ist an den Steuerkasten an Abbildung 3 Der Ansc...

Page 9: ...cken und zu halten während dessen Sie die neue Zahl auswählen Wiederholen Sie diesen Vorgang auf der anderen Seite Bitte beachten Zu keinem Zeitpunkt auf der Abdeckung stehen sitzen oder liegen 3 BEDIENUNGSANLEITUNG A BEFÜLLEN DES WHIRLPOOLS Bevor Sie mit dem Füllen des Schwimmbeckens beginnen wischen Sie es mit einem feuchten Tuch ab um eventuelle Restpartikel aus der Anlage zu entfernen Beginnen...

Page 10: ...nterlegten Schriften funktionieren nur im Passiv Modus B ERSTINBETRIEBNAHME AKTIV PASSIV MODUS Sobald der Whirlpool a m Stormnetz angeschlossen i st l euchtet das B edienteil und das L CD Display zeigt d ie Zeit und d ie aktuelle T emperatur an W enn unten i m Display e rscheint Passiv Modus Sowohl Vorheizen als auch Zirkulation Reinigung sind aus geschaltet Drücken Sie nun und der Whirlpool wechs...

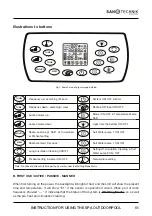
Page 11: ... ON OFF Set pre heating time Massage pump 1 ON OFF Setting switch Massage pump 2 ON OFF 24 hours circulation cleaning ON OFF Massage pump 3 ON OFF Heater ON OFF Temperature setting 3 1 2 TUNE TUNE MHz CH MEM 1 2 3 c c MINUTE HOUR LOCKED CYCLE PREHEAT F C SET Fig 1 Control panel Minute setting System ON OFF Setting confirm Hour setting CD DVD ON OFF or Switch ON OFF Set circulation cleaning time LE...

Page 12: ...onfirm Hour setting CD DVD ON OFF or Switch ON OFF Set circulation cleaning time LED Light ON OFF Set pre heating time Massage pump 1 ON OFF Setting switch Massage pump 2 ON OFF 24 hours circulation cleaning ON OFF Massage pump 3 ON OFF Heater ON OFF Temperature setting 3 1 2 TUNE TUNE MHz CH MEM 1 2 3 c c MINUTE HOUR LOCKED CYCLE PREHEAT F C SET Fig 1 Control panel 3 1 2 SET MINUTE HOUR CYCLE PRE...

Page 13: ...Funktionen Radio und Bluetooth Hohe Kompatibilität für eine Vielzahl von Mobiltelefonen Man kann den Radio mit zwei Lautsprechern und einem Subwoofer verbinden Es kann in verschiedenen Bereichen wie Schwimmbädern Whirlpools Saunen etc genutzt werden Wenn Sie das Radio auf den Bedienelement verwenden möchten müssen Sie die Lautsprecher an den Hauptelektronik anschließen Die Lautsprecher sind ab Wer...

Page 14: ...quenzsuche und Lautstärkeeinstellung 5 MODE OFF Umschalten zwischen Radio und Bluetooth und Ausschalten Steuerung 1 Schalten Sie auf dem Hauptbedienelement in die Position CD AUX 2 Drücken Sie zuerst Taste das System schaltet automatisch den Radio ein die Anzeigeleuchte leuchtet grün Drücken Sie erneut auf die Taste das System wechselt zu Bluetooth die Anzeigeleuchte leuchtet blau Drücken Sie erne...

Page 15: ...epumpen 10 bis 15 Minuten lang ein um sicherzustellen dass die Mittel gleichmäßig im Wasser verteilt werden 6 ENTLEERUNG Schalten Sie die Sicherung vor der Entleerung aus Sie können jetzt das Wasser ablassen Sie können einen Schlauch installieren oder normal auslaufen lassen Schrauben Sie die Abdeckung ab Abb 16 und drehen Sie den hinteren Teil des Ventils nach links um es zu öffnen Abb 17 Jetzt s...

Page 16: ...m oder ein weiches Tuch Verwenden Sie niemals Scheuermittel oder raue Gegenstände um den Pool zu reinigen da sonst das Acryl den Glanz verliert oder sogar Schaden nimmt In diesem Fall erlischt die Garantie 7 FEHLERBEHEBUNG Fehler Fehler äußert sich wie Fehlerbehebung Keine Funktion der Pumpen und der Heizung Im Display erscheint E01 Temperatursensor hat einen Kurzschluss oder ist nicht angeschloss...

Page 17: ...NAVODILA ZA UPORABO MASAŽNEGA SISTEMA SPA08 SPA09 SPA10 SPA11 SPA12 SPA13 SPA14 SPA15 SLO ...

Page 18: ...A KABLA 20 D TRANSPORTNE POTI 20 E PRIKLOP NA ELEKTRIČNO OMREŽJE 20 F POKROV 22 3 NAVODILA ZA UPORABO 22 A POLNJENJE MASAŽNEGA BAZENA 22 B PRVA UPORABA AKTIVNI PASIVNI NAČIN 23 C NASTAVITEV ČASA 24 D FILTRIRANJE IN ČIŠČENJE 24 E GRETJE PREDGRETJE 25 F ZAŠČITA PRED ZMRZOVANJEM 25 G RADIO CD AUX 25 H OSVETLITEV 26 I BLUETOOTH 26 4 MASAŽNE ŠOBE MASAŽNA ČRPALKA 27 5 PRAZNJENJE 28 6 ČIŠČENJE 29 A ČIŠČE...

Page 19: ... saj lahko temperatura prikazana na kontrolniku odstopa od dejanske Konzumacija alkohola drog ali močnih medikamentov lahko povzroči nezavest in posledično utopitev Če imate prekomerno telesno težo težave s srcem ali ožiljem ste sladkorni bolnik se pred uporabo masažnega bazena posvetujte s svojim zdravnikom Če jemljete kakršnakoli zdravila lahko v kombinaciji z vročino pride do povečane zaspanost...

Page 20: ...ansportne poti proste in dovolj široke E PRIKLOP DOVOD ELEKTRIČNEGA KABLA Priporočamo da za priklop na električno omrežje najamete elektrikarja priklop na hišno omrežje kot tudi priklop elektronike na samem masažnem bazenu Masažni bazen ne sme biti na hišno omrežje priključen z navadno vtičnico razen modela SPA 8 in 9 temveč s stabilno povezano električno linijo saj mora biti nenehno priklopljen n...

Page 21: ...e da snamete panel slika 3 Pri tem bodite pazljivi na kable zvočnikov in razsvetljave v kolikor ti spadajo k vašemu modelu da jih ne iztrgate iz ohišja Slika 1 Slika 2 Slika 3 Slika 4 Električni priključek masažnega bazena Odprite pokrov na strani ekrana Pod pokrovom se nahaja priključek Nato odvijte vijake iz krmilne škatle slika 4 Odstranite prozorno zaščito iz priključkov slika 6 Slika 5 Slika ...

Page 22: ...zujte če morda voda pušča na kakšnem neprimernem mestu do tega lahko pride zaradi vibracij nastalih pri transportu Vodo natočite minimalno do oznake za nivo vode slika spodaj nahaja se na levi strani V kolikor natočite manj vode se aktivira zaščita pred suhim obratovanjem V tem primeru ne funkcionira nobena črpalka prav tako ne gretje V krmilni škatli se nahajajo 4 priključki in priključek za ozem...

Page 23: ...SET Fig 1 Control panel Minute setting System ON OFF Setting confirm Hour setting 3 1 2 SET MINUTE HOUR CYCLE PREHEAT F C c Fig 1 Control panel Minute setting System ON OFF Setting confirm Hour setting CD DVD ON OFF or Switch ON OFF Set circulation cleaning time LED Light ON OFF Set pre heating time Massage pump 1 ON OFF Setting switch Massage pump 2 ON OFF 24 hours circulation cleaning ON OFF Mas...

Page 24: ... MHz CH MEM 1 2 3 c c MINUTE HOUR LOCKED CYCLE PREHEAT F C SET Fig 1 Control panel Minute setting System ON OFF Setting confirm Hour setting CD DVD ON OFF or Switch ON OFF Set circulation cleaning time LED Light ON OFF Set pre heating time Massage pump 1 ON OFF Setting switch Massage pump 2 ON OFF 24 hours circulation cleaning ON OFF Massage pump 3 ON OFF Heater ON OFF Temperature setting 3 1 2 TU...

Page 25: ...za 10 minut Pritisnite Sedaj lahko nastavite čas trajanja gretja s tipkama ali Maximalen čas predgretja znaša 19 ur in 50 minut Ponovno pritisnite Sedaj lahko s pritiskom na nastavite temperaturo vode med 15 C in 42 C Za izhod iz tega menija pritisnite s tem vaše nastavitve ne ostanejo shranjene Če pa pritisnete bodo vaše nastavitve shranjene Ko ste shranili nastavitve se na zaslonu prikaže ON Če ...

Page 26: ...skom na Če želite preklopiti na eno od shranjenih postaj pritisnite s tem boste lahko izbirali med shranjenimi postajami S ponovnim pritiskom na preklopite na CD AUX način v katerem lahko priklopite preko 2 RCA priklopov v kontrolnem ohišju elektro ohišju poljuben vir zvoka S ponovnim pritiskom na se vse skupaj izklopi in spet lahko pričnete od začetka Glasnost nastavljate s tipkama in F OSVETLITE...

Page 27: ...te predvajanje 5 Ko je predvajalnik v načinu radio ali Bluetooth z gumboma NAPREJ in NAZAJ spreminjate jakost zvoka 1 2 3 4 5 1 KONTROLNA LUČ zelena luč je v radijskem stanju modra luč je v stanju Bluetooth 2 Gumb NAPREJ spremenite na prejšnjo skladbo ali povečajte glasnost zvoka 3 Gumb NAZAJ preklopite na naslednjo skladbo ali zmanjšajte glasnost zvoka 4 Tipka TUN VOL iskanje radijskega postaje i...

Page 28: ...aznitev odstranite tudi priključke na črpalkah in gretju Izperite tudi filter 5 VZDRŽEVANJE VODE Pri polnjenju masažnega bazena preverite trdoto vaše vode V kolikor vaša voda vsebuje veliko vodnega kamna dodajte sredstvo za mehčanje vode ki ščiti bazen in bazensko tehniko pred vodnim kamnom Pomembno je tudi kloriranje vode pred prvo uporabo masažnega bazena Uporabljajte samo hitro topljiv klorov g...

Page 29: ...v ker lahko poškodujete akril Notranjost izgubi sijaj pojavijo se lahko druge poškodbe in garancija ni več veljavna 8 NAPAKE Napaka Napaka se prikaže kot Odprava napake Nobena od črpalk in ogrevanje ne deluje Na zaslonu se prikaže E01 senzor za temperaturo je v kratkem stiku ali ni priklopljen okvara senzorja za nivo vode nivo vode je prenizek Preverite kontakte in jih po potrebi zamenjajte Ekran ...

Page 30: ...NAVODILA ZA UPORABO SPA SISTEMA 30 ...

Page 31: ...NAVODILA ZA UPORABO KL8300 SISTEMA SPA 08 SPA09 SPA10 SPA11 SPA12 SPA13 SPA14 SPA15 CRO ...

Page 32: ...IMJERENO MJESTO ZA MONTAŽU 34 D UPUTE ZA TRANSPORT 34 E SPAJANJE NA STRUJU 34 F POKROV 36 3 UPUTSTVA ZA UPOTREBU 36 A PUNJENJE MASAŽNOG BAZENA 36 B PRVA UPOTREBA AKTIVNI PASIVNI NAČIN 37 C NAMJEŠTANJE SATA 38 D FILTRIRANJE I ČIŠČENJE 38 E GRIJANJE PREDGRIJAVANJE 39 F ZAŠTITA OD SMRZAVANJA 39 G RADIO CD AUX 39 H RASVIJETA 40 I BLUETOOTH 40 4 MLAZNICE 41 5 PRAŽNJENJE 42 6 ČIŠČENJEBAZENA 43 A ČIŠČENJ...

Page 33: ...i je temperatura prikazana na kontrolnoj ploći odstupa od stvarne Konzumacija alkadhola droga ili jakih medikamentata može uzrokovat nesvjesticu i utapanje Ukoliko imate preveliku tjelesnun težinu probleme sa srcem i krvožilnim sustavom Ako ste dijaebtićar prije upotrebe se posavjetujte s lječnikom Ukoliko uzimate ljekadve koji u kadmbinaciji s toplinom dolazi do povečane pospanosti te posljedice ...

Page 34: ...UTE ZA TRANSPORT Vrata stepenice prjelazi vas mogu smetati kod postavljanja masažnog bazena na željeno mjesto zato predhodno provjerite da su transportne rute jednostavne dovoljno široke E SPAJANJE NA STRUJU Prepuručujemo da za prikljućivanje na elektrićnu mrežu iznajmite električara prikljućenje na ploću kao i na elektrićnu ploću na bazenu Whirlpool ne može biti povezan na kućnu mrežu s jednostav...

Page 35: ...ijeme budite oprezni na kablove zvučnika i rasvjete Ako jesu na vašem modelu da se ne izvade iz kućišta Slika 1 Slika 2 Slika 3 Slika 4 Električni priključak masažnog bazena Otvorite pokrov na suprotnoj strani ekrana Pod pokrovom se nalazi priključak Potom odvijte vijke iz kontrolne ploće Slika 4 Otvorite pokrov Slika 5 Odsranite poklopac kad prikljućka oprezno Slika 6 Slika 5 Slika 6 ...

Page 36: ...sve male čestice iz bazena Započnite dodavanjem vode i provjerite je li možda voda curi na nekom neprikladnom mjestu To se može dogoditi zbog vibracija nastilih tijekom transporta Napunite vodu najmanje iznad kontrolnog senzora za vodu na slici dolje nalazi se na lijevoj strani Ako uspete manje vode aktivira se zaštita Onda ne funkcionira bilo pumpu i grijač na NO Na desnoj strani nalazi se slika ...

Page 37: ...1 2 SET MINUTE HOUR CYCLE PREHEAT F C c Fig 1 Control panel Minute setting System ON OFF Setting confirm Hour setting CD DVD ON OFF or Switch ON OFF Set circulation cleaning time LED Light ON OFF Set pre heating time Massage pump 1 ON OFF Setting switch Massage pump 2 ON OFF 24 hours circulation cleaning ON OFF Massage pump 3 ON OFF Heater ON OFF Temperature setting 3 1 2 TUNE TUNE MHz CH MEM 1 2 ...

Page 38: ...ump 1 ON OFF Setting switch Massage pump 2 ON OFF 24 hours circulation cleaning ON OFF Massage pump 3 ON OFF Heater ON OFF Temperature setting 3 1 2 TUNE TUNE MHz CH MEM 1 2 3 c c MINUTE HOUR LOCKED CYCLE PREHEAT F C SET Fig 1 Control panel Minute setting System ON OFF Setting confirm Hour setting CD DVD ON OFF or Switch ON OFF Set circulation cleaning time LED Light ON OFF Set pre heating time Ma...

Page 39: ... sa svakim pritiskom povećava za 10 minuta Pritisnite Sada jednostavno namjestite vrijeme trajanja grijanja s tipkama ili Maximalan vrijeme predgrijanja iznosi 19 sati i 50 minuta Ponovno pritisnite Sada s pritiskom na namjestite temperaturu vode između15 C i 42 C Za izlaz iz tega menija pritisnite s tim vaše postavke ne ostanu spremljene Ako pritisnete vaše postavke budu spremljene Kad ste pohran...

Page 40: ...m će te lako izabrat između poranjenih postaja S ponovnim pritiskom na spojite se na CD AUX model na kojem imate dvije tipke za pohranjivanje glasnoće S ponovnim pritiskom na se sve skupa iskljući i opet počnete od poćetka Jačinu zvuka namještate s tipkama i F RASVIJETA 1 put pritisnite i LED diode poćnu svjetliti pustite da se kombinacija boja mjenja samostalno ili ponovno pritisnete s tim pohran...

Page 41: ...ašeg uređaja lako s gumbima NAPRIJED i NAZAD mjenjate glazbu 5 Kad je uređaj u načinu radio ili Bluetooth s gumbima NAPRIJED i NAZAD mjenjate jaćinu zvuka 1 2 3 4 5 4 MLAZNICE Za ukljućivanje ili isključivanje masažne pumpe u aktivnom stanju pritisnite Masažni bazen je koncipiran tako da nudi maximalan užitak u svom prostoru u kojem djeluje više razlićitih masažnih mlaznica Za podešavanje pritiska...

Page 42: ...žnjenje bazena otpojite pumpu 5 ODRŽAVANJE VODE Prilikom punjenja masažnog bazena provjerite tvrdoću svoje vode Ako vaša voda sadrži puno kamenca dodajte joj omekšivač vode koji štiti bazen i tehniku bazena od kamenca Također je važno klorirati vodu prije prve upotrebe masažnog bazena Koristite samo brzi topljivi granulat klora a ne tablete klora ili tekući klor Na kraju postupka prilagodite pH vr...

Page 43: ... agresivnih sredstva za čišćenje jer će te oštetit akril Unutrašnjost gubi sjaj te gubite garanciju 8 GREŠKE Greška Greška se pokaže kad Otklanjanje greške Nijedna pumpa ne radi Na zaslonu se pokaže E01 senzor za temperaturu je u kratkom spoju ili nije prikljućen Kvar senzora za nivo vode nivo vode je prenizak Provjerite kontakte te ih po potrebi zamjenite Ekran ne pokazuje ništa Na ekranu se ništ...

Page 44: ...NAVODILA ZA UPORABO SPA SISTEMA 44 ...

Page 45: ...INSTRUCTION FOR USING THE SPA OUTDOORPOOL 45 INSTRUCTION FOR USING THE OUTDOORPOOL SPA 08 SPA09 SPA10 SPA11 SPA12 SPA13 SPA14 SPA15 ENG ...

Page 46: ...8 D TRANSPORTATION 48 E ELECTRICAL CABLE CONNECTION SUPPLY 48 F COVER 50 3 INSTRUCTION FOR USE 49 A FILLING OF THE OUTDOORPOOL 50 B FIRST USE ACTIVE PASSIVE MANNER 50 C SETTING THE TIME 52 D FILTERING AND CLEANING 52 E HEATING PREHEATING 53 F FREEZINGPROTECTION 53 G RADIO CD AUX 53 H LIGHTING 54 I BLUETOOTH 54 4 MASSAGE NAVES MASSAGE PUMP 55 5 WATER MAINTENANCE 56 6 DRAWING 56 7 CLEANING 56 A CLEA...

Page 47: ...er as the temperature displayed on the controller may deviate from the actual temperature Consumption of alcohol drugs or strong medicines can cause unconsciousness and consequent drowning If you are overweighted have heart or circulatory problems or you are a diabetic please consult your doctor before using the massage pool If you take any medications combined with fever may result in increased s...

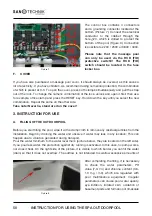
Page 48: ...at the transport paths are free and wide enough E ELECTRICAL CABLE CONNECTION SUPPLY We recommend that you hire an electrician to connect to the electric network connection to the home network as well as to connect the electronics to the massage pool itself The massage pool must not be connected to a home network with a regular socket except SPA 8 and 9 but with a stable electrical line as it must...

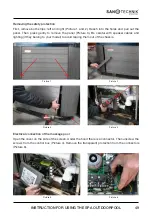
Page 49: ...ture 3 Be careful with speaker cables and lighting if they belong to your model to avoid tearing them out of the chassis Electrical connection of the massage pool Open the cover on the side of the screen Under the hood there is a connector Then unscrew the screws from the control box Picture 4 Remove the transparent protection from the connectors Picture 6 Picture 1 Picture 2 Picture 3 Picture 4 P...

Page 50: ...er minimum to the water level mark picture below they are located on the left side If you pour less water the protection against dry running is activated In this case no pump works nor does it heat On the right side of the picture it is visible to which border you can fill the water drain so that it does not overflow The outflow is not intended to swallow excessive amounts of The control box conta...

Page 51: ...ON OFF Temperature setting Surf Water pump 1 ON OFF Fig 1 Sketch map of big massage bathtub NAVODILA ZA UPORABO MASAŽNEGA SISTEMA 21 B PRVA UPORABA AKTIVNI PASIVNI NAČIN Takoj ko je masažni bazen priklopljen na elektriko se osvetli ekran kjer lahko na zaslonu vidite čas in aktualno temperaturo Če se na ekranu prikaže pomeni da je bazen v pasivnem načinu Predgretje kroženje vode in čiščenje so izkl...

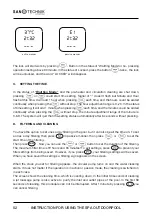
Page 52: ...e manner The lock will start work by pressing Button in the status of Waitting Mode or no pressing operation lasting above 30 minute In the status of Locked press the button twice the lock will be unlocked and the word LOCKED will disappear C SETTING THE TIME In the status of Waitting Mode and the pre heater and circulation cleaning are shut down pressing or could start time setting Signal of does...

Page 53: ...s program to be active once a day or is active continuously For the daily pre heating setting in passive mode press then press or to set the initial heating time The minimum heating time is 5 minutes and increases with each pressure of for 10 minutes Press Now you can set the heating time with the or The maximum preheat time is 19 hours and 50 minutes Press again Now you can press to set the water...

Page 54: ...table for a variety of mobile phones It can connected to two speakers and one subwoofer and is widely used in swimming pools spa bath sauna steam room and outdoor pavilions etc PROGRAMMING INSTRUCTIONS 55 4 ELECTRIC PARAMETERS 1 Performance index Rated voltage 220VAC 50Hz 110VAC 60Hz Maximum working current 60A 100A 110V Voltage resistance 1250V 1 minute without penetration Isolative resistance 20...

Page 55: ...ress button and then button and button to adjust the sound volume 1 2 3 4 5 1 INDICATOR LIGHTS green light is in radio status blue light is in Bluetooth status 2 PREVIOUS INCREASING button change to previous song or increase sound volume 3 NEXT DECREASING button change to next song or decrease sound volume 4 TUN VOL button Radio channel searching and sound volume setting 5 MODE OFF button switch a...

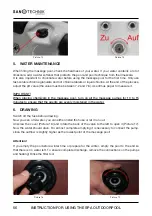
Page 56: ...discharge remove the connections on the pumps and heating Rinse the filter too Picture 14 Picture 15 Picture 16 Picture 17 5 WATER MAINTENANCE When filling the massage pool check the hardness of your water If your water contains a lot of limescale add a water softener that protects the pool and pool technique from the limescale It is also important to chlorinate water before using the massage pool...

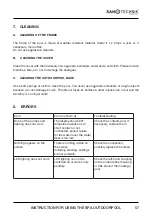
Page 57: ... damage acrylic The interior loses its brilliance other injuries can occur and the warranty is no longer valid 8 ERRORS Error Error is shown as Troubleshooting None of the pumps and heating does not work The display shows E01 temperature sensor is in short contact or not connected sensor failure for the water level the water level is too low Check the contacts and if necessary replace them Nothing...

Page 58: ......

Page 59: ......

Page 60: ...8 E info sanotechnik si SC SANOTECHNIK COM RUMANIEN S R L ROMANIA Tancabesti DN 1 KM 26 5 Com Snagov jud llfov T 40 21 350 13 43 F 40 21 350 13 44 E office sanotechnik ro SANOTECHNIK HUNGÁRIA KFT HUNGARIA Nagytétényi út 112 H 1222 Budapest T 361 424 06 70 F 361 424 06 79 E info sanotechnik hu Sanotechnik Bulgaria EOOD BULGARIA 3 Georgi Benev street 4000 Plovdiv T 359 32 961101 F 359 32 961102 E of...

Reviews: