background image

19

Setting the alarm clock

There are two alarms which can each be set to wake you to AM/FM radio, or buzzer alarm. The 
alarms may be set while the unit is off or while playing. Ensure that the time is set correctly before 

setting the alarms.

Note:

 If no buttons are pressed for 10 seconds, the radio will exit the alarm setup.

1. Before setting an alarm ensure the clock time is set. Press and hold any of the Alarm button for more 

    than 3.5 seconds until the radio beeps. The Alarm 1 icon or Alarm 2 icon will flash on the display. 
    You’ve now entered the alarm setting (e.g. Alarm 1 button to enter the alarm 1 setting).
2. The hour setting of alarm 1, for example, will begin to flash. Rotate the Tuning control knob to 
    select the required alarm hour, and press and release the Tuning control button to confirm the 
    setting. Rotate the Tuning control knob to select the required alarm minute, and press and release 
    the Tuning control button to confirm the setting.
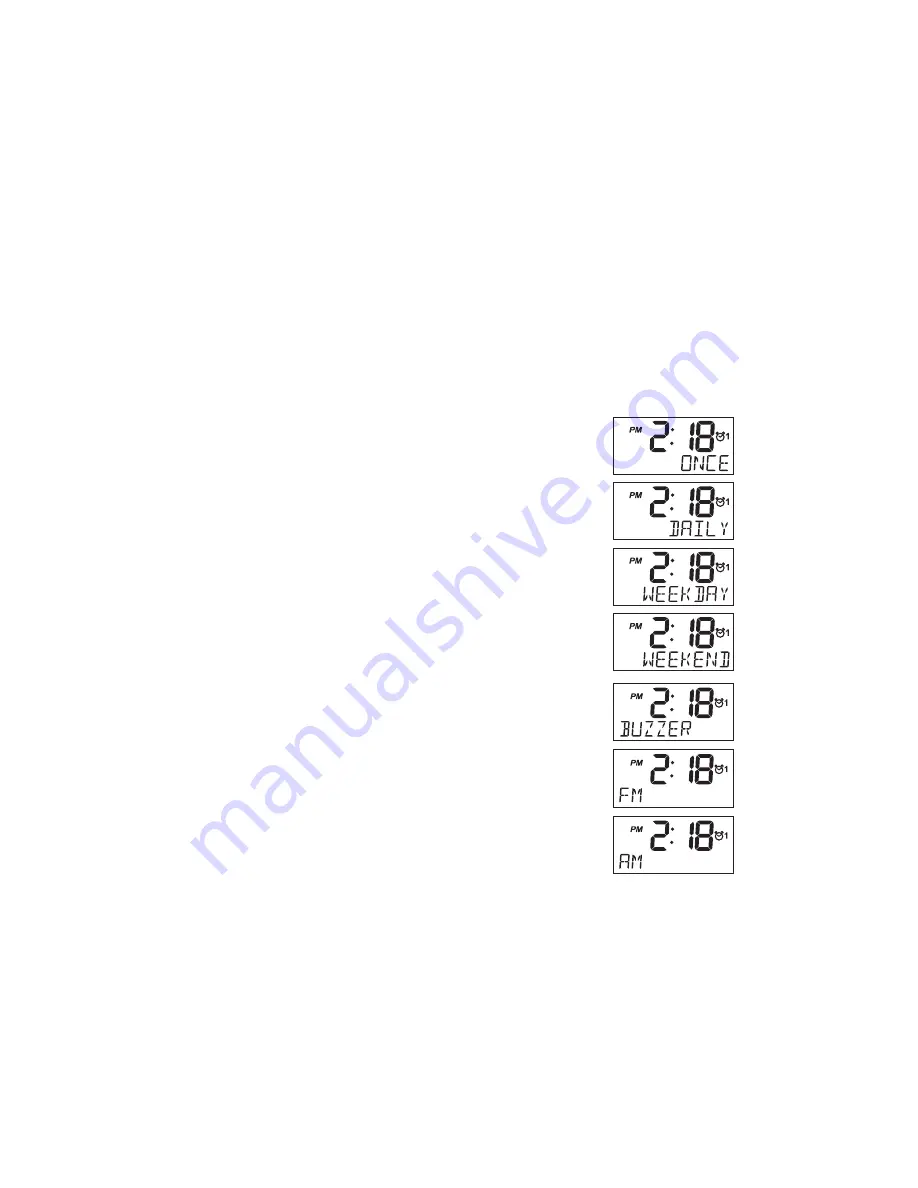
3. Then the display will show the frequency options for the alarm.
    The alarm options are as follows:

    ONCE – the alarm will sound once

    DAILY – the alarm will sound everyday
    WEEKDAY – the alarm will sound only on weekdays
    WEEKEND – the alarm will sound only at weekends
    Press and release the Tuning control button to confirm the setting.
4. Rotate the Tuning control knob to choose the required alarm type, and then press and release the 
    Tuning control button to confirm the setting. The alarm can be set to BUZZER,FM or AM. When 
    the BUZZER mode is selected, please go to step 5 to set alarm volume. When radio mode is 
    selected, the radio frequency and the preset number on the display will begin to flash. Rotate the 
    Tuning control knob to adjust the required radio frequency or the required preset number for the 
    radio alarm, then press and release the Tuning control button to confirm the setting.
5. Rotate the Tuning control knob to choose the required sound level for the alarm. Press and release 
    the Tuning control button to confirm the setting.

6. The alarm has now been set. Press and release the Tuning control button  again, and the radio 

    will revert to normal display. Active alarms are shown using the alarm indicator on the display.

Summary of Contents for RCR-20

Page 1: ...GB RCR 20 Version 1...

Page 2: ...1 The Bluetooth word mark and logos are registered trademarks owned by Bluetooth SIG Inc and any use of such marks by SANGEAN ELECTRONICS INC is under license...

Page 3: ...cing instructions are for use by qualified service personnel only To reduce the risk of the electric shock do not perform any servicing other than that contained in the operating instructions unless y...

Page 4: ...vases shall be placed on the radio It is recommended to operate the product such that there is a minimum distance 4 recommended to adjacent objects in order to ensure good ventilation The ventilation...

Page 5: ...ndby Main Power button Sleep timer button 13 Snooze dimmer button 14 Volume Tone control 1 Preset 1 2 Preset 2 3 NFC detection area 4 Preset 3 Rewind button 5 Preset 4 Play Pause button 6 Preset 5 Fas...

Page 6: ...5 Controls 15 LCD display 16 Remote control sensor 17 Speaker...

Page 7: ...6 GB Controls 18 FM antenna 19 Auxiliary input socket 20 USB socket for iPhone Smartphone charging 21 Headphone socket 22 DC IN socket...

Page 8: ...7 Controls 23 Backup battery compartment...

Page 9: ...8 GB Display icons PM indicator Time display Sleep timer icon Alarm 1 icon Alarm 2 icon Frequency information for station display RDS icon Backup battery capacity indicator A B C D E F G H...

Page 10: ...ons for the remote control 1 Rotating the Tuning control knob of the radio is the same as pressing the Tuning Up or Down buttons on the remote control 2 Pressing the Tuning control button of the radio...

Page 11: ...requency band 5 Use the Volume control to adjust the sound level as required Note If your radio has any interference in the AM band because of its AC adaptor please move your radio away from the AC ad...

Page 12: ...ate the Tuning control knob until the FM MONO shows on the display Press and release the Tuning control button and rotate the Tuning control knob to select AUTO Press and release the Tuning control bu...

Page 13: ...button until the display shows P4 for example after the frequency The station will be stored using the preset number Repeat this procedure for the remaining presets as you wish 4 Preset stations which...

Page 14: ...nection no other Bluetooth device can pair or link with your radio 3 If RCR 20 shows in your Bluetooth device list but your device cannot connect with it please delete the item from your list and pair...

Page 15: ...ooth source device Deleting Bluetooth paired device memory 1 Press the Source button as needed to select Bluetooth mode 2 To clear the memory of all paired devices press and hold the Bluetooth pairing...

Page 16: ...th the radio Once paired with a device Connecting RCR 20 or a similar message is shown on your NFC enabled device 3 Use the controls on your device or on your radio to play pause and navigate tracks N...

Page 17: ...confirm your choice of clock format The display will then revert to the previous menu If the 12 hour clock format is chosen the radio will then use the 12 hour clock for the setting of alarms with a P...

Page 18: ...the display will begin flashing Rotate the Tuning control knob to select the desired hour and press and release the Tuning control button to confirm the setting Then rotate the Tuning control knob to...

Page 19: ...ntrol knob until RDS CT appears on the display Press and release the Tuning control button to confirm the setting The clock time of the radio will set up automatically according to the RDS data receiv...

Page 20: ...quency options for the alarm The alarm options are as follows ONCE the alarm will sound once DAILY the alarm will sound everyday WEEKDAY the alarm will sound only on weekdays WEEKEND the alarm will so...

Page 21: ...zer alarm activates the alarm will start softly and gradually increase in level It will sound for 1 minute and silence for 1 minute in repetition for 60 minutes unless cancelled The radio will sound n...

Page 22: ...our radio can be set to turn off automatically after a preset time has elapsed The Sleep Timer setting can be adjusted between 15 30 45 60 90 or 120 minutes 1 Press and hold the Standby main power but...

Page 23: ...ween 5 5 and press and release the Volume control button to confirm the setting 3 Then the treble value will appear on the display Rotate the Volume control knob to adjust between 5 5 and press and re...

Page 24: ...nect an external audio source for example iPod MP3 or CD player to the Auxiliary Input socket 4 Adjust the volume setting on your iPod MP3 or CD player to ensure an adequate signal level from the play...

Page 25: ...etting is completed rotate the Tuning control knob until the FM frequency range shows on the display Then press the Tuning control button to enter the FM range setting 2 Rotate the Tuning control knob...

Page 26: ...s and hold the Info Menu button until you hear a beep to enter the menu setting 2 Rotate the Tuning control knob until FACTORY appears on the display Press and release the Tuning control button the RE...

Page 27: ...quency Range FM 87 5 108 MHz AM 9K 522 1710 KHz AM 10K 520 1710 KHz Back up Battery 2 x1 5V Size AA UM 3 LR6 Remote control Battery 2 x1 5V Size AAA UM 4 R03 Bluetooth Ver 4 1 A2DP AVRCP1 4 SBC Power...

Reviews: