background image

62

GB

Streaming data rate - Spotify Connect

Your radio can change different music streaming quality when you stream content from Spotify. If your 
internet connection has a low data usage allowance, or has a relatively low maximum data rate, it is 
strongly suggested that your radio uses a lower streaming quality (data rate) for Spotify connections. 
In some cases this may allow more reliable streaming, although some loss of audio quality will occur.

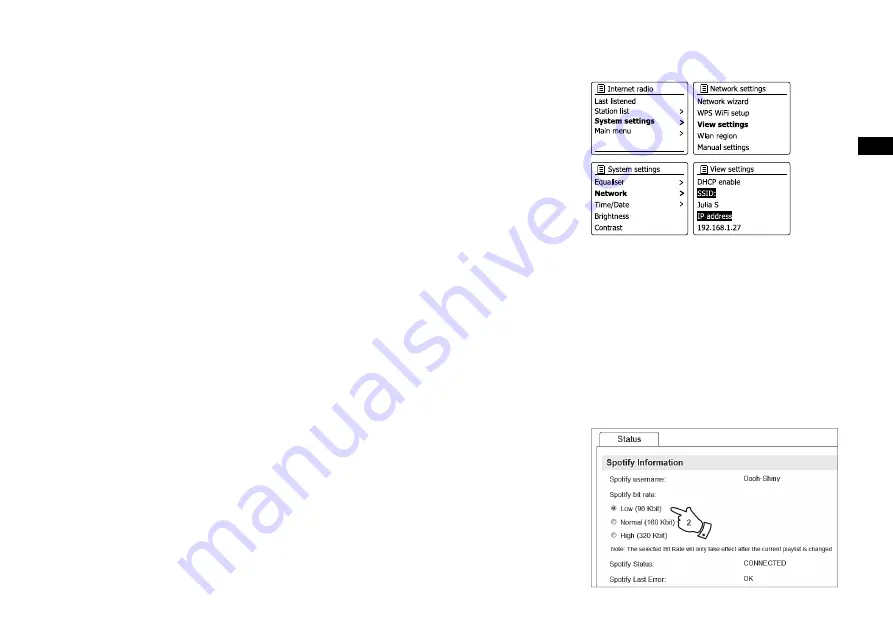
The data rate used for Spotify Connect is confi gured on a web browser

1. Y

ou need to access the radio's confi guration web page following the steps below:

    Access the menu for the current mode by pressing the Menu button> Select  “System settings”> 
    Select “Network”> Select “View settings”> Use the Select button to enter the “View settings” 
    and IP address is shown on the display> Note down the IP address shown on the display for 
    the next stage> Ensure that your computer/Smartphone is on the same network as the radio. 
    Enter the IP address noted above into the address bar of your web browser. 
2. When you enter the radio’s con

guration web page, the top page allows you to choose the 

    streaming quality (96k/160k/320k). The selected streaming quality will be applied when your 
    radio streams music from a new playlist of Spotify.

Friendly name - Spotify Connect

You can personalize the name of your radio so that it can be easily 

identified

 within connected 

network, UPnP server or Spotify app.
1. Follow the steps described in point 1 above and you can view some of the radios settings as 
    well as changing the “Friendly name.”
2. Type the name in the box and click Apply to save the change. The new Friendly name will be 
    viewable on the connect network devices.

Summary of Contents for RCR-11 WF

Page 1: ...GB RCR 11WF Version 1...

Page 2: ...DOK App is available for Android and iOS You can easily control every SmartLink device from your Smartphone or tablet with our full function UNDOK App to stream your favorite music or station Download...

Page 3: ...7 Play to function UPnP renderer 42 43 Using USB memory devices 44 45 DAB mode 46 53 Selecting a DAB radio station 47 Display modes 48 Finding new DAB radio stations 49 Manual Tuning 50 Dynamic Range...

Page 4: ...will depend upon the building type other nearby wireless network and possible interference sources DAB and FM radio functions can operate wherever the internet radio is able to receive a suitable bro...

Page 5: ...rd button 3 Preset 3 4 Preset 4 Play Pause button 5 Preset 5 Stop button 6 Tuning up down button 7 Standby button Sleep timer button 8 Select Radio seek button 9 Menu button Info button 10 Forward but...

Page 6: ...Controls and connections 15 LCD display 16 Speaker...

Page 7: ...GB Controls and connections 17 Wire antenna 18 Headphone socket 19 Auxiliary input socket 20 DC IN socket 21 USB socket for playback...

Page 8: ...the display of information relating to the radio station or music file being played 4 Many operations require the user to make a selection from the menu Highlight the menu item using the Tuning butto...

Page 9: ...ains plug should be removed from the mains socket outlet completely 3 When you apply power the display on the radio will light up and say SANGEAN The rst time that you use your radio or after Factory...

Page 10: ...You will then need to set Keep network connected By default your radio will shut down its WiFi connection when it is in standby This minimizes power consumption but it does mean that you will need to...

Page 11: ...ast the SSID You should then highlight and select the Manual config option in order to enter the network details manually This is described in Manual Network Configuration If your network name is bein...

Page 12: ...key characters are selected and entered using the Tuning but tons The highlight scrolls through the available characters as well as the three controls on the right The character currently highlighted...

Page 13: ...he time as obtained from the Internet If the time display is not correct for any reason it can easily be adjusted later see Manually setting the clock If you have followed the steps on the preceding p...

Page 14: ...acquire an IP address and other network settings from your router using DHCP Manual network configuration If you do not wish to use DHCP for automatic configuration or if your network is configured wi...

Page 15: ...r each group of digits and then press the Select button to enter the value and to move on to the next group Repeat this until all eight groups of digits have been entered The next step is to set up th...

Page 16: ...ure option if it is available The radio will then require you to enter the encryption key This must be a string of between 8 and 63 characters and must be identical to the key which has been entered i...

Page 17: ...adio stations which you like you may either store them as presets within the radio or add them to a list of your favorite stations which your radio can access The number of presets is limited there ar...

Page 18: ...ngdom and BBC stations for example Press the Tuning buttons until Location is highlighted on the display and then press the Select button to select Press the Tuning buttons to scroll through the list...

Page 19: ...of the week The examples shown here are typical Podcasts and Listen Again content can also be accessed separately from the main Internet Radio menu If your radio cannot connect to a radio station Not...

Page 20: ...ion When the chosen genre is highlighted press the Select button You then have the choice of All Stations of the chosen genre or a list of countries Note if a country is not shown then the station may...

Page 21: ...the remote control to highlight each character for the search in turn and press the Select button to enter If you make an error press the Info button to access the delete character on the screen and...

Page 22: ...inding stations by location and genre 1 Press and hold the Menu button to enter the main Internet radio menu Press the Tuning buttons until Station list is highlighted on the display and then press th...

Page 23: ...the display and then press the Select button 2 Press the Tuning buttons until Podcasts is highlighted on the display and press the Select button 3 You may then search by location genre or using part...

Page 24: ...using one of the methods described on the preceding pages 2 To store the currently playing radio station as a preset press and hold the required Preset button 1 5 on the panel until the display shows...

Page 25: ...e list The Last Listened list is stored when the radio is disconnected from the mains 1 With the radio switched on and in Internet radio mode press and hold the Menu button The first item on the menu...

Page 26: ...eing received e Playback buffer Displays status when connecting to and playing a radio station This indicates the reliability of the data stream to your radio If there are no bars shown to the right o...

Page 27: ...en instructions to register an account During the registration process the web site asks for an access code This allows it to uniquely identify your internet radio from the many others that it also pr...

Page 28: ...nk My favourites in the My account area To delete a favourite radio station click on the icon with a heart and minus symbol 1 2 3 4 5 If you wish to listen to a radio which is not a currently held in...

Page 29: ...ppear on the display set up as described on the preceding page Press the Tuning buttons to highlight the required station and then press Select button to confirm your selection The display will show C...

Page 30: ...be unable to connect to a particular station please note that some radio stations do not broadcast 24 hours per day and some stations are not always on line In addition as mentioned in the previous se...

Page 31: ...before streaming them to the radio Note that the playback of files encoded using WMA Voice WMA 10 Professional and for files which have DRM protection are not supported When using a UPnP server the se...

Page 32: ...media les available on your PC To add new media les to the library select Library then Music then All music or Artist Album etc This will show you the current library contents You may then simply dra...

Page 33: ...o may access the music les you will need to click the Library tab in WMP 12 and select the Stream item to open the Media Streaming window Select Automatically allow devices to play my media then selec...

Page 34: ...s the Select button If the display shows multiple media types select Music Some UPnP servers can serve pictures and video content to suitable devices 4 The radio will now list the media categories whi...

Page 35: ...content by Artist Album Genre etc according to your needs then press the Select button to enter your choice 2 When you reach the album or folder the menu will then switch to showing the tracks in tha...

Page 36: ...e current track 2 If you press the Play Pause button playback will resume from the point where it was paused 3 Press the Stop button to stop playing the current track 4 Press the Rewind button to star...

Page 37: ...uffle tracks 1 When a track is playing press and hold the Menu button to enter the main Music player menu Press the Tuning buttons until Shuffle play is highlighted on the display Press the Select but...

Page 38: ...splay and a WiFi strength indicator is shown in the bottom right corner together with an indicator showing the radio is obtaining the media from a UPnP server Your radio is able to display the album a...

Page 39: ...om the menu Adding a single track to your playlist 1 When selecting or when playing a track using a UPnP server press and hold the Select button and the display will show Added to My playlist 2 The tr...

Page 40: ...served via UPnP will show their track name Erasing a track from the playlist 1 Press and hold the Menu button to enter the main Music Player menu 2 Press the Tuning buttons until My Playlist is highl...

Page 41: ...ight NO and press the Select button to confirm Playing your playlists 1 Press and hold the Menu button to enter the main Music Player menu 2 Press the Tuning buttons until My playlist is highlighted o...

Page 42: ...e Failure of a computer to respond to Wale On Lan is not considered a fault of the radio Prune servers Your radio stores details of the UPnP servers that it has seen via its network connection in its...

Page 43: ...ld devices using Apple s iOS or Android operating systems In this mode the radio acts as a UPnP Renderer 1 In order to use the Play to function the radio must be actively connected to the network The...

Page 44: ...ct additional content within Windows and again use the Play to function see step 3 5 The additional tracks will be added to the playlist in the current Play to window You may also delete or change the...

Page 45: ...operate with the sound system However there are many different card variants available and not all cards can be guaranteed to work in the RCR 11WF USB memory must use the FAT or FAT 32 filing system i...

Page 46: ...the Select button to select the option 3 Press the Tuning buttons until USB playback is highlighted on the display and press the Select button Your radio will now list the content stored on the USB m...

Page 47: ...ning process as new stations are detected the station counter will increase and the stations will be added to the list which is stored in the radio The bar graph indicates the progress of the scan 5 W...

Page 48: ...reception A question mark in front of the station name merely indicates that the station has not recently been detected by the radio It may still be available Secondary services Some DAB radio station...

Page 49: ...gnal error and strength for the station being listened to A lower error number indicates a better quality of radio signal The signal strength graph can be used when positioning the radio or its antenn...

Page 50: ...ton and press the Tuning buttons as needed to highlight DAB radio mode Press the Select button to select the option 2 Once in DAB mode press and hold the Menu button 3 Press the Tuning buttons until S...

Page 51: ...radio has tuned the display shows the channel number and frequency and the name of the DAB multiplex found if any A bar graph shows the signal strength and is useful if you need to reposition the rad...

Page 52: ...er the DAB menu 4 Press the Tuning buttons until DRC is highlighted on the display 5 Press the Select button to enter the DRC adjustment mode The current DRC setting will be indicated with an asterisk...

Page 53: ...he Menu button to enter the DAB menu list 4 Press the Tuning buttons until Station order is highlighted Press the Select button to enter the station order adjustment mode 5 Press the Tuning buttons to...

Page 54: ...as needed to highlight DAB radio mode Press the Select button to select the option 3 Press and hold the Menu button to enter the DAB menu 4 Press the Tuning buttons until Prune invalid is highlighted...

Page 55: ...ld the Tuning up down button to scan further Your radio may have found a spurious interference signal 5 To find more FM stations press and hold the Tuning up down button to repeat the scan operation O...

Page 56: ...te Displays the current date Note If no RDS information is available then the radio will only be able to display the frequency There will be no text or program type information available under these c...

Page 57: ...ed and then press the Select button to enter the scan adjustment mode The current scan setting is indicated with an asterisk 4 To set your radio so that only the stations with the strongest signals ar...

Page 58: ...escribed 2 Press and hold the Menu button to enter the FM menu 3 Press the Tuning buttons until Audio setting is highlighted on the display Press the Select button to enter the audio setting mode The...

Page 59: ...et button Repeat this procedure as needed for the remaining presets 4 Stations which are already stored in the presets may be over written by following the above procedure Note The radio station prese...

Page 60: ...etwork environment and then turn on this radio s power please refer to Con guration in the previous section Note It is necessary that your radio and your smartphone connect to the same wi network so t...

Page 61: ...e the icon it indicates no connect device available Check your device s user manual or the manufacture s support site as a rmware upgrade may be required 5 Control playback Use the controls on your Co...

Page 62: ...Artist Displays the name of the artist for the track currently playing c Album Displays the name of the album from which the current track is taken d Bit rate Displays the bit rate and sampling rate o...

Page 63: ...tton to enter the View settings and IP address is shown on the display Note down the IP address shown on the display for the next stage Ensure that your computer Smartphone is on the same network as t...

Page 64: ...Alternatively you may specify that the time is not automatically updated In this case the clock must always be set manually after a power interruption 1 With your radio switched on press and hold the...

Page 65: ...buttons until Time Date is highlighted on the display Press the Select button to enter the time setup 4 Press the Tuning buttons until Set format is highlighted on the display Press the Select button...

Page 66: ...e display Press the Select button to enter the system settings menu 4 To change the time zone setting go to step 11 To change from winter to summer time go to step 13 To change the current time or dat...

Page 67: ...menu Press the Tuning buttons until Set time zone is highlighted on the display then press the Select button Press the Tuning buttons to highlight the time zone which is applicable to your location th...

Page 68: ...and the press the Select button to enter the selection 3 Press the Tuning buttons until the desired alarm 1 or 2 is highlighted on the display Press the Select button to enter alarm setup 4 Press the...

Page 69: ...arm can be set to buzzer Internet radio DAB radio FM radio For whichever radio mode is selected the radio alarm may be set to any of the stations which have been stored as presets or to the station mo...

Page 70: ...e the alarm settings Your radio will show Alarm saved and will then go back to the list of alarms with the new alarm setting shown in the display If you decide not to save the settings press the Back...

Page 71: ...by mode when the 60 minutes have elapsed Note If you have your earphone insert while the alarm is sounding the sound of the alarm will come out from your earphone Disabling alarms 1 To disable a singl...

Page 72: ...ress the Tuning buttons until Sleep is highlighted Press the Select button to enter the setup Sleep off will appear on the display 3 Press the Tuning buttons to select the desired sleep time The optio...

Page 73: ...the menu 2 Press the Tuning buttons until Inactive Standby is highlighted Press the Select button to enter the setup Options for idle time will appear on the display 3 Press the Tuning buttons to sele...

Page 74: ...Time out to adjust the length of time before the backlight turns off On level to adjust the the brightness when the radio is in use Dime level to adjust the brightness when the radio is in stanby Pres...

Page 75: ...om an external audio source such as an MP3 or CD player 1 Connect a stereo lead from the headphone output of your MP3 or CD player to the Aux In socket located on the left hand side of your radio Typi...

Page 76: ...ximum and most of iPhone models However it does not support external Hard disk drive and all mobile phones and electronic device The charger may not supply power to some USB devices Do not connect pow...

Page 77: ...ES to proceed If you do not wish to carry out a system reset highlight NO and then press the Select button to con rm the setting The display will revert to the previous menu 4 With YES highlighted a f...

Page 78: ...2 To check if there are any software updates available currently press the Tuning buttons to highlight Check now and then press the Select button to confirm the setting The radio will check to see if...

Page 79: ...ofiles 1 Access the menu for the current mode by pressing and holding the Menu button Press the Tuning buttons until System settings is highlighted on the display Press the Select button to enter the...

Page 80: ...the software version and radio ID Audio FAQ Your radio can access some audio help for Internet Radio use 1 With your radio switched on and in the Internet Radio mode Press the Tuning buttons until Sta...

Page 81: ...low the radio to access your media library 3 Press the Standby button to switch the unit on Then press the Mode button and press the Tuning buttons as needed until the Music Player mode display is sho...

Page 82: ...es and protocols even within UPnP In general your radio will play the supported formats with most common UPnP servers Bit Rates The following table summarizes the maximum supported bit rates for the v...

Page 83: ...The ventilation of the product should not be restricted by covering it with items such as newspapers tablecloths curtains etc No naked flame sources such as lighted candles should be placed on the pr...

Page 84: ...and Electronic Equipment Directive AC 100 240 V 50 60 Hz 12W 87 5 108 MHz 174 928 239 200 MHz 802 11b and 802 11g supported with WEP and WPA WPA2 encryption Compatible with 802 11n routers which offer...

Reviews: