background image

GB-11

Pr

epar

ation

Connec

tions

Initial 

Setup

U

sing 

the 

Fea

tur

es

U

sing 

the 

Fea

tur

es


via 

USB 

por

t

H

in

ts 

and 

Tips

, Specifica

tion 


and 

Saf

et

W

ar

nings

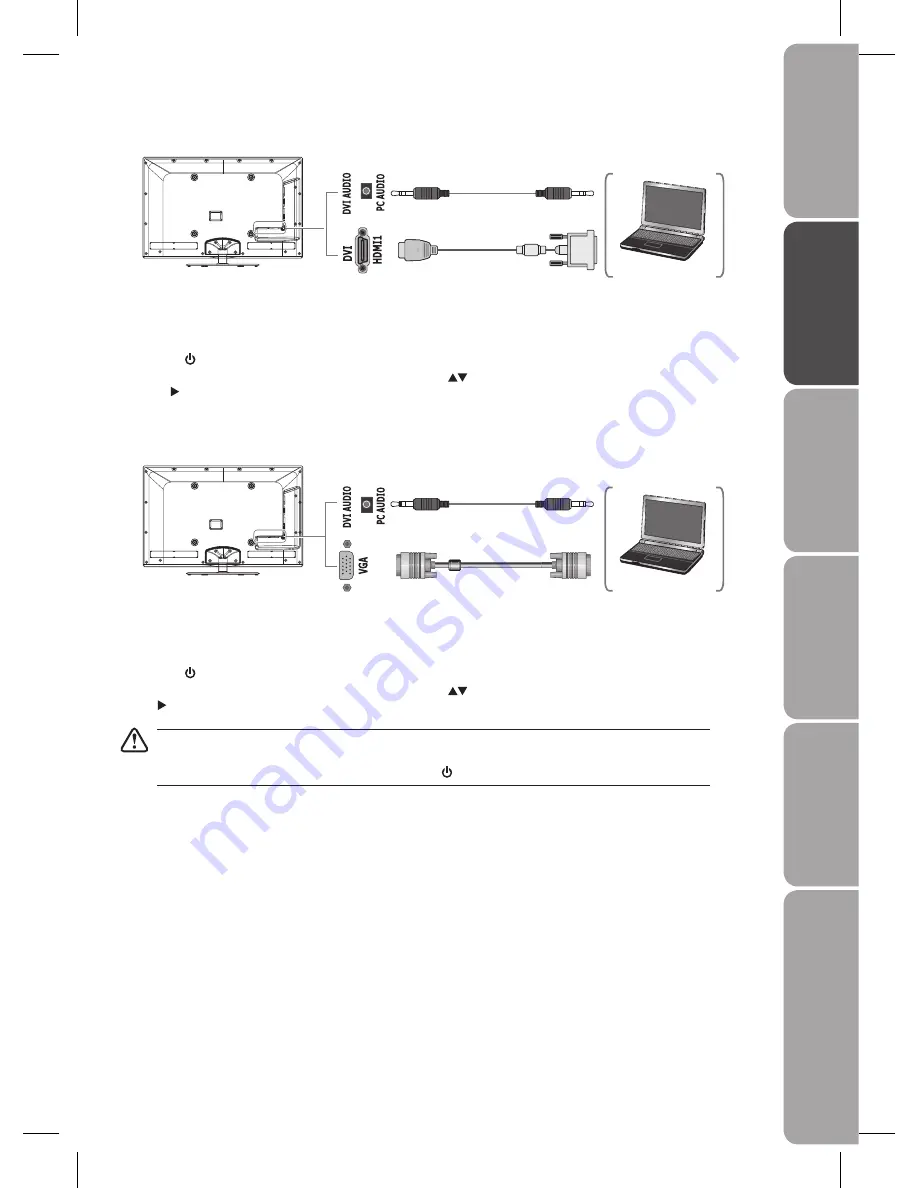
Connecting a Computer with VGA Cable

Use a VGA cable to connect the TV’s VGA input socket to a computer’s VGA output socket. Use an audio cable to connect the 

1. 

TV's PC AUDIO input socket to the computer’s audio output socket.
Plug the connected devices into the mains socket before switching on the 

2. 

I/O POWER ON/OFF switch at the bottom of the 

TV.
Press the

3. 

   button to turn on your TV.

Press the 

4. 

Source button to display the input source list. Use the 

 buttons to select VGA and then press the OK button or 

the   button to confirm.

•  The best resolution is 1920 * 1080 60Hz.

If your computer is set to shut down after a few minutes of idle mode, the TV will also switch to standby due to 

• 

no signal being received, this is to save energy. Press the   button to restart the TV. 

VGA Cable

(not included)

Audio Cable

(not included)

Computer

Connecting a Computer with DVI to HDMI Adapter or Cable

Use a DVI to HDMI adapter or cable to connect the TV’s DVI / HDMI1 input socket to a computer's DVI output socket. Use an 

1. 

audio cable to connect the TV's DVI AUDIO input socket to the computer's audio output socket.
Plug the connected devices into the mains socket before switching on the 

2. 

I/O POWER ON/OFF switch at the bottom of the 

TV.
Press the

3. 

   button to turn on your TV.

Press the 

4. 

Source button to display the input source list. Use the 

 buttons to select HDMI1 and then press the OK button 

or the   button to confirm.

Audio Cable

(not included)

Computer

DVI to HDMI Adapter / Cable

(not included)

Summary of Contents for S40LDIB10

Page 1: ...Instruction Manual 40 46 HD Ready 1080p LED Backlit LCD TV S40LDIB10 S46LDIB10...

Page 2: ......

Page 3: ...13 Using Earphones 13 Connecting a USB Storage Device 14 Connecting the Aerial 14 Turning the TV On for the First Time 15 Initial Setup 15 Selecting the Input Source 16 Channel Selection 17 Display Ch...

Page 4: ...tal Service 33 EPG Electronic Programme Guide DTV Mode 33 Switch On Off EPG 33 View a Programme 34 Photos 35 Music 35 Using the Features via USB Port 35 Movie 36 Text Files 36 Maintenance 37 Hints and...

Page 5: ...e and keep this instruction manual for future reference Unpacking the TV Remove all packaging from the TV Retain the packaging If you dispose of it please do so according to local regulations The foll...

Page 6: ...nt of the TV at any time because the screen could crack Disconnect all cables connected to the TV 1 Lay the TV down on a flat surface with the back side 2 facing up Please make sure to place a soft cu...

Page 7: ...OFF Switch on the I O POWER ON OFF switch to turn the TV to standby mode 4 Touch Control Panel Touch the touch control panel once to activate it indicators on the touch control panel will illuminate a...

Page 8: ...a set top box blu ray disc player and AV receiver DVI HDMI1 Connect to a computer or other devices with a DVI interface 6 USB port Allows the insertion of a USB storage device to play video audio pho...

Page 9: ...rty Only use the battery type indicated in this manual When the batteries are exhausted the remote will not function Replace both batteries at the same time with new ones Do not install new batteries...

Page 10: ...12 VOL Adjust the volume 13 CH Select a channel 14 Menu Display the OSD On Screen Display menu 15 EPG Display the EPG Electronic Programme Guide DTV mode 16 Allows you to navigate the OSD menus and a...

Page 11: ...GREEN YELLOW BLUE Access the TELETEXT items or programme edit when using Digital Freeview TV Channels TV DTV mode 24 Size To enlarge the picture on the TV in teletext TV mode 25 Text Turn on and off...

Page 12: ...ake sure the correct input source is selected corresponding to your connected HDMI input socket When you connect to the output of an HD ready player blu ray disc player game console set top box or com...

Page 13: ...60Hz If your computer is set to shut down after a few minutes of idle mode the TV will also switch to standby due to no signal being received this is to save energy Press the button to restart the TV...

Page 14: ...o display the input source list Use the buttons to select Component and then press the OK button or the button to confirm Satellite Receiver COMMON INTERFACE ANT 75 5V 50mA Output AV Cable not include...

Page 15: ...75 5V 50mA Output AV Cable not included Earphone to Audio Cable included Video Camera VCR DVD Player Recorder Set top Box Game Console Yellow VIDEO Yellow VIDEO Red R Red R Red R White L White L Whit...

Page 16: ...ch off the TV before connecting any USB storage device 1 Connect your USB storage device to the USB port of your TV 2 Plug the connected devices into the mains socket before switching on the 3 I O POW...

Page 17: ...the I O POWER ON OFF switch The first time you turn the TV on it will go straight into the 4 Installation Guide menu If you have already installed the TV using the Quick Start Guide please go to the...

Page 18: ...ist No To retune and overwrite the existing channel list It is always recommended to select No Press the 10 button to select Start on the screen and then press the OK button to start the auto tuning A...

Page 19: ...29 for details on Block Programme Press the FAV button to view the Favourite List Press the buttons to select a channel and then press the OK button to view the selected channel if you have previous...

Page 20: ...ally recommended if some channels have been added removed by the broadcaster or you have moved house Press the 1 Menu button and then press the buttons to select the Channel menu Press the 2 button to...

Page 21: ...menu ATV Manual Install Allows you to make manual fine tuning adjustments if the channel reception is poor under TV mode Press the 1 Menu button and then press the buttons to select the Channel menu P...

Page 22: ...the GREEN button to rename the selected channel Press the buttons to select the characters to represent the station name Press the buttons to move to the next character and then press the GREEN butto...

Page 23: ...Common Access Module into the slot to access the 2 content that has been encrypted Flip the Common Access Module to another side and try again if you feel resistance Switch the TV on 3 To remove the C...

Page 24: ...ts the colour components independently to achieve a warm or cool Standard Remains natural tint unchange Warm Increases red tint Cool Increases blue tint Aspect Ratio Allows you to watch the screen in...

Page 25: ...ak Press the 3 Menu button to return to the previous menu Press the 4 Exit button to exit the menu Customising the Sound Setting Allows you to select an audio enhancement technique Press the 1 Menu bu...

Page 26: ...r Select Return Customising the Function Setting Language Allows you to select your desired on screen menu language Press the 1 Menu button and then press the buttons to select the Function menu Press...

Page 27: ...utton to exit the menu Alternative While watching a DTV programme you can press the Lang button to display the audio language list Press the 1 buttons to select an audio language or audio format if av...

Page 28: ...n press the buttons to select On Off Press the 3 Menu button to return back to the previous menu Press the 4 Exit button to exit the menu OSD Transparency Allows to select the transparency of the on s...

Page 29: ...he OK button or the button enter the Time sub menu Press the 3 button and then press the buttons to select the following options in the Time sub menu Press the buttons to adjust each option s setting...

Page 30: ...dly to select the number of minutes Off 10 110 120 min directly To cancel the sleep time press the 2 Sleep button repeatedly until Off appears Time Zone When you select a Time Zone city the TV time is...

Page 31: ...the 1 Menu button and then press the buttons to select the Function menu Press the 2 button to select the Parental Control and then press the OK button or the button Press the 3 0 9 buttons to enter...

Page 32: ...function will not operate This TV is programmed to remember which option it was last set to even if you switch the TV off When a locked programme is selected the password screen will appear Enter the...

Page 33: ...I display mode Zoom 100 Press the 3 Menu button to return back to the previous menu Press the 4 Exit button to exit the menu Version View the software version of the TV Press the 1 Menu button and the...

Page 34: ...while watching TV While viewing teletext press the Cancel button to return to TV viewing the teletext page number will remain on the top left of the screen You can enter a teletext page number you wi...

Page 35: ...h off EPG and return to normal TV viewing Exit Info Date Remind OK Schedule Programme Guide Digital Teletext DTV Mode Some programmes are broadcast with digital teletext and special services these can...

Page 36: ...tons to view schedule of the previous next day Press the YELLOW button again to return to the EPG BLUE Remind Press the BLUE button while on the selected programme the Reminder menu will be displayed...

Page 37: ...orted JPEG Music Press the 1 Source button on the remote control to display the Input Source List Press the buttons to select DMP and then press the OK button or the button to confirm Press the 2 butt...

Page 38: ...previous or next movie Press the 5 Exit button to return to the previous directory Press the 6 Exit button again to exit the menu File formats supported AVI encoding H 264 Mpeg Xvid MKV MOVIE MUSIC P...

Page 39: ...e remote control directly at the TV Ensure that the batteries are installed with correct polarity to to Install new batteries Power is suddenly turned off Check the power of the TV The mains supply ma...

Page 40: ...Qs Frequently Asked Questions Why have I lost some all of my channels It happens sometimes if you have a weak signal Usually it just means you ll need to rescan your digital box or TV Don t worry it e...

Page 41: ...720 x 480 Full 4 3 576I 720 x 576 50 Full 4 3 576P 720 x 576 Full 4 3 720P 1280 x 720 50 Full 4 3 60 1080I 1920 x 1080 50 Full 4 3 60 Full 4 3 1080P 1920 x 1080 50 Full 4 3 60 Full 4 3 VGA Mode Please...

Page 42: ...System PAL I BG DK SECAM L BG DK PAL I BG DK SEACAM L BG DK Brightness 450 cd m2 450 cd m2 Contrast Ratio 5000 1 5000 1 Inputs Output SCART 1 1 HDMI 4 4 VGA 1 1 PC DVI AUDIO 1 1 YPbPr 1 1 COMMON INTER...

Page 43: ...disconnect the unit from the mains supply before connecting disconnecting other devices or moving the unit Unplug the unit from the mains socket during a lightning storm Mains Cable Make sure the unit...

Page 44: ...as been swallowed Please dispose of batteries correctly by following the guidance in this manual Supervision Children should be supervised to ensure that they do not play with the unit and the remote...

Page 45: ...at are harmful to the environment To preserve our environment dispose of used batteries according to your local laws or regulations Do not dispose of batteries with normal household waste For more inf...

Page 46: ......

Page 47: ......

Page 48: ......

Reviews: