background image

6

Installing Your Phone

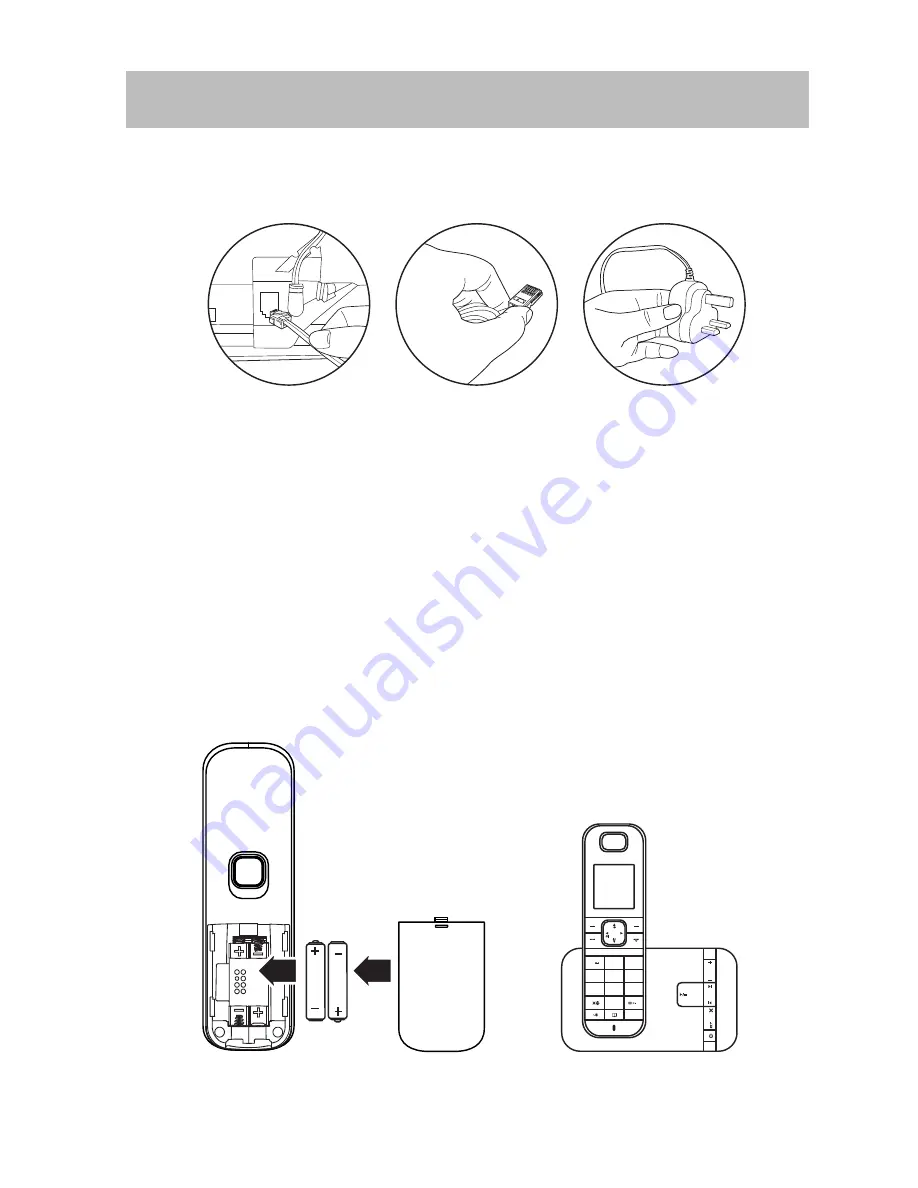
Connecting the Base Station

1.  Plug the mains adapter & telephone line cable into the base station.
2.  Plug the mains adapter & telephone line cable into the wall socket.
3.  Always use the cables provided in the box.

Installing and Charging the Batteries

1.  Slide open the battery compartment cover.
2.  Insert the 2 x AAA batteries (included) as indicated. Follow the polarity 

indicated on the handset.

3.  Slide the battery compartment cover back on.

VOL

1

2

3

8

9

D E F

4

5

6

M N O

G H I

7

T U V

J K L

A B C

W X Y Z

P Q R S

R

0

Base Station

Summary of Contents for S1DTAM13

Page 1: ...Instruction Manual Cordless Telephone with Answer Machine S1DTAM13 ...

Page 2: ...t Time and Date 12 Change your Handset s Name 13 Change the Display Language 13 Using Your Phone 14 Pre dialing 14 Direct Dialing 14 Call from Redial List 14 Call from the Call Log 14 Call from the Phonebook 14 Answer and End a Call 14 Adjust the Earpiece Volume 15 Mute Unmute Microphone 15 Paging 15 Call Waiting 15 Using the Intercom 16 Intercom another Handset 16 Answer an External Call during I...

Page 3: ...nebook 20 Modify a Phonebook Entry 20 Using the Redial List 21 Caller Display Network Dependent 21 Using the Call Log 22 Display Setting 23 Alarm Setting 23 Audio Setting 24 Ringtone 24 Advisory Tones 24 System Setting 25 Setting Date and time 25 Setting Handset 25 Setting Base 26 Answer Machine 28 Settings 28 Text and Digit Entry Table 30 Hints and Tips 31 ALWAYS check first that 31 Everyday use ...

Page 4: ... given supervision or instructions concerning the use of the phone by a person responsible of their safety Battery To reduce the disk risk of injury to persons read and follow these instructions Use only the battery ies specified Do not dispose the battery ies in a fire They may explode Check with local council office for special disposal instructions Do not open or mutilate the battery ies Releas...

Page 5: ...he safety instructions carefully before use and keep this instruction manual for future reference Unpacking Remove all items from the packaging Retain the packaging If you dispose of it please do so according to local regulations The following items are included Handset x 1 Base Station x 1 Mains Adapter x 1 Telephone Line Cable x 1 AAA Batteries x 2 Instruction manual x 1 If items are missing or ...

Page 6: ...he wall socket 3 Always use the cables provided in the box Installing and Charging the Batteries 1 Slide open the battery compartment cover 2 Insert the 2 x AAA batteries included as indicated Follow the polarity indicated on the handset 3 Slide the battery compartment cover back on VOL 1 2 3 8 9 D E F 4 5 6M N O G H I 7 T U V J K L A B C W X Y Z P Q R S R 0 Base Station ...

Page 7: ...teries may cause corrosion or battery leakage which could cause personal injury or damage to property Install the batteries correctly by following the polarity and indications in the battery compartment Use only the types of the batteries which are indicated in this manual Do not install new batteries with used ones and do not mix different types of batteries Do not dispose of the used batteries a...

Page 8: ...tem on a menu Button Display redial list Button Mute unmute the microphone during a call Button Display call list 4 Left Button Cancel a menu entry Backspace the digit s or character s Make an intercom call 5 Button Make a call and to receive a call 6 Right Button Display the menu Confirm the selection on the menu screen 7 Button End call Turn the handset on off Exit the menu operation ...

Page 9: ...Q R S R 0 8 9 11 12 13 14 10 8 Number Keypad 9 Button Insert a pause Turn the ringer on off 10 Button Activate the speakerphone 11 Key Lock Button Activate or deactivate the key lock 12 R Flash Button Flash the phone line 13 Button Access the phonebook 14 Microphone ...

Page 10: ...e next message 3 Button Go back to the previous message or replay the current message 4 Button Delete all old messages 5 Button Page the registered handset to the base station 6 Button Switch the answering machine on off 7 Button Play or stop message playback 8 Display 1 2 3 4 5 6 7 8 ...

Page 11: ...onnected or held Alarm Display when the alarm clock is activated Speakerphone Display when the speakerphone is activated Ringer Off Display when ringer volume is turned off Message Indicate you have a new voice mail message Signal Level Indicate that the handset is registered and within range of the base station Keylock Display when keylock is active 12 30 Int Menu Handset 2 30 07 ...

Page 12: ...lish a radio link with the base station To Lock Unlock the Keypad Press and hold for 2 seconds to lock unlock the keypad in idle mode Incoming calls can still be answered even if the keypad is locked Set Time and Date If you subscribe to the Caller Display service the time and date will be set automatically when you receive a call but you may still need to set the correct year 1 Press Menu and the...

Page 13: ... name maximum 10 characters and then press OK to confirm Change the Display Language 1 Press Menu and then to select Setting Press OK to confirm 2 Press to select Handset and then press OK to select 3 Press to select the Language and then press OK to select 4 Press to select the desired Language and then press OK to confirm Once the display language is set the option menus on the handset will swit...

Page 14: ...hen to dial Call from the Call Log 1 Press to enter Call list 2 Press to select received phone number and then to dial You need to subscribe to Caller Line Identification service to be able to see the caller s number or name in the call log Call from the Phonebook 1 Press to enter Phonebook menu Press OK to confirm 2 Press to select saved phone number and then press to call Answer and End a Call 1...

Page 15: ...the microphone Paging 1 The paging feature enables you to locate a missing handset if the handset is in range and contains charged batteries 2 Press on the base station All the registered handsets will start to ring 3 Once retrieved press any button on the handset or press again to end the paging Call Waiting If you have subscribed to Call Waiting service the earpiece will emit an audible tone to ...

Page 16: ...ess Int in idle mode 2 Intercom is established immediately if there are only 2 registered handsets 3 If there are more than 2 registered handsets press to select the desired handset and then press OK to call Answer an External Call during Intercom During intercom a new call tone is emitted when there is an incoming external call Press to end the intercom and then press to answer the external call ...

Page 17: ...nference Call 1 The conference call feature allows one external call to be shared with two handsets in intercom The three parties can share the conversation and no additional network subscription is required 2 During an external call press Int to put the external call on hold the caller can no longer hear you 3 If there are more than 2 registered handsets the handset numbers which are available fo...

Page 18: ...ngs for all the answering machine functions New Message Press to start playback message Press again to stop Adjust the Volume Press Vol to increase decrease the volume Previous Next Message Playback Press to go back to the previous message or replay the current message Press to skip to the next message The display will show the current number of message that is playing Delete Message Press to dele...

Page 19: ...n the Phonebook 1 Press Menu and then to select Phonebook Press OK to confirm 2 Press to select New Entry Press OK to confirm 3 Enter the name of the contact maximum 16 characters To edit press Back to delete the last character entered Press OK to confirm the name entry 4 Enter the number of the contact maximum 24 digits and then press OK to confirm You cannot store a new phonebook entry when the ...

Page 20: ...k Entry 1 Press Menu and then to select Phonebook Press OK to confirm 2 Press to select the desired entry and then press Options 3 Press and OK to select and adjust the following options Call Number Make a call from the selected entry Edit Entry Edit entry name and phone number View Entry View entry information Copy Entry Copy current entry to another handset Copy All Copy all entries from phonebo...

Page 21: ...ID you may need to contact your telephone service provider and they will inform you of any charges for it Caller ID lets you see the phone numbers of your callers on the handset display before you answer and in your Call Log afterwards The Call Log stores the last 20 external calls whether or not you answered the call so you can call them back later Only the most recent call is saved if there are ...

Page 22: ... the Call Log Using the Call Log Press to browse the call list The calls are displayed in chronological order with the most recent call at the top of the list 1 Press to select the desired phone number and then press Option 2 Press and OK to select the following setting Details Display phone number information Delete Entry Delete current entry Delete All Delete all entries from phonebook list Call...

Page 23: ...el LCD backlight Adjust backlight level 3 Press to exit the main menu OK Back Display OK Back Alarm Clock OK Back Settings Colour Scheme Handset Name Screensaver Brightness OK Back Alarm 1 Activation Time Melody Alarm Setting 1 Press Menu and then to select Alarm Clock Press OK to confirm 2 Press and OK to select and adjust the following options Activation Select current alarm on off Time Enter ti...

Page 24: ...enu Advisory Tones 1 Press Menu and then to select Audio Press OK to confirm 2 Press and OK to select Advisory Tones Setting Press OK to confirm 3 Press and OK to select and adjust the following options Key tone Turn key tone on off Confirm Tone Turn confirm tone on off Low Battery Turn low battery alert sound on off No coverage Turn no signal alert sound on off 4 Press to exit the main menu OK Ba...

Page 25: ...ress OK to confirm 2 Press and OK to select Date Time Press OK to confirm 3 Press and OK to select and adjust the following options Time Format Select time format Date Format Select date format Set Time Date Set time and date 4 Press to exit the main menu OK Back Settings OK Back Date Time Time Format Date Format Set Time Date OK Back Settings OK Back Handset Select Base Language Auto Answer Regis...

Page 26: ...ndsets By default the System PIN is 0000 On the base station press and hold for approximately 5 seconds De Register De register other handsets from the base station The System PIN should be requested before you can de register handsets By default the System PIN is 0000 You cannot de register the handset that you are currently using Reset Handset Reset current handset to default 4 Press to exit the...

Page 27: ...ting of Short 100ms as this is the standard recall required in the telephone network but it can be changed to Long 600ms if your telephone is connected to a PBX that requires a different recall time Change Sys PIN The System PIN is used for registration de registration of handsets and for accessing the answering machine remotely The default System PIN number is 0000 The maximum length of the Syste...

Page 28: ... Record outgoing message with your voice Setting Advanced setting for answer machine 3 Press to exit the main menu Settings 1 Press Menu and then to select Answer Machine Press OK to confirm 2 Press and OK to select Settings Press OK to confirm OK Back Answer Machine OK Back Answer Machine OK Back Answer Machine Answer On Off Outgoing Mess Record Memo Settings OK Back Answer Machine Play Message D...

Page 29: ...ecording Time Start recording message after desired number of rings Call Screening Allow to hear the caller while he is leaving a message You can then decide if you want to talk to the caller directly Remote Access Once the remote access is active you can check messages of your answering machine when you are away from home by calling from another phone 4 Press to exit the main menu ...

Page 30: ...a character is selected the cursor will move to the next position after a short pause 2 Press Clear to delete the last character Or press and hold Clear to delete all characters English Character Set Upper Case 1 space 1 _ 2 A B C 2 Ä À Á Â Ã Å Æ Ç 3 D E F 3 È É Ë Ê Δ Φ 4 G H I 4 Ğ Ì Í Î Ï İ Γ 5 J K L 5 Λ 6 M N O 6 Ö Ò Ó Ô Õ Ø Ñ 7 P Q R S 7 β Ş Π Θ Σ 8 T U V 8 Ü Ù Ú Û 9 W X Y Z 9 Ý Ϋ Ω Ξ Ψ 0 0 Pre...

Page 31: ...he handset back on the base station to turn it back on Check that the base station s mains power adapter is plugged in and the power is switched on The base station needs mains power for normal operation of the phone not just for charging the batteries Make sure you are using the telephone line cable supplied with your phone Other telephone line cables might not work Move the handset closer to the...

Page 32: ...ctrical equipment The phone does not ring Check that the base station s mains power adapter is plugged in and the power is switched on The base station needs mains power for normal operation of the phone not just for charging the batteries Make sure you are using the telephone line cable that was supplied with your telephone My call was cut off when I went out of range Now I cannot use my handset ...

Page 33: ...network service provider You should find contact details on your phone bill The caller may have withhold their number by dialing 141 Or they may be calling from a network that does not transmit the caller s number e g if they are making international calls When I try to make a call I hear a busy tone If you are using a multi handset system check whether another handset is already on a call The vol...

Page 34: ...mains power socket I try to recharge the batteries but I still get a warning that they are low You need to replace the batteries Do not use non rechargeable batteries in your handset they may explode causing damage If the fault persists Disconnect the base station from the telephone line and plug a different phone into the master telephone socket Try making a call If this works the line is OK If t...

Page 35: ...tion Adapter Input 100 240V 50 60Hz 150mA Adapter Output 6V 450mA Base station input 6V 450mA Charging Cradle with non detachable adapter Adapter Input 100 240V 50 60Hz 150mA Adapter Output 6V 450mA Charging Cradle input 6V 450mA Features and specifications are subject to change without prior notice PBX compatibility Timed break recall flash adjustable to 100ms 600ms Pause length 3 seconds Diallin...

Page 36: ...that it is recycled in a manner that protects human health and the environment For more information about where you can drop off your waste for recycling please contact your local authority or where you purchased your product Visit Partmaster co uk today for the easiest way to buy electrical spares and accessories With over 1 million spares and accessories available we can deliver direct to your d...

Reviews: