background image

54 


before attempting to charge the battery. 


Do not attempt to use the charger with any batteries other than those 
supplied. Keep the battery charger clean; foreign objects and dirt can 
cause a short circuit and block the ventilation holes. Failure to follow 
these instructions may cause overheating or fire. 


Allow  batteries  to  cool  for  15  minutes  after  charging  or  heavy  use. 
Failure to follow these instructions may cause overheating or fire. 


Recharge  only  with  the  charger  specified  by  the  manufacturer.  A 
charger that is suitable for one type of battery may create a risk of fire 
when used with another battery pack. Charge the lithium-ion battery 
only with the supplied charger or a charger specifically designed for this 
item. 


Use the machine only with specifically designated battery packs. Use of 
any other battery packs may create a risk of injury and fire. 


. If the power cord of the charger is damaged, it must be replaced by 
the manufacturer, an authorised service workshop or a specialist before 
use. 


Keep the battery out of reach of children. 


When  not  in  use  batteries  should  be  stored  at  room  temperature 
(approx.20

). 


When battery is not in use, make sure the battery cannot be shorted 
accidentally.  Keep  the  battery  clean  at  all  times.  Keep  it away from 
other metal objects, like paper clips, coins, keys, nails, screws or other 
small metal objects that can make a connection from one terminal to 
another. Shorting the battery terminals together may cause burns or a 
fire. 


If used incorrectly, liquid may leak from the battery. Avoid contact with 
it. In case of accidental contact, rinse with water. If the liquid gets into 
the eyes, seek additional medical attention. Leaking battery fluid may 

Summary of Contents for SG-TR 20

Page 1: ...INSTRUCTIONMANUAL Originai instructions ATTENZIONE Prima di utilizzare questo prodotto leggere attentamente le istruzioni per l uso WARNING Before using this item please read instruction manual carefu...

Page 2: ...MANUALE DI ISTRUZIONI Traduzione delle istruzioni originali cod 70910 50 TRONCARAMI A BATTERIA con accessori art SG TR 20...

Page 3: ...di istruzioni e di adottare tutte le misure di sicurezza ivi consigliate Attenzione il prodotto deve essere usato da persone competenti ed addestrate a lavorare con simili apparecchi attenendosi alle...

Page 4: ...1...

Page 5: ...lo Le persone con limitate capacit fisiche sensoriali o mentali non possono usare la sega a meno che non siano sorvegliate per la loro sicurezza da una persona qualificata o siano istruite dalla perso...

Page 6: ...sicurarsi di lavorare rivolti verso l alto Fare particolare attenzione quando si taglia il legno scheggiato Le schegge di legno possono essere lanciate in aria dalla catena della sega e aumentare il r...

Page 7: ...aggrovigliati aumentano il rischio di scosse elettriche e Qualora si voglia usare l apparecchioall aperto utilizzare una prolunga adatta all uso esterno L uso di un cavo adatto ad uso esterno riduce...

Page 8: ...l apparecchio Utilizzare l apparecchio adatto per l applicazione specifica L apparecchio corretto far il lavoro meglio e in modo pi sicuro se utilizzato alla velocit per cui stato progettato b Non ut...

Page 9: ...di ventilazione Il mancato rispetto di queste istruzioni pu causare surriscaldamento o incendio Lasciare raffreddare le batterie per 15 minuti dopo la carica o l uso intenso Il mancato rispetto di qu...

Page 10: ...za degli utensili Un azione incauta pu causare gravi lesioni in una frazione di secondo Mantenere le impugnature e le superfici di presa asciutte pulite e prive di olio e grasso Impugnature e superfic...

Page 11: ...ffie guanti occhiali elmetto protettivo e scarpe robuste di sicurezza DATI TECNICI MACCHINA DA POTATURA SENZA FILO Tensione nominale 12V Velocit a vuoto 3700rpm Dimensioni 398mm 175mm 81mm Peso senza...

Page 12: ...sibile per il funzionamento e lo stoccaggio 20 C fino a 50 C Tempi di ricarica Possono essere pi lunghi se il caricabatterie viene utilizzato ad una temperatura inferiore a 0 C o superiore a 30 C Prol...

Page 13: ...emissione sonora dichiarati sono stati misurati in accordo con un metodo standard e possono essere usati per un confronto con un altro utensile Tali valori possono anche essere utilizzati in una valu...

Page 14: ...e caricatore 1 Superficie di presa Per la presa e il controllo del potatore da giardino 2 Protezione Aiuta a proteggere l utente dal contatto con la catena della sega 3 Fodero per catena Aiuta a prote...

Page 15: ...egne la macchina 13 Impugnatura di comando Per azionare tenere e controllare la macchina 14 Vano batteria Accoglie la batteria 15 Batteria Fornisce energia allo svettatoio da giardino 16 Gancio di blo...

Page 16: ...a garantito secondo la direttiva 2000 14 CE in dB A per rendere comparabili le emissioni sonore dei prodotti PRECAUZIONI PER LA SICUREZZA I dati accanto a questo simbolo indicano il contenuto di energ...

Page 17: ...n movimento Rimuovere sempre la batteria durante le pause di lavoro trasporto stoccaggio manutenzione o riparazione Proteggere la macchina e il caricatore dalla pioggia e umidit Proteggere la batteria...

Page 18: ...ntali dell utilizzatore sono limitate egli pu lavorare solo sotto la supervisione di una persona responsabile o secondo le sue istruzioni L utilizzatore deve essere in grado di riconoscere e valutare...

Page 19: ...pu entrare in contatto con la catena della sega durante i lavori di pulizia e manutenzione Ci pu provocare lesioni personali AREA DI LAVORO E SPAZI LIMITROFI ATTENZIONE I non addetti ai lavori i bambi...

Page 20: ...ll umidit non immergerla in liquidi Non sottoporre la batteria ad alta pressione Non sottoporre la batteria alle microonde Proteggere la batteria da sostanze chimiche e sali CARICABATTERIE ATTENZIONE...

Page 21: ...i di usura sul pignone della catena non sono pi profondi di 0 5 mm montata una combinazione di barra di guida e di catena raccomandata da questo manuale di istruzioni La barra di guida e la catena son...

Page 22: ...are solo con una barra di guida non danneggiata Se la profondit della scanalatura inferiore alla profondit minima sostituire la barra di guida CATENA La catena in condizioni di sicurezza se vengono os...

Page 23: ...re fumo o bruciare Ci pu provocare lesioni gravi o mortali e danni alle cose Se la batteria ha un odore insolito o emette fumo non usare la batteria e tenerla lontana da sostanze combustibili Se la ba...

Page 24: ...o della catena ostruito da un oggetto spegnere l attrezzo e rimuovere la batteria quindi rimuovere l oggetto che causa il blocco La catena rotante si surriscalda e si dilata Se la catena non sufficien...

Page 25: ...uogo facilmente infiammabile Tenere presente che la catena continua a ruotare per un breve periodo dopo aver rilasciato il grilletto La catena rotante pu tagliare l utente Ci pu provocare gravi lesion...

Page 26: ...arica scollegare la spina del caricabatterie dalla presa a muro Il caricabatterie pu surriscaldarsi e causare un incendio se la dissipazione del calore inadeguata Ci pu provocare lesioni gravi o morta...

Page 27: ...nare i cavi di collegamento e di estensione in modo che non possano essere danneggiati attorcigliati schiacciati o sfregati Proteggere il cavo di collegamento e il cavo di prolunga da calore olio e pr...

Page 28: ...i ambientali e possono verificarsi danni alla propriet Non trasportare mai una batteria danneggiata Trasportare la batteria nella borsa in dotazione Se non viene fornita alcuna borsa con lo strumento...

Page 29: ...TENZIONE I bambini non conoscono e non possono valutare i pericoli della batteria e possono essere feriti gravemente Conservare la batteria fuori dalla portata dei bambini La batteria non protetta da...

Page 30: ...pi correttamente o i dispositivi di sicurezza possono essere rendere inutilizzabili i dispositivi di sicurezza Ci pu provocare lesioni gravi o mortali Non tentare di manutenere o riparare l attrezzo d...

Page 31: ...la spina inserita in una presa a muro e la batteria inserita nel caricatore Il caricatore si spegne automaticamente quando la batteria completamente carica La batteria e il caricatore diventano caldi...

Page 32: ...carica indicato quando i LED si accendono o lampeggiano in verde Se i LED si accendono o lampeggiano in rosso significa che vi un malfunzionamento nella macchina o nella batteria LED SUL CARICABATTER...

Page 33: ...rchio del pignone della catena 3 pu essere rimosso Rimuovere il coperchio del pignone della catena 2 Rimuovere la barra e la catena MONTAGGIO DELLA BARRA E DELLA CATENA Le combinazioni di barra e cate...

Page 34: ...Tendere la catena Montare il coperchio della ruota dentata in modo che sia a filo con l attrezzo da giardino Ruotare il dado ad alette in senso orario fino a quando il coperchio del rocchetto della ca...

Page 35: ...ando il coperchio del pignone della catena non saldamente inserito Se la catena pu ancora essere tirata facilmente lungo la barra con due dita la catena ben tesa Se le maglie della catena sul lato inf...

Page 36: ...AVVIO DELLA MACCHINA Tenere saldamente l attrezzo con una mano sulla superficie di presa 1 dell impugnatura di comando avvolgendo il pollice intorno all impugnatura di comando Tenere e controllare la...

Page 37: ...il proprio rivenditore per assistenza Il pignone della catena deve essere sostituito VERIFICA DELLA BARRA DI GUIDA Spegnere l attrezzo e rimuovere la batteria Rimuovere la catena e la barra di guida M...

Page 38: ...corrisponde al passo della catena Se l angolo di riempimento di 30 non stato mantenuto riaffilare la catena VERIFICA DELLA PROTEZIONE CATENA Rimuovere la batteria ATTENZIONE I denti della catena sono...

Page 39: ...contattare il rivenditore per assistenza C un malfunzionamento nell attrezzo da giardino Rilasciare il grilletto La catena smette di ruotare Se la catena continua a ruotare rimuovere la batteria e con...

Page 40: ...a batteria Se la macchina bagnata lasciare asciugare la macchina Se la batteria bagnata lasciare asciugare la batteria Pulire la macchina Montare il fodero in modo che copra completamente la barra di...

Page 41: ...one Fissare la borsa per evitare che si sposti durante il trasporto Se il caricabatterie non viene fornito assieme ad una borsa fissare il caricabatterie per evitare che si sposti durante il trasporto...

Page 42: ...ricabatterie deve essere conservato separatamente e lontano dalla batteria Il caricabatterie deve essere conservato non attaccato al collegamento Il caricabatterie deve essere conservato in un luogo c...

Page 43: ...ATTERIA Pulire la batteria con un panno umido PULIRE IL CARICABATTERIE Scollegare la spina dalla corrente Pulire il caricabatterie con un panno umido Pulire i contatti elettrici del caricabatterie con...

Page 44: ...Se la batteria ha un malfunzionamento o danneggiata sostituire la batteria Se il caricabatterie non funziona correttamente o danneggiato sostituire il caricabatterie Se il cavo di collegamento present...

Page 45: ...sso Malfunziona mento della batteria Rimuovere la batteria e inserirla di nuovo Accendere la macchina Se i 4 Led continuano a lampeggiare in rosso non utilizzare la batteria e contattare il proprio ri...

Page 46: ...correttamen te Affilare la catena correttamente Catena troppo tesa Tendere la catena correttamente Catena poco lubrificata Lubrificare la catena La macchina funziona per un intervallo di tempo troppo...

Page 47: ...e 1 minuto Reinserire la spina in una presa a muro Istruzioni per lo smaltimento del prodotto Il disegno del bidone con una barratura eventualmente riportato anche sull apparecchio stesso indica che s...

Page 48: ...volto nel riutilizzo nel riciclaggio e nelle altre forme di recupero dei RAEE Si evidenziano altres i potenziali effetti negativi sull ambiente e sulla salute nel caso di un non corretto smaltimento d...

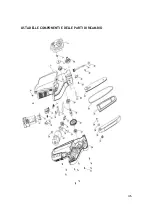
Page 49: ...46 LISTA DELLE COMPONENTI E DELLE PARTI DI RICAMBIO...

Page 50: ...regolazione 1 12 Micro interruttore 1 32 Vite Fibbia 1 13 717 3 Supporto 1 33 Manopola di regolazione Base 1 14 Batteria 1 34 Vite 1 15 Ingranaggio a cono 1 35 Barra di guida 1 16 Cuscinetto 1 36 Cate...

Page 51: ...ta iva societ di persone o di capitali ditte individuali imprese artigiane liberi professionisti ecc che utilizzano il prodotto per scopi professionali e che acquistano il prodotto con fattura fiscale...

Page 52: ...INSTRUCTIONS MANUAL Original instructions cod 70910 50 BRANCH CUTTER art SG TR 20...

Page 53: ...d or dark areas invite accidents Do not operate power tools in explosive atmospheres such as in the presence of flammable liquids gases or dust Power tools create sparks which may ignite the dust or f...

Page 54: ...CD reduces the risk of electric shock NOTE The term residual current device RCD can be replaced by the term ground fault circuit interrupter GFCI or earth leakage circuit breaker ELCB 3 Personal safet...

Page 55: ...ust extraction and collection facilities ensure these are connected and properly used Use of dust collection can reduce dust related hazards Do not let familiarity gained from frequent use of tools al...

Page 56: ...ting edges are less likely to bind and are easier to control Use the power tool accessories and tool bits etc in accordance with these instructions taking into account the working conditions and the w...

Page 57: ...e only with specifically designated battery packs Use of any other battery packs may create a risk of injury and fire If the power cord of the charger is damaged it must be replaced by the manufacture...

Page 58: ...w in any way Should the multi saw becomes damaged do not use it and have it repaired by a professional or contact our customer support department Do not disassemble the machine or try repairing it you...

Page 59: ...sufficient distance from electrical conduits and follow the warnings Beware of kick back Protect from rain and humid conditions Warning Danger for hands Do not touch cutting saw Warning Wear protecti...

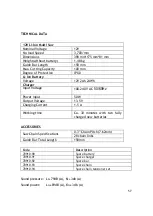
Page 60: ...put Voltage 100 240 V AC 50 60Hz Power Input 50 W Output Voltage 13 5 V Charging Current 1 5 A Working time Ca 30 minutes with two fully charged new batteries ACCESSORIES Saw Chain Specifications 0 3...

Page 61: ...ission values may also be used in a preliminary assessment of exposure The noise emissions during actual use of the power tool can differ from the declared values depending on the ways in which the to...

Page 62: ...59 Overview Garden pruner battery and charger...

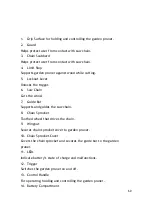
Page 63: ...Saw Chain Cuts the wood 7 Guide Bar Supports and guides the saw chain 8 Chain Sprocket Toothed wheel that drives the chain 9 Wingnut Secures chain sprocket cover to garden pruner 10 Chain Sprocket Co...

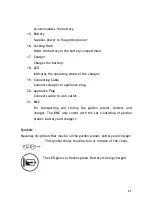
Page 64: ...able Connects charger to appliance plug 20 Appliance Plug Connects cable to wall outlet 21 BMC For transporting and storing the garden pruner battery and charger The BMC only comes with the set consis...

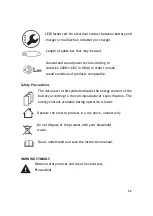
Page 65: ...roducts comparable Safety Precautions The data next to this symbol indicates the energy content of the battery according to the cell manufacturer s specification The energy content available during op...

Page 66: ...Always remove the battery during work breaks transport storage maintenance or repairs Protect garden pruner and charger from rain and Dampness Protect battery from heat and fire Protect the battery f...

Page 67: ...sustain serious or fatal injuries Read understand and save the instruction manual If you lend the garden pruner battery or charger to another person Always give them the instruction manual Make sure t...

Page 68: ...so that it cannot be entangled in the garden pruner Objects can be thrown through the air at high speed Wear close fitting safety glasses Suitable safety glasses that have been tested and labeled in a...

Page 69: ...NING Innocent bystanders children and animals are not aware of the dangers of the garden pruner or flying debris Bystanders children and animals may be seriously injured and damage to property may occ...

Page 70: ...animals away from the work area Do not leave the battery unattended Make sure that children cannot play with the battery The battery is not protected against all ambient conditions If the battery is e...

Page 71: ...s to the user and may damage the charger The charger is not protected against all ambient conditions If the charger is exposed to certain ambient conditions it may catch fire or explode This can resul...

Page 72: ...struction manual is mounted The guide bar and chain are properly mounted The chain is properly tensioned Only original accessories designed for this garden pruner model are mounted Accessories are pro...

Page 73: ...l or the instructions supplied with the accessory Never insert objects in the garden pruner s openings Guide bar The guide bar is in a safe condition if the following points are observed Guide bar is...

Page 74: ...sult in serious or fatal injuries Work only with an undamaged saw chain Sharpen the chain properly Battery The battery is in a safe condition if the following points are observed Battery is undamaged...

Page 75: ...minutes and seek medical advice A damaged or defective battery may smell unusual emit smoke or burn This can result in serious or fatal injuries and damage to property If the battery smells unusual or...

Page 76: ...area are within calling distance The user cannot concentrate on the work in certain situations The user can lose control of the garden pruner stumble or fall and be seriously injured Work calmly and...

Page 77: ...ome hot during operation There is a risk of burn injuries Do not touch the hot guide bar saw chain or chain sprocket Wait for the guide bar saw chain and chain sprocket to cool down Wear work gloves m...

Page 78: ...is can result in serious injuries Wait for the chain to come to a standstill DANGER Working near live electric cables can result in accidental contact with the chain and damage the cables This can res...

Page 79: ...t has not been modified Always cut with a properly sharpened and tensioned saw chain Keep the guide bar straight in the cut Apply the stop properly Cut with the motor running at full speed Charging WA...

Page 80: ...and their plugs are not damaged If the connecting cable or extension cable is damaged Do not touch damaged areas Disconnect the plug from the wall outlet Never touch the connecting cable extension cab...

Page 81: ...extension cable from heat oil and chemicals Lay the connecting and extension cables on a dry surface The extension cable becomes hot during operation If the heat cannot dissipate it may cause a fire...

Page 82: ...hat it completely covers the guide bar Transport the garden pruner in the bag supplied If no bag is supplied with the garden pruner Secure the special harvester with lashing straps or a net to prevent...

Page 83: ...transported This may result in personal injuries and damage to property Disconnect the plug from the wall outlet Remove the battery Transport the charger in the bag supplied If no bag is supplied wit...

Page 84: ...dry condition Battery WARNING Children are not aware of and cannot assess the dangers of the battery and can be seriously injured Store the battery out of the reach of children The battery is not pro...

Page 85: ...y Remove the battery Aggressive cleaning agents a water jet or pointed objects can damage the garden pruner guide bar saw chain battery and charger If the garden pruner guide bar sawchain battery or c...

Page 86: ...in personal injury Wear work gloves made of durable material Preparing Garden Pruner for Operation Perform the following steps before starting work Make sure the following components are in a safe co...

Page 87: ...rging process starts automatically when the plug is inserted in a wall outlet and the battery is fitted in the charger The charger switches itself off automatically when the battery is fully charged T...

Page 88: ...hes green The battery 2 is being charged The LED 3 stop glowing The battery is fully charged and can be taken out of the charger 2 If the charger 2 is no longer required Disconnect the plug 5 from the...

Page 89: ...Ds glow or flash green If the LEDs glow or flash red Troubleshooting There is a malfunction in the garden pruner or battery LED on Charger The LED indicates the operating status of the charger or faul...

Page 90: ...n be removed Remove the chain sprocket cover 2 Remove the bar and chain Mounting the bar and chain The bar and chain combinations that can be used with the chain sprocket are listed in the specificati...

Page 91: ...lot The guide bar may be either way round The logo on the guide bar may also be upside down Tension the chain Fit the sprocket cover so that it is flush with the garden pruner Rotate the wingnut clock...

Page 92: ...f durable material Move guide bar to the left or right until the following points apply The drive links on the underside of the bar are still half visible Rotate the wingnut clockwise until the chain...

Page 93: ...he sprocket cover facing up Clean the guide bar and saw chain with a soft brush Apply multifunctional oil in area 1 between guide bar and saw chain Fit the battery Switch on the garden pruner Multifun...

Page 94: ...battery compartment 2 as far as stop The battery 1 engages in position with a click Removing the Battery Depress both locking hooks 1 The battery 2 is unlocked and can be removed SWITCHING ON AND OFF...

Page 95: ...thumb and hold it there Pull the trigger 4 with your index finger and hold it there The motor accelerates and the chain rotates Release the lockout lever 3 Switching Off the Garden Pruner Release the...

Page 96: ...ket must be replaced Checking the Guide Bar Switch off the garden pruner and remove the battery Remove the chain and guide bar Measure depth of bar groove with scale Install a new guide bar if one of...

Page 97: ...e sure the service marks 1 to 2 on the cutters are visible If one of the service marks is not visible on a cutter do not use your saw chain and contact your servicing dealer for assistance Use a filli...

Page 98: ...he trigger without depressing the lockout lever If the trigger can be pulled Contact a servicing dealer for assistance The lockout lever is faulty Depress the lockout lever and hold it in that positio...

Page 99: ...arden pruner The LEDs glow or flash If the LEDs do not glow or flash Do not use the garden pruner or battery and contact your dealer for assistance There is a malfunction in the garden pruner or batte...

Page 100: ...battery If the garden pruner is wet Allow garden pruner to dry If the battery is wet Allow the battery to dry Clean the garden pruner Clean the bar and chain Fit the scabbard so that it completely cov...

Page 101: ...tery cannot shift inside the packaging Secure the packaging so that it cannot move The battery is subject to the requirements for the transport of dangerous goods The battery is classified as UN 3480...

Page 102: ...E BATTERY Recommends that you store the battery with a charge between 40 and 60 2 LEDs glow green Check the following points when storing the battery Battery is out of the reach of children Battery is...

Page 103: ...d 60 C CLEANING Cleaning the Garden Pruner Switch off the garden pruner and remove the battery Clean the garden pruner with a damp cloth or resin solvent Remove the chain sprocket cover Clean the area...

Page 104: ...charger with a damp cloth Clean the charger s electrical contacts with a soft brush SHARPENING THE SAW CHAIN Correctly sharpening saw chains requires a lot of practice WARNING The chain s cutters are...

Page 105: ...icing dealer for assistance If the battery has a malfunction or is damaged Replace the battery If the charger has a malfunction or is damaged Replace the charger If the connecting cable has a malfunct...

Page 106: ...the garden pruner and contact your dealer for assistance 3 LEDs glow red Garden pruner is too hot Remove the battery Allow garden pruner to cool down 4 LEDs flash red There is a malfunction in the ba...

Page 107: ...ing performance of garden pruner deteriorates 1 LED flashes Battery has low charge Charge the battery Chain is not properly sharpened Sharpen the chain properly The chain is over tensioned Tension the...

Page 108: ...rger 3 does not run a self test The LED 4 glows green for about 1 second and then red for about 1 second Electrical contact charger was briefly interrupted Disconnect the plug from the wall outlet Wai...

Page 109: ...product indicates that the article is classified as EEE electrical and electronic equipment and must therefore be disposed of in the appropriate recycling receptacles of WEEE waste electrical and ele...

Page 110: ...who do not dispose of electric and electronic waste correctly are liable to sanctions by the Local Authority EXPLODED VIEW AND SPARE PARTS LIST No Desctription Q ty No Description Q Ty 1 Sprocket Cov...

Page 111: ...2005 the Consumer code of Italian Civil Code In accordance with the law our company applies the guarantees listed here below the LEGAL GUARANTEE OF CONFORMITIES set by article 132 of Consumer Code th...

Page 112: ...s included in the user s manual continued use after failure use of incorrect non original accessories use of spare parts different from original ones defective or improper maintenance use of wrong lub...

Page 113: ...E relativa alle macchine e che modifica la direttiva 95 16 CE rifusione Direttiva Macchine Machinery Directive 2014 30 EU concernente l armonizzazione delle legislazioni degli Stati membri relative al...

Page 114: ...Made in China Importato da Viglietta Matteo S p A Via Torino 55 12045 Fossano CN Italy Lot no 2112R01738 Riservato il diritto di apportare modi che tecniche...

Reviews: