background image

23

22

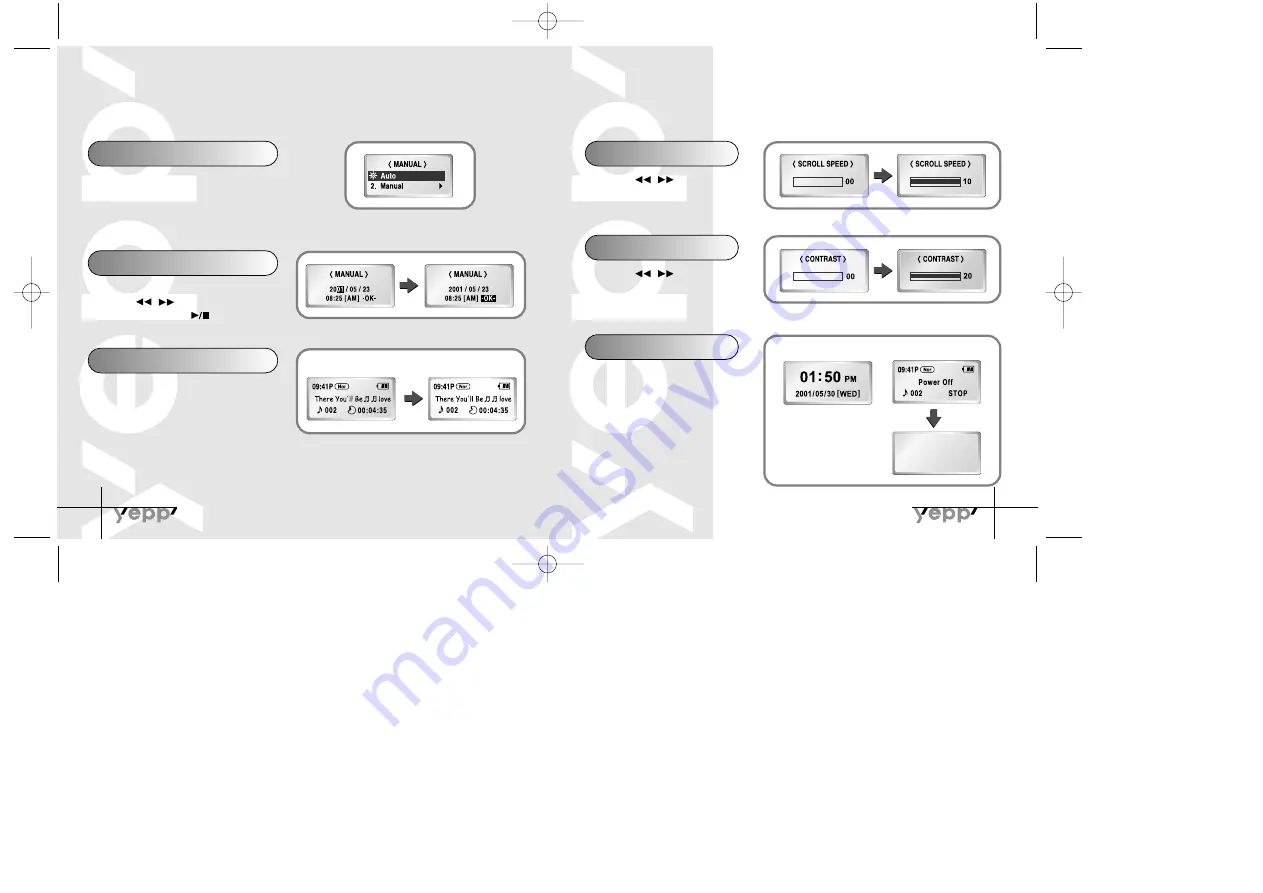
Time

➞ 

1. Auto

● 

Automatic time setting

● 

How to set up:

Set time in PC

➝ 

Set yepp as Auto

➝ 

Connect to PC 

➝ 

Execute  yepp Explorer

● 

You can’t use automatic time setting function in yepp Audio Manager

Scroll speed

Press the         /         button to set
the scroll speed.

Time

➞ 

2. Manual

● 

Manual time setting

Press the        /         button to change Year, Date
and Time and press the          button to select.

Backlight

● 

Button: Backlight is "ON" when button is pressed

● 

Auto: Backlight is "ON" according to the current

time (06 p.m. ~ 07 a.m.)

● 

Never: No backlight.

❈ 

Select Never to save battery power.

● 

On: Setting Sleep mode

● 

Off: Setting Power Off mode

❈ 

Select Power Off mode to save battery

power.

Contrast

Press the         /         button to set
the contrast.

Sleep mode

Button Setting

On

Off

YP-30S-Rioport  9/11/01  1:59 PM  Page 22

Summary of Contents for Yepp YP-300S

Page 1: ...upport Backlight Support Real Time Clock Voice Recording High Speed USB 64MB of Built in Memory Samsung Electronics America Inc 105 Challenger Road Ridgefield Park N J 07660 SERVICE DIVISION TEL 1 800 SAMSUNG 1 800 726 7864 Cover Quark Rio 9 11 01 4 26 PM Page 2 ...

Page 2: ...ng Files 45 Description of Buttons 46 MENU Table 48 Customer Support Precautions 50 Troubleshooting 51 Security 52 Specifications 53 Safety Information 54 Warranty 56 Listening to Music with yepp 8 Setting up Volume Hold Functions 9 Changing Modes 10 Recording Voice 11 Searching for Music Voice Files 12 Loop Repeating 14 Setting up Menu 15 Repeating Tracks 16 Setting up EQ 17 Managing Files Deleti...

Page 3: ... Logo Embellishment Refer to p 21 Changeable LCD Fonts Refer to p 25 Adjustable Scroll Speed Refer to p 23 Adjustable Contrast Refer to p 23 Player Earphones Neck Strap One Battery 1 5V AAA type User s Guide Digital Audio Player Arm Band Belt Clip USB Cable Installation CD Pull the packing foam on the bottom in the direction of the arrow to remove the installation CD N No ot ti ic ce e To attach o...

Page 4: ...r in the direction of the arrow open the cover by pressing PUSH OPEN Open the battery cover and insert the AAA battery following proper polarity Push the battery cover in the direction of the arrow to close it Slide the cover back onto the unit and press PUSH OPEN to close it N No ot ti ic ce e Do not place heavy objects on the cover N No ot te e Please peel the tape off the Display after unpackin...

Page 5: ...D Function Slide the switch on the side in the direction of the arrow to change to HOLD mode N No ot te e Both Power Off and Sleep modes can be set in the MENU mode refer to P 23 Power Off mode Sleep mode N No ot te e Volume ranges from 00 to 30 Press to adjust step by step Press and hold to adjust continuously N No ot ti ic ce e Under Hold mode no buttons work When you press the button while play...

Page 6: ...00 00 Nor VI002 SC4 09 41 002 00 00 35 Nor Record Pause 09 41 002 00 00 35 Nor VI002 SC4 09 41 002 STOP Nor 1 Press the button to pause while recording Press the button again to resume recording 2 Press the button to stop recording A new voice file is created 3 N No ot ti ic ce e Recording is done in the order of VI001 VI002 When memory is full recording stops automatically The available time is d...

Page 7: ...conds after the start of the track to play the beginning of the current track Searching for Music Voice Files in STOP mode Press the button in STOP mode to skip to the previous or next track Press the button to play N No ot ti ic ce e There s no sound while searching for specific parts in a voice file N No ot te e With VBR files pressing the button within 5 seconds from the start may not result in...

Page 8: ...usic voice files Setting To change the basic setup options of the display Exit menu To exit MENU Press the button for longer than 2 seconds to switch to MENU mode Use the button to select and the button to move Press the button one more time to cancel the MENU mode 2 Equalizer 1 Play mode 1 Play mode 2 Equalizer 2 Equalizer 3 File 3 File 4 Setting 4 Setting 5 Exit menu N No ot te e Press the butto...

Page 9: ...the button to select 2 2 Repeat one Normal Normal 2 Repeat one 2 Repeat one 3 Repeat all 3 Repeat all 4 Shuffle 4 Shuffle 5 lntro Normal To play all the tracks in order one time Repeat one To repeat one track Repeat all To repeat all tracks Shuffle To play tracks at random Intro T o play the first 10 seconds of each track One All Intro Normal Classic Jazz Rock Normal DBB Classic DBB Jazz DBB Rock ...

Page 10: ...e and press the button to select The file is deleted 3 Formatting In MENU select 3 File 1 In File select Format Confirm Select Cancel to exit the mode 2 Select Cancel to exit the mode 4 N No ot te e You can also format in yepp Explorer and Audio Manager All files will be deleted when formatting the built in memory YP 30S Rioport 9 11 01 1 59 PM Page 18 ...

Page 11: ...n time displays remaining play time Total time displays total play time Display 2 Logo Default yepp logo User define displays user defined logo None displays no logo Display 3 Time 12Hours Displays the time in the 12 hour setting 24Hours Displays the time in the 24 hour setting Compression displays compression rate Free memory displays remaining memory 128 Kbps 32MBFREE Default Setting ex User def...

Page 12: ... setting Press the button to change Year Date and Time and press the button to select Backlight Button Backlight is ON when button is pressed Auto Backlight is ON according to the current time 06 p m 07 a m Never No backlight Select Never to save battery power On Setting Sleep mode Off Setting Power Off mode Select Power Off mode to save battery power Contrast Press the button to set the contrast ...

Page 13: ...ore making a new installation N No ot te e How to delete the yepp Audio Manager Start Settings ControlPanel Add Remove Programs Select the yepp Audio Manager Add Remove Remove OK Click on yepp Audio Manager install 2 Additional Features Fonts Downloading Auto Clock Setting Logo Editing You need to download yepp Explorer and Logo Editor for the additional features Please visit http www samsungyepp ...

Page 14: ... 9 1 only Select the installation icon as shown in the picture Double Click on YP 30S yepp Explorer Installer 1 Click Continue in the series of windows that appear 2 yepp Explorer folder yepp Explorer is executed When installation is completed yepp Explorer is created in Mac YP 30S Rioport 9 11 01 1 59 PM Page 26 ...

Page 15: ... the other end of the USB cable into the USB port on the right side at the bottom 2 N No ot te e Before connecting to the computer make sure to install yepp Audio Manager If Add New Hardware Wizard appears press the Cancel button and install yepp Explorer If USB driver is not installed automatically refer to page 30 N No ot te e The computer may temporary malfunction if you unplug the USB cable fr...

Page 16: ...ar Insert installation CD and select drive Insert installation CD and select drive To complete the installation process reboot the system 1In Windows 98 2In Windows 2000 If the USB driver does not install automatically connect yepp to PC to install the driver manually How to check USB driver refer to 33 page YP 30S Rioport 9 11 01 2 00 PM Page 30 ...

Page 17: ...How to check USB driver Turning on the power of yepp Connecting yepp to PC USB driver is installed with a message saying that it is searching for a new device If USB driver is not installed try one more time after rebooting the PC If USB driver is not installed at the second attempt contact your PC manufacturer When USB driver is installed SAMSUNG YP 30S will appear in System Properties Device Man...

Page 18: ...tabase 2 Select Copy to devices Select Tracks From Database Select Playlists From Database Check the music file to send and click on the OK button If the YP 30S memory capacity is insufficient a warning message will pop up 3 Click on Copy to Portable Then the file is transferred 4 N No ot te e An 128Kbps file uses about 1MB of memory per minute Directories are divided according to file extensions ...

Page 19: ... 2 Select files to copy 3 Files are saved Now you can unplug the USB cable from Mac and listen to music using yepp 4 N No ot te e An 128Kbps file uses about 1MB of memory per minute Directories are divided according to file extensions mp3 sc4 Open the directory to check the saved file N No ot te e You can select the font you want before copying Select Environment Font YP 30S Rioport 9 11 01 2 01 P...

Page 20: ...nd then proceed Before deleting files connect yepp to Mac When in Sleep mode press the button to make sure the power is on and then proceed Double click the yepp Audio Manager 1 Select Copy to devices 2 Select the file to delete 3 Press the icon 4 Run yepp Explorer 1 Select files to delete 2 Click File Delete 3 YP 30S Rioport 9 11 01 2 01 PM Page 38 ...

Page 21: ...on to see CD information 2 Select songs to convert into an MP3 file 3 N No ot te e Make sure to connect yepp to PC and refresh before conducting a format Press the Start Reading button Conversion status is indicated on the right bottom of the picture 4 File converting status will be displayed Options function should be set first to select the file format Refer to page 34 5 N No ot te e The stored ...

Page 22: ...e to copyright protection Voice Files recorded on the player are converted into WAV when they are stored on PC Formatting Before formatting connect yepp to computer When in Sleep mode press the button to make sure the power is on and then proceed Run yepp Explorer 1 Implement the yepp Audio Manager Double click yepp Audio Manager icon 1 Select Copy to devices 2 Click on the Format Media 3 Click Fi...

Page 23: ...es Mac Before uploading files connect yepp to Mac When in Sleep mode press the button to make sure the power is on and then proceed Run yepp Explorer 1 Select File Refresh 2 Select files to save in Mac and click File Copy to Mac 3 N No ot ti ic ce e Voice files are not supported on the Mac N No ot te e File transfer between directories Music Voice is not allowed On Mac drag and drop the selected f...

Page 24: ...crease Set the starting point for loop function Loop mode Cancel loop mode Changing modes music voice Enter MENU Exiting MENU Voice recording Stop voice recording Fast reverse search in the current track Longer than 2 Seconds Stop MENU Mode MENU Clock Setting RESPONSE Play Less than 1 Second Within 5 seconds from the start of the track Plays the previous track After 5 seconds from the start Plays ...

Page 25: ...ht Scroll speed Contrast Sleep mode Go up Button On Off Auto Never Go up Play time Remain time Total time Compression Free memory Go up Default User define None Logo Confirm Cancel Cancel Format Go up Classic Jazz Rock Normal DBB Classic DBB Jazz DBB Rock DBB 12 Hours 24 Hours Go up Go up Time Time Time Go up Select with the button and move with the button YP 30S Rioport 9 11 01 2 01 PM Page 48 ...

Page 26: ...s not played after pressing the PLAY button Check to see if MP3 files are saved in the built in memory MP3 files cannot be downloaded Check to see if the driver is installed correctly in the computer Check the connection between yepp and computer 3 Keep out of humid hot or magnetic places 4 Do not clean it with thinner alcohol or benzene yepp keeps being turned off In Stop mode the power is automa...

Page 27: ...copyrighted music against infringement SecuMAX can be adapted to various types of digital contents For further details on SecuMAX please visit www samsungyepp com www cddb com Music CD related data is provided through the internet from the CDDBTM Music CD Database Copyright 1998 CDDB Inc All rights reserved N No ot te e Model Processor Memory capacity Voltage Battery Dimensions Weight Case File Tr...

Page 28: ...Paldal Gu Suwon City Kyungki Do Korea 442 742 declares under its sole responsibility that the product Trade Name Samsung Electronics Co Ltd Model Number YP 30S has been tested according to the FCC CISPR22 95 requirements for Class B devices and found compliant with the following standards This product conforms to the following Council Directive Directive 89 336 EEC 92 31 EEC EMC Reorient or reloca...

Page 29: ...Centers and warranty coverage will not be valid for any repairs or damage caused by such repairs 4 Repair or replacement under the terms of this warranty does not give right to extension to or a new starting of the period of warranty Repair or direct replacement under the terms of this warranty may be fulfilled with functionally equivalent service exchange units 5 The warranty is not applicable in...

Page 30: ...T LIMITING THE FOREGOING PURCHASER ASSUMES ALL RISK AND LIABILITY FOR LOSS DAMAGE OR INJURY TO PURCHASER AND PURCHASER S PROPERTY AND TO OTHERS AND THEIR PROPERTY ARISING OUT OF THE USE MISUSE OR INABILITY TO USE THIS PRODUCT SOLD BY SAMSUNG NOT CAUSED DIRECTLY BY THE NEGLIGENCE OF SAMSUNG THIS LIMITED WARRANTY SHALL NOT EXTEND TO ANYONE OTHER THAN THE ORIGINAL PURCHASER OF THIS PRODUCT IS NONTRAN...

Reviews: