background image

English

Installation

English

20

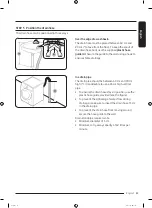
STEP 3 

Adjust the levelling feet

1. 

Gently slide the washing machine into position. 

Excessive force may damage the levelling feet.

2. 

Level the washing machine by manually adjusting 

the levelling feet.

3. 

When levelling is complete, tighten the nuts using 

the spanner.

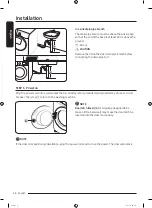
CAUTION

When installing the product make sure the levelling 
feet is not pressing the power cord.

Untitled-1   20

2022-09-28     3:07:23

Summary of Contents for WW11BB904AGBS2

Page 1: ...Washing Machine User manual WW1 B Untitled 1 1 2022 09 28 3 07 19...

Page 2: ...Critical cleaning warnings 12 Instructions about the WEEE 13 Installation 14 What s included 14 Installation requirements 16 Step by step installation 18 Before you start 27 Initial setup 27 Laundry g...

Page 3: ...ing machine 53 Care against an extended time of disuse 53 Troubleshooting 54 Checkpoints 54 Information codes 58 Specifications 61 Fabric care chart 61 Protecting the environment 62 Spare parts guaran...

Page 4: ...ne Because the following operating instructions cover various models the characteristics of your washing machine may differ slightly from those described in this manual and not all warning signs may b...

Page 5: ...rstand the hazards involved Children shall not play with the appliance Cleaning and user maintenance shall not be made by children without supervision 3 Children should be supervised to ensure that th...

Page 6: ...duct specifications Failure to do so may result in electric shock or fire Remove all foreign substances such as dust or water from the power plug terminals and contact points using a dry cloth on a re...

Page 7: ...ug Unplug the power plug by holding the plug Failure to do so may result in electric shock or fire This appliance should be positioned so that the power plug the water supply taps and the drain pipes...

Page 8: ...gasoline kerosene benzene paint thinner alcohol or other inflammable or explosive substances This may result in electric shock fire or an explosion Do not open the washing machine door by force while...

Page 9: ...When the washing machine is contaminated by a foreign substance such as detergent dirt food waste etc unplug the power cord and clean the washing machine using a damp soft cloth Failure to do so may r...

Page 10: ...roblems with the appliance Do not place objects that generate electromagnetic fields near the washing machine This may result in injury due to a malfunction Water drained during a high temperature was...

Page 11: ...rust starts appearing on the surface of the drum apply a neutral cleansing agent to the surface and use a sponge to clean it Never use a metal brush Do not use dry cleaning detergent directly and do n...

Page 12: ...after a wash cycle to allow the drum to dry To prevent limescale build up leave the detergent drawer open after a wash cycle and dry inside it Critical cleaning warnings WARNING Do not clean the appl...

Page 13: ...rces Household users should contact either the retailer where they purchased this product or their local government office for details of where and how they can take these items for environmentally sa...

Page 14: ...age If you have a problem with the washing machine or the parts contact a local Samsung customer centre or the retailer 01 02 12 11 10 09 03 04 06 08 07 05 01 Release lever 02 Detergent drawer 03 Cont...

Page 15: ...r removing the shipping bolts and levelling the washing machine Bolt caps For covering the holes after removing the shipping bolts The provided number of bolt caps 3 to 6 depends on the model Hose gui...

Page 16: ...ctors may cause electric shock Water supply A proper water pressure for this washing machine is between 50 kPa and 1000 kPa Water pressure less than 50 kPa may cause the water valve to not close compl...

Page 17: ...o not install the washing machine in areas where water may freeze as the washing machine always retains some water in its water valves pumps and or hoses Frozen water left in the connection parts may...

Page 18: ...tilation and wiring The ambient temperature is always higher than the freezing point 0 C Away from a heat source NOTE To prevent excessive vibration while operating the washing machine consider stabil...

Page 19: ...g the shipping bolts Do not move the washing machine without the shipping bolts in place Assemble the shipping bolts before moving the washing machine to another location Keep the shipping bolts in a...

Page 20: ...on Excessive force may damage the levelling feet 2 Level the washing machine by manually adjusting the levelling feet 3 When levelling is complete tighten the nuts using the spanner CAUTION When insta...

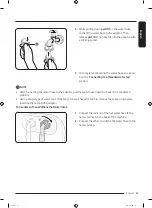
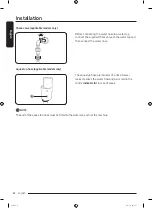
Page 21: ...the provided water hose Connecting to a threaded water tap 1 Connect the water hose to the water tap and then turn it to the right to tighten CAUTION Before connecting the water hose make sure there...

Page 22: ...CAUTION Do not stretch the water hose by force If the hose is too short replace the hose with a longer high pressure hose Connecting to a non threaded water tap A B 1 Remove the adaptor A from the wat...

Page 23: ...After connecting the water hose to the adaptor pull the water hose down to check if it is connected properly Use a popular type of water taps If the tap is square shaped or too big remove the spacer r...

Page 24: ...to the water tap and then connect the water hose Aqua stop hose applicable models only A The aqua stop hose alerts users of a risk of water leaks It senses the water flow and turns red on the centre i...

Page 25: ...ge In a drain pipe The drain pipe should be between 60 cm and 90 cm high It is advisable to use a 65 cm high vertical pipe To ensure the drain hose stays in position use the plastic hose guide provide...

Page 26: ...e to it STEP 6 Power on Plug the power cord into a wall socket that is correctly rated grounded and protected by a fuse or circuit breaker Then tap to turn on the washing machine A NOTE Door latch lev...

Page 27: ...Tap or turn the Navigation dial to skip to the next screen Run Calibration Initial setup includes the calibration process which comes after the language selection You must proceed calibration before u...

Page 28: ...g with buttons and embroideries inside out If trousers or jacket zippers are open while washing the drum may be damaged Zippers should be closed and fixed with a string Clothing with long strings may...

Page 29: ...aught in the door STEP 6 Apply a proper detergent type The type of detergent depends on the type of fabric cotton synthetic delicate items wool colour wash temperature and degree of soiling Make sure...

Page 30: ...lease follow these instructions 1 Put the capsule in the bottom of the empty drum towards the rear 2 Put the laundry in the drum on top of the capsule CAUTION For cycles using cold water or cycles tha...

Page 31: ...co 40 60 40 60 AI Wash applicable models only 40 Cotton Cold 90 15 Quick Wash Cold 40 Super Speed applicable models only Cold 40 Mixed Load applicable models only Cold 60 Intense Cold Cold Synthetics...

Page 32: ...e A NOTE The actual appearance of the softener guide may differ with the model CAUTION Do not open the detergent drawer while the washing machine is operating Do not use the following types of deterge...

Page 33: ...se liquid detergent see page 34 Do not exceed the max line A when adding detergent A 3 Apply fabric softener to the softener compartment Do not exceed the max line A Softener is dispensed into the was...

Page 34: ...provided liquid detergent guide in the main wash compartment Then apply liquid detergent to the guide below the marked max line A NOTE Insert the liquid detergent guide only after you remove the deter...

Page 35: ...the washing machine automatically turns off The washing machine automatically turns off when the cycle completes CAUTION Do not tap to turn the washing machine off while the wash cycle is in progress...

Page 36: ...menu 10 Smart Control Tap to activate or deactivate the Smart Control function Tap and hold to enter pairing mode to connect to the SmartThings app When the Smart Control function is activated you ca...

Page 37: ...ional function in the Options menu For more information on Options see page 40 5 Tap to change the settings for selected additional function For WW B 9 model you can tap Quick Drive to turn on or off...

Page 38: ...t to wash quickly Use less than 20 g of detergent Using more than 20 g of detergent may leave detergent residue For liquid detergent use a max of 20 ml of liquid detergent 2 Super Speed applicable mod...

Page 39: ...ced spinning to ensure that the laundry is washed gently and rinsed thoroughly 4 Denim Featuring a higher water level in the main wash and an extra rinse cycle to ensure that no powder detergent remai...

Page 40: ...perform at lower temperatures and longer duration Options Using Options 1 Tap 2 Turn the Navigation dial to select the desired additional function 3 Tap to change the selected function s settings or s...

Page 41: ...Silent Wash Mixed load and Cloudy day 4 Tap and hold My Cycles Add or remove cycles to create a personal cycle list 1 Tap 2 Turn the Navigation dial to select My Cycles and then tap You can only edit...

Page 42: ...two hour cycle 3 hours later from now For this you add the Delay End option to the current cycle with the 3 hour setting and press Start Pause at 2 00 p m Then what happens The washing machine starts...

Page 43: ...ng is On Set it to Off if you do not want to use this function When you turn off the function all the saved data resets Sound You can turn on or off the sound from the washer 1 Tap and hold for 3 seco...

Page 44: ...rn on the washing machine s Wi Fi and connect to a network the washing machine remains connected to the network even when you turn off the power The Wi Fi indicates that the washing machine is connect...

Page 45: ...ng machine appears offline on the SmartThings app if the washing machine s Wi Fi is off Close the door before starting the Smart Control function If you use your washing machine for a while without co...

Page 46: ...eate your account NOTE If you have a Samsung account use the account to log in A registered Samsung smartphone or tablet user automatically logs in To register your appliance to SmartThings 1 Make sur...

Page 47: ...menu It is also possible to obtain the complete corresponding source code in a physical medium such as a CD ROM a minimal charge will be required The following URL http opensource samsung com opensou...

Page 48: ...cording to your local water hardness or add a water softener additive together with the detergent Drum Clean Drum Clean reminder An alert message appears on the control panel display when it is time t...

Page 49: ...n TYPE 2 Push down the latch of the filter cover A to open B 3 Put an empty spacious container around the cover and stretch the emergency drain tube to the container while holding the tube cap B C 4 O...

Page 50: ...m the back of the washing machine Cover the hose with a cloth to prevent water from gushing out 4 Use pliers to pull out the mesh filter from the inlet valve 5 Submerge the mesh filter deeply in water...

Page 51: ...filter and turn the filter knob to the right NOTE Some debris filters feature a safety knob that is designed to prevent accidents by children To open the safety knob of the debris filter push in and...

Page 52: ...tergent guide from the drawer 3 Clean the drawer components in flowing water using a soft brush 4 Clean the drawer recess using a soft brush 5 Reinsert the release lever and the liquid detergent guide...

Page 53: ...TE If the washing machine still doesn t operate normally repeat the above steps until it operates normally Care against an extended time of disuse Avoid leaving the washing machine unused for an exten...

Page 54: ...power is supplied properly Low voltage detected Check if the power cord is plugged in Make sure laundry is not caught in the door Water supply is insufficient or no water is supplied Fully open the wa...

Page 55: ...n system If you encounter a drain problem call for service Make sure the debris filter is not clogged Close the door and tap and hold For your safety the washing machine will not tumble or spin unless...

Page 56: ...r the washing machine will temporarily not drain or spin As soon as the washing machine regains sufficient power it will operate normally Fills with the wrong water temperature Fully open both taps Ma...

Page 57: ...recesses and can cause foul odours Run cleansing cycles to sanitise periodically Clean the door seal diaphragm Dry the washing machine interior after a cycle has finished No bubbles are seen Bubble mo...

Page 58: ...the mesh filter as it may be clogged All buttons will be disabled for 3 minutes after the information code appears When the Check water supply faucets and restart message appears the machine drains wa...

Page 59: ...oltage detected Check if the power cord is plugged in If the information code remains contact a customer service centre HC High temperature heating check If the information code remains contact a cust...

Page 60: ...k unlock is not working properly Turn the machine off and restart the cycle If the information code remains contact a customer service centre If any information code keeps appearing on the screen cont...

Page 61: ...ine wash 30 C mild fine wash 30 C very mild fine wash Hand wash Do not wash NOTE The numbers in the wash tub specify the maximum washing temperatures in degrees celsius which must not be exceeded Blea...

Page 62: ...ional wet cleaning Very mild professional wet cleaning Do not wet clean NOTE The letters in a circle indicate the solvents P F used in dry cleaning or wet cleaning W Generally the line under the symbo...

Page 63: ...ars after placing the last unit of the model on the market Door door hinges and seals other seals door locking assembly and plastic peripherals such as detergent dispensers Listed parts can be purchas...

Page 64: ...0 kg WW BB G 72 0 kg WW BB T WW BB A Maximum load capacity Washing and spinning 11 0 kg Power consumption Washing and heating AC 220 240 V 50 Hz 1900 2300 W Spin revolutions 1400 RPM NOTE The design a...

Page 65: ...0 1400 Cotton 60 C 11 2 32 1 460 132 0 60 50 0 1400 Cotton 60 C Bubble Soak 11 3 02 2 240 147 0 60 50 0 1400 Synthetics 40 C 4 2 59 0 760 58 0 40 33 0 1200 15 Quick Wash 2 0 15 0 015 41 0 15 105 0 800...

Page 66: ...information about this product on the European Product Registry for Energy Labelling EPREL go to https eprel ec europa eu qr where is the product s EPREL registration number You can find the registrat...

Page 67: ...70 www samsung com dk support FINLAND 030 6227 515 www samsung com fi support SWEDEN 0771 400 300 www samsung com se support AUSTRIA 0800 72 67 864 0800 SAMSUNG www samsung com at support SWITZERLAND...

Page 68: ...G 800 7267864 www samsung com it support CYPRUS 8009 4000 only from landline toll free www samsung com gr support GREECE 80111 SAMSUNG 80111 726 7864 only from land line 30 210 6897691 from mobile and...

Page 69: ...Memo Untitled 1 69 2022 09 28 3 07 41...

Page 70: ...Memo Untitled 1 70 2022 09 28 3 07 41...

Page 71: ...Memo Untitled 1 71 2022 09 28 3 07 41...

Page 72: ...DC68 000000 00 Untitled 1 72 2022 09 28 3 07 41...

Reviews: