background image

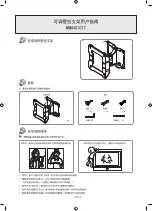
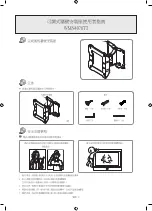
使用固定器和螺絲 

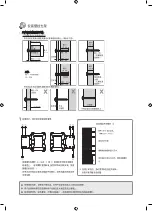
 按照從 ① 到 ⑥ 的順序將可調式安裝座

固定在牆壁上。(將螺絲鎖緊在牆壁上時,同時移動可調式安

裝座,可以更輕鬆地鎖緊螺絲。)

若您無法按照指定位置鎖緊固定器和螺絲,請盡可能在最近的

位置鎖緊。


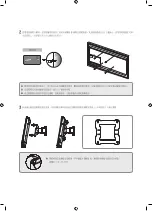
安裝牆壁安裝座

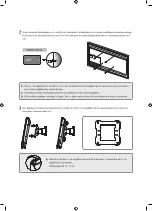
1


將可調式安裝座固定在牆壁上,如圖所示。

각  若您在牆壁上鑽孔,務必使用指定直徑的鑽頭。  

若無法這麼做,可能會造成安全問題。

   檢查牆壁強度,若牆壁強度不夠,請先強化牆壁,再將產品安裝在牆壁上。

  產品隨附的螺絲和固定器是用來將產品固定在木頭或水泥上。

  檢查牆壁材質,並根據塑膠板、大理石、鐵板等材質類型使用合適的固定螺絲。


[

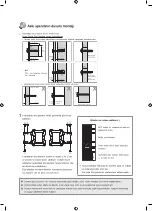
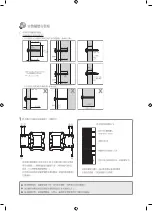
安裝前查看牆壁的類型。

各牆壁類型的標準安裝需求


• 只可安裝在水泥牆壁或厚度足夠的室內裝飾牆。請參閱下圖。

最少 50 公釐

最少 10 公釐
MDF、PW

最少 10 公釐
MDF、PW

最少 10 公釐
MDF、PW

MDF、PW

水泥

MDF、PW

(石膏板
厚度 
除外)

混合的水泥牆 
(石膏板厚度 
除外)

藝術牆

藝術牆

最少 30 公釐

最少 30 公釐

最少  
25 公釐

最少  
25 公釐

MDF、 
PW 等。
經過強化

最少  
50 公釐

MDF = Medium Density Fiberboard 
(中密度纖維板或密集板)

PW = Plywood(夾板)


• 不可安裝在未經強化的牆壁或石膏板表面上。

0-24 公釐

MDF、PW、、、

未經
強化

不可安裝在石膏板上

石膏板

藝術牆

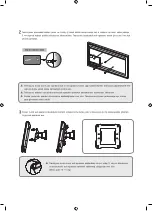
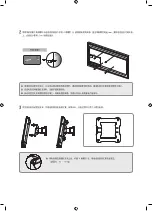
固定固定器和螺絲 

使用 9X70 鑽頭鑽孔。

(WMN-2370:4X25)

清潔孔洞內部。

將隨附的固定器插入孔洞。

對齊可調式安裝座與孔洞,並鎖緊螺絲 

Summary of Contents for WMN4070TT

Page 1: ...ll the product in a hot humid location or on a weak wall that is unable to sustain the weight of the product 4 Do not insert your hand into the groove at the bottom of the TV while installing the TV o...

Page 2: ...rial of the wall and use appropriate fixing screws depending on the type of material such as plaster board marble or iron plate Check the type of the wall before installing Standard Installation Requi...

Page 3: ...you move the wall mount from left to right Take care not to hurt your fingers when you install the TV or adjust the wall mount Make sure to fix the wall mount onto the wall firmly If the TV falls it...

Page 4: ...djusted After connecting the cables and pulling the adjustable mount as far forward as possible arrange the cables using the cable tie that has been passed through the specified hole in the adjustable...

Page 5: ...mooth Moving Mechanism so that it always moves very smoothly You can adjust the angle up to 15 15 horizontally and up to 20 20 vertically The allowed adjustable angle may differ depending on the model...

Page 6: ...uit dans un endroit chaud et humide ou sur un mur fragile qui ne peut pas supporter le poids du produit 4 N ins rez pas votre main dans la rainure du bas du t l viseur lorsque vous installez le t l vi...

Page 7: ...exemple du pl tre du marbre ou une plaque m tallique V rifiez le type de mur avant de proc der l installation Conditions d installation standard en fonction du type de mur Peut uniquement tre install...

Page 8: ...tion de ne pas vous blesser les doigts lorsque vous installez le t l viseur ou que vous r glez la fixation murale Veillez bien attacher la fixation murale au mur Si le t l viseur bascule cela pourrait...

Page 9: ...tion murale Apr s avoir branch les c bles et tir la fixation r glable aussi loin que possible vers l avant arrangez les c bles en utilisant le serre c ble qui a t pass travers le trou sp cifi dans la...

Page 10: ...nt de sorte qu il se d place toujours tr s facilement Vous pouvez r gler l angle entre 15 15 l horizontale et entre 20 20 la verticale L angle de r glage auto ris peut varier en fonction du mod le Par...

Page 11: ...en feuchten Ort oder an einer schwachen Wand die das Gewicht des Produkts nicht tragen kann 4 F hren Sie Ihre Hand nicht in die Aussparung an der Unterseite des Fernsehger ts ein w hrend Sie das Fern...

Page 12: ...erial der Wand und verwenden Sie je nach Art des Materials wie z B Gipskarton Marmor oder Eisenplatte die geeigneten Befestigungsschrauben Pr fen Sie vor der Installation die Art der Mauer Anforderung...

Page 13: ...nach rechts bewegen Achten Sie darauf dass Sie sich bei der Installation des Fernsehger ts oder der Verstellung der Wandhalterung nicht an den Fingern verletzen Achten Sie darauf die Wandhalterung fe...

Page 14: ...Sie die Kabel angeschlossen und die verstellbare Halterung so weit wie m glich nach vorne gezogen haben ordnen Sie die Kabel wie in der Abbildung gezeigt mit Hilfe des Kabelbinders an der durch das v...

Page 15: ...nen Mechanismus f r reibungslose Bewegungen sodass es sich immer besonders reibungslos bewegt Sie k nnen den Winkel bis zu 15 15 horizontal und bis zu 20 20 vertikal verstellen Der zul ssige verstell...

Page 16: ...prodotto 3 Non installare il prodotto in un luogo caldo e umido o su una parete che non in grado di sostenere il peso del prodotto 4 Non inserire la mano nella scanalatura presente nella parte inferi...

Page 17: ...opriate in base a esso ovvero cartongesso marmo o lastra in ferro Prima di iniziare verificare il tipo di parete su cui eseguire l installazione Requisiti di installazione standard per tipo di parete...

Page 18: ...are attenzione a non procurarsi lesioni alle dita quando si installa la TV o si regola il supporto a parete Assicurarsi che il supporto a parete sia saldamente fissato alla parete Se la TV dovesse cad...

Page 19: ...a parete Dopo aver collegato i cavi e tirato il pi avanti possibile il supporto a parete sistemare i cavi con la fascetta fatta passare attra verso il foro specificato nel supporto regolabile come mos...

Page 20: ...ete Il prodotto dotato di un meccanismo che favorisce il movimento possibile regolare l angolo fino a 15 15 orizzontal mente e fino a 20 20 verticalmente L angolo regolabi le consentito pu variare in...

Page 21: ...l k rosod s t 3 Ne szerelje fel a term ket meleg p r s helyre vagy gyenge falra amely nem k pes megtartani a term k s ly t 4 A TV nek a fali konzolra t rt n szerel sekor ne dugja be a kez t a TV alj n...

Page 22: ...zben mozgatja az ll that konzolt akkor a csavarok k nnyebben r gz thet k Ha a horgonyokat s a csavarokat nem tudja r gz teni a megadott poz ci kn l akkor a lehet legk zelebbi poz ci k n l r gz tse az...

Page 23: ...ali konzolt balr l jobbra mozgatja gyeljen arra hogy ne s r ljenek meg az ujjai a TV felszerel sekor vagy a fali konzol be ll t sakor gyeljen arra hogy a fali konzolt stabilan r gz tse a falra Ha a TV...

Page 24: ...ll t sakor A k belek csatlakoztat sa s az ll that konzol lehet legel bbre t rt n h z sa ut n rendezze a k beleket a k belk tegel seg ts g vel amely az br n l that m don thalad az ll that konzolban e...

Page 25: ...t tartalmaz gy mindig nagyon sim n mozog A sz get v zszintesen maximum 15 15 fokkal s f g g legesen maximum 20 20 fokkal ll thatja A megen gedett be ll that sz g modellt l f gg en elt r lehet A f elem...

Page 26: ...cianach zbyt delikatnych aby wytrzyma obci enie uchwytem 4 Nie wk ada r k do rowka na spodzie telewizora podczas jego monta u na uchwycie ciennym poniewa mo e to spowodowa pora enie pr dem elektryczny...

Page 27: ...nale y sprawdzi rodzaj ciany przeznaczonej do monta u Standardowe wymagania monta owe zwi zane z rodzajem ciany Produkt przeznaczony do monta u wy cznie na cianie betonowej lub cianie wewn trznej o o...

Page 28: ...ciennego od lewej do prawej strony Podczas mocowania telewizora i regulowania uchwytu ciennego nale y uwa a aby nie zrani palc w Upewni si e uchwyt cienny zosta dok adnie przymocowany do ciany Je li t...

Page 29: ...uje poluzowanie przewod w Po pod czeniu przewod w i wysuni ciu regulowanego uchwytu najdalej jak to mo liwe rozmie ci odpowiednio przewody u ywaj c opaski kablowej prze o onej przez wskazany otw r w u...

Page 30: ...ego przemieszczania dzi ki czemu ruch uchwytu jest zawsze bardzo p ynny K t mo na regulowa w zakresie 15 15 w poziomie oraz 20 20 w pionie Dopuszczalne ustawienie k ta mo e si r ni w zale no ci od mod...

Page 31: ...ido ou numa parede fr gil que seja incapaz de suportar o peso do produto 4 Ao instalar o televisor no suporte para montagem na parede n o coloque a m o na ranhura da parte inferior do televisor pois p...

Page 32: ...na parede mover o suporte ajust vel torna o aparafusamento mais f cil Se n o conseguir apertar os parafusos de ancoragem e os parafusos nas posi es indicadas aperte os o mais pr ximo poss vel desses...

Page 33: ...da esquerda para a direita Tenha cuidado para n o magoar os dedos ao instalar o televisor ou ao ajustar o suporte para montagem na parede Certifique se de que fixa bem o suporte na parede Se o televi...

Page 34: ...a montagem na parede Ap s ligar os cabos e puxar o suporte ajust vel o mais para a frente poss vel arrume os cabos com a bra adeira que foi pas sada pelo orif cio indicado no suporte conforme ilustrad...

Page 35: ...e se possa mover sempre com grande facilidade Pode ajustar o ngulo at 15 15 na horizontal e at 20 20 na vertical O ngulo ajust vel permitido pode variar consoante o modelo Pe a de fixa o da estrutura...

Page 36: ...WMN4270S WMN4270S 1 2 4 3 4 5 WMN4070TT 1 7 7 4 1...

Page 37: ...50 10 10 10 30 30 25 25 50 MDF PW 0 24 1 9X70 WMN 2370 4X25...

Page 38: ...2 4 5 5 3 2 4 10 15 TV...

Page 39: ...4 2 3...

Page 40: ...15 15 20 20 248 250 2 53 3 9 VESA 200 X 200 110 210 250 214 53 132 180 200 205 2 248 200 15 15 15 15 20 20 20 20...

Page 41: ...te y h medo o en una pared d bil incapaz de soportar el peso del producto 4 No inserte la mano en la ranura de la parte inferior del televisor mientras instala el televisor en el soporte de pared podr...

Page 42: ...dependiendo del tipo de material como placa de yeso m rmol o hierro Compruebe el tipo de pared antes de la instalaci n Requisitos de la instalaci n est ndar seg n el tipo de pared Solo se puede utili...

Page 43: ...porte mural de izquierda a derecha Tenga cuidado de no lastimarse los dedos al instalar el televisor o ajustar el soporte mural Aseg rese de fijar firmemente el soporte mural a la pared Si el televiso...

Page 44: ...porte de pared Despu s de conectar los cables y tirar del soporte ajustable lo m s hacia adelante posible disponga los cables utilizando la brida que se ha pasado a trav s del orificio especificado en...

Page 45: ...suave para que siempre se mueva con fluidez Puede ajustar el ngulo hasta 15 15 horizontalmente y hasta 20 20 verticalmente El ngulo ajustable per mitido puede variar en funci n del modelo Pieza de fi...

Page 46: ...r 3 Montera inte produkten p en varm och fuktig plats eller p en svag v gg som inte kan b ra produktens vikt 4 S tt inte in handen i sk ran l ngst ned p tv n n r du installerar den p v ggf stet efters...

Page 47: ...det jus terbara f stet medan du f ster skruvarna p v ggen blir det l ttare att f sta skruvarna Om det inte g r att f sta pluggarna och skruvarna p de angivna platserna f ster du dem p de n rmaste m j...

Page 48: ...ttar v ggf stet fr n v nster till h ger Var f rsiktig s att du inte skadar fingrarna n r du installerar tv n eller justerar v ggf stet Se till att f sta v ggf stet ordentligt p v ggen Om tv n faller n...

Page 49: ...justeras Efter att du anslutit kablarna och dragit det justerbara f stet s l ngt fram t som m jligt ordnar du kablarna med buntbandet som har dragits igenom det angivna h let i det justerbara f stet s...

Page 50: ...mekanism f r j mna r relser s att den alltid r rs mycket j mnt Du kan justera vinkeln upp till 15 15 horisontellt och 20 20 vertikalt Vilken justerbar vinkel som till ts kan variera beroende p modell...

Page 51: ...kadar zay f bir duvara monte etmeyin 4 Televizyonu duvara monte ask aparat na takarken elinizi televizyonun alt taraf ndaki a kl a sokmay n aksi halde elektrik arpabilir 5 Televizyonun alt taraf ndaki...

Page 52: ...n hareket ettirerek vida lar daha kolay s kabilirsiniz E er d belleri ve vidalar belirtilen konumlarda s kam yorsa n z m mk n olan en yak n konumda s k n Ask aparat n n duvara montaj 1 Ayarlanabilir...

Page 53: ...ak lmad n kontrol edin Televizyonu takarken veya duvara monte ask aparat n ayarlarken parmaklar n z incitmemeye dikkat edin Duvara monte ask aparat n duvara s k ca sabitledi inizden emin olun Televizy...

Page 54: ...i inden emin olun Kablolar ba lad ktan ve ayarlanabilir ask aparat n m mk n oldu unca ne do ru ektikten sonra ayarlanabilir ask aparat n daki belirtilen delikten ge irilmi olan kablo ba n kullanarak k...

Page 55: ...ve bu sayede daima kolayca hareket eder A y yatay olarak maks 15 15 ve dikey olarak maks 20 20 olacak ekilde ayarlayabilirsiniz zin verilen ayarlanabilir a modele ba l olarak de i ebilir Ana G vde Sab...

Page 56: ...WMN4270S WMN4270S 1 2 4 3 4 5 WMN4070TT 1 7 7 4 1...

Page 57: ...50 mm 10 mm MDF PW 10 mm MDF PW 10 mm MDF PW MDF PW MDF PW 30 mm 30 mm 25 mm 25 mm MDF PW 50 mm MDF PW 0 24 mm MDF PW 1 9X70 WMN 2370 4X25...

Page 58: ...2 4 5mm 5 mm 3 4 10 15 Kg TV...

Page 59: ...4 2 3...

Page 60: ...15 15 20 20 mm 248 mm 250 2 mm 53 Kg 3 9 VESA 200 X 200 110 210 250 214 53 132 180 200 205 2 248 200 15 15 15 15 20 20 20 20...

Page 61: ...WMN4270S WMN4270S 1 2 4 3 4 5 WMN4070TT 1 7 7 4 1...

Page 62: ...1 50 10 MDF PW 10 MDF PW 10 MDF PW MDF PW MDF PW 30 30 25 25 MDF PW 50 MDF Medium Density Fiberboard PW Plywood 0 24 MDF PW 9X70 WMN 2370 4X25...

Page 63: ...2 4 5 5 3 2 4 10 15 TV...

Page 64: ...4 2 3...

Page 65: ...15 15 20 20 248 250 2 53 3 9 VESA 200 X 200 110 210 250 214 53 132 180 200 205 2 248 200 15 15 15 15 20 20 20 20...

Page 66: ...1 2 4 3 4 TV 5 TV TV WMN4070TT 1 7 7 4 1...

Page 67: ...1 50 mm 10 mm MDF PW 10 mm MDF PW 10 mm MDF PW MDF PW MDF PW 30 mm 30 mm 25 mm 25 mm MDF PW 50 mm NOTE MDF Medium Density Fiberboard PW Plywood 0 24 mm MDF PW 9X70 WMN 2370 4X25...

Page 68: ...3 TV 2 TV 4 TV 5 mm 5 mm TV 4 10 15 Kg TV...

Page 69: ...4 2 3...

Page 70: ...SMOOTH MOVING MECHANISM 15 15 20 20 mm 248 mm 250 2 mm 53 Kg 3 9 VESA 200 X 200 110 210 250 214 53 132 180 200 205 2 248 200 15 15 15 15 20 20 20 20...

Page 71: ......

Page 72: ......

Reviews: