background image

053

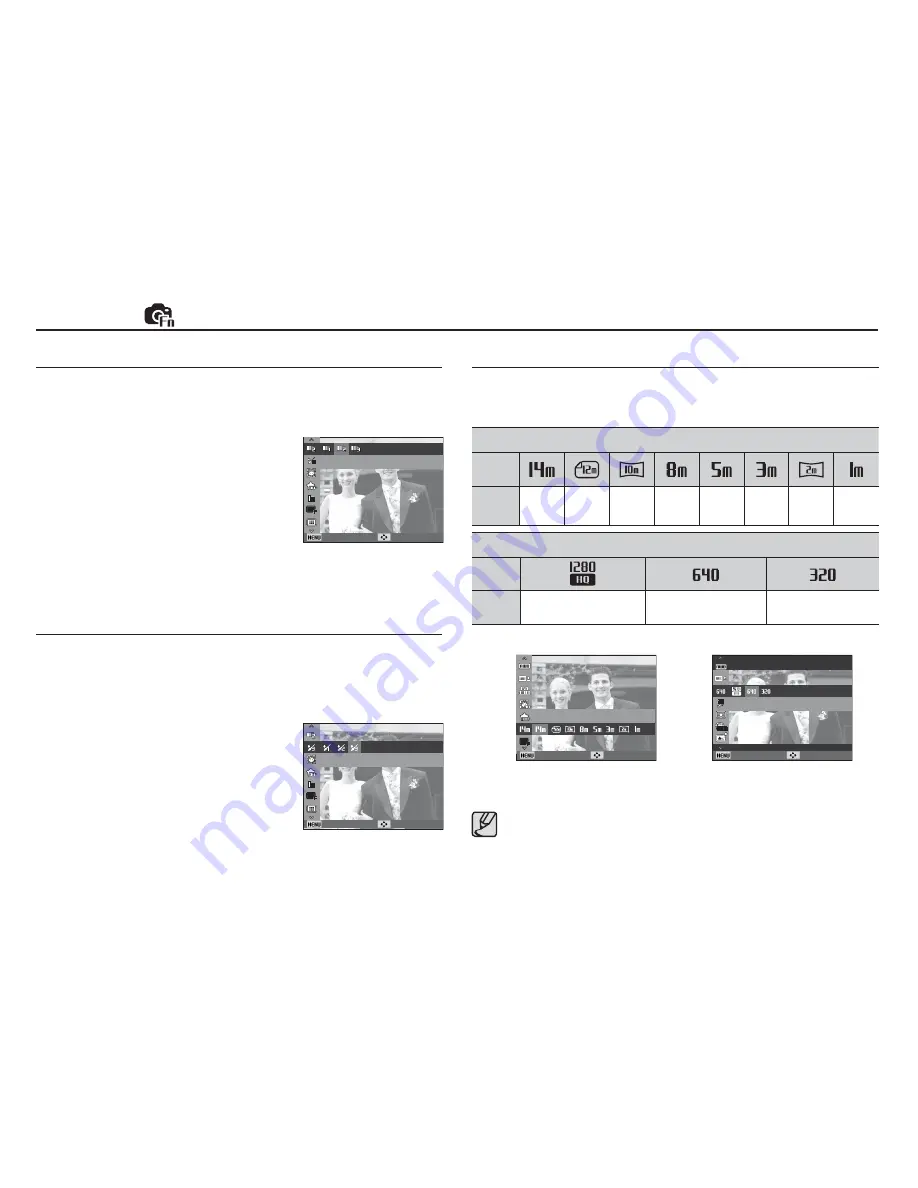
Face Tone

This menu allows you to control the skin tone in images in beauty shot 
mode. The higher the level you select, the brighter the skin tone.

 1.  Select [Face Tone] by pressing the 

Up/Down button.

 2.  Select a desired face tone by pressing 

the Left / Right button and then press 
the OK button. 

 3.  Press the Shutter button to take an 

image.

Face Retouch

This menu allows you to make skin appear clear and beautiful before 
recording in beauty shot mode. The higher the level selected, the 
more effective the control.

 1.  Select [Face Retouch] by pressing the 

Up/Down button.

 2.  Select a desired face retouch by 

pressing the Left / Right button and 
then press the OK button. 

 3.  Press the Shutter button to take an 

image.

The higher the resolution, the lower the number of shots 
available because high resolution images require more memory.

Photo Size / Movie Size

You can select the photo size / movie size appropriate for your application.

[ Still image mode ]

[ Movie clip mode ]

(Unit: pixel)

Still image mode

Icon

Size

4288x

3216

4288x

2848

4288x

2416

3264x

2448

2592x

1944

2048x

1536

1920x

1080

1024x

768

Movie clip mode

Icon

Size

1280x720HQ

640x480

320x240

Shooting ( 

 ) 

Face Tone

Back Move

Face Retouch

Back Move

Photo Size

Back Move

Movie Size

Back Move

Summary of Contents for WB5500

Page 1: ......

Page 2: ...osoft Windows and Windows logo are registered trademarks of Microsoft Corporation incorporated in the United States and or other countries Adobe and Reader are either trademarks or registered trademar...

Page 3: ...use do not cover the camera or Charger This may cause heat to build up and distort the camera body or cause a fire Always use the camera and its accessories in a well ventilated area Danger DANGER ind...

Page 4: ...and possibly causing camera malfunction Avoid obstructing the lens or the flash when you capture an image When using this camera in low temperatures you may experience the following These are not cam...

Page 5: ...ound 065 Shutter sound 065 Start up sound 065 AF sound 066 Setupmenu 028 How to use the Movie clip mode 029 Recording HD High Definition movie clips 029 Recording the movie clip without sound 030 Thin...

Page 6: ...093 Face List Edit 093 Voice memo 094 DPOF 096 Copy To Card 097 PictBridge 066 Display 066 Setting the Grid Line 066 Function Description 066 Start up image 067 Display Bright 067 Quick view 067 Displ...

Page 7: ...orecontactingaservicecenter 104 Specifications 107 Transferringfilestoyourcomputer forWindows 107 For Windows users 111 Transferringfilestoyourcomputer forMac 111 For Mac users 113 UsingtheSamsungRAWC...

Page 8: ...your nearest Samsung dealer or Samsung service center Parts and accessories illustrated below may differ from exact appearance Package Contents Camera Rechargeable battery AC adapter USB cable Neck s...

Page 9: ...Microphone AF Lamp Self timer lamp Lens Flash pop up button p 34 Built in flash p 34 Speaker Hook for neck strap p 10 Diopter adjustment lever p 34 Zoom T Lever Digital zoom Zoom W Lever Thumbnail Sh...

Page 10: ...iewfinder EVF p 36 Play mode button Smart dial p 11 EVF LCD button p 35 Video shooting button MENU button Mode Dial POWER button Fn Delete button Hook for neck strap AE lock image protection button p...

Page 11: ...ert the lens cap string into the hole in the lens cap 2 Attach the lens cap to the neck strap 3 Attach the lens cap as shown in the image Attaching the neck strap Attach the neck strap as shown below...

Page 12: ...attery chamber Smart dial When pressing the Smart Dial Move UP DOWN LEFT RIGHT Execute options in the shooting mode c Change the display d Change the timer option e Change the close up shooting option...

Page 13: ...hen flash battery is charging The lamp blinks When the USB cable is inserted to a PC The lamp lights up LCD monitor turns off after initializing the device Transmitting Data with a PC The lamp blinks...

Page 14: ...se figures are measured under Samsung s standard conditions and shooting conditions and may vary depending on the user s methods Important information about battery usage When camera is not in use tur...

Page 15: ...ime remove other device Camera can not be detected using the front side USB port of computer In this case use the back side USB port of computer If the USB port of the PC doesn t meet the Power output...

Page 16: ...ce coin key watch and so on Use the 2nd Advanced Lithium Batteries with the guarantee under the manufacturing company Do not try to disassemble or perforate the product by using the sharp pin Do not g...

Page 17: ...actual battery status Insert the battery as shown If the camera does not turn on after you have inserted battery please check whether the battery direction is right When the battery chamber cover is o...

Page 18: ...different camera Turn off the camera power whenever the memory card is being inserted or removed Repeated use of the memory card will eventually reduce the memory card s performance Should this be the...

Page 19: ...imes can be changed by the zoom operation The Zoom W T lever doesn t function during the movie recording Several videos were recorded in succession to determine the total recording time When using a 1...

Page 20: ...displayed again after setting up the date time time zone and language Set up the date time time zone and language before using this camera Setting up the language 1 Select the Language menu by pressi...

Page 21: ...ash p 41 8 Self timer p 43 9 Macro p 38 10 Smart Range p 54 11 Photo Style Selector p 57 12 Face Detection Smart Filter p 49 58 13 Camera shake compensation Without Sound p 60 63 14 Date Time 2010 03...

Page 22: ...und On Volume Medium Off Low Medium High Beep Sound 1 Shutter Sound 1 Start Sound Off AF Sound On Volume Medium Exit Back Shooting Sound Display Settings Beep Sound Shutter Sound Start Sound AF Sound...

Page 23: ...s can be set manually Aperture Shutter Priority Aperture values or shutter speed can be set manually Manual Various shooting options including the shutter speed and the aperture values can be set manu...

Page 24: ...cognizes scenes only when the flash is set to off The camera operates the Tripod mode after checking the shooting condition on the tripod for a certain time Despite using a tripod the camera may not s...

Page 25: ...e aperture value or shutter speed an ap propriate aperture value or shutter speed is configured automatically When the user configures an aperture value the camera adjusts the shutter speed automatica...

Page 26: ...ial 4 Point the camera towards the subject and compose the image by using the LCD monitor 5 Press the Shutter button to capture an image Starting the recording mode How to use the User Setting shootin...

Page 27: ...e Nightscene modes Starting the recording mode Take a photo of portraits by setting options to clear facial imperfections 1 Select the Beauty Shot mode by using the Mode dial p 22 2 Press the Up Down...

Page 28: ...rks Firework scenes Beach Snow For ocean lake beach and snowscape scenes Starting the recording mode Use the menu to easily configure optimal settings for a variety of shooting situations 1 Select the...

Page 29: ...and compose the image by using the LCD monitor 3 Press the shutter button once and movie clips are recorded for as long as the available recording time allows Movie clips will still be recorded if the...

Page 30: ...rding the movie clip without sound What is H 264 MPEG4 part10 AVC With its high compression rate and the small file size it is a standard for the digital video codec It supports the recording function...

Page 31: ...see page 87 function Things to Watch Out for When Taking Pictures Pressing the shutter button down half way Lightly press the shutter button to confirm focus and flash battery charge Press the shutte...

Page 32: ...e and fully depress the shutter button 1 The image to be captured 2 Press the shutter button halfway and focus on the subject Using the Focus Lock 1 Ensure the subject is in the center of the autofocu...

Page 33: ...abled even if you operate the Zoom W T lever Used for taking an image or recording voice in the Recording mode In Movie clip mode Pressing the shutter button down fully starts the process for record i...

Page 34: ...operation sound of the Zoom W T lever Select Zoom Mute from the recording menu during video recording to disable the recording of zoom sound You may notice a decrease in image quality when using the d...

Page 35: ...e page 61 for setting procedure In the playback mode this button can be used as an image protec tion button p 92 When a background is brighter than a subject or when intentionally turning on the flash...

Page 36: ...ensation button in the shooting mode 2 Set a desired exposure compensation value by using the LEFT RIGHT but tons or the Smart Dial 3 Press the OK button to save a configured value and the setting for...

Page 37: ...as the LCD monitor and is used when it is difficult for the user to see the LCD monitor due to bright lighting Pressing the EVF LCD button will switch between the electronic viewfinder and the LCD mon...

Page 38: ...sub menu or for confirming data This button is used when moving to or saving the changed data on the menu screen Press the UP DOWN LEFT RIGHT buttons to shift the AF points OK AF point button Histogr...

Page 39: ...ed images If the bars in the histogram are higher towards the right the image may be too bright If the bars are higher on the left the image may be too dark If the light ing conditions are too bright...

Page 40: ...80 Infinity 10 Infinity 10 80 Tele Tele Tele 170 Infinity 170 Infinity 80 150 Note that the picture may be blurred if manual focusing is not performed properly How to Set Focus Manually If it is diffi...

Page 41: ...focus range Macro Down button Mode Normal Auto Macro Macro Super Macro Manual Focus o o o o o o o o o o o o o o o o o o o o o o o o o Mode SCENE Normal Auto Macro Macro Super Macro Manual Focus o o o...

Page 42: ...e The speck is caused by the flash light reflecting off atmospheric dust If flash doesn t pop up can not use the flash Flash Left button When the menu is displayed on the LCD monitor pressing the Left...

Page 43: ...ro The flash operates with a slow shutter speed to obtain a balanced correct exposure In poor lighting conditions the camera shake warning indicator will display on the LCD monitor Red eye reduction W...

Page 44: ...timer button This function is used when the photographer would also like to be in the image If you operate the Self timer button during the self timer operation the self timer function is cancelled Us...

Page 45: ...ntil the desired mode indicator displays on the LCD monitor A 10 second 2 second or Double Self timer icon appears on the LCD monitor 3 When you press the shutter button the picture will be taken afte...

Page 46: ...button to select the Shooting menu and press the Right OK button How to Enable Functions Using the MENU Button Up Down button Right OK button Shooting Sound Display Settings WB Fine tuning ISO Face De...

Page 47: ...escent_H For shooting under daylight fluorescent types of three way fluorescent lighting Fluorescent_L Shooting under white fluorescent lighting Tungsten For shooting under tungsten standard light bul...

Page 48: ...will be applied starting with the next picture you take The user configured white balance will be remain effective until it is overwritten Shooting Red light Blue light Candle flame Incandescent Halo...

Page 49: ...noise level in the image will increase as the ISO value increases making the image appear coarse When Motion Capture is set ISO speed will be set to Auto ISO setting is available in the Program Apert...

Page 50: ...many people at the same time it will focus on the nearest person The Digital zoom is not activated in this mode When the camera detects a target face the white color focus frame will be displayed over...

Page 51: ...cture is taken in the normal way When taking a picture of smile shot showing teethes or keeping the smiley face of your subject helps detecting the smile face of the subject Blink Detection If the eye...

Page 52: ...2 Indicate faces that the camera automatically registers The same person can be recognized as a different person and vice versa depending on glasses brightness extreme change of pose or facial express...

Page 53: ...ars Your favorite faces are indicated with a on the face list Smart FR Edit You can register frequently shot faces or edit the registered face list prior to shooting This feature is available only whe...

Page 54: ...Select Face Retouch by pressing the Up Down button 2 Select a desired face retouch by pressing the Left Right button and then press the OK button 3 Press the Shutter button to take an image The highe...

Page 55: ...compression ratio the lower the picture quality Mode Still image mode Icon Sub menu RAW S Fine RAW Fine Super Fine Fine Normal File Format DNG JPEG DNG JPEG JPEG JPEG JPEG Mode Movie clip mode Icon Su...

Page 56: ...he center of the focus area do not use the spot metering as this may result in an exposure error In this circumstance it is better to use exposure compensation Drive mode You can select continuous sho...

Page 57: ...cus Area according to the shooting conditions Center AF The rectangular area in the center of the LCD monitor will be focused Multi AF This camera selects all of available AF point from the 9 AF point...

Page 58: ...y effect If the flash intensity is out of the control range because the exposure value is too high or low the camera may not operate properly You can add various effects to the image without using ima...

Page 59: ...ed Smart Filter by pressing the Left Right button and press the OK button 2 Press the Shutter button to take an image Smart Filter Icon Description Normal No effect Vignetting Apply the retro looking...

Page 60: ...utton 2 Change the Sharpness by pressing the Left Right button 3 Press the Shutter button to take an image Shooting 2 1 0 1 2 2 1 0 1 2 2 1 0 1 2 Back Move Sharpness Contrast Saturation Image Adjust S...

Page 61: ...amera shake warning indicator is not displayed If the subject is moving the captured image may be blurred As the DUAL IS uses the camera s digital signal processor it may take a little longer for the...

Page 62: ...ment the picture is stored In the middle of the sound recording pressing the shutter button will stop the voice memo Shooting Key mapping A desired AEL button can be set AEL Shooting is available whil...

Page 63: ...ter button again File type wav Voice recording mode Pausing while recording a voice Using this function you can record your favorite voice clips into a voice recording file without having to create mu...

Page 64: ...n use your own shooting mode by saving the shooting options which are set in the Program Aperture Shutter Priority and Manual modes Set a desired option and save the setting information How to set the...

Page 65: ...Off Disable scene detection function On Enable scene detection function Shooting Select Off for normal movie recording When you set Smart Scene Detection you cannot set the Photo Style Selector and S...

Page 66: ...ter sound Sound menu If you set sound to ON a beep will sound when buttons are pressed letting you know the camera operation status Beep Sound sub menus Off 1 2 3 Beep Sound Sound If you set AF sound...

Page 67: ...Setting the Grid Line You can select the image that is first displayed on the LCD monitor whenever the camera is turned on Sub menus Off Logo User Image Use a saved image for the start up image with t...

Page 68: ...time the LCD monitor will be turned off automatically Sub menus Off The LCD monitor will not be turned off On If the camera isn t operated during the specified time about 30 SEC the camera power will...

Page 69: ...ompleted message will appear No The memory will not be formatted Be sure to run Format on the following types of memory card A new memory card or an unformatted memory card A memory card that has a fi...

Page 70: ...able cities London Cape Verde Mid Atlantic Buenos Aires Sao Paulo Newfoundland Caracas La Paz NewYork Miami Chicago Dallas Denver Phoenix LA San Francisco Alaska Honolulu Hawaii Samoa Midway Wellingto...

Page 71: ...f after a set amount of time in order to prevent unnecessary battery drainage Sub menus Off The power off function will not operate 1 min 3 min 5 min 10 min The power will turn off automatically if no...

Page 72: ...cture after turning on the TV press the source button on the TV remote control to change to the HDMI mode Depending on the TV it might not change to the HDMI mode although you press the source button...

Page 73: ...t to 480p NTSC or 576p PAL it is only available to play back the image movie clip voice If the selected HDMI resolution is not supported by HDTV the clear image can not be shown in the screen If you t...

Page 74: ...o a PC or a printer using a USB cable you can manually set Computer or Printer USB sub menus Auto Automatically enables an external device connected with a USB cable Computer Sets computer connection...

Page 75: ...elect the recorded movie clip that you want to play back by using the Left Right button 2 Press the OK button to play back a movie clip file To pause a movie clip file while playing it back press the...

Page 76: ...ht button 2 Press the OK button to play back a recorded voice file To pause a recorded voice file while playing it back press the OK button again To resume playback of the voice file press the OK butt...

Page 77: ...p 74 2 Voice Memo p 93 3 DPOF p 94 4 Protect p 92 5 Smart Face Recognition p 51 6 Folder name File name 100 0010 p 69 7 Memory indicator 8 Battery p 16 9 Histogram p 38 10 ISO 80 6400 p 48 11 Apertur...

Page 78: ...ver to the right Play mode button If you have turned on the camera by pressing the POWER button you can press the Play mode button once to switch to Play mode and press it again to switch to Recording...

Page 79: ...Album screen 3 Select the file by pressing the Up Down Left Right buttons 4 Press the Delete button to delete the selected file 9 Thumbnail Window 20 Thumbnail Window When Smart Album feature runs or...

Page 80: ...o enlarge and turn the lever to the right 2 Different parts of the image can be viewed by pressing the 5 function button 3 Turning the lever to the left will zoom back to the original full sized image...

Page 81: ...mage with a voice memo a voice file or a movie clip During playback Temporarily stops playback In Pause mode Resumes playback Info DISP Up button When the menu is displayed on the LCD monitor the Up b...

Page 82: ...on Left Right Down MENU buttons activate the following Left button While the menu is showing the Left button operates as a direction button While the menu is not showing press the Left button to selec...

Page 83: ...Selector Normal Soft p 85 Vivid Forest Retro Cool Calm Classic Negative Custom RGB Smart Filter Off Miniature p 86 Vignetting Fish eye Sketch Defog Image Adjust Off ACB p 87 Red eye Fix Face Retouch...

Page 84: ...the camera is connected to a PictBridge supporting printer direct connection to the camera sold separately with a USB cable Setting up the play back function using the LCD monitor Menus are subject to...

Page 85: ...A large sized image can be resized to a smaller sized image but not vice versa Only JPEG images can be resized Movie clip H 264 Voice recording WAV files can t be resized You can change the resolutio...

Page 86: ...e button and press the MENU button 2 Click the Up Down button from the Edit menu to select Photo Style Selector menu tab and press the OK button 3 Select a desired sub menu by pressing the Left Right...

Page 87: ...OK button 3 Select a desired sub menu by pressing the Left Right button and press the OK button Smart Filter Smart Filter Icon Description Off No effect Miniature Make a photo of a life size location...

Page 88: ...electing the face retouch will be displayed 2 Change the face retouch by pressing the Left Right button 3 Press the OK button and the image will be saved as a new file name Red eye Removal Red eye eff...

Page 89: ...rast of the image 1 Select by pressing the Left Right button and press the OK button Then a bar for selecting the contrast will be displayed 2 Change the contrast by pressing the Left Right button 3 P...

Page 90: ...de Show is closed after one cycle Repeat The Slide show is repeated until cancelled 3 Press the OK button and the slide show will be started To pause the slide show while playing it back press the OK...

Page 91: ...Select1 will be saved as Select2 automatically You can change and cancel the images which were saved as Select1 Select2 and Select3 Press the Fn button and the settings are saved 3 Select Play or Repe...

Page 92: ...an image OK button Select the image for deletion mark Fn Button Press the Fn button to display the confirmation message Select the Yes menu and press the OK button to delete marked images All Display...

Page 93: ...Up Down button and press the OK button Select Selection window for an image to be protected released is displayed Up Down Left Right Select an image OK button Protect release the image Fn button Your...

Page 94: ...you use a memory card 1 Press the Up Down button to select the Face List Edit menu and press the Right OK button 2 Select a desired menu by pressing the Up Down button and then press the OK button Edi...

Page 95: ...This function allows you to embed printing quantity information on a stored image 1 Press the Up Down button and select the DPOF menu tab And then press the Right button 2 Press the Right button agai...

Page 96: ...d press the Right button again Sub menu will display 3 Select a desired sub menu by pressing the Up Down button and press the OK button Select Selection window to change the printed size of the image...

Page 97: ...e Copy to Card command will copy only some of the images and display Memory Full message Then the system will return to the playback mode Please be sure to delete any unnecessary files to free up spac...

Page 98: ...USB cable 2 Once the camera is turned on the camera automatically recognizes the printer and is connected to it If automatic connection fails set the USB menu to Printer p 73 For a printer that can en...

Page 99: ...ate Print and File Name Print menus for printed pictures 1 Press the Menu button and the PictBridge menu will display 2 Use the Up Down button to select the desired menu and then press the Right butto...

Page 100: ...or highly flammable materials Do not leave this camera in places subject to dust chemicals like naphthalene and mothballs high temperature and high humidity Keep this camera with silica gel in a herm...

Page 101: ...LCD assemblies If this does not work lens cleaning paper with lens cleaning fluid can be used Clean the camera body with a soft cloth Do not allow this camera to come into contact with solvent materia...

Page 102: ...are no images stored on the memory Take images Insert a memory card that is holding some images File Error File error Delete the file Memory card error Contact a camera service center Low Battery Ther...

Page 103: ...when pressing the Shutter button There is insufficient memory capacity Delete unnecessary image files The memory card has not been formatted Format the memory card p 68 The memory card is exhausted In...

Page 104: ...The external monitor has not been connected properly with the camera Check the connection cables There are incorrect files on the memory card Insert a memory card that has correct files When using th...

Page 105: ...000 sec A S Manual User 16 1 2 000 sec Continuous AEB 1 4 1 2 000 sec Exposure Control Program AE Metering Multi Spot Center weighted Face Detection AE Compensation 2EV 1 3EV steps ISO Auto 80 100 20...

Page 106: ...Multi slide show Movie Clip Multi slide show Slide show with Effect Music Shooting Single Continuous High Speed Motion Capture AEB Self timer 10 sec 2 sec Double Movie Clip With Audio or without Audi...

Page 107: ...Rechargeable battery SLB 11A 3 8V 1130mAh Included battery may vary depending on sales region Dimensions WxHxD 116 1 82 8 91 1mm excluding protrusions Weight Approx 396g without battery and card Opera...

Page 108: ...024 X 768 pixels 16 bit color display compatible monitor 1280 X 1024 pixels 32 bit color display recommended Microsoft DirectX 9 0c or later For Windows users Using a self assembled PC or a PC and OS...

Page 109: ...ith the USB cable You must plug the end of the cable with the indicator light into your camera If the cable is reversed it may damage your files The manufacturer is not responsible for any loss of dat...

Page 110: ...camera fails to connect a pop up window will appear Select Computer Disconnecting the camera for Windows XP The way to disconnect the USB cable for Windows Vista 7 is similar 1 If the status lamp on y...

Page 111: ...the Intelli studio icon on your Windows desktop The Intelli studio allows you to play back and edit files You can also upload files to websites such as Flickr or YouTube For details select Menu Help...

Page 112: ...tion 1 Open menus 2 Display files in the selected folder 3 Change to the Photo edit mode 4 Change to the Video edit mode 5 Change to the Sharing mode You can send files by email or upload files to web...

Page 113: ...disk icon 4 Transfer photos or videos to the computer 1 Connect your camera to a Macintosh computer with the USB cable You must plug the end of the cable with the indicator light into your camera If t...

Page 114: ...it functions are listed below Menu bar Image editing tools Exposure bias Compensates the exposure value White balance Adjusts the white balance value Tone Adjusts the contrast Color Changes the color...

Page 115: ...ult whichever you change first The following images show how you can change the exposure to the image using the Samsung RAW Converter You can adjust the exposure by using the menu option as shown in t...

Page 116: ...s Using the Samsung RAW Converter you can handle the JPEG TIFF files as you edit RAW files You can adjust the white balance sharp ness and reducing the noise is also available The following images sho...

Page 117: ...connected to the USB port located on the front of the computer the computer may not recognize the camera Connect the camera to the USB port located on the back of the computer Case 1 USB cable is not...

Page 118: ...ing the DirectX If a PC connected with the camera stops responding while Windows is starting In this case disconnect the PC and the camera and Windows will start If the problem happens continuously se...

Page 119: ...onic accessories should not be mixed with other commercial wastes for disposal Samsung Eco mark It is Samsung s own symbol mark is used to effectively communicate Samsung s environmental friendly prod...

Page 120: ......

Reviews: