background image

46

English

Other Information


x

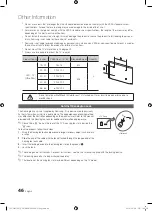
Do not use screws that are longer than the standard dimension or do not comply with the VESA standard screw 
specifications. Screws that are too long may cause damage to the inside of the TV set.


x

For wall mounts that do not comply with the VESA standard screw specifications, the length of the screws may differ 
depending on the wall mount specifications.


x

Do not fasten the screws too strongly; this may damage the product or cause the product to fall, leading to personal 
injury. Samsung is not liable for these kinds of accidents.


x

Samsung is not liable for product damage or personal injury when a non-VESA or non-specified wall mount is used or 
the consumer fails to follow the product installation instructions.


x

Do not mount the TV at more than a 15 degree tilt.


x

Always use two people to mount the TV to a wall.

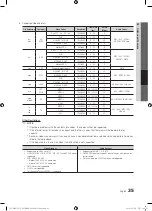
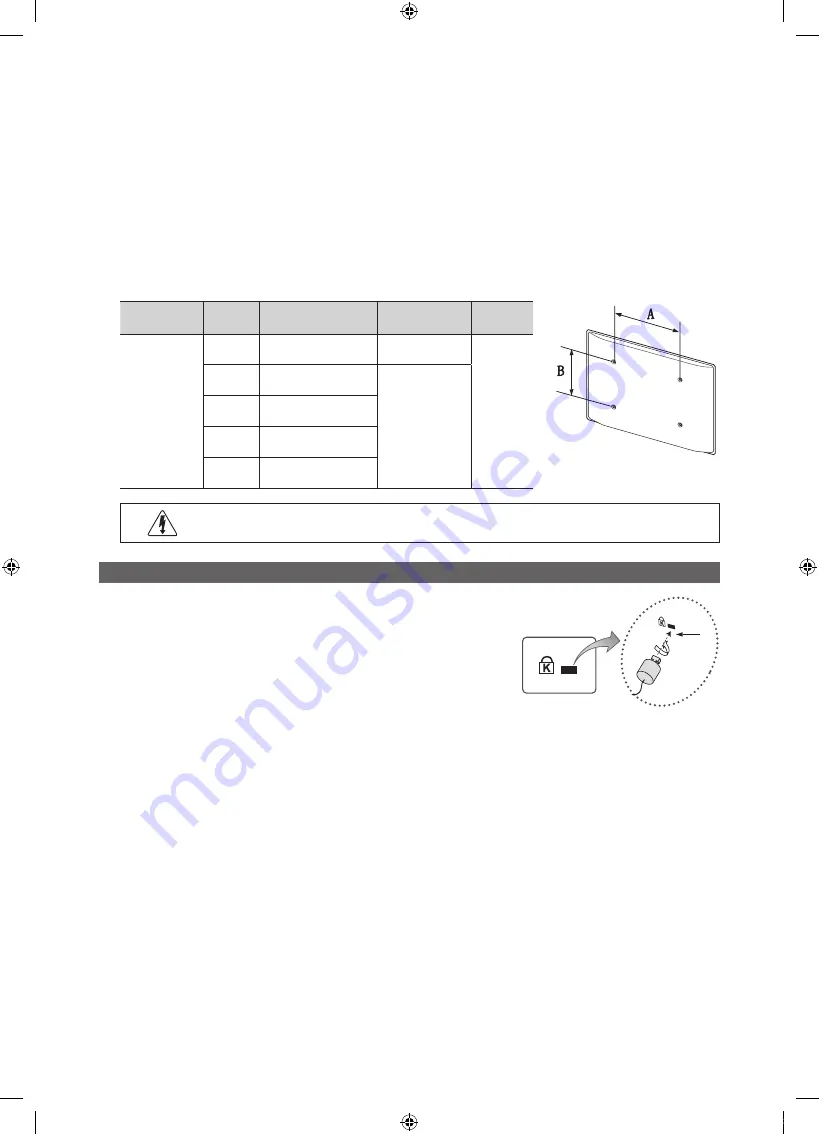
Product Family

inches

VESA Spec. (A * B)

Standard Screw

Quantity

LED - TV

[Ultra-Slim]

19~22

75 X 75

M4

4

23~29

200 X 100

M8

32~37

200 X 200

40~55

400 X 400

56~65

600 X 400

Do not install your Wall Mount Kit while your TV is turned on. It may result in personal injury due to 
electric shock.

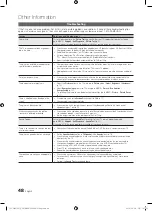
Anti-theft Kensington Lock

The Kensington Lock is not supplied by Samsung. It is a device used to physically 
fix the system when using it in a public place. The appearance and locking method 
may differ from the illustration depending on the manufacturer. Refer to the manual 
provided with the Kensington Lock for additional information on proper use.


Please find a “

K

” icon on the rear of the TV. A kensington slot is beside the 

K

” icon.

To lock the product, follow these steps:

1. 

Wrap the Kensington lock cable around a large, stationary object such as desk 
or chair.

2. 

Slide the end of the cable with the lock attached through the looped end of the 
Kensington lock cable.

3. 

Insert the locking device into the Kensington slot on the product 

1

.

4. 

Lock the lock.


These are general instructions. For exact instructions, see the User manual supplied with the locking device.


The locking device has to be purchased separately.


The location of the Kensington slot may be different depending on the TV model.

1

<Optional>

<TV Rear>

[UC5000(55)_USA]BN68-03004A-01Eng.indb   46

2010-06-28   오후 1:06:58

Summary of Contents for UN55C5000

Page 1: ...G WORLDWIDE If you have any questions or comments relating to Samsung products please contact the SAMSUNG customer care center Country Customer Care Center Web Site Address CANADA 1 800 SAMSUNG 726 7864 www samsung com Samsung Electronics Canada Inc Customer Service 55 Standish Court Mississauga Ontario L5R 4B2 Canada U S A 1 800 SAMSUNG 726 7864 www samsung com Samsung Electronics America Inc 105...

Page 2: ...nada on SAMSUNG products purchased in the United States for the warranty period originally specified and to the Original Purchaser only The above described warranty repairs must be performed by a SAMSUNG Authorized Service Center Along with this Statement the Original Limited Warranty Statement and a dated Bill of Sale as Proof of Purchase must be presented to the Service Center Transportation to ...

Page 3: ...g Programs 20 Other Features 21 Picture In Picture PIP 23 y y Support Menu 23 Advanced Features y y Network Connection 25 Connecting to a Wired Network 25 Connecting to a Wireless Network 27 y y Media Play 32 Connecting a USB Device 32 Connecting to your PC through a network 32 Screen Display 34 Playing Multiple Files 37 Media Play Additional Functions 37 y y Anynet 39 Setting Up Anynet 40 Switchi...

Page 4: ...luded with your LED TV If any items are missing contact your dealer The items colors and shapes may vary depending on the models y y Remote Control BN59 01041A Batteries AAA x 2 y y Owner s Instructions y y Warranty Card Safety Guide Quick Setup Guide y y Cleaning Cloth BN63 01798B y y Power Cord Blanking Bracket Screw 1EA Cable Tie Holder Wire stand BN63 06543A BN61 05596A BN61 05491A Holder Wire...

Page 5: ... L8 at position 1 and then fasten three screws M4 X L8 at position 2 NOTE x x Make sure to distinguish between the front and back of the Stand and Guide Stand when assembling them x x Make sure that at least two persons lift and move the LED TV x x Stand the product up and fasten the screws If you fasten the screws with the LED TV placed down it may lean to one side 5EA M4 X L12 A B 5EA M4 X L8 s ...

Page 6: ...the y buttons as you would use the and buttons on the remote control z Changes the channels In the OSD use the z buttons as you would use the and buttons on the remote control P Power Turns the TV on or off Power Indicator Blinks and turns off when the power is on and lights up in standby mode Standby mode Do not leave your TV in standby mode for long periods of time when you are away on a holiday...

Page 7: ...battery usage time Displays Favorite Channel Lists on the screen p 13 Displays information on the TV screen Selects the on screen menu items and changes the values seen on the menu Exits the menu S MODE Press to select the sound mode p 18 SLEEP Use to set the sleep timer function p 19 MTS Press to choose stereo mono or Separate Audio Program SAP broadcast p 18 P MODE Press to select the picture mo...

Page 8: ...press and hold MENU for 5 sec 3 Selecting an antenna Press the or button then press the ENTERE button Select Air Cable or Auto 4 Selecting a channel Press the or button then press the ENTERE button Select the channel source to memorize When setting the antenna source to Cable a step appears allowing you to assign numerical values channel frequencies to the channels For more information refer to Ch...

Page 9: ... problem occurs ask the manufacturer of the external device about the HDMI version and if out of date request an upgrade x x Be sure to purchase a certified HDMI cable Otherwise the picture may not display or a connection error may occur Using a Component up to 1080p or Audio Video 480i only Cable Available devices DVD Blu ray player cable box STB satellite receiver VCR When connecting to AV IN th...

Page 10: ...ble box STB Set Top Box satellite receiver and is connected to the TV via HDMI only 2 CH audio will be heard from the amplifier or DVD home theater If you want to hear 5 1 CH audio connect the digital audio out jack from your DVD Blu ray player cable box STB satellite receiver directly to an amplifier or home theater AUDIO OUT Connects to the audio input jacks on your amplifier DVD home theater x ...

Page 11: ...469 37 861 37 500 37 879 48 077 46 875 48 363 56 476 60 023 67 500 63 981 79 976 45 000 49 702 62 795 60 000 47 712 55 935 70 635 65 290 59 940 72 809 75 000 60 317 72 188 75 000 60 004 70 069 75 029 75 000 60 020 75 025 60 000 59 810 74 934 60 000 60 015 59 887 74 984 59 954 25 175 31 500 31 500 40 000 50 000 49 500 65 000 75 000 78 750 108 000 108 000 135 000 74 250 83 500 106 500 108 000 85 500...

Page 12: ...ment in the OSD may differ depending on the selected menu 6 ENTERE Press ENTERE to confirm the selection 7 EXITe Press EXIT Changing the Input Source Source List Use to select TV or an external input sources such as a DVD Blu ray player cable box STB satellite receiver O O MENUm Input Source List ENTERE SOURCE TV AV Component PC HDMI1 DVI HDMI2 HDMI3 HDMI4 USB You can only choose external devices ...

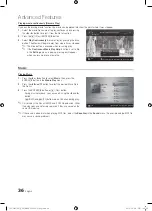
Page 13: ...d Program Using Favorite Channels O O MENUm Channel Channel List ENTERE Add to Favorite Delete from Favorite t Set channels you watch frequently as Favorites 1 Select a channel and press the TOOLS button 2 Add or delete a channel using the Add to Favorite or Delete from Favorite menu respectively To show all Favorite channels click on the button shown on the right FAV CH Memorizing Channels O O ME...

Page 14: ...wing You can set a desired channel to be displayed automatically at the reserved time Set the current time first to use this function 1 Press the buttons to select the desired channel in Channel List 2 Press the TOOLS button then select Timer Viewing 3 Scroll up or down to adjust the settings in the box or use the numeric buttons on your remote to enter the date and time If you selected Once Every...

Page 15: ... TV Economical Solutions The Eco Function can be used to enhance your power savings Eco Solution O O MENUm Picture Eco Solution ENTERE Energy Saving Off Low Medium High Picture Off Auto This adjusts the brightness of the TV in order to reduce power consumption If you select Picture Off the screen is turned off but the sound remains on Press any button except the volume button to turn on the screen...

Page 16: ...lable when the picture mode is set to Movie and when the external input is set to all input Some external devices may not support this function Interval Select interval to adjust Red Adjust the red level Green Adjust the green level Blue Adjust the blue level Reset Resets the 10p White Balance to its default settings Flesh Tone Emphasize pink Flesh Tone Edge Enhancement Off On Emphasize object bou...

Page 17: ...een When the signal is weak try other options until the best picture is displayed Auto Visualization When changing analog channels displays signal strength Only available for analog channels When bar is green is that the best possible signal MPEG Noise Filter Off Low Medium High Auto Reduces MPEG noise to provide improved picture quality HDMI Black Level Normal Low Selects the black level on the s...

Page 18: ...tween the right and left speaker 100Hz 300Hz 1kHz 3kHz 10kHz Bandwidth Adjustment Adjusts the level of specific bandwidth frequencies Reset Resets the equalizer to its default settings Sound Settings O O MENUm Sound ENTERE SRS TruSurround HD Off On t standard sound mode only This function provides a virtual 5 1 channel surround sound experience through a pair of speakers using HRTF Head Related Tr...

Page 19: ...us timer features of the TV O O The current time will appear every time you press the INFO button If you disconnect the power cord you have to set the clock again Clock Mode Auto Manual Auto Set the current time automatically using the time from a digital channel The antenna must be connected in order to set the time automatically Manual Set the current time manually Depending on the broadcast sta...

Page 20: ... of the V Chip restrictions are set up or changed NOTE x x V Chip is not available in HDMI Component or PC mode x x The default PIN number of a new TV set is 0 0 0 0 x x Allow All Press to unlock all TV ratings x x Block All Press to lock all TV ratings V Chip Lock Off On You can block rated TV Programs TV Parental Guidelines You can block TV programs depending on their rating This function allows...

Page 21: ...ke several seconds x x The Downloadable U S Rating menu is available for use after information is downloaded from the broadcasting station However depending on the information from the broadcasting station it may not be available for use x x Parental restriction levels differ depending on the broadcasting station The default menu name and Downloadable US Rating change depending on the downloaded i...

Page 22: ...igital Caption Options are available only when Default and Service1 Service6 can be selected in Caption Mode x x The availability of captions depends on the program being broadcasted x x The Default setting follows the standards set by the broadcaster x x The Foreground and Background cannot be set to have the same color x x You cannot set both the Foreground Opacity and the Background Opacity to ...

Page 23: ...ar or there is noise in the test pattern select Yes There may be a problem with the TV Contact Samsung s Call Center for assistance 1 800 SAMSUNG No If the test pattern is properly displayed select No There may be a problem with your external equipment Please check your connections If the problem persists refer to the external device s user manual Sound Test Use the built in melody sound to check ...

Page 24: ...pgrade the software using the Internet First configure your network For detailed procedures on using the Network Setup refer to the Network Connection instructions If the internet connection doesn t operate properly the connection may be broken Please retry downloading If the problem persists download by USB and upgrade Alternative Software backup Displays the software version downloaded through B...

Page 25: ...ocol DHCP Modems and routers that support DHCP automatically provide the IP address subnet mask gateway and DNS values your TV needs to access the Internet so you don t have to enter them manually Most home networks are Dynamic Networks Some networks require a Static IP address If your network requires a Static IP address you must enter the IP address subnet mask gateway and DNS values manually on...

Page 26: ...a Static IP address Getting the Network Connection Values To get the Network connection values on most Windows computers follow these steps 1 Right click the Network icon on the bottom right of the screen 2 In the pop up menu that appears click Status 3 On the dialog that appears click the Support tab 4 On the Support Tab click the Details button The Network connection values are displayed How to ...

Page 27: ...ed by another device nearby this will result in interference and communication failure x x If you apply a security system other than the systems listed below it will not work with the TV x x If you select the Pure High throughput Greenfield 802 11N mode and set your AP s Security Encryption type to WEP TKIP or TKIPAES WPS2Mixed your Samsung TV will not support the connection in compliance with new...

Page 28: ...tion or manual configuration To use this function you must set SWL Samsung Wireless Link to Off in the TV s on screen menu You can check for equipment that supports Samsung Auto Configuration on www samsung com How to set up using Samsung Auto Configuration 1 Place the AP and TV next to each other and turn them on Because AP booting times vary you may have to wait approximately two minutes for you...

Page 29: ...elect Internet Protocol Setup and then press the ENTERE button Press the or button to select Auto and then press the ENTERE button 3 Press the button to go to Select a Network and then press the ENTERE button The Network function searches for available wireless networks When done it displays a list of the available networks 4 In the list of networks press the or button to select a network and then...

Page 30: ... doesn t operate normally check the Network Name SSID and Security Key again An incorrect Security Key may cause a malfunction Network Setup Manual If the other methods do not work you need to enter the Network setting values manually Getting the Network Connection Values To get the Network connection values on most Windows computers follow these steps 1 Right click the Network icon on the bottom ...

Page 31: ...120 seconds message appears press the PBC button on the device to connect For more information refer to the wireless network setup manual of the device to be connected 5 If the TV connects properly to the device after the count in the message box starts then the message box disappears automatically If the connection fails please retry after 2 minutes If Your TV Fails to Connect to the Internet You...

Page 32: ... Manager and the users manual from www samsung com 1 For more information on how to configure your network refer to Network Connection p 25 You are recommended to locate both the TV and the PC in same subnet The first 3 parts of the subnet address of the TV and the PC IP addresses should be the same and only the last part the host address should be changed e g IP Address 123 456 789 2 Using a LAN ...

Page 33: ... HDD to the dedicated USB 1 HDD port x x Do not disconnect the USB device while it is loading x x The higher the resolution of the image the longer it takes to display on the screen x x The maximum supported JPEG resolution is 15360X8640 pixels x x For unsupported or corrupted files the Not Supported File Format message is displayed x x If the files are sorted by Basic View up to 1000 files can be...

Page 34: ...xt string based Information You can ascertain the selected file name and the number of files and page Sort List Section Displays the sorting standard The sorting standard is different depending on the contents Operation Buttons Red Change Device Selects a connected device B Green Preference Sets the file preference not supported in Basic view Yellow Select Selects multiple files from file list Sel...

Page 35: ...PEG2 1920x1080 24 25 30 30 H 264 1920x1080 6 30 25 ts tp trp TS MPEG2 1920x1080 24 25 30 30 AC3 AAC MP3 DD HE AAC H 264 1920x1080 6 30 25 VC1 1920x1080 6 30 25 Other Restrictions NOTE x x If there are problems with the contents of a codec the codec will not be supported x x If the information for a Container is incorrect and the file is in error the Container will not be able to play correctly x x...

Page 36: ...ia Play menu 2 Press the button to select the desired Music file in the file list 3 Press the ENTERE button or Play button During music playback you can search using the and button REW and µ FF buttons do not function during play Only displays the files with MP3 and PCM file extension Other file extensions are not displayed even if they are saved on the same USB device If the sound is abnormal whe...

Page 37: ...n the desired group 2 Press the TOOLS button and select Play Current Group Media Play Additional Functions Sorting the file list Press the Blue button in the file list to sort the files Category Operation Videos Music Photos Basic View Displays the whole folder You can view the photo by selecting the folder Title Sorts and displays the file title in Symbol Number Alphabet Special order Preference ...

Page 38: ...peed during the slide show Background Music You can set and select background music when watching a slide show Zoom You can zoom into images in full screen mode Rotate You can rotate images in full screen mode Information You can see detailed information about the played file Settings Using the Setup Menu Continuous Movie Play Help Resume Play On Off Select to display the help pop up message for c...

Page 39: ...Input on the Home Theater x x When following the connection above the Optical jack only outputs 2 channel audio You will only hear sound from the Home Theater s Front Left and Right speakers and the subwoofer If you want to hear 5 1 channel audio connect the DIGITAL AUDIO OUT OPTICAL jack on the DVD Satellite Box i e Anynet Device 1 or 2 directly to the Amplifier or Home Theater not the TV x x You...

Page 40: ...f if recording is in progress May not be enabled depending on the device Switching between Anynet Devices 1 Anynet devices connected to the TV are listed If you cannot find a device you want press the Red button to refresh the list 2 Select a device and press the ENTERE button You can switch to the selected device The Device List menu will only appear when you set Anynet HDMI CEC to On in the Appl...

Page 41: ... or Plug Play initial setup etc When connecting or removing the HDMI cable please make sure to search devices again or turn your TV off and on again Check if the Anynet Function of Anynet device is set on I want to start Anynet Check if the Anynet device is properly connected to the TV and check if the Anynet HDMI CEC is set to On in the Anynet Setup menu Press the TOOLS button to display the Anyn...

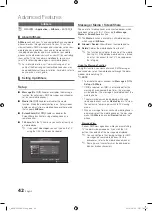
Page 42: ...sage Media or ScreenShare function The Media function is available in all mobile devices which support AllShare Allowed Denied Allows Blocks the mobile phone Delete Deletes the mobile phone from the list This function only deletes the name of the mobile from the list If the deleted mobile device is turned on or trys to connect to the TV it may appear on the list again Using the Message Function Us...

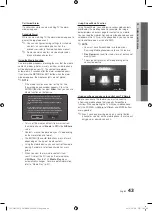
Page 43: ... For more detail information refer to Media Play p 32 Using ScreenShare Function Using ScreenShare you can browse various web contents provided by the mobile phone For example the image below displays an access page for contents on a mobile You can read the mobile s files and view the phone book and calendar on the TV Also in the phone book you can make a call to another person or send to SMS NOTE...

Page 44: ...le Tie so that the cables are not visible through the transparent stand 3 1 2 1 2 3 Wall Mount Type Do not pull the cables too hard when arranging them This may cause damage to the product s connection terminals Other Information UC5000 55 _USA BN68 03004A 01Eng indb 44 2010 06 28 오후 1 06 57 ...

Page 45: ...ith the wall mount Contact a technician for assistance when installing the wall mount bracket Samsung Electronics is not responsible for any damage to the product or injury to yourself or others if you elect to install the TV on your own Wall Mount Kit Specifications VESA The wall mount kit is not supplied but sold separately Install your wall mount on a solid wall perpendicular to the floor When ...

Page 46: ... 400 56 65 600 X 400 Do not install your Wall Mount Kit while your TV is turned on It may result in personal injury due to electric shock Anti theft Kensington Lock The Kensington Lock is not supplied by Samsung It is a device used to physically fix the system when using it in a public place The appearance and locking method may differ from the illustration depending on the manufacturer Refer to t...

Page 47: ...o use only the appropriate supplied screw If you use a different screw you can damage your TV 2 Firmly fasten the screw you provided size M4xL20 or similar to the wall or cabinet where the TV is to be installed If you fasten the screw to the wall we recommend you drive the screw into a stud If that is not possible use a molly to anchor the screw 3 Tie the TV Holder cord to the screw fastened on th...

Page 48: ...Saving p 15 Try resetting the picture to view the default picture settings go to MENU Picture Picture Reset p 17 There is a dotted line on the edge of the screen If the picture size is set to Screen Fit change it to 16 9 p 17 Change cable satellite box resolution The picture is black and white If you are using an AV composite input connect the video cable yellow to the Green jack of component inpu...

Page 49: ...ure distortion especially with fast moving pictures such as sports and action movies A low signal can cause picture distortion This is not a TV problem PC Connection A Mode Not Supported message appears Set your PC s output resolution so they match the resolutions supported by the TV p 11 PC is always shown on the source list even if a PC is not connected This is normal PC is always shown on the s...

Page 50: ...t audio and picture settings every 30 minutes Change the settings from Store Demo mode to Home Use mode in the Plug Play procedure Press the SOURCE button to select TV mode and go to MENU Setup Plug Play ENTERE p 8 You have intermittent loss of audio or video Check the cable connections and reconnect them Loss of audio or video can be caused by using overly rigid or thick cables Make sure the cabl...

Page 51: ...1080p including premium content ABOUT DIVX VIDEO DivX is a digital video format created by DivX Inc This is an official DivX Certified device that plays DivX video Visit www divx com for more information and software tools to convert your files into DivX video ABOUT DIVX VIDEO ON DEMAND This DivX Certified device must be registered in order to play DivX Video on Demand VOD content To generate the ...

Page 52: ...onal 55 inches 54 6 inches measured diagonally Sound Output 15 W X 2 Dimensions WxDxH Body With Stand 51 1 x 1 2 x 30 7 inches 1298 x 29 9 x 780 0 mm 51 1 x 12 0 x 33 1 inches 1298 x 305 0 x 842 0 mm Weight Without Stand With Stand 45 6 Ibs 20 7 kg 56 0 Ibs 25 4 kg Design and specifications are subject to change without prior notice This device is a Class B digital apparatus For information about ...

Page 53: ...5 6 7 8 UN55C5000 15 7 15 7 36 0 3 8 11 2 3 4 5 0 11 5 NOTE All drawings are not necessarily to scale Some dimensions are subject to change without prior notice Refer to the dimensions prior to performing installation of your TV Not responsible for typographical or printed errors 2010 Samsung Electronics America Inc 1 2 3 4 5 6 7 8 5 8 7 3 6 4 1 2 UC5000 55 _USA BN68 03004A 01Eng indb 53 2010 06 2...

Page 54: ...one 16 Frequency 11 H HDMI 9 39 Home Theater 10 39 I Installation Space 2 L Language 21 License 51 M Media Play 32 Melody 22 Menu Transparency 22 Mono 18 Music 36 N Navigate 12 Network Connection 25 Network Setup 26 O ON OFF button 7 Optimal resolution 11 P Photos 37 Picture Size 16 38 PIP Picture in Picture 23 Plug Play 8 Power Indicator 6 R Receiver 41 Recording 40 Remote Control 7 Repeat Mode 3...

Reviews: