background image

English - 15

How to Navigate Menus

Your TV’s Main and Tools menus contains functions that let you control the TV’s features. For example, in 
the Main menu you can change the size and configuration of the picture, its brightness, its contrast and so 
on. There are also functions that let you control the TV’s sound, channel configuration, energy use, and a 
host of other features. To access the main, on-screen menu, press the 

MENU

m

 button on your remote. 

To access Tools menus, press the 

TOOLS

T

 button. Tools menus are available when the 

TOOLS

T

 menu 

Icon is displayed on the bottom right of the screen.
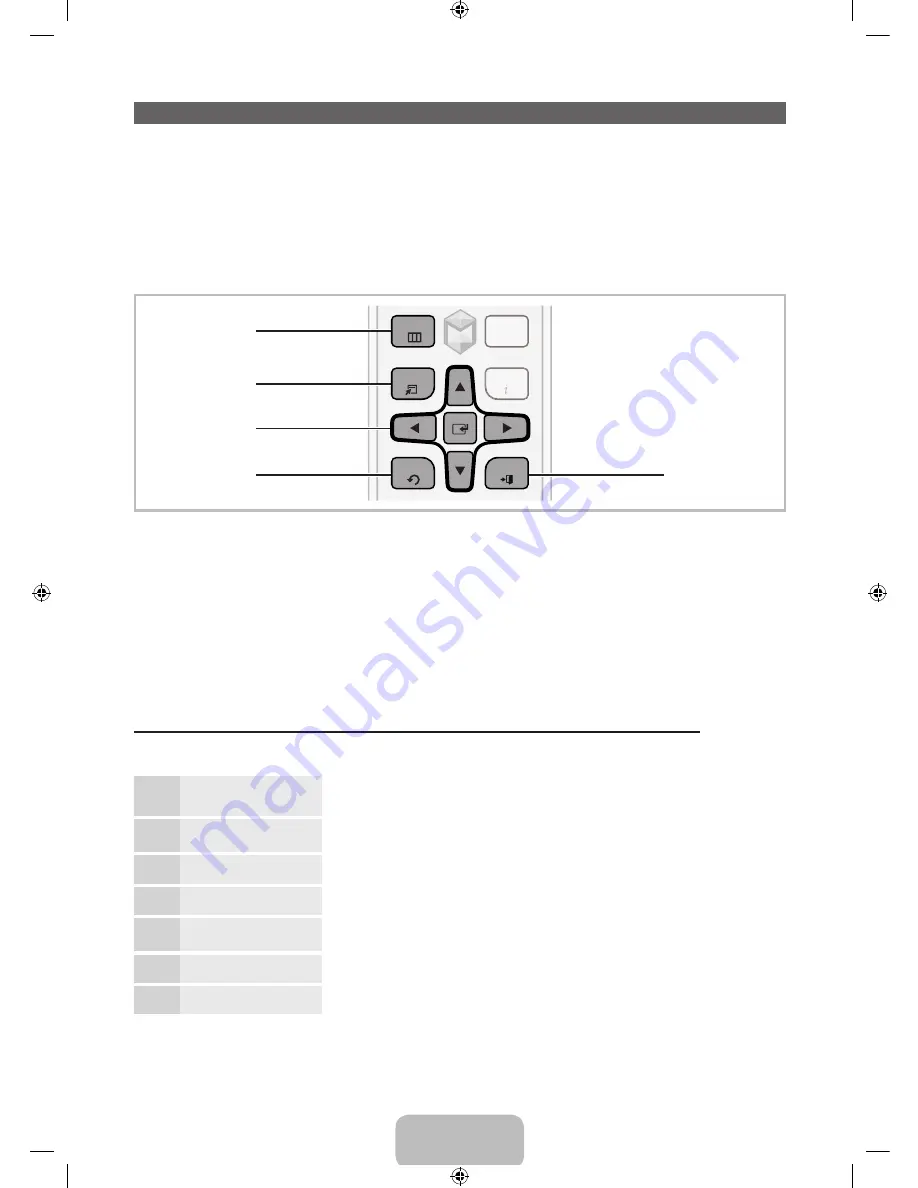
The illustration below displays the buttons on the standard remote you use to navigate the menus and 
select and adjust different functions. For information about using the Smart Touch Control, see page 39.

INFO

TOOLS

RETURN

HISTORY

MENU

EXIT

1

2

3

5

4

1


MENU

m

 button: Displays the main on-screen menu.

2


TOOLS

T

 button: Displays the Tools menus when available.

3


E

 and Direction buttons: Use the Direction buttons to move the cursor and highight an item. Use the 

Enter button to select an item or confirm the setting.

4


RETURN

R

 button: Returns to the previous menu.

5


EXIT

e

 button: Exits the on-screen menu.

How to Operate the Main Menu (OSD - On Screen Display) Using the Standard Remote

The access steps may differ depending on the menu option you select.

1

MENU

m

The main menu options appear on the screen:

Picture

Sound

Channel

Network

System

Support

.

2

u

 / 

d

Select a main menu option on the left side of the screen with the 

u

 or 

d


button.

3

E

Press 

E

 to access the sub-menus.

4

u

 / 

d

Select the desired submenu with the 

u

 or 

d

 button.

5

u

 / 

l

 / 

r

Adjust the value of an item with the

 l

r

u

, or 

button. The 

adjustment in the OSD may differ depending on the selected menu.

6

E

Press 

E

 to confirm the selection.

7

EXIT

e

Press 

EXIT

e

.

[UE8000-ZA]BN68-04495A-00Eng.indb   15

2012-10-11   �� 1:16:41

Summary of Contents for UN46ES8000

Page 1: ...cs Canada Inc Customer Service 55 Standish Court Mississauga Ontario L5R 4B2 Canada U S A 1 800 SAMSUNG 726 7864 www samsung com Samsung Electronics America Inc 85 Challenger Road Ridgefield Park NJ 0...

Page 2: ...bject to the requirements conditions exclusions and limitations of the original Limited Warranty supplied with Samsung Electronics SAMSUNG products and the requirements conditions exclusions and limit...

Page 3: ...23 The EX Link Cable Connection 23 Changing the Input Source 24 Using Smart Hub 25 SMART Interaction 26 Voice Control 27 Motion Control 29 Face recognition 32 The Evolution Kit Slot Kit Sold Separate...

Page 4: ...apps to your taste AllShare Play Lets you access view or play photos videos or music located on USB devices digital cameras cell phones and PCs PCs and cell phones can be accessed wirelessly through y...

Page 5: ...ol AA59 00637A Batteries AAA x 2 User Manual Cleaning Cloth BN63 01798B Warranty Card Safety Guide 3D Active Glasses Power Cord AV Adapter Holder Wire stand Holder Ring x 4 BN39 01154H BN61 08391A BN9...

Page 6: ...ommon plugs and jacks are below Cable Plugs Ports Jacks HDMI USB Optical Warning Do not plug cables in upside down Be sure to check the orientation of the plug before plugging it in Wireless Keyboard...

Page 7: ...stand For more detailed instructions see the separate stand installation guide 1 4 3 2 B A C 2 1 2 1 Place a soft cloth over a table to protect the TV and then place the TV on the cloth screen side do...

Page 8: ...ers if you elect to install the wall mount on your own To order the wall mount kit contact Samsung Customer Care at 1 800 SAMSUNG 1 800 726 7864 VESA Wall Mount Kit Notes and Specifications Install yo...

Page 9: ...ize in inches VESA screw hole specs A B in millimeters Standard Screw Quantity LED TV 26 100 X 100 M4 4 32 40 200 X 200 M6 46 65 400 X 400 M8 Remove the screws in the mounting holes before you install...

Page 10: ...d or a wall mount we strongly recommend you use parts provided by Samsung Electronics only If you use parts provided by another manufacturer it may cause difficulties with the product or result in inj...

Page 11: ...r of the TV camera and then you can use a TV camera after adjust a camera angle When you don t want to use a TV camera we recommend to use after a camera lens fixes to upwards In this case Face recogn...

Page 12: ...ose the Menu Smart Hub or Source press the Controller for more than 1 second Standby mode Your TV enters Standby mode when you turn it off and continues to consume a small amount of electric power To...

Page 13: ...e e Manual Moves the cursor selects the on screen menu items and changes the values seen on the TV s menu Turns the remote control light on or off When on the buttons become illuminated for a moment w...

Page 14: ...ol see page 39 NOTE Install the batteries so that the polarity of the batteries matches the illustration in the battery compartment Use the remote control within 23 feet of the TV Bright light may aff...

Page 15: ...XIT 1 2 3 5 4 1 MENUm button Displays the main on screen menu 2 TOOLST button Displays the Tools menus when available 3 E and Direction buttons Use the Direction buttons to move the cursor and highigh...

Page 16: ...ct the menu language you want using your remote and then select Next The TV will display on screen menus using the language you select beginning with the next step in the Setup process 2 Use Mode Sele...

Page 17: ...F again 3 When done select Next if you have entered a security key or WPS PIN if you have entered a WPS PIN 4 The TV checks the wireless connection If the connection is successful the You are connecte...

Page 18: ...a set top box If you select this option go to 6 Auto Program 2 Step No I don t need to Select if you have a satellite or cable set top box You do not need to run Auto Program If you select this option...

Page 19: ...ice and Motion Control function You can turn the Voice and Motion Control function on or off Select Off or On and then select Next 10 Setup Complete Review the Setup data and then select Close to fini...

Page 20: ...MI the video and audio may not work If this occurs ask the manufacturer of the device about the HDMI version and if it is out of date request an upgrade Be sure to purchase a certified HDMI cable Othe...

Page 21: ...cable The TV will be recognized as the HDMI input In this case the TV may work differently than when you use MHL devices via a MHL cable For the best cable connection to this product use cables no th...

Page 22: ...rom the TV s optical jack When the TV is receiving a DTV signal the TV will send 5 1 CH sound to the home theater receiver When the source is a digital component such as a DVD player Blu ray player ca...

Page 23: ...920 X 1080 60 Hz See the Display Resolution page for all available resolutions page 58 NOTE For an HDMI to DVI cable connection you must use the HDMI IN 1 DVI jack For PCs with DVI video out jacks use...

Page 24: ...following selections appear under Edit Name VCR DVD Cable STB Satellite STB PVR STB AV Receiver Game Camcorder PC DVI PC DVI Devices TV IPTV Blu ray HD DVD DMA Select an input jack and then select th...

Page 25: ...Browser Lets you browse the Internet Schedule Manager Lets you schedule shows and channels for viewing Source Lets you select a connected external video source to view AllShare Play Lets you access v...

Page 26: ...we recommend rotating the TV Camera lens and tucking it into the bezel of the TV This will prevent any inadvertent and unintentional TV Camera functionalities and Face Recognition and Motion Control w...

Page 27: ...ft of your TV When you use microphone attached to your TV your voice may not be recognized because of ambient noise in your surrounding environment or other factors If this occurs try using the microp...

Page 28: ...t to conduct the Noise Test This measures the ambient noise in the room The ambient noise in your room should be below 40 decibels for Voice Control to work properly Mic Speaker Test Select Start with...

Page 29: ...ice Control mode 2 Say the word or phrase you wish to search for 3 The TV executes the spoken function Voice Text Input Mode performance may vary depending on the language spoken your pronunciation th...

Page 30: ...Test failed This means that it is too dark for Motion Control to see your movements It is suggested that you increase the brightness in your room Also check the angle of the camera to be sure it is f...

Page 31: ...cursor or is highlighted Action Clench your fist Return Return to the previous menu Action Spread your hand and rotate counterclockwise Channel Volume Control Changes the channel or adjust the volume...

Page 32: ...Change account information screen appears 4 Select Register Face A pop up message appears If you agree to use Face recognition select OK A QWERTY Keyboard screen appears 5 For security purposes you ma...

Page 33: ...TV with your face level with the camera Password mode Pause RReturn 3 The TV starts Face recognition Face the front of the TV screen Try to hold still A green circle indicates a registered face A red...

Page 34: ...evice called the Evolution Kit The Evolution Kit enables the TV to run a variety of the latest applications for a better user experience The Evolution Kit which may not be available depending on the p...

Page 35: ...as a DHCP Server This TV supports the IEEE 802 11a b g and n communication protocols Samsung recommends using IEEE 802 11n If you play video using IEEE 802 11a b or g the video may not play smoothly M...

Page 36: ...xternal Modem ADSL VDSL Cable TV The Modem Port on the Wall External Modem ADSL VDSL Cable TV IP Router that has a DHCP Server TV Rear Panel Modem Cable Not Supplied LAN Cable Not Supplied LAN Cable N...

Page 37: ...een 5 Enter your network security key or WPS PIN using your remote Enter numbers and letters using your remote If you are using the standard remote you can enter numbers by pressing the number buttons...

Page 38: ...your TV and then go to the Network Settings screen Menu Network Network Settings 3 Select Start 4 The Network Connection screen appears and verifies the network connection When the connection has bee...

Page 39: ...the Touch Pad If you press and hold the Touch Pad it has the same effect as pressing the MUTEM button on your remote However this action scrolls the page on a Web Browser Press the Touch Pad or RETURN...

Page 40: ...Touch Control 2 The connection icon appears at the bottom left of the screen and the Smart Touch Control is automatically connected to the TV If you want to perform the pairing process again press th...

Page 41: ...en slide it from one side to the other from top to bottom or bottom to top To move the Highlight continuously flick your finger across the Touch Pad from right to left left to right top to bottom or b...

Page 42: ...general mode To Enter a channel number through Smart Touch Control 1 While watching a broadcast press the NUMBER button on the Smart Touch Control The TV displays the number button screen 2 Using the...

Page 43: ...es of the up down left and right directions of the IR sensor of the external device IR Blaster OPEN ON OFF PAIRING OPEN 1 2 1 Power Switch Device Indicator LED IR Blaster shows the pairing state Pairi...

Page 44: ...laster try again from step 2 OPEN ON OFF PAIRING OPEN IR Blaster PAIRING Reset button To set an Universal Remote Control after pairing an IR Blaster select Yes To use IR Blaster universal remote contr...

Page 45: ...Which device do you want to control Previous Next 3 Select the port used to connect the external device and then press the Touch Pad Make sure that the selected device is on If it is turned off turn t...

Page 46: ...model number for your Set top box What is the model number of your Set top box Previous Next 6 Select Download and then press the Touch Pad Download the configuration data for the IR Blaster in the s...

Page 47: ...he external device and press the Touch Pad to test if the device works Point your remote towards the Set top box then press the button below until the power is turned off and on your Set top box Is it...

Page 48: ...ture modes apply preset adjustments to the picture N When your TV is connected to a PC via the HDMI to DVI cable you can only select Entertain and Standard Picture Picture Mode Backlight Brightness Co...

Page 49: ...To search for a topic select a letter The Index displays a list of topics and keywords that begin with the letter you selected 3 Select a topic or keyword you want 4 The e Manual page with the topic...

Page 50: ...Self Diagnosis User Menu Support Self Diagnosis Picture Test If the problem does not appear in the Picture test make sure Your connections are all consistent For example if you ve used the AV In jack...

Page 51: ...hat you are having trouble powering on your Samsung television there are a number of things to check before making a call to the service department If you re sure your power cord remote control and PC...

Page 52: ...ected device by unplugging it and then reconnecting the device s power cable The remote control does not work Replace the remote control batteries Make sure the batteries are installed with their pole...

Page 53: ...g cleaning Be sure to wipe the exterior and screen carefully using the cloth provided or a soft cloth to prevent scratches Do not spray water directly onto the product Any liquid that goes into the pr...

Page 54: ...y or other screw appropriate for the wall or cabinet you intend to secure the TV Holder string to We recommend a size M4xL20 wood screw TV Holder BN96 15753A Screw M8 X L19 Installing the TV Holder 1...

Page 55: ...the cord occasionally to make sure it is secure Before moving the TV separate the connected cord first 4 Verify all connections are properly secured Periodically check the connections for any sign of...

Page 56: ...5 mm Weight Without Batteries Including Batteries 0 1 lbs 84 0 g 0 2 lbs 130 0 g Specifications IR Blaster Model Name VG IRB2000 Power Source Battery AA x 4 To extend the battery life use of alkaline...

Page 57: ...diagonally 65 Class 64 5 measured diagonally Sound Output 10 W X 2 Dimensions W x H x D Body With stand 53 8 x 31 8 x 1 2 inches 1368 5 x 808 8 x 31 5 mm 53 8 x 33 3 x 8 2 inches 1368 5 x 847 9 x 210...

Page 58: ...0 800 x 600 1024 x 768 1024 x 768 1024 x 768 1152 x 864 1280 x 720 1280 x 800 1280 x 1024 1280 x 1024 1366 x 768 1440 x 900 1600 x 900RB 1680 x 1050 1920 x 1080 31 469 37 861 37 500 37 879 48 077 46 8...

Page 59: ...above the compatible Frame sec listed in the table above If the Index Table is damaged the Seek Jump function is not supported When you play video over a network connection the video may not be played...

Page 60: ...15 7 15 7 35 8 8 9 6 0 9 3 UN65ES8000 15 7 15 7 38 0 11 1 6 1 11 9 NOTE All drawings are not necessarily to scale Some dimensions are subject to change without prior notice Refer to the dimensions pri...

Page 61: ...g 44 L Language 27 Licenses 53 M Menu Language 16 Motion Control 29 Motion Control Environment Test 30 S Securing the TV to the Wall 54 Setting up the Universal Remote Control 45 SMART Interaction 26...

Page 62: ...onnect the equipment into an outlet on a circuit different from that to which the receiver is connected Consult the dealer or an experienced radio TV technician for help FCC Caution Any changes or mod...

Page 63: ...n compromettre le fonctionnement For product available in the USA Canada market only channel 1 11 can be operated Selection of other channels is not possible This device and its antenna s must not be...

Reviews: