background image

- 11 -

Media Play - Additional Functions

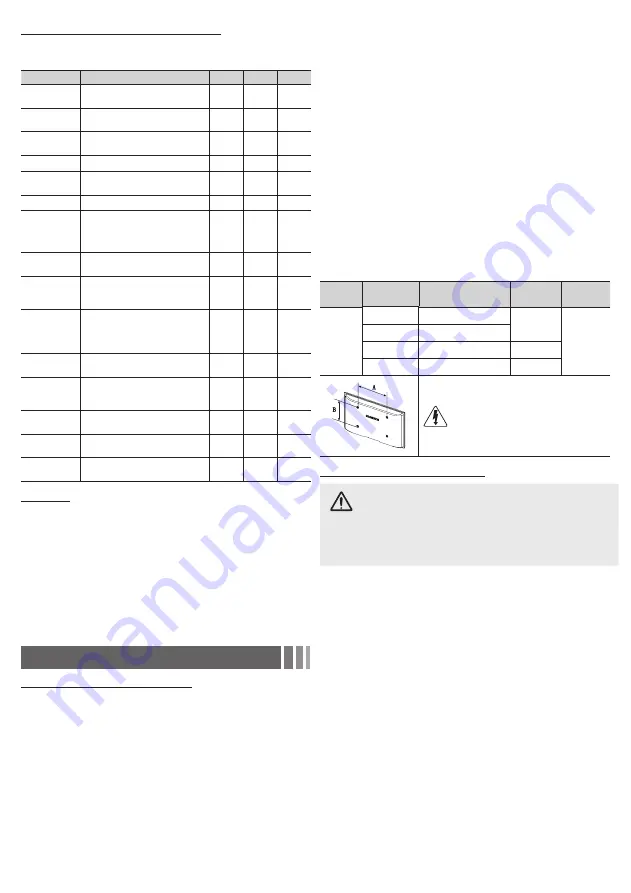
Videos/Music/Photos Play Option menus

When playing a file, press the 

TOOLS

 button.

Category

Operation

Videos

Music

Photos

Title

You can select another video file 

to play directly.

c

Repeat Mode

You can play movie and music 

files repeatedly.

c

c

Picture Size 

You can adjust the picture size to 

your preference.

c

Picture Mode

You can adjust the picture setting. 

c

c

Auto Motion 

Plus

You can enhance motion in fast 

moving scenes.

c

Sound Mode

You can adjust the sound setting.

c

c

c

Subtitle 

Setting

You can play the video with 

Subtitles. This function only works 

if the subtitles have the same file 

name as the video.

c

Audio Format

You can select the digital audio 

output format.

c

Audio 

Language

You can change the audio 

language if the video has more 

than one language.

c

Stop Slide 

Show / 
Start Slide 

Show

You can start or stop a Slide 

Show.

c

Slide Show 

Speed

You can select the slide show 

speed during the slide show.

c

Background 

Music

You can set and select 

background music when 

watching a Slide Show.

c

Zoom

You can zoom into images in full 

screen mode.

c

Rotate

You can rotate images in full 

screen mode.

c

Information

You can see detailed information 

about the played file.

c

c

c

Settings

Using the Setup Menu

DivX® Video On Demand 

: Shows the registration code 

authorized for the TV. If you connect to the DivX web site and 

register with the 10-digit registration code, you can download 

the VOD activation file. Once you play it using Media Play, the 

registration is completed.


For more information on DivX® VOD, visit “http://vod.divx.

com”.

Information

Select to view information about the connected 

USB device.

Other Information

Installing the Wall Mount Kit

The wall mount kit (sold separately) allows you to mount the TV on 

the wall.
For detailed information about installing the wall mount, see 

the instructions provided with the wall mount items. Contact a 

technician for assistance when installing the wall mount bracket. 

Samsung Electronics is not responsible for any damage to the 

product or injury to yourself or others if you elect to install the wall 

mount on your own.

Wall Mount Kit Specifications (VESA) 


The wall mount kit is not supplied, but sold separately.

Install your wall mount on a solid wall perpendicular to the floor. 

When attaching to other building materials, please contact your 

nearest dealer. If you install the TV on a ceiling or slanted wall, it 

may fall and result in severe personal injury.


NOTE


x

Standard dimensions for wall mount kits are shown in the table 

below.


x

When purchasing our wall mount kit, a detailed installation 

manual and all parts necessary for assembly are provided.


x

Do not use screws that do not comply with the VESA standard 

screw specifications.


x

Do not use screws that are longer than the standard dimension 

or do not comply with the VESA standard screw specifications. 

Screws that are too long may cause damage to the inside of the 

TV set.


x

For wall mounts that do not comply with the VESA standard 

screw specifications, the length of the screws may differ 

depending on the wall mount specifications.


x

Do not fasten the screws too firmly. This may damage the 

product or cause the product to fall, leading to personal injury. 

Samsung is not liable for these kinds of accidents.


x

Samsung is not liable for product damage or personal injury 

when a non-VESA or non-specified wall mount is used or the 

consumer fails to follow the product installation instructions.


x

Do not mount the TV at more than a 15 degree tilt.


x

Always have two people mount the TV on a wall.

Product 

Family

TV size in 

inches

VESA screw hole specs 

(A * B) in millimeters

Standard 

Screw

Quantity

LED-TV

19~22

75 X 75

M4

4

26

100 X 100

32~40

200 X 200

M6

46~60

400 X 400

M8

Do not install your Wall Mount Kit while 
your TV is turned on. It may result in 
personal injury due to electric shock.

Securing the TV to the Wall

Caution

: Pulling, pushing, or climbing onto the TV may cause 

the TV to fall. In particular, ensure that your children do not 

hang over or destabilize the TV; doing so may cause the TV 

to tip over, resulting in serious injuries or death. Follow all 

safety precautions provided on the included Safety Flyer. For 

added stability, install the anti-fall device for safety purposes, 

as follows.

To prevent the TV from falling 


Since the necessary brackets, screws, and string or cable are 

not supplied, please purchase these separately.

1. 

Insert the screws into the wall brackets and firmly fasten them to 

the wall. Make sure the screws are firmly fixed to the wall.


We strongly recommend you drive the screws into a stud.

2. 

Using screws, insert the screws through the TV brackets, and 

then fasten the screws to the top VESA screw holes on the back 

of the TV.

3. 

Connect the brackets on the TV and the brackets on the wall 

with a strong string or cable, and then tie the string or cable 

tightly to the brackets.


Verify all connections are properly secured. Periodically check 

the connections for any sign of fatigue or failure. If you have 

any doubt about the security of your connections, contact a 

professional installer.


Install the TV close to the wall so that it does not fall.


Connect the string or cable so that the brackets on the wall 

are at the same height or lower than the brackets on the TV. 

Untie the string or cable before moving the TV.


To purcase a TV Holder kit, contact Samsung customer care.

Summary of Contents for UN40EH6000

Page 1: ...G products purchased in the United States for the warranty period originally specified and to the Original Purchaser only The above described warranty repairs must be performed by a SAMSUNG Authorized Service Center Along with this Statement the Original Limited Warranty Statement and a dated Bill of Sale as Proof of Purchase must be presented to the Service Center Transportation to and from the S...

Page 2: ...ma and White Balance Color Space Auto Native Auto automatically matches the range of colors available to create pictures to the color range of the video source Native provides a color range wider than the color range of the video source White Balance Adjusts the color temperature of the picture so that white objects look white instead of for example slightly pink or slightly yellow and the overall...

Page 3: ...multaneous translations of a program into foreign languages You can only select a language from among the ones being broadcast Multi Track Sound MTS Analog channels only Mono Select for channels that are broadcasting in mono or if you are having difficulty receiving a stereo signal Stereo Select for channels that are broadcasting in stereo SAP Select to listen to the Separate Audio Program which i...

Page 4: ...process may take up to 20 30 minutes Press the ENTERE button to stop the Clear Scrambled Channel This function is only available in Cable mode Managing Channels Channel List See your list of Added channels Favorite channels or channels you ve scheduled for viewing Add or delete Favorite channels add or delete channels from the Added Channels list schedule channels or programs for viewing Watch a c...

Page 5: ...starting from that date For Everyweek the TV will turn on every week on the same day of the week as the start date you selected at the time you selected from that day on If you select Once the TV will turn on once on the date and time you selected 5 Press the ENTERE button on your remote when done Only Added Channels can be scheduled Scheduled programs and channels are displayed in the Programmed ...

Page 6: ...ect your Time Zone and then press ENTERE Select DST Daylight Savings Time and then press ENTERE Select On if you want to turn the DST adjustment on and off manually Select Off to turn off the DST adjustment Select Auto if you want the TV to adjust to DST automatically Press ENTERE when done DST and Time Zone function are only available when the Clock Mode is set to Auto If you selected Manual The ...

Page 7: ...ock programs and or movies in essentially the same way for each option Each option displays a grid or table All the tables have ratings listed on the left The TV Parental Guidelines option also has kinds of content listed across the top ALL Lock all TV ratings FV Fantasy violence V Violence S Sexual situation L Adult Language D Sexually Suggestive Dialog To lock block movies or shows with certain ...

Page 8: ...turned off when no user operation is received for 4 hours Support Menu Self Diagnosis Picture Test Use to check for picture problems If the problem appears in the test picture select Yes and follow the directions on the screen Sound Test Use the built in melody sound to check for sound problems If the problem occurs during the test select Yes and follow the directions on the screen Signal Strength...

Page 9: ... USB storage device is over approximately 4000 the files and folders may not appear and some folders may not open x x The maximum displayed number of files including sub folders in one folder of USB storage device is 2000 x x The media may not be playing smoothly when using the device lower than USB 2 0 Videos SUM 00 04 03 00 07 38 1 1 Movie 01 avi E Pause L Jump T Tools R Return 1 In the Media Pl...

Page 10: ...just the Equalizer in the Sound menu An over modulated MP3 file may cause a sound problem Photos Image1024 jpg 1024x768 2010 2 1 3 15 SUM E Pause L Previous Next T Tools R Return Normal 1 In the Media Play menu press the or button to select Photos then press the ENTERE button 2 Press the buttons to select a photo in the file list 3 Press the ENTERE button or Play button NOTE x x While a photo list...

Page 11: ...ion manual and all parts necessary for assembly are provided x x Do not use screws that do not comply with the VESA standard screw specifications x x Do not use screws that are longer than the standard dimension or do not comply with the VESA standard screw specifications Screws that are too long may cause damage to the inside of the TV set x x For wall mounts that do not comply with the VESA stan...

Page 12: ...r Samsung TV appears to turn off by itself there may be an issue with either your Timer settings or your Eco friendly No Signal Power Off feature First make sure the Sleep Timer is not accidentally set The Sleep Timer lets you fall asleep with the TV still on knowing that it will turn off after a certain period of time and not waste energy y y Sleep Timer User Menu Setup Time Sleep Timer If the Sl...

Page 13: ...annels Color is wrong or missing If you re using a component connection make sure the component cables are connected to the correct jacks Incorrect or loose connections may cause color problems or a blank screen There is poor color or brightness Adjust the Picture options in the TV menu go to Picture Mode Color Brightness Sharpness Adjust the Energy Saving option in the TV menu go to MENU Setup Ec...

Page 14: ...e Set top box remote control to operate the TV Refer to the Cable Set top box user manual for the SAMSUNG TV code A Mode Not Supported message appears Check the supported resolution of the TV and adjust the external device s output resolution accordingly Refer to resolution settings in this manual Caption on the TV menu is greyed out You cannot select Caption in the TV menu when watching content f...

Page 15: ... trademark of DTS Inc Product includes software DTS Inc All Rights Reserved The terms HDMI and HDMI High Definition Multimedia Interface and the HDMI Logo are trademarks or registered trademarks of HDMI Licensing LLC in the United States and other countries Open Source License Notice Open Source used in this product can be found on the following webpage http opensource samsung com Open Source Lice...

Page 16: ...s 1374 1 X 329 8 X 859 0 mm Weight Without Stand With Stand 20 2 Ibs 9 2 kg 24 6 Ibs 11 2 kg 26 4 Ibs 12 0 kg 30 8 Ibs 14 0 kg 34 3 Ibs 15 6 kg 40 1 Ibs 18 2 kg 45 6 Ibs 20 7 kg 51 3 Ibs 23 3 kg 54 6 Ibs 24 8 kg 60 4 Ibs 27 4 kg Design and specifications are subject to change without prior notice This device is a Class B digital apparatus For information about power supply and more about power con...

Reviews: