2-22
2. Product specifications
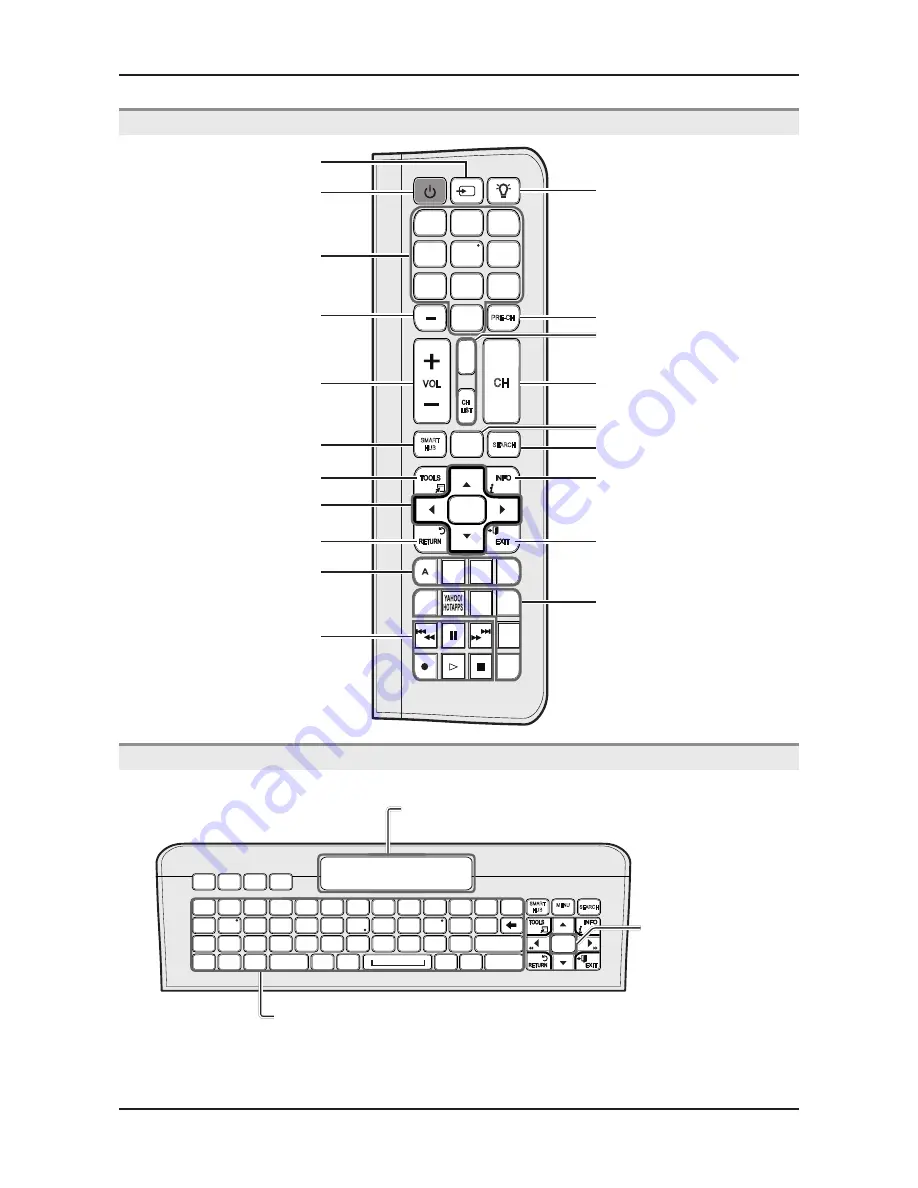
Key description
Remote Side View
English - 8
QWERTY Remote (RMC-QTD1)
Remote Side View
PRE-CH
CH
LIST
1
4
2
3
5
6
7
8
9
0
MUTE
M
MENU
m
SOURCE
POWER
ON/OFF
SMART
HUB
l
B
X
E-MANUAL
P.SIZE
CC
SOCIAL
TV
C
D
VOL
<
<
CH
SEARCH
E
Turns the TV on and off.
Displays and selects the available video
sources.
Turns the remote control light on or
off. When on, the buttons become
illuminated for a moment when pressed.
(Using the remote control with this button
set to On will reduce the battery usage
time.)
Returns to the previous channel.
MUTE
: Cuts off the sound temporarily.
CH LIST
: Displays channel lists on the
screen.
Changes channels.
Support to recommendation search
word and search function.
Displays information on the TV screen.
Exits the menu.
Gives direct access to channels.
Press to select additional digital channels
being broadcast by the same station. For
example, to select channel ‘54-3’, press
‘54’, then press ‘-’ and ‘3’.
Adjusts the volume.
Opens the OSD.
Quickly select frequently used functions.
Link to various application services.
Returns to the previous menu.
Selects the on-screen menu items and
changes the values seen on the menu.
Buttons used in the
Channel
and
SMART HUB
menu, etc.
Use these buttons in
SMART HUB
and
(HDMI-CEC)
modes.
SOCIAL TV
: Connect to
Social TV
application.
HOTAPPS
: Runs BBY.
X
: Turns the 3D image on or off.
E-MANUAL
: Displays the
e-Manual
.
P.SIZE
: Lets you select the
Picture Size
.
CC
: Displays digital subtitles.
[UD6900-NA]BN68-03488A-02L03.indb 8
2011-02-16 오전 9:53:08
QWERTY Side View
English - 9
✎
NOTE
y
The remote side doesn’t work when the QWERTY side is up, and vice versa.
Inserting Batteries
1
2
y
Slide out the battery cover.
y
Push the button right.
3
4
y
Pull the battery tray out.
y
Insert 4 AAA batteries in the tray, insert the battery tray
into the QWERTY Remote and put the cover back on.
Initial Pairing
1.
When the user inserts batteries into the QWERTY Remote, "NEED PAIRING PRESS SYM+TAB” will be displayed on the
screen.
2.
Press
SYM
and
TAB
buttons at the same time more than 2 seconds.
✎
A TV can be paired with only one QWERTY Remote.
When turn on the TV, start the pairing process about 30 seconds later.
To perform the pairing process again
1.
If the QWERTY Remote have been paired before, press @ and
←
on the QWERTY side more than 3 seconds.
"RESET OK" will be displayed on the LCD of QWERTY remote.
2.
Press
MUTE
,
0
,
MUTE
and
0
on the remote side of new QWERTY Remote facing the TV.
Press the buttons in 4 seconds, without waiting any OSD displayed on the TV.
3.
Follow the initial pairing process in 3 minutes.
✎
If the initial pairing process doesn't finish in 3 minutes, perform the whole process again.
SMART
HUB
SEARCH
B
A
C
ESC
CAPS
SHIFT
SHIFT
SYM
SYM
.COM
@
2
1
3
5
4
6
8
0
7
9
#
!
$
@
^
%
&
(
*
)
-
_
+
~
`
<
[
=
]
;
/
/
>
,
}
{
|
‘
:
“
?
.
W
Q
E
S
A
D
Z
TAP
ENTER
X
T
R
Y
G
F
H
V
C
B
I
U
O
K
J
L
P
M
N
D
MENU
m
E
Convenient QWERTY keyboard to type characters in
SMART HUB
and
SOCIAL TV
menu, etc.
SYM
: Enables the symbol printed on the lower right side of each button.
OFN(Optical Finger
Navigation) Sensor
In full browser function,
it can be used as the
pointer. If the user
doesn’t press any button
during 30 seconds,
the sensor will be off
automatically.
To wake up the sensor,
press any button on the
QWERTY side.
Displays the characters the user typed in.
When the user presses
ENTER
E
, all characters
on the screen are removed.
[UD6900-NA]BN68-03488A-02L03.indb 9
2011-02-16 오전 9:53:09
N
NOTE
The remote side doesn’t work when the QWERTY side is up, and vice versa.
Summary of Contents for UN40D6400UF
Page 37: ...4 4 4 Troubleshooting Location Main A B Detail A B...
Page 38: ...4 5 4 Troubleshooting Location T Con C Detail C...
Page 40: ...4 7 4 Troubleshooting Location Main B A Detail A B...
Page 41: ...4 8 4 Troubleshooting WAVEFORMS 1 PC input V sink H sink R G B 2 LVDS output...
Page 43: ...4 10 4 Troubleshooting Location Main B A Detail A B...
Page 44: ...4 11 4 Troubleshooting WAVEFORMS 1 PC input V sink H sink R G B 2 LVDS output...
Page 46: ...4 13 4 Troubleshooting Location Main B A Detail A B...
Page 47: ...4 14 4 Troubleshooting WAVEFORMS 1 CVBS OUT Grey Bar 2 LVDS output...
Page 49: ...4 16 4 Troubleshooting Location Main B A Detail A B...
Page 50: ...4 17 4 Troubleshooting WAVEFORMS 1 LVDS output 2 CH_CLK CH_VALID...
Page 52: ...4 19 4 Troubleshooting Location Main B D C A Detail A B C D...
Page 53: ...4 20 4 Troubleshooting WAVEFORMS 1 CVBS OUT Grey Bar 2 LVDS output...
Page 55: ...4 22 4 Troubleshooting Location Main B A Detail A B...
Page 56: ...4 23 4 Troubleshooting WAVEFORMS 1 Compnent_Y Gray scale Pb Pr Color bar 2 LVDS output...
Page 58: ...4 25 4 Troubleshooting Location Main B A C Detail A B C...
Page 59: ...4 26 4 Troubleshooting WAVEFORMS 1 MCLK LRCLK PCM_I2C_DATA 2 Speaker Monitor OUT SPDIF OUT...


