background image

 How to View the e-Manual


E-MANUAL

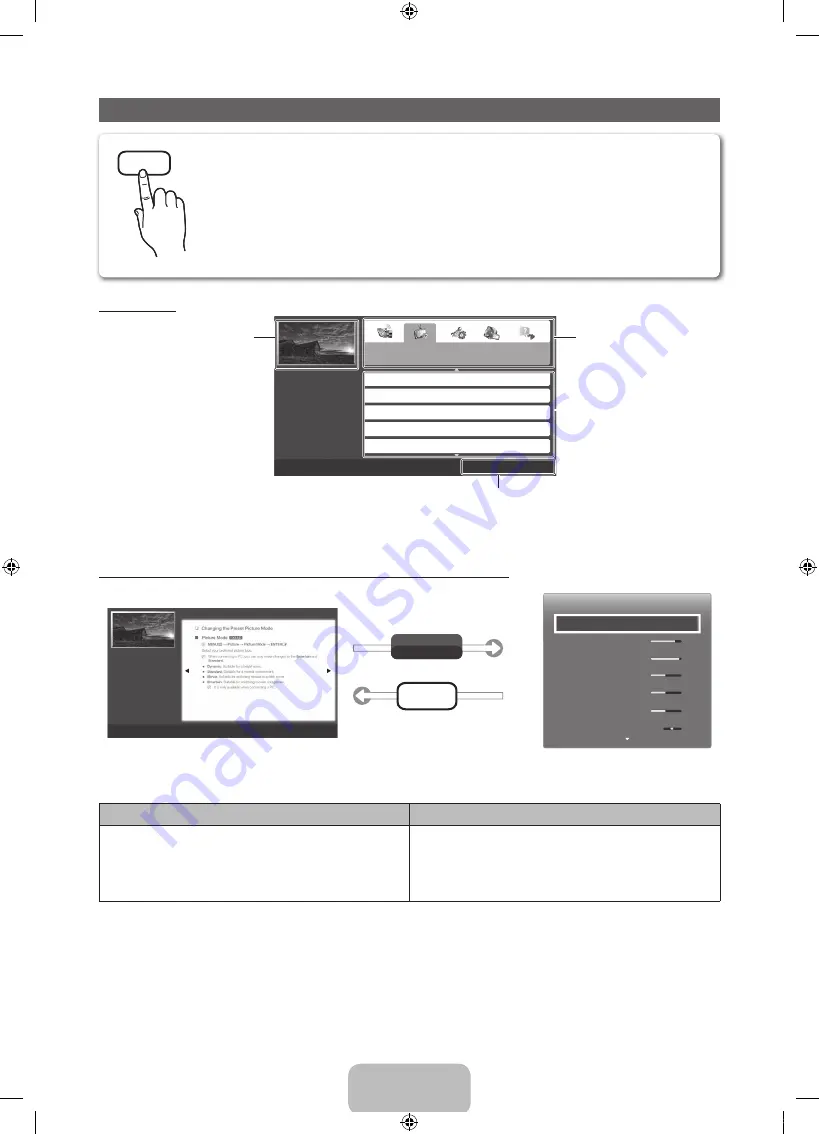
 You can fi nd instructions for your TV’s features in the e-Manual in your TV. To use, press the 

E-MANUAL

 button on 

your remote. Move the cursor using the up/down/right/left buttons to highlight a category, then a topic, and then 

press the 

ENTER

E

 button. The e-Manual displays the page you want to see.

 You can also access it through the menu:


O

 MENU

m


 Support 

 e-Manual 


ENTER

E


 If you want to return to the e-Manual, press the 

E-MANUAL

 button on your remote.


 You can not use the 

Try Now

 function if the menu is not activated.

 Screen  Display


 Basic  Features

 Changing the Preset Picture Mode

 Adjusting Picture Settings

 Changing the Picture Options

 Changing the Preset Sound Modes

 Adjusting Sound Settings

 }


Index


E


Enter


e


Exit

 TV Screen: Displays the program, 

movie, video, etc. you are currently 

watching. 

 The category list. Press 

l

 or 

r


button to select the category you 
want.

 Displays the sub-menu list. Use the 
arrow buttons on your remote to 
move the cursor.
 Press  the 

ENTER

E

 button to 

select the sub-menu you want.

 Operation  Buttons:

 }

 Blue (

Index

): Displays index screen.

 E

 Enter

: Select a category or sub-menu.

 e

 Exit

: Exit the e-Manual.


 How to toggle between an e-Manual topic and the corresponding OSD menu(s).


E-MANUAL

 Try  Now


a


Try Now


b


Home


{


Zoom


}


Index


L


Page


e


Exit

 Basic Features > Changing the Preset Picture Mode (1/1)

 Picture

 Picture  Mode

 Standard

• 

Backlight

 10

• 

 Contrast

 95

• 

 Brightness

 45

• 

 Sharpness

 50

• 

 Color

 50

• 

 Tint  (G/R)

 G50                 R50


 This function is not enabled in some menus.


 Method  1

 Method  2

 1. 

If you want to use the menu that corresponds to an 

e-Manual topic, press the red button to select 

Try Now

.

 2. 

To return to the e-Manual screen, press the 

E-MANUAL


button.

 1. 

Press the 

ENTER

E

 button when a topic is displayed. 

“Do 

you want to execute this?”

 appears. Select 

Yes,

 and then 

press the 

ENTER

E

 button. The OSD window appears.

 2. 

To return to the e-Manual screen, press the 

E-MANUAL


button.

 English - 9

[J4000-ZS]BN68-07048T-00L02.indb   9

2015-04-20   �� 11:07:32

Summary of Contents for UN32J4000

Page 1: ... SAM 726 www samsung com co support COSTA RICA 0 800 507 7267 00 800 1 SAMSUNG 726 7864 www samsung com latin support Spanish www samsung com latin_en support English DOMINICAN REPUBLIC 1 800 751 2676 www samsung com latin support Spanish www samsung com latin_en support English ECUADOR 1 800 10 7267 1 800 SAMSUNG 72 6786 www samsung com latin support Spanish www samsung com latin_en support Engli...

Page 2: ...if there are any unusual sounds or smells coming from it unplug it immediately and contact an authorized dealer or service center y Be sure to pull the power plug out of the outlet if the TV is to remain unused or if you are to leave the house for an extended period of time especially when children elderly or disabled people will be left alone in the house Accumulated dust can cause an electric sh...

Page 3: ...se controls to view different formats as a full screen picture Be careful in the selection and duration of television formats used for viewing Uneven LED aging as a result of format selection and use as well as burned in images are not covered by your Samsung limited warranty Still image warning Avoid displaying still images such as jpeg picture files or still image elements such as TV channel log...

Page 4: ...issing contact your dealer The items colors and shapes may vary depending on the models Check that there are no accessories hidden behind packing materials when you open the box Remote Control Batteries AAA x 2 Owner s Instructions Warranty Card Regulatory Guide Not available in some locations Power Cord Adapter wall mount adapter Input Cables Sold Separately HDMI HDMI DVI Component Composite AV C...

Page 5: ...hoose the picture size Turns the Soccer Mode on or off Cut off the sound temporarily Display the EPG Electronic Program Guide Not available in some countries Displays the channel list on the screen Press to display information on the TV screen Quickly select frequently used functions Selects the on screen menu items and changes the values seen on the menu Exit the menu Return to the previous menu ...

Page 6: ...Standby mode when you turn it off and continues to consume a small amount of electric power To be safe and to decrease power consumption do not leave your TV in standby mode for long periods of time when you are away on vacation for example It is best to unplug the power cord Setup Initial Setup When the TV is initially powered on a sequence of on screen prompts will assist in configuring basic se...

Page 7: ... cable connection you must use the HDMI IN 2 DVI jack If an HDMI to DVI cable is connected to the HDMI IN 2 DVI port the audio does not work For PCs with DVI video out jacks use an HDMI to DVI cable to connect the DVI out on the PC to the HDMI IN 2 DVI jack on the TV Use the PC s speakers for audio The HDD Hard Disk Drive connected to USB is not supported Display Modes HDMI DVI Input Optimal resol...

Page 8: ...ou want VCR DVD Cable STB Satellite STB PVR STB AV Receiver Game Camcorder PC DVI PC DVI Devices TV IPTV Blu ray HD DVD DMA Name the device connected to the input jacks to make your input source selection easier When connecting a PC to the HDMI IN 2 DVI port with HDMI cable you should set the TV to PC mode under Edit Name When connecting a PC to the HDMI IN 2 DVI port with HDMI to DVI cable you sh...

Page 9: ...ategory you want Displays the sub menu list Use the arrow buttons on your remote to move the cursor Press the ENTERE button to select the sub menu you want Operation Buttons Blue Index Displays index screen E Enter Select a category or sub menu e Exit Exit the e Manual How to toggle between an e Manual topic and the corresponding OSD menu s E MANUAL Try Now a Try Now b Home Zoom Index L Page e Exi...

Page 10: ... the Zoom mode When you are viewing an e Manual instruction page press the Zoom button to magnify the screen You can scroll through the magnified screen by using the u or d buttons To return to the screen to normal size press the RETURN button U Move R Return How to search for a topic on the index page 1 To search for a topic press the left or right arrow button to select a letter The Index displa...

Page 11: ...ightness Sharpness Adjust Energy Saving option in the TV menu go to MENU System Eco Solution Energy Saving Try resetting the picture to view the default picture setting go to MENU Picture Reset Picture There is a dotted line on the edge of the screen If the picture size is set to Screen Fit change it to 16 9 Change cable Set top box resolution The picture is black and white If you are using an AV ...

Page 12: ...d devices are powered on Be sure to select the TV s correct source by pressing the SOURCE button on the remote control Reboot the connected device by reconnecting the device s power cable Antenna Air Cable Connection The TV is not receiving all channels Make sure the coaxial cable is connected securely Please try Setup Initial setup to add available channels to the channel list Go to MENU System S...

Page 13: ...s selected Your settings are lost after 5 minutes or every time the TV is turned off If TV is in the Store Demo mode it will reset audio and picture settings every 5 minutes If you want to change the settings from Store Demo mode to Home Use press the SOURCE button to select TV mode and go to MENU Support Use Mode You have intermittent loss of audio or video Check the cable connections and reconne...

Page 14: ...ed wall it may fall and result in severe personal injury NOTE Standard dimensions for wall mount kits are shown in the table below When purchasing our wall mount kit a detailed installation manual and all parts necessary for assembly are provided Do not use screws that do not comply with the VESA standard screw specifications Do not use screws that are longer than the standard dimension or do not ...

Page 15: ...all are equal to or lower than the clamps fixed on the TV Untie the string before moving the TV 4 Verify all connections are properly secured Periodically check connections for any sign of fatigue for failure If you have any doubt about the security of your connections contact a professional installer Wall Anti theft Kensington Lock The Kensington Lock is not supplied by Samsung It is a device use...

Page 16: ... DTS the Symbol DTS in combination with the Symbol and DTS Studio Sound are registered trademarks or trademarks of DTS Inc in the United States and or other countries DTS Inc All Rights Reserved The terms HDMI and HDMI High Definition Multimedia Interface and the HDMI Logo are trademarks or registered trademarks of HDMI Licensing LLC in the United States and other countries This DivX Certified dev...

Page 17: ...ed diagonally Sound 10W 5W 5W Dimensions W x H x D Body With stand 745 4 x 442 2 x 69 mm 745 4 x 463 1 x 150 5 mm Weight Without Stand With Stand 3 7 kg 3 8 kg Design and specifications are subject to change without prior notice The actual appearance of the TV may differ from the images in this manual depending on the model For information about the power supply and more about power consumption re...

Page 18: ...ra devices may not be compatible with the TV Video decoder Audio decoder Supports up to H 264 Level 4 1 FMO ASO RS are not supported VC1 AP L4 is not supported GMC 2 or higher is not supported WMA 10 Pro supports up to 5 1 channels WMA lossless audio is not supported Vorbis supports up to 2ch Supported Subtitle Formats External Name File extension MPEG 4 timed text ttxt SAMI smi SubRip srt SubView...

Page 19: ...This page is intentionally left blank J4000 ZS BN68 07048T 00L02 indb 19 2015 04 20 11 07 36 ...

Page 20: ...extraños o desprende olores desde el interior desconéctelo inmediatamente y contacte con un distribuidor o un centro de servicio técnico autorizado Desenchufe el televisor de la toma de corriente si no se va a usarlo o si va ausentarse durante un tiempo prolongado en especial si quedan en la casa niños ancianos o personas discapacitadas sin compañía El polvo acumulado puede causar una descarga elé...

Page 21: ...la imagen utilice estos controles para ver los distintos formatos como la imagen en pantalla completa Tenga precaución en la selección y duración de los formatos televisivos que visualizará Su garantía limitada de Samsung no cubre el desgaste desparejo de la LED como resultado de la selección y el uso de formatos así como otras imágenes retenidas Advertencia de imagen fija Evite visualizar imágene...

Page 22: ...quese con su distribuidor Los colores y las formas pueden variar según el modelo Verifique que no haya ningún accesorio oculto detrás o debajo de los materiales de embalaje cuando abra la caja Control remoto y pilas AAA x 2 Manual del usuario Tarjeta de garantía Guía regulatoria No disponible en algunos lugares Cable de alimentación Adaptador Adaptador del montaje de pared Cables de entrada vendid...

Page 23: ...Le permite elegir el tamaño de la imagen Activa y desactiva el Modo Fútbol Cortar el sonido temporalmente Muestra la EPG Guía electrónica de programas No disponible en algunos países Muestra la lista de canales en la pantalla Muestra la información en la pantalla del televisor Selecciona rápidamente las funciones usadas con más frecuencia Selecciona los elementos del menú en pantalla y cambia los ...

Page 24: ...pensión cuando lo apaga y continúa consumiendo una pequeña cantidad de energía eléctrica Por motivos de seguridad y para disminuir el consumo de energía no deje su televisor en modo Suspensión durante períodos prolongados cuando se va de vacaciones por ejemplo Es mejor desenchufar el cable de alimentación Configuración Configuración inicial Cuando se enciende el televisor por primera vez una secue...

Page 25: ... En una conexión de cable HDMI a DVI debe utilizarse la entrada HDMI IN 2 DVI Si se conecta un cable HDMI a DVI al puerto HDMI IN 2 DVI el audio no funciona En las PC con tomas de salida de video DVI use un cable HDMI a DVI para conectar la salida DVI de la PC a la toma HDMI IN 2 DVI del televisor Use los altavoces del PC para el audio La unidad de disco duro HDD conectada a USB no es compatible M...

Page 26: ...da externas que desee Vídeo DVD Cable STB Satélite STB PVR STB Receptor AV Juego Filmadora PC DVI PC Dispositivos DVI TV IPTV Blu ray HD DVD DMA Dé un nombre al dispositivo conectado a las tomas de entrada para facilitar su elección de la fuente de entrada Cuando conecta una PC al puerto HDMI IN 2 DVI con un cable HDMI debe configurar el televisor en modo PC en Editar Nombre Cuando conecta una PC ...

Page 27: ... categoría que desea Muestra la lista de submenús Utilice los botones de flecha en su control remoto para desplazar el cursor Pulse el botón ENTERE para seleccionar el submenú que desee Botones de operación Azul Índice Mostrar la pantalla del índice E Entrar Seleccionar una categoría o submenú e Salir Sale del e Manual Cómo conmutar entre un tema del e Manual y los menús de la OSD correspondientes...

Page 28: ...ualiza una página de instrucciones en el e Manual pulse el botón Zoom para ampliar la pantalla Puede desplazarse a través de la pantalla ampliada utilizando los botones u o d Para regresar la pantalla a su tamaño normal pulse el botón RETURN U Mover R Regresar Cómo buscar un tema en la página de índice 1 Para buscar un tema pulse el botón de flecha hacia la izquierda o hacia la derecha para selecc...

Page 29: ... en el menú del televisor vaya a Modo de Imagen Color Brillo Definición Ajuste la opción Ahorro de energía en el menú del televisor vaya a MENU Sistema Solución Eco Ahorro de energía Intente reiniciar la imagen para ver la configuración de imagen predeterminada vaya a MENU Imagen Restablezca imagen Hay una línea de puntos en el borde de la pantalla Si el tamaño de la imagen está establecido en Aju...

Page 30: ... el televisor Compruebe que los dispositivos externos estén encendidos Asegúrese de seleccionar la fuente correcta del televisor pulsando el botón SOURCE del control remoto Reinicie el dispositivo conectado volviendo a conectar el cable de alimentación del dispositivo Conexión de la antena aire cable El televisor no recibe todos los canales Compruebe que el cable coaxial esté firmemente conectado ...

Page 31: ...le cuando está seleccionada la fuente TV La configuración se pierde después de 5 minutos o cada vez que se apaga el televisor Si el televisor está en el modo Demo comercio la configuración del audio y la imagen se restablecerá cada 5 minutos Si desea cambiar la configuración del Demo comercio al Uso domiciliario pulse el botón SOURCE para seleccionar el modo TV y vaya a MENU Soporte técnico Modo d...

Page 32: ...rse y causar graves lesiones personales NOTA Las dimensiones estándar de los kits de montaje de pared se muestran en la tabla que sigue Al adquirir el kit de montaje de pared también se distribuye un manual de instalación detallado y todas las piezas necesarias para el montaje No use tornillos que no cumplan las especificaciones de tornillos estándar VESA No use tornillos con una longitud superior...

Page 33: ...r Cuando desee mover el televisor deberá desatar la cadena 4 Verifique que todas las conexiones estén bien aseguradas Compruébelas periódicamente para detectar cualquier signo de fatiga o falla Si tiene alguna duda sobre la seguridad de sus conexiones comuníquese con un instalador profesional Pared Bloqueo antirrobo Kensington Samsung no suministra el Bloqueo antirrobo Kensington Es un dispositivo...

Page 34: ...icense from DTS Licensing Limited DTS the Symbol DTS in combination with the Symbol and DTS Studio Sound are registered trademarks or trademarks of DTS Inc in the United States and or other countries DTS Inc All Rights Reserved The terms HDMI and HDMI High Definition Multimedia Interface and the HDMI Logo are trademarks or registered trademarks of HDMI Licensing LLC in the United States and other ...

Page 35: ...gadas medidas en diagonal Sonido Salida 10W 5W 5W Dimensiones An x Al x Pr Cuerpo principal Con el soporte 745 4 x 442 2 x 69 mm 745 4 x 463 1 x 150 5 mm Peso Sin el soporte Con el soporte 3 7 kg 3 8 kg El diseño y las especificaciones pueden cambiar sin previo aviso El aspecto real de su televisor puede ser distinto de las imágenes de este manual según el modelo Para obtener información sobre la ...

Page 36: ... de los menús se visualicen lentamente Algunos dispositivos de cámaras digitales USB pueden no ser compatibles con el televisor Decodificador de video Decodificador de audio Admite hasta H 264 nivel 4 1 No se admite FMO ASO RS VC1 AP L4 no se admite GMC 2 o superior no se admite WMA 10 Pro admite hasta 5 1 canales El audio WMA Lossless no se admite Admite hasta 2 canales Formatos de subtítulo admi...

Page 37: ...This page is intentionally left blank J4000 ZS BN68 07048T 00L02 indb 19 2015 04 20 11 07 44 ...

Reviews: