background image

English

04

Advanced Featur

es

Notice

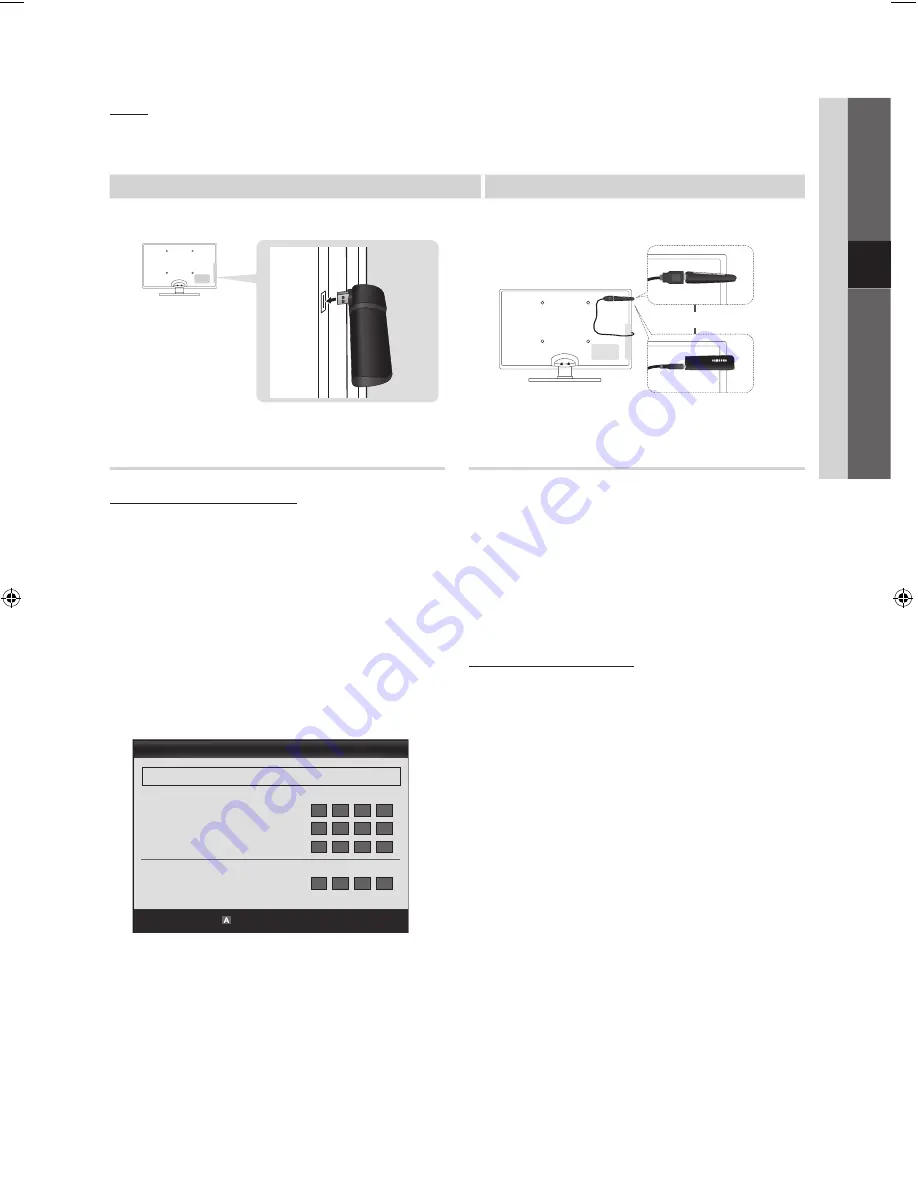
The picture may appear corrupted or have static for some channels when the TV is connected to the Samsung Wireless LAN 
Adapter. In such a case, establish a connection using one of the following methods or connect the Samsung Wireless LAN 
Adapter using a USB cable in a place that is not affected by radio interference.

Method 1

Method 2

Connect using the USB right angle adapter

Connect via an extension cable

or

Network Setup (PBC (WPS))

How to set up using PBC (WPS)

If your router has a PBC (WPS) button, follow these steps:

1. 

Connect your TV to your LAN as described in the 
previous section.

2. 

Turn on your TV, press the 

MENU

 button on your 

remote, use the 

 or 

 button to select 

Setup

, and 

then press the 

ENTER

E

 button. 

3. 

Use the 

 or 

 button to select 

Network

 in the 

Setup


menu, and then press the 

ENTER

E

 button.

4. 

On the 

Network

 screen, select 

Network Type

.

5. 

Set 

Network Type

 to 

Wireless

.

6. 

Select 

Network Setup

. The 

Network Setup

 screen 

appears.

7. 

Press the Red button on your remote.

8. 

Press the PBC (WPS) button on your router within 2 
minutes. Your TV player automatically acquires all the 
network setting values it needs and connects to your 
network.

9. 

After the network connection is set up, press the 

RETURN

 button to exit the 

Network Setup

 screen. 

Network Setup (Auto)

Most wireless networks have an optional security system 
that requires devices that access the network to transmit 
an encrypted security code called an Access or Security 
Key. The Security Key is based on a Pass Phrase, typically 
a word or a series of letters and numbers of a specified 
length you were asked to enter when you set up security for 
your wireless network.  If you use this method of setting up 
the network connection, and have a Security Key for your 
wireless network, you will have to enter the Pass Phrase 
during the setup process.

How to set up automatically

To set up the wireless connection automatically, follow these 
steps:

1. 

Follow Steps 1 through 6 in the “How to set up using 
PBC (WPS)” procedure.

2. 

Press the 

 button to select 

Internet Protocol Setup

and then press the 

ENTER

E

 button. Press the 

 or 

 button to select 

Auto

, and then press the 

ENTER

E


button.

3. 

Press the 

 button to go to 

Select a Network

, and 

then press the 

ENTER

E

 button. The 

Network

 function 

searches for available wireless networks. When done, it 
displays a list of the available networks.

4. 

In the list of networks, press the 

 or 

 button to select 

a network, and then press the 

ENTER

E

 button.


If the AP is set to Hidden (Invisible), you have 
to select 

Add Network

 and enter the correct 

Network Name (SSID)

 and 

Security Key

 to 

establish the connection.

5. 

If the Security/PIN pop-up appears, go to Step 6. If the 
Network Connecting Screen appears, go to Step 10. 

23

Network Setup

 PBC(WPS)   

 U 

Move   

 E 

Enter   

 R 

Return

Select a network 

 : Not Selected  ►

Internet Protocol Setup 

 : Auto 

IP Address 

 : 


Subnet Mask 

 : 


Gateway 

 : 


DNS 

 : Auto

DNS Server 

 : 


[UC5000-EA]BN68-02838A-01Eng.indb   23

2010-03-18   오전 10:52:29

Summary of Contents for UA46C5000

Page 1: ...m NEW ZEALAND 0800 SAMSUNG 0800 726 786 www samsung com CHINA 400 810 5858 010 6475 1880 www samsung com HONG KONG 852 3698 4698 www samsung com hk www samsung com hk_en INDIA 3030 8282 1800 110011 18...

Page 2: ...tch Reduce brightness and contrast values to minimum required level to achieve desired picture quality exceeded values may speed up the burnout process Frequently use all TV features designed to reduc...

Page 3: ...a 7 Plug Play Initial Setup Connections 8 8 Connecting to an AV Device 9 Connecting to an Audio Device 10 Changing the Input Source Basic Features 10 10 How to Navigate Menus 11 Channel Menu 13 Pictur...

Page 4: ...wner s Instructions y y Warranty Card Safety Guide Not available in some locations y y Cleaning Cloth y y Power Cord y y Blanking Bracket Screw 1EA y y Holder Ring 4EA y y Holder Wire stand y y Holder...

Page 5: ...s y Adjusts the volume In the OSD use the y buttons as you would use the and buttons on the remote control z Changes the channels In the OSD use the z buttons as you would use the and buttons on the r...

Page 6: ...ntly will reduce the battery usage time in the remote control Returns to the previous channel To mute all TV output sound Changes channels Displays channel lists on the screen p 12 Selects the HDMI mo...

Page 7: ...d MENU for 5 sec 3 Selecting an area Press the ENTERE button Select the appropriate area by pressing the or button Press the ENTERE button to confirm your choice 4 Selecting a channel The channel sear...

Page 8: ...ormal colour x x If there is no sound after connecting an HDMI cable check the HDMI version of the external device If you suspect the version is older than 1 3 contact the provider of the device to co...

Page 9: ...e theatre When the source is a digital component such as a DVD Blu ray player cable box STB Set Top Box satellite receiver and is connected to the TV via HDMI only 2 CH audio will be heard from the am...

Page 10: ...ess the sub menu 4 Select the desired submenu with the or button 5 Adjust the value of an item with the or button The adjustment in the OSD may differ depending on the selected menu 6 ENTER E Press EN...

Page 11: ...sing Favourite Channels My Channels In Channel Manager Shows all favourite channels Edit My Channels t You can set the selected channels to desired my channels group The symbol will be displayed and t...

Page 12: ...2 Select a function and change its settings Lock Unlock Lock a channel so that the channel cannot be selected and viewed NOTE x x This function is available only when the Child Lock is set to On x x...

Page 13: ...Sensor will be set to Off Min Backlight When Eco sensor is On the minimum screen brightness can be adjusted manually If Eco Sensor is On the display brightness may change become slightly darker or br...

Page 14: ...source the picture size options may vary x x The available items may differ depending on the selected mode x x In PC mode only 16 9 and 4 3 modes can be adjusted x x Settings can be adjusted and stor...

Page 15: ...0 X 1080 pixels y y If a vertical frequency option exists on your display settings dialog box the correct value is 60 or 60 Hz Otherwise just click OK and exit the dialog box Sound Menu Changing the P...

Page 16: ...ng the Sound Mode When you set to Dual f g the current sound mode is displayed on the screen DUAL Audio Type Dual f g Default A2 Stereo Mono Mono Automatic change Stereo Stereo Mono Dual Dual f Dual g...

Page 17: ...event unauthorized users such as children from watching unsuitable programme Available only when the Input source is set to TV Change PIN Change your personal ID number required to set up the TV If yo...

Page 18: ...e Current Version the software already installed in the TV Software is represented as Year Month Day_Version Installing the Latest Version By USB Insert a USB drive containing the firmware upgrade fil...

Page 19: ...4 1280 x 720 1280 x 800 1280 x 800 1280 x 960 1360 x 768 1440 x 900 1440 x 900 1680 x 1050 31 469 37 861 37 500 37 879 48 077 46 875 48 363 56 476 60 023 67 500 63 981 79 976 45 000 49 702 62 795 60 0...

Page 20: ...use an ADSL modem or router that supports Dynamic Host Configuration Protocol DHCP Modems and routers that support DHCP automatically provide the IP address subnet mask gateway and DNS values your TV...

Page 21: ...anual Network Setup when connecting your TV to a network that requires a Static IP address Getting the Network Connection Values To get the Network connection values on most Windows computers follow t...

Page 22: ...t for the wireless IP sharer is currently being used by another device nearby this will result in interference and communication failure x x If you apply a security system other than the systems liste...

Page 23: ...ity system that requires devices that access the network to transmit an encrypted security code called an Access or Security Key The Security Key is based on a Pass Phrase typically a word or a series...

Page 24: ...e ENTERE button Network Setup Ad Hoc You can connect to a mobile device without an access point through the Samsung Wireless LAN Adapter by using a peer to peer network This function is available when...

Page 25: ...8 Press the button to go to the first DNS entry field 9 When done press the button to go to Select a Network Select your network and then press the ENTERE button 10 Go to Step 4 in the How to set up a...

Page 26: ...from www samsung com 1 For more information on how to configure your network refer to Network Connection p 20 You are recommended to locate both TV and PC in same subnet The first 3 parts of the subn...

Page 27: ...a loss x x Connect a USB HDD to the dedicated port USB 1 HDD port x x Do not disconnect the USB device while it is loading x x The higher the resolution of the image the longer it takes to display on...

Page 28: ...sub string based Micro DVD sub or txt string based Jan 10 2010 Jan 10 2010 Jan 10 2010 Jan 10 2010 Jan 10 2010 Jan 10 2010 Jan 10 2010 Jan 10 2010 Jan 10 2010 Jan 10 2010 Movie 01 avi 1 1 Movie 01 avi...

Page 29: ...S MPEG1 1920x1080 24 25 30 30 AC3 MPEG LPCM AAC MPEG2 1920x1080 24 25 30 30 H 264 1920x1080 6 30 25 ts tp trp TS MPEG2 1920x1080 24 25 30 30 AC3 AAC MP3 DD HE AAC H 264 1920x1080 6 30 25 VC1 1920x1080...

Page 30: ...d on the same USB device If the sound is strange when playing MP3 files adjust the Equalizer in the Sound menu An over modulated MP3 file may cause a sound problem Photos Viewing a Photo or Slide Show...

Page 31: ...hoto by selecting the folder Title It sorts and displays the file title in Symbol Number Alphabet Special order Preference It sorts and displays the file by preference You can change the file preferen...

Page 32: ...during the slide show Background Music You can set and select background music when watching a slide show Zoom You can zoom into images in full screen mode Rotate You can rotate images in full screen...

Page 33: ...L AUDIO OUT OPTICAL jack on your TV and the Digital Audio Input on the Home Theatre x x When following the connection above the Optical jack only outputs 2 channel audio You will only hear sound from...

Page 34: ...vice is still recording it may turn off Switching between Anynet Devices 1 Anynet devices connected to the TV are listed If you cannot find a device you want press the Red button to refresh the list 2...

Page 35: ...connecting or removing the HDMI cable please make sure to search devices again or turn your TV off and on again Check if the Anynet Function of Anynet device is set on I want to start Anynet Check if...

Page 36: ...ing the Message Media or ScreenShare function The Media function is available in all mobile devices which support AllShare Allowed Denied Allows Blocks the mobile phone Delete Deletes the mobile phone...

Page 37: ...ScreenShare Function ScreenShare displays the same web page as provide in mobile Using ScreenShare you can open the various contents saved in a mobile phone For example the image below displays an acc...

Page 38: ...any the different topics on a Teletext page are colour coded and can be selected by pressing the coloured buttons Press the colour corresponding to the topic of your choice A new colour coded page is...

Page 39: ...and Type Enclose the cables in the Cable Tie so that the cables are not visible through the transparent stand 3 1 2 1 2 3 Wall Mount Type Do not pull the cables too hard when arranging them This may c...

Page 40: ...using the removed screw as shown Preparing before installing Wall Mount To install a wall mount from another manufacturer use the Holder Ring Installing the Wall Mount Kit The wall mount kit sold sepa...

Page 41: ...able for these kinds of accidents x x Samsung is not liable for product damage or personal injury when a non VESA or non specified wall mount is used or the consumer fails to follow the product instal...

Page 42: ...ease purchase these additionally 2 Remove the screws from the back centre of the TV put the screws into the clamps and then fasten the screws onto the TV again Screws may not be supplied with the prod...

Page 43: ...r Brightness Sharpness p 13 Adjust Energy Saving option in the TV menu go to MENU Picture Eco Solution Energy Saving p 13 Try resetting the picture to view the default picture settings go to MENU Pict...

Page 44: ...icture distortion especially with fast moving pictures such as sports and action movies A low signal can cause picture distortion This is not a TV issue PC Connection A Mode Not Supported message appe...

Page 45: ...d using cables with 90 degree connectors You see small particles when you look closely at the edge of the frame of the TV This is part of the product s design and is not a defect The PIP menu is not a...

Page 46: ...Dimensions WxDxH Body With stand 785 X 30 X 491 mm 785 X 240 X 552 mm 908 X 30 X 561 mm 908 X 255 X 623 mm Weight Without Stand With Stand 8 kg 11 kg 11 kg 14 kg Model Name UA40C5000 UA46C5000 Screen...

Page 47: ...vX Certified to play DivX video up to HD 1080p including premium content ABOUT DIVX VIDEO DivX is a digital video format created by DivX Inc This is an official DivX Certified device that plays DivX v...

Page 48: ...quency 19 H HDMI 8 33 Home Theatre 9 33 I Installation Space 2 L Licence 47 Language 17 Lock 12 M Media Play 26 Melody 17 Music 30 Menu Transparency 17 N Network Connection 20 Network Setup 21 Navigat...

Reviews: